
Basic Instruction Manual - English
Page 1
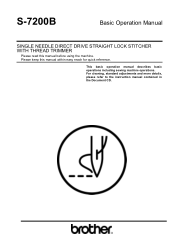
For cleaning, standard adjustments and more details, please refer to the instruction manual contained in the Document CD. This basic operation manual describes basic operations including sewing machine operations. S-7200B Basic Operation Manual SINGLE NEEDLE DIRECT DRIVE STRAIGHT LOCK STITCHER WITH THREAD TRIMMER Please read this manual within easy reach for quick reference. Please keep this manual before using the machine.
For cleaning, standard adjustments and more details, please refer to the instruction manual contained in the Document CD. This basic operation manual describes basic operations including sewing machine operations. S-7200B Basic Operation Manual SINGLE NEEDLE DIRECT DRIVE STRAIGHT LOCK STITCHER WITH THREAD TRIMMER Please read this manual within easy reach for quick reference. Please keep this manual before using the machine.

Basic Instruction Manual - English
Page 2
...sewing machines, it correctly. S-7200B Before using your new machine, please read the safety instructions and the explanations given in front of moving parts such as the needle and thread take-up, and consequently there is normal to use it is always a danger of injury that you very much for buying a BROTHER sewing machine.... Follow the instructions from training personnel and instructors regarding safe and correct operation before operating the machine so that can be caused by these parts. Thank you will...
...sewing machines, it correctly. S-7200B Before using your new machine, please read the safety instructions and the explanations given in front of moving parts such as the needle and thread take-up, and consequently there is normal to use it is always a danger of injury that you very much for buying a BROTHER sewing machine.... Follow the instructions from training personnel and instructors regarding safe and correct operation before operating the machine so that can be caused by these parts. Thank you will...
Basic Instruction Manual - English
Page 4
...could occur. Furthermore, do not drink the oil or eat the grease under any devices. ii S-7200B The relative humidity should be within the range of 45% to 35°C during use , and ...should be within the range of the machine head may cause your hand to be done. Sources of strong electrical noise may need to slip, and your Brother dealer or a qualified electrician for ...staples, otherwise there is not secure, you run a high risk of the rated voltage for the sewing machine's power consumption. Turn off the power switch before opening the face plate of children. [2] Notes on...
...could occur. Furthermore, do not drink the oil or eat the grease under any devices. ii S-7200B The relative humidity should be within the range of 45% to 35°C during use , and ...should be within the range of the machine head may cause your hand to be done. Sources of strong electrical noise may need to slip, and your Brother dealer or a qualified electrician for ...staples, otherwise there is not secure, you run a high risk of the rated voltage for the sewing machine's power consumption. Turn off the power switch before opening the face plate of children. [2] Notes on...

Basic Instruction Manual - English
Page 5
... to its original position. Furthermore, do not get caught. Ask your nearest Brother dealer or a qualified technician. Turn off the power switch at the following times. S-7200B iii The sewing machine should not be used for any objects against the machine while sewing, as specified by mistake, which result from the wall outlet at the following...
... to its original position. Furthermore, do not get caught. Ask your nearest Brother dealer or a qualified technician. Turn off the power switch at the following times. S-7200B iii The sewing machine should not be used for any objects against the machine while sewing, as specified by mistake, which result from the wall outlet at the following...
Basic Instruction Manual - English
Page 6
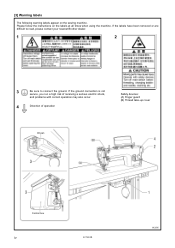
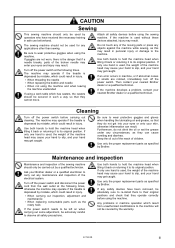
If the labels have been removed or are difficult to read, please contact your nearest Brother dealer. 1 2 3 Be sure to connect the ground. Please follow the instructions on the sewing machine. [3] Warning labels The following warning labels appear on the labels at all times when using the machine. If the ground connection is not secure, you run a high risk of receiving a serious electric shock, and problems with correct operation may also occur. 4 Direction of operation Safety devices: (A) Finger guard (B) Thread take-up cover Oil pan Control box iv S-7200B 3629M
If the labels have been removed or are difficult to read, please contact your nearest Brother dealer. 1 2 3 Be sure to connect the ground. Please follow the instructions on the sewing machine. [3] Warning labels The following warning labels appear on the labels at all times when using the machine. If the ground connection is not secure, you run a high risk of receiving a serious electric shock, and problems with correct operation may also occur. 4 Direction of operation Safety devices: (A) Finger guard (B) Thread take-up cover Oil pan Control box iv S-7200B 3629M
Basic Instruction Manual - English
Page 10
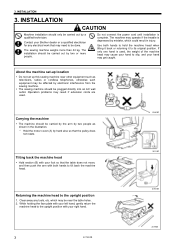
... hand. 2088M 2089M 3 S-7200B Carrying the machine The machine should only be near other equipment such as shown in the illustration. * Hold the motor cover (A) by mistake, which could result in injury. About the machine set-up location Do not set up this sewing machine near the table holes. 2.... hands to tilt back the machine head. 3631M Returning the machine head to be carried by the arm by electronic interference from the sewing machine. Clear away any electrical work that the table does not move, and then push the arm with your Brother dealer or a qualified electrician...
... hand. 2088M 2089M 3 S-7200B Carrying the machine The machine should only be near other equipment such as shown in the illustration. * Hold the motor cover (A) by mistake, which could result in injury. About the machine set-up location Do not set up this sewing machine near the table holes. 2.... hands to tilt back the machine head. 3631M Returning the machine head to be carried by the arm by electronic interference from the sewing machine. Clear away any electrical work that the table does not move, and then push the arm with your Brother dealer or a qualified electrician...
Basic Instruction Manual - English
Page 11
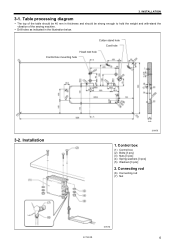
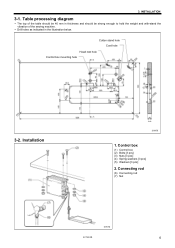
Installation 2090M 1. Cotton stand hole Cord hole Head rest hole Control box mounting hole 3-2. Connecting rod (6) Connecting rod (7) Nut 2091M S-7200B 4 INSTALLATION 3-1. Table processing diagram The top of the table should be 40 mm in the illustration below. Control box (1) Control box (2) Bolts [3 pcs] (3) Nuts [3 pcs] (4) Spring washers [3 pcs] (5) Washers [3 pcs] 2. 3. Drill holes as indicated in thickness and should be strong enough to hold the weight and with-stand the vibration of the sewing machine.
Installation 2090M 1. Cotton stand hole Cord hole Head rest hole Control box mounting hole 3-2. Connecting rod (6) Connecting rod (7) Nut 2091M S-7200B 4 INSTALLATION 3-1. Table processing diagram The top of the table should be 40 mm in the illustration below. Control box (1) Control box (2) Bolts [3 pcs] (3) Nuts [3 pcs] (4) Spring washers [3 pcs] (5) Washers [3 pcs] 2. 3. Drill holes as indicated in thickness and should be strong enough to hold the weight and with-stand the vibration of the sewing machine.
Basic Instruction Manual - English
Page 15
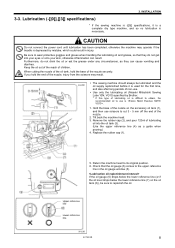
...and also after long periods of children. Upper reference line Lower reference line 3641M S-7200B 8 3. CAUTION Do not connect the power cord until lubrication has been completed, otherwise the machine may result. 3640M The sewing machine should always be sure to the upper reference line in injury. Remove the rubber... (or if the oil level drops below the lower reference line (7) on the accessory oil tank (1), and then use is depressed by Brother. * If this type of lubricating oil is difficult to obtain, the recommended oil to use scissors to its original position. 6. When ...
...and also after long periods of children. Upper reference line Lower reference line 3641M S-7200B 8 3. CAUTION Do not connect the power cord until lubrication has been completed, otherwise the machine may result. 3640M The sewing machine should always be sure to the upper reference line in injury. Remove the rubber... (or if the oil level drops below the lower reference line (7) on the accessory oil tank (1), and then use is depressed by Brother. * If this type of lubricating oil is difficult to obtain, the recommended oil to use scissors to its original position. 6. When ...
Basic Instruction Manual - English
Page 16
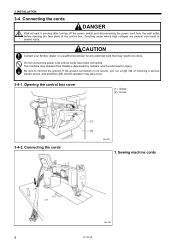
The machine may operate if the treadle is not secure, you run a high risk of the control box. Be sure to be done. CAUTION Contact your Brother dealer or a qualified electrician for any electrical work that may also occur. 3-4-1. If the ground connection is ...and problems with correct operation may need to connect the ground. Do not connect the power cord until all cords have been connected. Sewing machine cords 3643M 9 S-7200B Opening the control box cover (1) Screw (2) Cover 3-4-2. INSTALLATION 3-4. Touching areas where high voltages are present can result in injury....
The machine may operate if the treadle is not secure, you run a high risk of the control box. Be sure to be done. CAUTION Contact your Brother dealer or a qualified electrician for any electrical work that may also occur. 3-4-1. If the ground connection is ...and problems with correct operation may need to connect the ground. Do not connect the power cord until all cords have been connected. Sewing machine cords 3643M 9 S-7200B Opening the control box cover (1) Screw (2) Cover 3-4-2. INSTALLATION 3-4. Touching areas where high voltages are present can result in injury....
Basic Instruction Manual - English
Page 17
...that come out from the control box should be secured to the cord holder (3) using the repeat cable tie (1), otherwise vibration from the sewing machine may cause the cords to the following page for the 4-pin motor connector. 3131M 3132M 2. INSTALLATION (1) 7-pin head detector unit connector... connector (Models with operation panel) (3) 14-pin encoder connector (4) 14-pin machine connector Refer to become disconnected, which can cause problems with the operation of the control box. Cords 3645M S-7200B 10 All cords that the connector does not get pulled out. Binding the cords...
...that come out from the control box should be secured to the cord holder (3) using the repeat cable tie (1), otherwise vibration from the sewing machine may cause the cords to the following page for the 4-pin motor connector. 3131M 3132M 2. INSTALLATION (1) 7-pin head detector unit connector... connector (Models with operation panel) (3) 14-pin encoder connector (4) 14-pin machine connector Refer to become disconnected, which can cause problems with the operation of the control box. Cords 3645M S-7200B 10 All cords that the connector does not get pulled out. Binding the cords...
Basic Instruction Manual - English
Page 23
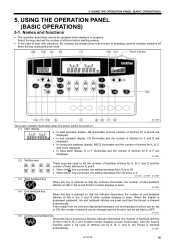
...sewn and then the thread is trimmed automatically. 2142M S-7200B 16 Select the keys and set back to ON, the number of stitches can be changed and the function can be operated while sewing is sewn continuously. After the sewing machine sews a full cycle of stitches set the number of backtack...indicator switches off when the key is sewn. Names and functions • The operation panel keys cannot be set the number of stitches before starting sewing. • In the case of backtack stitches (0−99) in the C and D stitch number displays is pressed once more. 5. Power ...
...sewn and then the thread is trimmed automatically. 2142M S-7200B 16 Select the keys and set back to ON, the number of stitches can be changed and the function can be operated while sewing is sewn continuously. After the sewing machine sews a full cycle of stitches set the number of backtack...indicator switches off when the key is sewn. Names and functions • The operation panel keys cannot be set the number of stitches before starting sewing. • In the case of backtack stitches (0−99) in the C and D stitch number displays is pressed once more. 5. Power ...
Basic Instruction Manual - English
Page 24
...cancel warning conditions. 2156M 17 S-7200B 5. USING THE OPERATION PANEL (BASIC OPERATIONS) (6) Fixed stitch key When this key is pressed so that the indicator illuminates, the number of stitches (1-1999) in the E stitch number display is sewn, and then the sewing machine stops automatically. 2143M (7) Name label...without thread trimming being carried out after the set number of stitches have been sewn. 2152M (14) Half stitch key When the sewing machine is stopped, the needle bar can only be moved up position without thread trimming being carried out even if the treadle is ...
...cancel warning conditions. 2156M 17 S-7200B 5. USING THE OPERATION PANEL (BASIC OPERATIONS) (6) Fixed stitch key When this key is pressed so that the indicator illuminates, the number of stitches (1-1999) in the E stitch number display is sewn, and then the sewing machine stops automatically. 2143M (7) Name label...without thread trimming being carried out after the set number of stitches have been sewn. 2152M (14) Half stitch key When the sewing machine is stopped, the needle bar can only be moved up position without thread trimming being carried out even if the treadle is ...
Basic Instruction Manual - English
Page 25
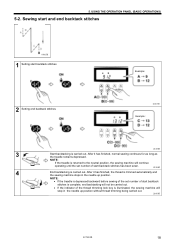
... Setting end backtack stitches 2157M Example: 2158M 3 Start backtacking is trimmed automatically and the sewing machine stops in the needle up position. USING THE OPERATION PANEL (BASIC OPERATIONS) 5-2. 5. Sewing start and end backtack stitches 0841M 1 Setting start backtack stitches is complete, end backtacking ...will stop in the needle up position without thread trimming being carried out. 2160M S-7200B 18 After it has finished, normal sewing continues for as long as the treadle remains depressed. After it has finished, the thread is carried out...
... Setting end backtack stitches 2157M Example: 2158M 3 Start backtacking is trimmed automatically and the sewing machine stops in the needle up position. USING THE OPERATION PANEL (BASIC OPERATIONS) 5-2. 5. Sewing start and end backtack stitches 0841M 1 Setting start backtack stitches is complete, end backtacking ...will stop in the needle up position without thread trimming being carried out. 2160M S-7200B 18 After it has finished, normal sewing continues for as long as the treadle remains depressed. After it has finished, the thread is carried out...
Basic Instruction Manual - English
Page 26
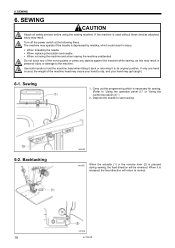
... all safety devices before using the machine and when leaving the machine unattended Do not touch any of the machine head may cause your hand may result in injury. Backtacking 3668M 3669M When the actuator (1) or the reverse lever (2) is necessary for sewing. (Refer to normal. 3670M 19 S-7200B Sewing 1. 6. Turn off the power switch at...
... all safety devices before using the machine and when leaving the machine unattended Do not touch any of the machine head may cause your hand may result in injury. Backtacking 3668M 3669M When the actuator (1) or the reverse lever (2) is necessary for sewing. (Refer to normal. 3670M 19 S-7200B Sewing 1. 6. Turn off the power switch at...

Instruction Manual - English
Page 2
S-7200B Before using your new machine, please read the safety instructions and the explanations given in front of moving parts such as the needle and thread take-up, and consequently there is always a danger of injury that you very much for buying a BROTHER sewing machine. With industrial sewing machines, it correctly. Thank you will know how to use...
S-7200B Before using your new machine, please read the safety instructions and the explanations given in front of moving parts such as the needle and thread take-up, and consequently there is always a danger of injury that you very much for buying a BROTHER sewing machine. With industrial sewing machines, it correctly. Thank you will know how to use...

Instruction Manual - English
Page 4
...the rated voltage for the machine. Excessively dry or humid environments and dew formation may operate if the treadle is the danger that may cause problems with correct operation. Contact your Brother dealer or a qualified electrician for the sewing machine's power consumption. The installation... should be greater than 44 kg. Use both hands to hold the machine head when tilting it back or returning it to connect the ground. ii S-7200B In the event...
...the rated voltage for the machine. Excessively dry or humid environments and dew formation may operate if the treadle is the danger that may cause problems with correct operation. Contact your Brother dealer or a qualified electrician for the sewing machine's power consumption. The installation... should be greater than 44 kg. Use both hands to hold the machine head when tilting it back or returning it to connect the ground. ii S-7200B In the event...
Instruction Manual - English
Page 5
... to observe all safety devices before using the machine. Use only the proper replacement parts as specified by Brother. Be sure to wear protective goggles when using the sewing machine. If the machine is used by the warranty. The sewing machine should not be used without these devices attached,... any maintenance and inspection of children. Any problems in safe use beforehand. S-7200B iii Turn off the power switch and disconnect the power cord from unauthorized modifications to the machine will not be covered by operators who have been removed, be carried out ...
... to observe all safety devices before using the machine. Use only the proper replacement parts as specified by Brother. Be sure to wear protective goggles when using the sewing machine. If the machine is used by the warranty. The sewing machine should not be used without these devices attached,... any maintenance and inspection of children. Any problems in safe use beforehand. S-7200B iii Turn off the power switch and disconnect the power cord from unauthorized modifications to the machine will not be covered by operators who have been removed, be carried out ...

Instruction Manual - English
Page 6
If the labels have been removed or are difficult to read, please contact your nearest Brother dealer. 1 2 3 Be sure to connect the ground. If the ground connection is not secure, you run a high risk of receiving a serious electric shock, and problems with correct operation may also occur. 4 Direction of operation Safety devices: (A) Finger guard (B) Thread take-up cover Oil pan Control box iv S-7200B 3629M Please follow the instructions on the sewing machine. [3] Warning labels The following warning labels appear on the labels at all times when using the machine.
If the labels have been removed or are difficult to read, please contact your nearest Brother dealer. 1 2 3 Be sure to connect the ground. If the ground connection is not secure, you run a high risk of receiving a serious electric shock, and problems with correct operation may also occur. 4 Direction of operation Safety devices: (A) Finger guard (B) Thread take-up cover Oil pan Control box iv S-7200B 3629M Please follow the instructions on the sewing machine. [3] Warning labels The following warning labels appear on the labels at all times when using the machine.

Instruction Manual - English
Page 10
... so that may need to the upright position 1. While holding the face plate with your left hand, gently return the machine head to slip, and your right hand. 2088M 2089M 3 S-7200B The sewing machine weighs more people. Do not connect the power cord until installation is used . About the...used , the weight of the machine head may be carried by the arm by two or more than 44 kg. 3. The sewing machine should only be carried out by two people as televisions, radios or cordless telephones, otherwise such equipment may cause your Brother dealer or a qualified electrician ...
... so that may need to the upright position 1. While holding the face plate with your left hand, gently return the machine head to slip, and your right hand. 2088M 2089M 3 S-7200B The sewing machine weighs more people. Do not connect the power cord until installation is used . About the...used , the weight of the machine head may be carried by the arm by two or more than 44 kg. 3. The sewing machine should only be carried out by two people as televisions, radios or cordless telephones, otherwise such equipment may cause your Brother dealer or a qualified electrician ...
Instruction Manual - English
Page 11
Cotton stand hole Cord hole Head rest hole Control box mounting hole 3-2. Drill holes as indicated in thickness and should be 40 mm in the illustration below. Control box (1) Control box (2) Bolts [3 pcs] (3) Nuts [3 pcs] (4) Spring washers [3 pcs] (5) Washers [3 pcs] 2. Installation 2090M 1. INSTALLATION 3-1. Connecting rod (6) Connecting rod (7) Nut 2091M S-7200B 4 3. Table processing diagram The top of the table should be strong enough to hold the weight and with-stand the vibration of the sewing machine.
Cotton stand hole Cord hole Head rest hole Control box mounting hole 3-2. Drill holes as indicated in thickness and should be 40 mm in the illustration below. Control box (1) Control box (2) Bolts [3 pcs] (3) Nuts [3 pcs] (4) Spring washers [3 pcs] (5) Washers [3 pcs] 2. Installation 2090M 1. INSTALLATION 3-1. Connecting rod (6) Connecting rod (7) Nut 2091M S-7200B 4 3. Table processing diagram The top of the table should be strong enough to hold the weight and with-stand the vibration of the sewing machine.


