

Basic Instruction Manual - English
Page 28
...7200B SA7307-001 E 2006.05. B (1) http://www.brother.com/ © 2006 Brother Industries, Ltd. All Rights Reserved. Recommended system configuration for using the Document CD OS: Browser version: Microsoft® Windows® 98 Second Edition, Windows® 2000 Service Pack 4, Windows® XP Service Pack 2 Microsoft® Internet Explorer 6 Service... Pack 1 or higher Screen resolution: 1024 x 768 pixeles or more details, please refer to the instruction manual contained in the...
...7200B SA7307-001 E 2006.05. B (1) http://www.brother.com/ © 2006 Brother Industries, Ltd. All Rights Reserved. Recommended system configuration for using the Document CD OS: Browser version: Microsoft® Windows® 98 Second Edition, Windows® 2000 Service Pack 4, Windows® XP Service Pack 2 Microsoft® Internet Explorer 6 Service... Pack 1 or higher Screen resolution: 1024 x 768 pixeles or more details, please refer to the instruction manual contained in the...
Instruction Manual - English
Page 33
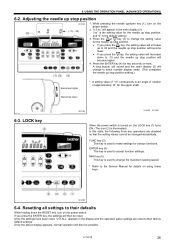
...reset. ENTER key (4) This key is used to change the maximum sewing speed. * Refer to their factory default settings. Resetting all settings to the Service Manual for details on , the LOCK key (1) turns ON. (The icon (2) is used to -10 and the needle up stop position will become lower... Once the settings have been reset, "iniT ALL" appears in the main display (2). ("xx" is the setting value for two seconds or more. S-7200B 26 "n.0 xx" will then be changed accidentally. Press the or key (3) to change to their defaults While holding down key (1), turn on the power...
...reset. ENTER key (4) This key is used to change the maximum sewing speed. * Refer to their factory default settings. Resetting all settings to the Service Manual for details on , the LOCK key (1) turns ON. (The icon (2) is used to -10 and the needle up stop position will become lower... Once the settings have been reset, "iniT ALL" appears in the main display (2). ("xx" is the setting value for two seconds or more. S-7200B 26 "n.0 xx" will then be changed accidentally. Press the or key (3) to change to their defaults While holding down key (1), turn on the power...

Service Manual
Page 1
S-7200B SERVICE MANUAL (MD-741B, 751B, 741C, 751C) Please read this manual before making any adjustments. SINGLE NEEDLE DIRECT DRIVE STRAIGHT LOCK STITCHER WITH THREAD TRIMMER
S-7200B SERVICE MANUAL (MD-741B, 751B, 741C, 751C) Please read this manual before making any adjustments. SINGLE NEEDLE DIRECT DRIVE STRAIGHT LOCK STITCHER WITH THREAD TRIMMER
Service Manual
Page 2
As a result of research and improvements regarding this product before this manual may not be sure to understand this product, please contact a Brother dealer. be the same as those for S-7200B; This service manual is intended for the product you have any questions regarding this product, some details of this manual. Carefully read the "SAFETY INSTRUCTIONS" and the whole of this manual to read the S-7200B instruction manual before you start maintenance. S-7200B If you purchased.
As a result of research and improvements regarding this product before this manual may not be sure to understand this product, please contact a Brother dealer. be the same as those for S-7200B; This service manual is intended for the product you have any questions regarding this product, some details of this manual. Carefully read the "SAFETY INSTRUCTIONS" and the whole of this manual to read the S-7200B instruction manual before you start maintenance. S-7200B If you purchased.
Service Manual
Page 3
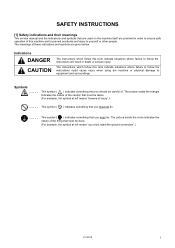
SAFETY INSTRUCTIONS [1] Safety indications and their meanings This service manual and the indications and symbols that are used on the machine itself are given below. This symbol ( ) indicates something that must be done. (For example, the symbol at left means "you must make the ground connection".) S-7200B i The picture inside the triangle indicates the...
SAFETY INSTRUCTIONS [1] Safety indications and their meanings This service manual and the indications and symbols that are used on the machine itself are given below. This symbol ( ) indicates something that must be done. (For example, the symbol at left means "you must make the ground connection".) S-7200B i The picture inside the triangle indicates the...
Service Manual
Page 71
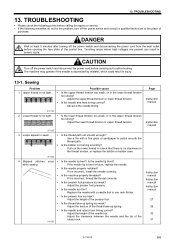
...needle too thin? TROUBLESHOOTING 13. CAUTION Turn off the power switch and disconnecting the power cord from the wall outlet before calling for repairs or service. Is the bobbin not turning smoothly? Is the thread take -up spring too weak? Adjust the tension of purchase. Is the needle tip .... If it is incorrect, install the needle correctly. Adjust the height of the control box. Is the presser foot pressure too weak? Instruction manual Instruction manual Instruction manual 27 26 30 31 S-7200B 64 If the following points before opening the face plate of the needle bar. 13.
...needle too thin? TROUBLESHOOTING 13. CAUTION Turn off the power switch and disconnecting the power cord from the wall outlet before calling for repairs or service. Is the bobbin not turning smoothly? Is the thread take -up spring too weak? Adjust the tension of purchase. Is the needle tip .... If it is incorrect, install the needle correctly. Adjust the height of the control box. Is the presser foot pressure too weak? Instruction manual Instruction manual Instruction manual 27 26 30 31 S-7200B 64 If the following points before opening the face plate of the needle bar. 13.
Service Manual
Page 84
B (1) SERVICE MANUAL Printed in Japan S-7200B I6100914B 2007. 03.
B (1) SERVICE MANUAL Printed in Japan S-7200B I6100914B 2007. 03.


