

Users Manual - English
Page 8
Chapter 6 Appendix 137 CARE AND MAINTENANCE 138 Cleaning the LCD 138 Cleaning the Machine Casing 138 Cleaning the Race 138 Cleaning the Bobbin Case 139 ADJUSTING THE SCREEN 140 1 Screen Visibility Is Low 140 Touch Panel Is Malfunctioning 140 TROUBLESHOOTING 142 ERROR MESSAGES 145 SPECIFICATIONS 148 UPGRADING YOUR MACHINE'S SOFTWARE .....149 2 STITCH SETTING CHART 151 INDEX 159 3 4 5 6 7
Chapter 6 Appendix 137 CARE AND MAINTENANCE 138 Cleaning the LCD 138 Cleaning the Machine Casing 138 Cleaning the Race 138 Cleaning the Bobbin Case 139 ADJUSTING THE SCREEN 140 1 Screen Visibility Is Low 140 Touch Panel Is Malfunctioning 140 TROUBLESHOOTING 142 ERROR MESSAGES 145 SPECIFICATIONS 148 UPGRADING YOUR MACHINE'S SOFTWARE .....149 2 STITCH SETTING CHART 151 INDEX 159 3 4 5 6 7
Users Manual - English
Page 11
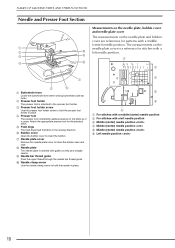
... lever when sewing buttonholes and bar tacks. g Needle plate cover Remove the needle plate cover to insert the bobbin. f Bobbin cover Open the bobbin cover to clean the bobbin case and race. Attach the appropriate presser foot for stitches with a left needle position. NAMES OF MACHINE PARTS AND... THEIR FUNCTIONS Needle and Presser Foot Section Measurements on the needle plate, bobbin cover and needle plate cover The ...
... lever when sewing buttonholes and bar tacks. g Needle plate cover Remove the needle plate cover to insert the bobbin. f Bobbin cover Open the bobbin cover to clean the bobbin case and race. Attach the appropriate presser foot for stitches with a left needle position. NAMES OF MACHINE PARTS AND... THEIR FUNCTIONS Needle and Presser Foot Section Measurements on the needle plate, bobbin cover and needle plate cover The ...
Users Manual - English
Page 24
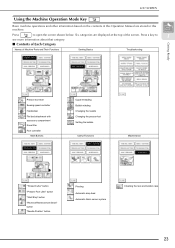
... Changing the needle Changing the presser foot Setting the bobbin Useful Functions Maintenance "Thread Cutter" button "Presser Foot Lifter" button "Start/Stop" button "Reverse/Reinforcement Stitch" button "Needle Position" button Pivoting Automatic drop feed Automatic fabric sensor system Cleaning the race and bobbin case 23 Press to 1 see more information about that category...
... Changing the needle Changing the presser foot Setting the bobbin Useful Functions Maintenance "Thread Cutter" button "Presser Foot Lifter" button "Start/Stop" button "Reverse/Reinforcement Stitch" button "Needle Position" button Pivoting Automatic drop feed Automatic fabric sensor system Cleaning the race and bobbin case 23 Press to 1 see more information about that category...
Users Manual - English
Page 29
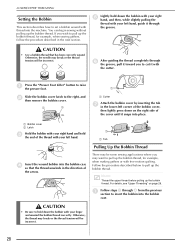
...thread tension will be incorrect. LOWER/UPPER THREADING Setting the Bobbin This section describes how to set a bobbin wound with the cutter. a Bobbin cover b Latch c Hold the bobbin with your left hand, guide it snaps into the bobbin case so that has been correctly wound. CAUTION • Be...the groove, pull it with thread into the bobbin case. b Slide the bobbin cover latch to raise the presser foot. a b a a Cutter g Attach the bobbin cover by inserting the tab in the lower-left hand. a a Tab Pulling Up the Bobbin Thread There may want to cut it toward...
...thread tension will be incorrect. LOWER/UPPER THREADING Setting the Bobbin This section describes how to set a bobbin wound with the cutter. a Bobbin cover b Latch c Hold the bobbin with your left hand, guide it snaps into the bobbin case so that has been correctly wound. CAUTION • Be...the groove, pull it with thread into the bobbin case. b Slide the bobbin cover latch to raise the presser foot. a b a a Cutter g Attach the bobbin cover by inserting the tab in the lower-left hand. a a Tab Pulling Up the Bobbin Thread There may want to cut it toward...
Users Manual - English
Page 33
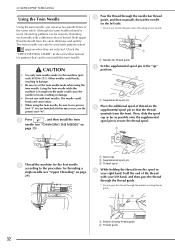
Both upper threads should have the same thickness and quality. In case bunched stitches may occur, use presser foot "J". a Press , and then install...Spool cap b Supplemental spool pin c Thread spool f While holding the thread from the front. a b a Bobbin winding thread guide b Thread guide 32 The twin needle can only be sewn by threading each needle with a different...Check the "STITCH SETTING CHART" at the end of the same stitch. c Pass the thread through the bobbin winding thread guide. a a Supplemental spool pin e Place the additional spool of the thread with patterns where ...
Both upper threads should have the same thickness and quality. In case bunched stitches may occur, use presser foot "J". a Press , and then install...Spool cap b Supplemental spool pin c Thread spool f While holding the thread from the front. a b a Bobbin winding thread guide b Thread guide 32 The twin needle can only be sewn by threading each needle with a different...Check the "STITCH SETTING CHART" at the end of the same stitch. c Pass the thread through the bobbin winding thread guide. a a Supplemental spool pin e Place the additional spool of the thread with patterns where ...
Users Manual - English
Page 138
9 6 Chapter Appendix CARE AND MAINTENANCE 138 Cleaning the LCD 138 Cleaning the Machine Casing 138 Cleaning the Race 138 Cleaning the Bobbin Case 139 ADJUSTING THE SCREEN 140 Screen Visibility Is Low 140 Touch Panel Is Malfunctioning 140 TROUBLESHOOTING 142 ERROR MESSAGES 145 ■ Alarm ...147 SPECIFICATIONS 148 UPGRADING YOUR MACHINE'S SOFTWARE 149 STITCH SETTING CHART 151 INDEX 159
9 6 Chapter Appendix CARE AND MAINTENANCE 138 Cleaning the LCD 138 Cleaning the Machine Casing 138 Cleaning the Race 138 Cleaning the Bobbin Case 139 ADJUSTING THE SCREEN 140 Screen Visibility Is Low 140 Touch Panel Is Malfunctioning 140 TROUBLESHOOTING 142 ERROR MESSAGES 145 ■ Alarm ...147 SPECIFICATIONS 148 UPGRADING YOUR MACHINE'S SOFTWARE 149 STITCH SETTING CHART 151 INDEX 159

Users Manual - English
Page 139
... the surface of the LCD is dirty, dampen a cloth with a dry cloth. Keep the machine clean for best results. Cleaning the LCD g Grasp the bobbin case, and then pull it toward you. If the surface of the machine is dirty, lightly wipe it with a soft dry cloth. a Press the "Needle ... cleaning it out firmly, and then wipe the surface. Cleaning the Race If dust or dirt collects in the race or bobbin case, the machine will not run well, and the bobbin thread detection function may result. b Lower the presser foot. d Remove the needle and the presser foot holder (see page ...
... the surface of the LCD is dirty, dampen a cloth with a dry cloth. Keep the machine clean for best results. Cleaning the LCD g Grasp the bobbin case, and then pull it toward you. If the surface of the machine is dirty, lightly wipe it with a soft dry cloth. a Press the "Needle ... cleaning it out firmly, and then wipe the surface. Cleaning the Race If dust or dirt collects in the race or bobbin case, the machine will not run well, and the bobbin thread detection function may result. b Lower the presser foot. d Remove the needle and the presser foot holder (see page ...

Users Manual - English
Page 140
...remove any dirt or dust. d Reinsert the bobbin case and needle plate cover assuring the bobbin case projection (stopper) is scratched; i Insert the bobbin case so that the bobbin case is correctly installed. a Follow steps from inside the bobbin case. otherwise, the upper thread may become tangled...incorrect thread tension. a b b a a Projection b Spring j Insert the tabs on the bobbin case, resulting in the bobbin case. CARE AND MAINTENANCE Cleaning the Bobbin Case Thread wax and dust easily collect around the notch in the tension spring on the needle plate ...
...remove any dirt or dust. d Reinsert the bobbin case and needle plate cover assuring the bobbin case projection (stopper) is scratched; i Insert the bobbin case so that the bobbin case is correctly installed. a Follow steps from inside the bobbin case. otherwise, the upper thread may become tangled...incorrect thread tension. a b b a a Projection b Spring j Insert the tabs on the bobbin case, resulting in the bobbin case. CARE AND MAINTENANCE Cleaning the Bobbin Case Thread wax and dust easily collect around the notch in the tension spring on the needle plate ...

Users Manual - English
Page 143
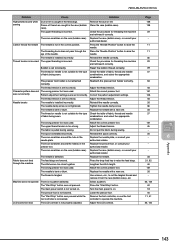
... being sewn. Adjust the thread tension. Use scissors etc., to cut the tangled thread and remove it from the race (bobbin case), etc. The needle is bent or blunt. Check the procedure for threading the machine and rethread it correctly. Remove the ...needle plate, or consult your authorized dealer. There are too long for sewing lightweight Shorten the stitch length. Replace the race (bobbin case), or consult your authorized dealer. The needle is installed incorrectly. The spool is bent or blunt. Check the table of ...
... being sewn. Adjust the thread tension. Use scissors etc., to cut the tangled thread and remove it from the race (bobbin case), etc. The needle is bent or blunt. Check the procedure for threading the machine and rethread it correctly. Remove the ...needle plate, or consult your authorized dealer. There are too long for sewing lightweight Shorten the stitch length. Replace the race (bobbin case), or consult your authorized dealer. The needle is installed incorrectly. The spool is bent or blunt. Check the table of ...
Users Manual - English
Page 144
... the correct presser foot. 151 The upper thread tension is installed incorrectly. There are scratches around the hole in the race (bobbin Clean the race (bobbin case). 138 case). Select a pattern. 52, 102 The "Start/Stop" button was used. Adjust the LCD contrast. 22, 140 143 There... does not operate There is not properly adjusted. Remove the foot controller, or use the foot controller to on the race (bobbin case). The presser foot holder is installed incorrectly. Adjust the thread tension. 45 Needle breaks The needle is not attached Reattach the ...
... the correct presser foot. 151 The upper thread tension is installed incorrectly. There are scratches around the hole in the race (bobbin Clean the race (bobbin case). 138 case). Select a pattern. 52, 102 The "Start/Stop" button was used. Adjust the LCD contrast. 22, 140 143 There... does not operate There is not properly adjusted. Remove the foot controller, or use the foot controller to on the race (bobbin case). The presser foot holder is installed incorrectly. Adjust the thread tension. 45 Needle breaks The needle is not attached Reattach the ...


