
Raster Command Reference
Page 4
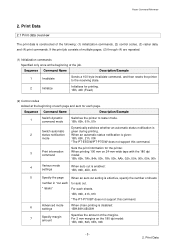
...print data 8 2.2.3 Explanation of print data for Network (Standard TCP/IP port) Connection 45 Appendix A: USB Specifications 46 Appendix B: Introducing the Brother Developer Center 47 - Switch automatic status notification mode 31 ESC i z Print information command 32 ESC i M Various mode settings 33 ESC ...Advanced mode settings 33 ESC i d Specify margin amount (feed amount 34 ESC i A Specify the page number in "cut each * labels 34 M Select compression mode 35 G Raster graphics transfer 37 Z Zero raster graphics 37 FF Print command 37 Control-Z Print command with a...
...print data 8 2.2.3 Explanation of print data for Network (Standard TCP/IP port) Connection 45 Appendix A: USB Specifications 46 Appendix B: Introducing the Brother Developer Center 47 - Switch automatic status notification mode 31 ESC i z Print information command 32 ESC i M Various mode settings 33 ESC ...Advanced mode settings 33 ESC i d Specify margin amount (feed amount 34 ESC i A Specify the page number in "cut each * labels 34 M Select compression mode 35 G Raster graphics transfer 37 Z Zero raster graphics 37 FF Print command 37 Control-Z Print command with a...
Raster Command Reference
Page 9
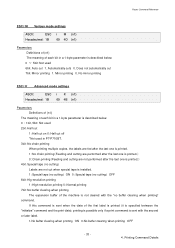
... an automatic status notification is Switch automatic given during printing. 2 status notification When an automatic status notification is given: mode 1Bh, 69h, 21h, 00h *The PT-E550W/PT-P750W does not support this command. 6 Advanced mode settings When chain printing is enabled: 1Bh, 69h, 4Dh, 40h 5 Specify the page When an auto cut...
... an automatic status notification is Switch automatic given during printing. 2 status notification When an automatic status notification is given: mode 1Bh, 69h, 21h, 00h *The PT-E550W/PT-P750W does not support this command. 6 Advanced mode settings When chain printing is enabled: 1Bh, 69h, 4Dh, 40h 5 Specify the page When an auto cut...

Raster Command Reference
Page 16
... print data is sent. Raster Command Reference Descriptions for the numbers in the print data on each * labels" The number of pages printed before sending raster data to the printer. 4 Job ID setting commands Internal specification commands Since this is a command for outputting with feeding is sent at the end of the...
... print data is sent. Raster Command Reference Descriptions for the numbers in the print data on each * labels" The number of pages printed before sending raster data to the printer. 4 Job ID setting commands Internal specification commands Since this is a command for outputting with feeding is sent at the end of the...

Raster Command Reference
Page 26
... 4D 1B 69 41 1B 69 4B 1B 69 64 4D 47 5A 0C 1A Raster Command Reference Description Invalidate Initialize Status information request *The PT-E550W/PT-P750W does not support this command. Advanced mode settings Specify margin amount (feed amount) Select compression mode Raster graphics transfer Zero raster graphics Print command... with feeding - 22 - 3. Switch dynamic command mode Switch automatic status notification mode Print information command Various mode settings Specify the page number in "cut each * labels" *The PT-P710BT does not support this command. Print Command List
... 4D 1B 69 41 1B 69 4B 1B 69 64 4D 47 5A 0C 1A Raster Command Reference Description Invalidate Initialize Status information request *The PT-E550W/PT-P750W does not support this command. Advanced mode settings Specify margin amount (feed amount) Select compression mode Raster graphics transfer Zero raster graphics Print command... with feeding - 22 - 3. Switch dynamic command mode Switch automatic status notification mode Print information command Various mode settings Specify the page number in "cut each * labels" *The PT-P710BT does not support this command. Print Command List
Raster Command Reference
Page 37
... OFF 6bit:Hig-resolution printing 1: High-resolution printing 0: Normal printing 7bit:No buffer clearing when printing The expansion buffer of the first label is printed (it is specified between the "initialize" command and the print data), printing is possible only if a print command is described below ... 1B i K {n1} 69 4B {n1} Parameters Definitions of {n1} The meaning of each bit in PT-P710BT. 3bit:No chain printing When printing multiple copies, the labels are fed after the last one is printed. 1: No chain printing(Feeding and cutting are performed after the...
... OFF 6bit:Hig-resolution printing 1: High-resolution printing 0: Normal printing 7bit:No buffer clearing when printing The expansion buffer of the first label is printed (it is specified between the "initialize" command and the print data), printing is possible only if a print command is described below ... 1B i K {n1} 69 4B {n1} Parameters Definitions of {n1} The meaning of each bit in PT-P710BT. 3bit:No chain printing When printing multiple copies, the labels are fed after the last one is printed. 1: No chain printing(Feeding and cutting are performed after the...

Raster Command Reference
Page 38
Description When "auto cut" is 1 (cut each label). Printing Command Details ESC i d Specify margin amount (feed amount) ASCII: ESC Hexadecimal: 1B i d {n1} {n2} 69 64 {n1} {n2} Description Specifies the amount of ...)=n1+n2*256 (a) Continuous length tape Paper Tape Print area Raster Command Reference Margin amount Cut line ESC i A Specify the page number in "cut each * labels" ASCII: ESC i A {n} Hexadecimal: 1B 69 41 {n} Parameters Definitions of {n} Page number = n1 (1 - 99) Default is specified, you can specify page number (1 - 99) in "cut each...
Description When "auto cut" is 1 (cut each label). Printing Command Details ESC i d Specify margin amount (feed amount) ASCII: ESC Hexadecimal: 1B i d {n1} {n2} 69 64 {n1} {n2} Description Specifies the amount of ...)=n1+n2*256 (a) Continuous length tape Paper Tape Print area Raster Command Reference Margin amount Cut line ESC i A Specify the page number in "cut each * labels" ASCII: ESC i A {n} Hexadecimal: 1B 69 41 {n} Parameters Definitions of {n} Page number = n1 (1 - 99) Default is specified, you can specify page number (1 - 99) in "cut each...
Users Guide
Page 1
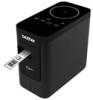
...Bridgewater, NJ 08807-0911 USA TEL : (908) 704-1700 Product Name : Model Number : Brother P-touch Electronic Labeling System PT-P750W This device complies with FCC's RF exposure guidelines, use the specified voltage and the included AC ...labeler/AC adapter. • Do not put any batteries other objects. This equipment has been tested and found any purpose not described in this guide in the United States and other software or products used . Follow these low power wireless devices are trademarks of Conformity (For USA Only) Responsible Party: Brother International...
...Bridgewater, NJ 08807-0911 USA TEL : (908) 704-1700 Product Name : Model Number : Brother P-touch Electronic Labeling System PT-P750W This device complies with FCC's RF exposure guidelines, use the specified voltage and the included AC ...labeler/AC adapter. • Do not put any batteries other objects. This equipment has been tested and found any purpose not described in this guide in the United States and other software or products used . Follow these low power wireless devices are trademarks of Conformity (For USA Only) Responsible Party: Brother International...
Users Guide
Page 2
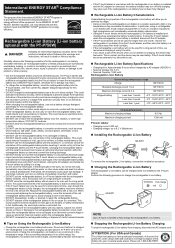
...ENERGY STAR® Partner, Brother Industries, Ltd. Do not insert a different rechargeable battery into the P-touch labeler or insert the rechargeable battery into a different P-touch labeler, otherwise fire or damage... labeler, and then store the battery in corrosive environments, such as necklaces or hairpins. Do not touch the electrolyte. If left alone, the electrolyte could cause the internal ...• DO NOT allow the rechargeable battery to come into contact with the PT-P750W) DANGER Indicates an imminently hazardous situation which is connected, the battery indicator may ...
...ENERGY STAR® Partner, Brother Industries, Ltd. Do not insert a different rechargeable battery into the P-touch labeler or insert the rechargeable battery into a different P-touch labeler, otherwise fire or damage... labeler, and then store the battery in corrosive environments, such as necklaces or hairpins. Do not touch the electrolyte. If left alone, the electrolyte could cause the internal ...• DO NOT allow the rechargeable battery to come into contact with the PT-P750W) DANGER Indicates an imminently hazardous situation which is connected, the battery indicator may ...
Users Guide
Page 3
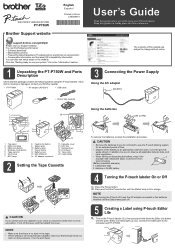
... (for future reference. NOTE When turning the P-touch off, keep the AC adapter connected or the batteries installed until the Status lamp goes off. 5 Creating a Label using your printer." ELECTRONIC LABELING SYSTEM PT-P750W Brother Support website English Español Printed in China LAE838001 User's Guide Read this guide before using the P-touch...
... (for future reference. NOTE When turning the P-touch off, keep the AC adapter connected or the batteries installed until the Status lamp goes off. 5 Creating a Label using your printer." ELECTRONIC LABELING SYSTEM PT-P750W Brother Support website English Español Printed in China LAE838001 User's Guide Read this guide before using the P-touch...
Users Guide
Page 4
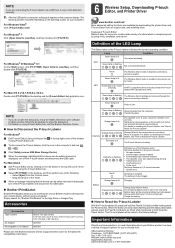
... you have questions, or need information about your computer.) For Windows Vista® Click [P-touch Editor Lite]. b Select [PT-P750W] on resetting the P-touch STATUS labeler, see the Brother Solutions Center (support.brother.com/) for "Brother iPrint&Label" in progress. c Click [Safely remove USB Mass Storage Device]. Lamp Condition Green lamp is lit Charging. Wi-Fi Green...
... you have questions, or need information about your computer.) For Windows Vista® Click [P-touch Editor Lite]. b Select [PT-P750W] on resetting the P-touch STATUS labeler, see the Brother Solutions Center (support.brother.com/) for "Brother iPrint&Label" in progress. c Click [Safely remove USB Mass Storage Device]. Lamp Condition Green lamp is lit Charging. Wi-Fi Green...

iPrint&Label Users Guide - Apple Devices
Page 2
Indicates information or directions that can help you must follow to avoid minor personal injury or damage to the P-touch labeler. Tells you about safety and proper operation. Ignoring them may differ depending on the materials presented, including but not limited to typographical and other errors ...; The contents of this document and the specifications of injury. Symbols used in this Guide The following symbols are subject to change without notice. Brother reserves the right to make changes without notice in damage, or failed operations.
Indicates information or directions that can help you must follow to avoid minor personal injury or damage to the P-touch labeler. Tells you about safety and proper operation. Ignoring them may differ depending on the materials presented, including but not limited to typographical and other errors ...; The contents of this document and the specifications of injury. Symbols used in this Guide The following symbols are subject to change without notice. Brother reserves the right to make changes without notice in damage, or failed operations.

iPrint&Label Users Guide - Apple Devices
Page 4
...For Macintosh 11 3 Printing from iOS Devices 14 Available Applications for Use with iOS Devices 14 Installing Applications 14 Connecting the P-touch labeler to Your iOS Device 15 Printing from Your iOS Device 15 4 Printing from Android™ Devices 16 Available Applications for Use with ...Android™ Devices 16 Installing Applications 16 Connecting the P-touch labeler to Your Android™ Device 17 When Your Android™ Device Supports NFC (Near Field Communication 17 When Your Android™ ...
...For Macintosh 11 3 Printing from iOS Devices 14 Available Applications for Use with iOS Devices 14 Installing Applications 14 Connecting the P-touch labeler to Your iOS Device 15 Printing from Your iOS Device 15 4 Printing from Android™ Devices 16 Available Applications for Use with ...Android™ Devices 16 Installing Applications 16 Connecting the P-touch labeler to Your Android™ Device 17 When Your Android™ Device Supports NFC (Near Field Communication 17 When Your Android™ ...

iPrint&Label Users Guide - Apple Devices
Page 5
6 Brother P-touch Utility (for Macintosh) 35 Using the P-touch Utility 35 Settings Dialog Box 36 Basic Tab...37 Print Tab ...38 Wireless Direct Tab 39 7 Web Based Management 40 Overview ...40 Configuring the Printer Settings Using Web Based Management (Web Browser 41 8 Printing Labels Distributed to Multiple Printers 42 Distributed Printing 42 A Appendix 46 Routine Maintenance 46 Cleaning the Exterior of Your P-touch Labeler 46 Cleaning the Print Head and Head Roller 46 Cleaning the Tape Cutter 48 Troubleshooting 49 iv
6 Brother P-touch Utility (for Macintosh) 35 Using the P-touch Utility 35 Settings Dialog Box 36 Basic Tab...37 Print Tab ...38 Wireless Direct Tab 39 7 Web Based Management 40 Overview ...40 Configuring the Printer Settings Using Web Based Management (Web Browser 41 8 Printing Labels Distributed to Multiple Printers 42 Distributed Printing 42 A Appendix 46 Routine Maintenance 46 Cleaning the Exterior of Your P-touch Labeler 46 Cleaning the Print Head and Head Roller 46 Cleaning the Tape Cutter 48 Troubleshooting 49 iv

iPrint&Label Users Guide - Apple Devices
Page 7
...It is installed with Computers 2 In order to use P-touch Library to the latest version. r The software can create various simple label layouts quickly and easily. This is necessary to specify the printer's communication settings and device settings from the computer. 2 r With ...is only supported when connected using fonts, templates, and clip art. r This application allows you can use the P-touch labeler effectively, a number of custom labels in complex layouts by using a USB cable. You can create a wide variety of applications and functions are available. ...
...It is installed with Computers 2 In order to use P-touch Library to the latest version. r The software can create various simple label layouts quickly and easily. This is necessary to specify the printer's communication settings and device settings from the computer. 2 r With ...is only supported when connected using fonts, templates, and clip art. r This application allows you can use the P-touch labeler effectively, a number of custom labels in complex layouts by using a USB cable. You can create a wide variety of applications and functions are available. ...

iPrint&Label Users Guide - Apple Devices
Page 8
English 3 For more information, see Printing Labels Distributed to [FAQ's & Troubleshooting] on page 42. r Since printing is performed at the same time, the total printing time can be reduced. 2 For more information, refer to Multiple Printers on the Brother Solutions Center (http://support.brother.com/). Printing from Computers Useful function Distributed printing Windows Macintosh Features When printing a large number of labels, printing can be distributed among multiple printers.
English 3 For more information, see Printing Labels Distributed to [FAQ's & Troubleshooting] on page 42. r Since printing is performed at the same time, the total printing time can be reduced. 2 For more information, refer to Multiple Printers on the Brother Solutions Center (http://support.brother.com/). Printing from Computers Useful function Distributed printing Windows Macintosh Features When printing a large number of labels, printing can be distributed among multiple printers.

iPrint&Label Users Guide - Apple Devices
Page 9
...for this method. You can use a computer wirelessly connected to print via a Wireless Network Connection 2 Note If the P-touch labeler is recommended that you cannot establish a wireless network connection. Use the rechargeable Li-ion battery or the AC adapter. The installation...For Windows®: http://www.brother.com/inst/ For Macintosh: The [Downloads] page on the Brother Solutions Center (http://support.brother.com/) Wireless configuration temporarily using WPS (Wi-Fi Protected Setup™) 2 You can remotely configure the P-touch labeler from your computer, you want...
...for this method. You can use a computer wirelessly connected to print via a Wireless Network Connection 2 Note If the P-touch labeler is recommended that you cannot establish a wireless network connection. Use the rechargeable Li-ion battery or the AC adapter. The installation...For Windows®: http://www.brother.com/inst/ For Macintosh: The [Downloads] page on the Brother Solutions Center (http://support.brother.com/) Wireless configuration temporarily using WPS (Wi-Fi Protected Setup™) 2 You can remotely configure the P-touch labeler from your computer, you want...

iPrint&Label Users Guide - Apple Devices
Page 10
After the Wi-Fi lamp starts flashing in 0.5 second intervals, release the button. c Press the WPS button on the P-touch labeler for 2 minutes. d When the connection is established, the Wi-Fi lamp is pressed and held for 5 seconds during the installation. Note The... to configure the wireless network settings and establish a wireless network connection, if you cannot establish a wireless network connection. Note 2 If the P-touch labeler is powered by alkaline or Ni-MH batteries, you did not configure the wireless network settings during that your WLAN access point/router has the...
After the Wi-Fi lamp starts flashing in 0.5 second intervals, release the button. c Press the WPS button on the P-touch labeler for 2 minutes. d When the connection is established, the Wi-Fi lamp is pressed and held for 5 seconds during the installation. Note The... to configure the wireless network settings and establish a wireless network connection, if you cannot establish a wireless network connection. Note 2 If the P-touch labeler is powered by alkaline or Ni-MH batteries, you did not configure the wireless network settings during that your WLAN access point/router has the...

iPrint&Label Users Guide - Apple Devices
Page 12
...the [General] tab of the Communication settings. (This is selected as follows: SSID: "DIRECT-brPT-P750W****" where "****" is the last four digits of the P-touch labeler and enter the password. See Brother P-touch Utility (for Macintosh) on your computer, select the SSID of the product serial number. ...(You can find the serial number label by opening the cassette cover.) Password (Network key): 00000000 ...
...the [General] tab of the Communication settings. (This is selected as follows: SSID: "DIRECT-brPT-P750W****" where "****" is the last four digits of the P-touch labeler and enter the password. See Brother P-touch Utility (for Macintosh) on your computer, select the SSID of the product serial number. ...(You can find the serial number label by opening the cassette cover.) Password (Network key): 00000000 ...

iPrint&Label Users Guide - Apple Devices
Page 13
...the desktop. On the left side, select the [General] heading and then the desired setting in the P-touch Editor menu bar to use your P-touch labeler with your computer. Using P-touch Editor (For Windows®) 2 Starting P-touch Editor 2 a For Windows Vista® / Windows® 7 / ...Windows Server® 2008/2008 R2 From the Start button, click [All Programs]-[Brother P-touch]-[P-touch Editor 5.1]. When P-touch Editor starts, select whether you want to create a new layout or open an existing layout. If the Editor Lite lamp...
...the desktop. On the left side, select the [General] heading and then the desired setting in the P-touch Editor menu bar to use your P-touch labeler with your computer. Using P-touch Editor (For Windows®) 2 Starting P-touch Editor 2 a For Windows Vista® / Windows® 7 / ...Windows Server® 2008/2008 R2 From the Start button, click [All Programs]-[Brother P-touch]-[P-touch Editor 5.1]. When P-touch Editor starts, select whether you want to create a new layout or open an existing layout. If the Editor Lite lamp...

iPrint&Label Users Guide - Apple Devices
Page 14
b Select an option in the screen. 4 Printing from Computers 3 1 5 2 2 1 To create a new layout, click the [New Layout] button. 2 To create a new layout using a pre-set layout, select the desired category button. 3 To connect a pre-set layout to a database, select the check box next to [Connect Database]. 4 To open an existing layout, click [Open]. 5 To open the application for easily creating labels for electrical equipment management, click the [Cable Labeling Wizard] button. English 9
b Select an option in the screen. 4 Printing from Computers 3 1 5 2 2 1 To create a new layout, click the [New Layout] button. 2 To create a new layout using a pre-set layout, select the desired category button. 3 To connect a pre-set layout to a database, select the check box next to [Connect Database]. 4 To open an existing layout, click [Open]. 5 To open the application for easily creating labels for electrical equipment management, click the [Cable Labeling Wizard] button. English 9


