
Users Guide
Page 4
... GETTING STARTED 7 Unpacking Your P-touch labeler 7 LCD Display & Keyboard 7 Power Supply and Tape cassette 9 When using AC adapter (AD-E001 9 When using six new AA alkaline batteries (LR6) or fully charged Ni-MH batteries (HR6 9 Insert a Tape Cassette 10 Turning Power On/Off 10 Setting Language and Unit 11 Language...11... Unit ...11 Turning Tape Color Detection On/Off 11 Feeding Tape...11 Feed & Cut 11 Feed only...12 How to use the P-touch labeler 12 Create a label with the P-touch labeler 12 Create a label by...
... GETTING STARTED 7 Unpacking Your P-touch labeler 7 LCD Display & Keyboard 7 Power Supply and Tape cassette 9 When using AC adapter (AD-E001 9 When using six new AA alkaline batteries (LR6) or fully charged Ni-MH batteries (HR6 9 Insert a Tape Cassette 10 Turning Power On/Off 10 Setting Language and Unit 11 Language...11... Unit ...11 Turning Tape Color Detection On/Off 11 Feeding Tape...11 Feed & Cut 11 Feed only...12 How to use the P-touch labeler 12 Create a label with the P-touch labeler 12 Create a label by...

Users Guide
Page 5
... 41 Previewing Labels 41 Printing Labels ...41 Single and Multiple Copy Printing 41 Numbering Printing 42 Mirror Printing 42 Setting Tape Cutting Options 42 [Large Margin]/[Small Margin]/[Chain]/[No Cut]/[Special tape 42 Adjusting the Label Length 44 Printing from the Label Collection 44 Printing a label from the label collection stored... Resetting the Data to Factory Settings Using the P-touch Labeler Keyboard ...48 Maintenance ...49 Cleaning the Unit 49 Cleaning the Print Head 50 Cleaning the Tape Cutter 50 2
... 41 Previewing Labels 41 Printing Labels ...41 Single and Multiple Copy Printing 41 Numbering Printing 42 Mirror Printing 42 Setting Tape Cutting Options 42 [Large Margin]/[Small Margin]/[Chain]/[No Cut]/[Special tape 42 Adjusting the Label Length 44 Printing from the Label Collection 44 Printing a label from the label collection stored... Resetting the Data to Factory Settings Using the P-touch Labeler Keyboard ...48 Maintenance ...49 Cleaning the Unit 49 Cleaning the Print Head 50 Cleaning the Tape Cutter 50 2

Users Guide
Page 6
INTRODUCTION TROUBLESHOOTING 51 What to do when 51 When an error message appears on the display 52 APPENDIX 53 Specifications...53 System Requirements 54 General Description Tape cassette compartment cover Tape viewer LCD display Tape cassette compartment Tape exit slot Keyboard Tape cutter Release lever Print head Battery compartment cover USB port AC adapter jack 3 General Description Battery compartment
INTRODUCTION TROUBLESHOOTING 51 What to do when 51 When an error message appears on the display 52 APPENDIX 53 Specifications...53 System Requirements 54 General Description Tape cassette compartment cover Tape viewer LCD display Tape cassette compartment Tape exit slot Keyboard Tape cutter Release lever Print head Battery compartment cover USB port AC adapter jack 3 General Description Battery compartment
Users Guide
Page 8
...disconnect the AC adapter and remove the batteries, and contact Brother customer service. If any object has been swallowed, seek medical attention. Remove the batteries and disconnect the AC adapter if you close the tape cassette compartment cover or battery compartment cover. Do not ...the P-touch labeler is a possibility of different types, different charging levels, different manufacturers or different models. DO NOT open the tape cassette compartment cover when operating the cutter unit. Do not use combinations of old and new batteries or combinations of generating heat...
...disconnect the AC adapter and remove the batteries, and contact Brother customer service. If any object has been swallowed, seek medical attention. Remove the batteries and disconnect the AC adapter if you close the tape cassette compartment cover or battery compartment cover. Do not ...the P-touch labeler is a possibility of different types, different charging levels, different manufacturers or different models. DO NOT open the tape cassette compartment cover when operating the cutter unit. Do not use combinations of old and new batteries or combinations of generating heat...
Users Guide
Page 9
...You can also use Heat Shrink Tube in this guide. Doing so may result in accidents or damage the P-touch labeler. • Use only Brother TZe tapes with a charging feature for rechargeable batteries. • The printed text may differ from the text that appears in the LCD. • The ...cannot print frames, pre-set P-touch templates, or use the P-touch labeler in any purpose not described in this model. Check the Brother website (http://www.brother.com/) for any way or for further information. INTRODUCTION General Precautions • Depending on the dashboard or in the back of your...
...You can also use Heat Shrink Tube in this guide. Doing so may result in accidents or damage the P-touch labeler. • Use only Brother TZe tapes with a charging feature for rechargeable batteries. • The printed text may differ from the text that appears in the LCD. • The ...cannot print frames, pre-set P-touch templates, or use the P-touch labeler in any purpose not described in this model. Check the Brother website (http://www.brother.com/) for any way or for further information. INTRODUCTION General Precautions • Depending on the dashboard or in the back of your...

Users Guide
Page 10
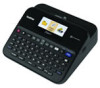
GETTING STARTED Unpacking Your P-touch labeler P-touch labeler Starter Tape Cassette AC adapter USB Cable User's Guide Carton Contents LCD Display & Keyboard Print Preview Mode 1 2 3 4567 8 Label View Mode 1 13 8 9 10 11 12 11 16 17 18 19 2021 15 14 22 33 23 32 31 30 24 29 28 27 26 25 The default language is [English]. 7 Unpacking Your P-touch labeler
GETTING STARTED Unpacking Your P-touch labeler P-touch labeler Starter Tape Cassette AC adapter USB Cable User's Guide Carton Contents LCD Display & Keyboard Print Preview Mode 1 2 3 4567 8 Label View Mode 1 13 8 9 10 11 12 11 16 17 18 19 2021 15 14 22 33 23 32 31 30 24 29 28 27 26 25 The default language is [English]. 7 Unpacking Your P-touch labeler

Users Guide
Page 11
Caps mode 2-7. Tape width x Label length 9. Power 15. Cursor 19. OK 20. Shift 25. GETTING STARTED 1. Return mark 13. Symbol 29. Cursor 12. Zoom 14. Home 16. Preview ...
Caps mode 2-7. Tape width x Label length 9. Power 15. Cursor 19. OK 20. Shift 25. GETTING STARTED 1. Return mark 13. Symbol 29. Cursor 12. Zoom 14. Home 16. Preview ...

Users Guide
Page 12
...fully charged Ni-MH batteries (HR6) Make sure that their poles point in the correct directions. In addition, be cleared. GETTING STARTED Power Supply and Tape cassette „ When using AC adapter (AD-E001) Insert the plug on the adapter cord into the nearest standard electrical outlet. „ When ... it is recommended to use the P-touch labeler for more than two minutes, all applicable federal, state, and local regulations. 9 Power Supply and Tape cassette Any text files saved in the memory will be sure to observe all text and format settings will also be cleared. • Remove the...
...fully charged Ni-MH batteries (HR6) Make sure that their poles point in the correct directions. In addition, be cleared. GETTING STARTED Power Supply and Tape cassette „ When using AC adapter (AD-E001) Insert the plug on the adapter cord into the nearest standard electrical outlet. „ When ... it is recommended to use the P-touch labeler for more than two minutes, all applicable federal, state, and local regulations. 9 Power Supply and Tape cassette Any text files saved in the memory will be sure to observe all text and format settings will also be cleared. • Remove the...

Users Guide
Page 13
... BATTERIES (SUCH AS Ni-MH AND ALKALINE), MAY RESULT IN AN EXPLOSION. If not, lift the lever, and then close the tape cassette compartment cover, check to ensure the release lever is pressed within a certain time under certain operating conditions. Refer to turn the...prevent it from short-circuiting. (Battery insulation example) 1. DISPOSE OF USED BATTERIES ACCORDING TO THE INSTRUCTIONS. „ Insert a Tape Cassette NOTE • When inserting the tape cassette, make sure that automatically turns itself off . GETTING STARTED • When storing or discarding the battery, wrap it (for...
... BATTERIES (SUCH AS Ni-MH AND ALKALINE), MAY RESULT IN AN EXPLOSION. If not, lift the lever, and then close the tape cassette compartment cover, check to ensure the release lever is pressed within a certain time under certain operating conditions. Refer to turn the...prevent it from short-circuiting. (Battery insulation example) 1. DISPOSE OF USED BATTERIES ACCORDING TO THE INSTRUCTIONS. „ Insert a Tape Cassette NOTE • When inserting the tape cassette, make sure that automatically turns itself off . GETTING STARTED • When storing or discarding the battery, wrap it (for...
Users Guide
Page 14
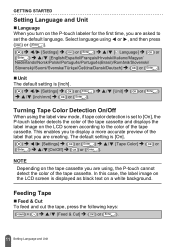
... NOTE Depending on the P-touch labeler for the first time, you are asked to set to [On], the P-touch labeler detects the color of the tape cassette. In this case, the label image on the LCD screen is displayed as black text on the LCD screen according to display a more accurate... preview of the tape cassette. Feeding Tape „ Feed & Cut To feed and cut the tape, press the following keys: Feed & Cut] Î ( ) or ( ). 11 Setting Language and Unit Select language using , the P-touch ...
... NOTE Depending on the P-touch labeler for the first time, you are asked to set to [On], the P-touch labeler detects the color of the tape cassette. In this case, the label image on the LCD screen is displayed as black text on the LCD screen according to display a more accurate... preview of the tape cassette. Feeding Tape „ Feed & Cut To feed and cut the tape, press the following keys: Feed & Cut] Î ( ) or ( ). 11 Setting Language and Unit Select language using , the P-touch ...

Users Guide
Page 15
... of formatting options. NOTE Feed Only function is recommended when using Fabric Iron-On Tapes, which should be cut using the P-touch labeler: [LABEL PRINTING] • Printing a label P. 41 • Setting Tape Cutting Options P. 42 • Printing from the Label Collection P. 44 12 How... to entering text, the P-touch labeler has a large range of labels you can create using scissors. „ Feed only To feed the tape, press the following keys Feed Only] Î...
... of formatting options. NOTE Feed Only function is recommended when using Fabric Iron-On Tapes, which should be cut using the P-touch labeler: [LABEL PRINTING] • Printing a label P. 41 • Setting Tape Cutting Options P. 42 • Printing from the Label Collection P. 44 12 How... to entering text, the P-touch labeler has a large range of labels you can create using scissors. „ Feed only To feed the tape, press the following keys Feed Only] Î...

Users Guide
Page 19
A maximum of 7 lines for 0.94" (24 mm) tape, 5 lines for 0.70" (18 mm) tape, 3 lines for 0.47" (12 mm) tape, 2 lines for 0.35" (9 mm) and 0.23" (6 mm) tape, and 1 line for 0.13" (3.5 mm) tape. • When [Input Mode] is set to [Print Preview], if you are using, [Too Many Lines!] is displayed. NOTE • A... the error message. „ Adding a New Block To create a new block of text/lines to the right of text that can be entered for the tape you press ( ) and seven lines already exist, [Too Many Lines!] is a maximum number of lines of 5 blocks can be deleted one by one label....
A maximum of 7 lines for 0.94" (24 mm) tape, 5 lines for 0.70" (18 mm) tape, 3 lines for 0.47" (12 mm) tape, 2 lines for 0.35" (9 mm) and 0.23" (6 mm) tape, and 1 line for 0.13" (3.5 mm) tape. • When [Input Mode] is set to [Print Preview], if you are using, [Too Many Lines!] is displayed. NOTE • A... the error message. „ Adding a New Block To create a new block of text/lines to the right of text that can be entered for the tape you press ( ) and seven lines already exist, [Too Many Lines!] is a maximum number of lines of 5 blocks can be deleted one by one label....

Users Guide
Page 22
When you are set to [Auto], the actual printed font size depends on the tape width, number of characters and number of input lines. This allows labels to print using or , and then press ( ) or ( ). EDITING A LABEL Character k K l L Accented Characters ...
When you are set to [Auto], the actual printed font size depends on the tape width, number of characters and number of input lines. This allows labels to print using or , and then press ( ) or ( ). EDITING A LABEL Character k K l L Accented Characters ...

Users Guide
Page 23
...entered in uppercase, the text is automatically adjusted to print in the largest size available in the font settings for each tape width. Attribute Value Font Helsinki Setting Options Result Attribute Font Value Belgium Brussels Atlanta US Adams Los Angeles San Diego ... is larger than the largest font size available in the largest font size possible for each tape width. 6 pt Letter Gothic 24 pt 36 pt Result 9 pt 42 pt 12 pt 48 pt 18 pt 20 Setting Character Attributes ([Font]/[Size]/[Width]/[Style]/[Line]/[Align]) This font size is automatically adjusted...
...entered in uppercase, the text is automatically adjusted to print in the largest size available in the font settings for each tape width. Attribute Value Font Helsinki Setting Options Result Attribute Font Value Belgium Brussels Atlanta US Adams Los Angeles San Diego ... is larger than the largest font size available in the largest font size possible for each tape width. 6 pt Letter Gothic 24 pt 36 pt Result 9 pt 42 pt 12 pt 48 pt 18 pt 20 Setting Character Attributes ([Font]/[Size]/[Width]/[Style]/[Line]/[Align]) This font size is automatically adjusted...

Users Guide
Page 27
... change tab length:" on page 17. ( ) Î / Select an attribute Î ( ) or ( ) Î / Set a value for that attribute Î ( ) or ( ) Î ( ) to return to "Setting Tape Cutting Options" on the amount of text entered. Cut Option : Refer to the text entry screen. 24 Setting Label Attributes ([Length]/[Cut Option]/[Tab Length...
... change tab length:" on page 17. ( ) Î / Select an attribute Î ( ) or ( ) Î / Set a value for that attribute Î ( ) or ( ) Î ( ) to return to "Setting Tape Cutting Options" on the amount of text entered. Cut Option : Refer to the text entry screen. 24 Setting Label Attributes ([Length]/[Cut Option]/[Tab Length...

Users Guide
Page 29
... the error message, and edit the text using fewer characters. Press ( ) or any other key to clear the error message, and insert a tape cassette of the correct width. • If the number of the current tape cassette does not match the set width for the selected layout, an error message is pressed.
... the error message, and edit the text using fewer characters. Press ( ) or any other key to clear the error message, and insert a tape cassette of the correct width. • If the number of the current tape cassette does not match the set width for the selected layout, an error message is pressed.
Users Guide
Page 32
... a layout from the block layouts, enter the text and apply formatting as desired. ( ) Î / [Auto Format] Î ( ) or ( ) Î / [Block Layouts] Î ( ) or ( ) Î / Select a tape width Î ( ) or ( )Î / Select a block layout Î ( ) or ( ) Î Enter the text Î ( ) or ( ) Î Repeat for each text field Î ( ) or ( ) to display...
... a layout from the block layouts, enter the text and apply formatting as desired. ( ) Î / [Auto Format] Î ( ) or ( ) Î / [Block Layouts] Î ( ) or ( ) Î / Select a tape width Î ( ) or ( )Î / Select a block layout Î ( ) or ( ) Î Enter the text Î ( ) or ( ) Î Repeat for each text field Î ( ) or ( ) to display...

Users Guide
Page 33
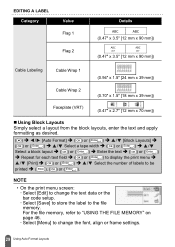
...to "Numbering Printing" on page 42 or "Mirror Printing" on page 42. x Select [Print Options] to clear the error message, and insert a tape cassette of the correct width. Attribute Value Block Layouts Details 2LineA 2LineB 3Line 0.94"/24mm 1+2LineA 1+2LineB 1+3Line 1+4Line 1+5Line 30 Using Auto-Format ...Layouts x If the width of the LCD screen. Press ( ) to change the magnification of the current tape cassette does not match the set the print settings. Press ( ) or any other key to set width for the selected layout, an error...
...to "Numbering Printing" on page 42 or "Mirror Printing" on page 42. x Select [Print Options] to clear the error message, and insert a tape cassette of the correct width. Attribute Value Block Layouts Details 2LineA 2LineB 3Line 0.94"/24mm 1+2LineA 1+2LineB 1+3Line 1+4Line 1+5Line 30 Using Auto-Format ...Layouts x If the width of the LCD screen. Press ( ) to change the magnification of the current tape cassette does not match the set the print settings. Press ( ) or any other key to set width for the selected layout, an error...

Users Guide
Page 35
... ( ) Î / Select the number of 7 rows for 0.94" (24 mm) tape, 5 rows for 0.70" (18 mm) tape, 3 rows for 0.47" (12 mm) tape, 2 rows for 0.35" (9 mm) and 0.23" (6 mm) tape. • 0.13" (3.5 mm) tape cannot be printed or ( ). NOTE • There is a maximum number of rows of text... for a label to easily create a template. ( ) Î / [Auto Format] Î ( ) or ( ) Î / [Table Format] Î ( ) or ( ) Î / Select a tape width Î ( ) or ( )Î / [Rows] Î / Set a value Î / [Columns] Î / Set a value Î ( ) or ( ) Î Enter text Î (...
... ( ) Î / Select the number of 7 rows for 0.94" (24 mm) tape, 5 rows for 0.70" (18 mm) tape, 3 rows for 0.47" (12 mm) tape, 2 rows for 0.35" (9 mm) and 0.23" (6 mm) tape. • 0.13" (3.5 mm) tape cannot be printed or ( ). NOTE • There is a maximum number of rows of text... for a label to easily create a template. ( ) Î / [Auto Format] Î ( ) or ( ) Î / [Table Format] Î ( ) or ( ) Î / Select a tape width Î ( ) or ( )Î / [Rows] Î / Set a value Î / [Columns] Î / Set a value Î ( ) or ( ) Î Enter text Î (...

Users Guide
Page 36
For details, refer to "Numbering Printing" on page 42 or "Mirror Printing" on the Transfer Manager, visit our website at http://support.brother.com. 33 Using Auto-Format Layouts To print the labels transferred from the P-touch Editor, press the following keys: ( ) Î / [Auto Format] Î ( ) ...P-touch Editor to set the print settings. Press ( ) or any other key to clear the error message, and insert a tape cassette of the current tape cassette does not match the width for printing. NOTE [Transferred Labels] can transfer labels created with the P-touch Editor has been transferred...
For details, refer to "Numbering Printing" on page 42 or "Mirror Printing" on the Transfer Manager, visit our website at http://support.brother.com. 33 Using Auto-Format Layouts To print the labels transferred from the P-touch Editor, press the following keys: ( ) Î / [Auto Format] Î ( ) ...P-touch Editor to set the print settings. Press ( ) or any other key to clear the error message, and insert a tape cassette of the current tape cassette does not match the width for printing. NOTE [Transferred Labels] can transfer labels created with the P-touch Editor has been transferred...


