
Users Manual - English
Page 1
...layouts Printing a layout containing data merged from a record Saving a database document Reference P-touch Editor Environment Layout document window Record view window Pop-Up menu commands Menu bar commands 1. Starting up P-touch Editor Basic Operation Layout area Creating a new layout document Working with text objects Working ..."), including but not limited to the program, images, clip art, fonts, templates, text and documents, are owned by BROTHER. You may not reproduce, modify, reverse engineer, disassemble, or decompile any part of the SOFTWARE without prior written permission by...
...layouts Printing a layout containing data merged from a record Saving a database document Reference P-touch Editor Environment Layout document window Record view window Pop-Up menu commands Menu bar commands 1. Starting up P-touch Editor Basic Operation Layout area Creating a new layout document Working with text objects Working ..."), including but not limited to the program, images, clip art, fonts, templates, text and documents, are owned by BROTHER. You may not reproduce, modify, reverse engineer, disassemble, or decompile any part of the SOFTWARE without prior written permission by...
Users Manual - English
Page 2
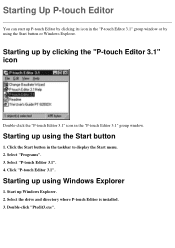
... or Windows Explorer. Select the drive and directory where P-touch Editor is installed. 3. Select "Programs". 3. Click "P-touch Editor 3.1". Starting Up P-touch Editor You can start up P-touch Editor by clicking its icon in the "P-touch Editor 3.1" group window or by clicking the "P-touch Editor 3.1" icon Double-click the "P-touch Editor 3.1" icon in the taskbar to display the...
... or Windows Explorer. Select the drive and directory where P-touch Editor is installed. 3. Select "Programs". 3. Click "P-touch Editor 3.1". Starting Up P-touch Editor You can start up P-touch Editor by clicking its icon in the "P-touch Editor 3.1" group window or by clicking the "P-touch Editor 3.1" icon Double-click the "P-touch Editor 3.1" icon in the taskbar to display the...

Users Manual - English
Page 3
More detailed explanations of commands and dialog boxes can be found in order to start using P-touch Editor. We recommend that this chapter provides only enough information to create your own database. Note that you go through the basics you get started. Basic Operations This chapter walks you through the examples to become familiar with how to use the mouse to create objects and move them around the layout area and how to help you need to know in Reference.
More detailed explanations of commands and dialog boxes can be found in order to start using P-touch Editor. We recommend that this chapter provides only enough information to create your own database. Note that you go through the basics you get started. Basic Operations This chapter walks you through the examples to become familiar with how to use the mouse to create objects and move them around the layout area and how to help you need to know in Reference.
Users Manual - English
Page 5
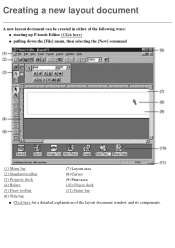
Creating a new layout document A new layout document can be created in either of the following ways: q starting up P-touch Editor (Click here) q pulling down the [File] menu, then selecting the [New] command (1) Menu bar (2) Standard toolbar (3) Property dock (4) Rulers (5) Draw toolbar (7) Layout area (8) Cursor (9) Print area (10) Object dock (11) Status bar (6) Title bar q Click here for a detailed explanation of the layout document window and its components.
Creating a new layout document A new layout document can be created in either of the following ways: q starting up P-touch Editor (Click here) q pulling down the [File] menu, then selecting the [New] command (1) Menu bar (2) Standard toolbar (3) Property dock (4) Rulers (5) Draw toolbar (7) Layout area (8) Cursor (9) Print area (10) Object dock (11) Status bar (6) Title bar q Click here for a detailed explanation of the layout document window and its components.
Users Manual - English
Page 16
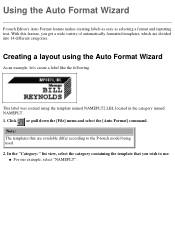
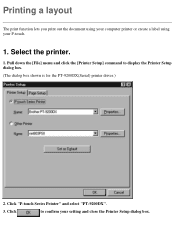
... "NAMEPLT". Note: The templates that you get a wide variety of automatically formatted templates, which are available differ according to use. Using the Auto Format Wizard P-touch Editor's Auto Format feature makes creating labels as easy as selecting a format and inputting text. Creating a layout using the template named NAMEPLT2.LBL located in.... 1. This label was created using the Auto Format Wizard As an example, let's create a label like the following. With this feature, you wish to the P-touch model being used. 2.
... "NAMEPLT". Note: The templates that you get a wide variety of automatically formatted templates, which are available differ according to use. Using the Auto Format Wizard P-touch Editor's Auto Format feature makes creating labels as easy as selecting a format and inputting text. Creating a layout using the template named NAMEPLT2.LBL located in.... 1. This label was created using the Auto Format Wizard As an example, let's create a label like the following. With this feature, you wish to the P-touch model being used. 2.
Users Manual - English
Page 19
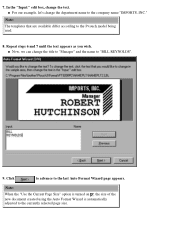
... example, let's change the text. In the "Input:" edit box, change the department name to the company name "IMPORTS, INC." Click to advance to the P-touch model being used. 8. Repeat steps 6 and 7 until the text appears as you wish. Note: The templates that are available differ according to the last Auto...
... example, let's change the text. In the "Input:" edit box, change the department name to the company name "IMPORTS, INC." Click to advance to the P-touch model being used. 8. Repeat steps 6 and 7 until the text appears as you wish. Note: The templates that are available differ according to the last Auto...
Users Manual - English
Page 22
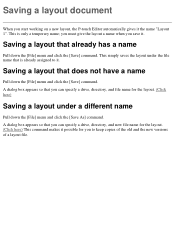
Pull down the [File] menu and click the [Printer Setup] command to confirm your P-touch. 1. Click to display the Printer Setup dialog box. (The dialog box shown is for the PT-9200DX(Serial) printer driver.) 2. Click "P-touch Series Printer" and select "PT-9200DX". 3. Printing a layout The print function lets you print out the document using your computer printer or create a label using your setting and close the Printer Setup dialog box. Select the printer. 1.
Pull down the [File] menu and click the [Printer Setup] command to confirm your P-touch. 1. Click to display the Printer Setup dialog box. (The dialog box shown is for the PT-9200DX(Serial) printer driver.) 2. Click "P-touch Series Printer" and select "PT-9200DX". 3. Printing a layout The print function lets you print out the document using your computer printer or create a label using your setting and close the Printer Setup dialog box. Select the printer. 1.
Users Manual - English
Page 24
... the layout. (Click here) This command makes it the name "Layout 1". you must give the layout a name when you start working on a new layout, the P-touch Editor automatically gives it possible for you can specify a drive, directory, and new file name for the layout. (Click here) Saving a layout under the file...
... the layout. (Click here) This command makes it the name "Layout 1". you must give the layout a name when you start working on a new layout, the P-touch Editor automatically gives it possible for you can specify a drive, directory, and new file name for the layout. (Click here) Saving a layout under the file...
Users Manual - English
Page 25
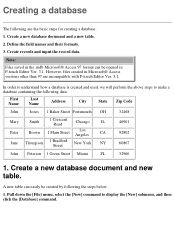
If your P-touch Editor, you can be used to sort the records, making it is given a format which determines the type of the table, and the fields are ... top of customers, for example, each record could contain a field for the first name, a field for the last name, a field for the telephone number, etc. A P-touch Editor database document is a list of each containing text data. When a field is created, it easier to find a desired record. Any of fields, each column...
If your P-touch Editor, you can be used to sort the records, making it is given a format which determines the type of the table, and the fields are ... top of customers, for example, each record could contain a field for the first name, a field for the last name, a field for the telephone number, etc. A P-touch Editor database document is a list of each containing text data. When a field is created, it easier to find a desired record. Any of fields, each column...
Users Manual - English
Page 26
... 97 format can easily be opened in Microsoft® Access versions other than 97 are the basic steps for creating a database. 1. However, files created in P-touch Editor Ver. 3.1. Create a new database document and a new table. 2. Define the field names and their formats. 3. Create records and input the record data. Creating a database...
... 97 format can easily be opened in Microsoft® Access versions other than 97 are the basic steps for creating a database. 1. However, files created in P-touch Editor Ver. 3.1. Create a new database document and a new table. 2. Define the field names and their formats. 3. Create records and input the record data. Creating a database...
Users Manual - English
Page 45
Note: Files saved with P-touch Editor Ver. 3.1 are saved with the same .mdb extension used by Microsoft® Access 97. Saving a database document Use the same procedures as those outlined Saving a layout document.
Note: Files saved with P-touch Editor Ver. 3.1 are saved with the same .mdb extension used by Microsoft® Access 97. Saving a database document Use the same procedures as those outlined Saving a layout document.
Users Manual - English
Page 46
Reference This chapter is organized as a reference. It contains detailed information about the P-touch Editor's windows, docks, toolbars, commands and dialog boxes.
Reference This chapter is organized as a reference. It contains detailed information about the P-touch Editor's windows, docks, toolbars, commands and dialog boxes.
Users Manual - English
Page 47
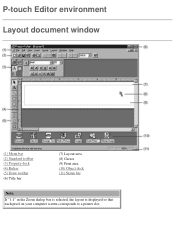
P-touch Editor environment Layout document window (1) Menu bar (2) Standard toolbar (3) Property dock (4) Rulers (5) Draw toolbar (6) Title bar (7) Layout area (8) Cursor (9) Print area (10) Object dock (11) Status bar Note: If "1:1" in the Zoom dialog box is selected, the layout is displayed so that each pixel on your computer screen corresponds to a printer dot.
P-touch Editor environment Layout document window (1) Menu bar (2) Standard toolbar (3) Property dock (4) Rulers (5) Draw toolbar (6) Title bar (7) Layout area (8) Cursor (9) Print area (10) Object dock (11) Status bar Note: If "1:1" in the Zoom dialog box is selected, the layout is displayed so that each pixel on your computer screen corresponds to a printer dot.
Users Manual - English
Page 52
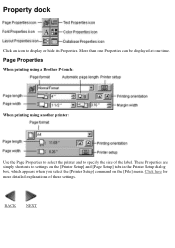
Property dock Click an icon to settings on the [Printer Setup] and [Page Setup] tabs in the Printer Setup dialog box, which appears when you select the [Printer Setup] command on the [File] menu. Click here for more detailed explanations of the label. These Properties are simply shortcuts to display or hide its Properties. BACK NEXT Page Properties When printing using a Brother P-touch: When printing using another printer: Use the Page Properties to select the printer and to specify the size of these settings. More than one Properties can be displayed at one time.
Property dock Click an icon to settings on the [Printer Setup] and [Page Setup] tabs in the Printer Setup dialog box, which appears when you select the [Printer Setup] command on the [File] menu. Click here for more detailed explanations of the label. These Properties are simply shortcuts to display or hide its Properties. BACK NEXT Page Properties When printing using a Brother P-touch: When printing using another printer: Use the Page Properties to select the printer and to specify the size of these settings. More than one Properties can be displayed at one time.

Users Manual - English
Page 54
... [Text] command on the [Format] menu is selected. Click here for more details on these settings. Note: The Color Properties may not appear when the P-touch Editor is displayed by selecting "Color" on the [Property Dock] tab of the Options dialog box. (Click here) BACK NEXT Text Properties The settings of...
... [Text] command on the [Format] menu is selected. Click here for more details on these settings. Note: The Color Properties may not appear when the P-touch Editor is displayed by selecting "Color" on the [Property Dock] tab of the Options dialog box. (Click here) BACK NEXT Text Properties The settings of...
Users Manual - English
Page 72
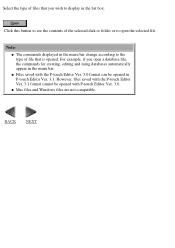
... Ver. 3.0. However, files saved with the P-touch Editor Ver. 3.1 format cannot be opened with the P-touch Editor Ver. 3.0 format can be opened . Select the type of file that you open the selected file. Note: q The commands displayed in the list box. ...For example, if you wish to open a database file, the commands for creating, editing and using databases automatically appear in P-touch Editor Ver. 3.1. BACK NEXT q Mac files and Windows files are not compatible. Click this button to see the contents of the selected disk or folder...
... Ver. 3.0. However, files saved with the P-touch Editor Ver. 3.1 format cannot be opened with the P-touch Editor Ver. 3.0 format can be opened . Select the type of file that you open the selected file. Note: q The commands displayed in the list box. ...For example, if you wish to open a database file, the commands for creating, editing and using databases automatically appear in P-touch Editor Ver. 3.1. BACK NEXT q Mac files and Windows files are not compatible. Click this button to see the contents of the selected disk or folder...

Users Manual - English
Page 73
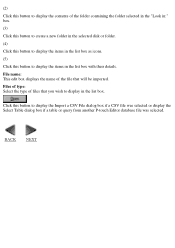
..., create a field that will be used for sorting as Key 1 to import. (1) This list box displays the contents of the table while P-touch Editor is being used, newly added records may not be set in the [File] menu displays the Open dialog box, which allows you want to ...sort the records. Double-click a disk or folder to select a CSV file or a table or query from another P-touch Editor database file. Before using P-touch Editor to edit records repeatedly in this from occurring. Import Database (only for a table or query from another...
..., create a field that will be used for sorting as Key 1 to import. (1) This list box displays the contents of the table while P-touch Editor is being used, newly added records may not be set in the [File] menu displays the Open dialog box, which allows you want to ...sort the records. Double-click a disk or folder to select a CSV file or a table or query from another P-touch Editor database file. Before using P-touch Editor to edit records repeatedly in this from occurring. Import Database (only for a table or query from another...
Users Manual - English
Page 74
... display the Import a CSV File dialog box if a CSV file was selected or display the Select Table dialog box if a table or query from another P-touch Editor database file was selected. Files of type: Select the type of the file that you wish to display the items in the list box...
... display the Import a CSV File dialog box if a CSV file was selected or display the Select Table dialog box if a table or query from another P-touch Editor database file was selected. Files of type: Select the type of the file that you wish to display the items in the list box...
Users Manual - English
Page 77
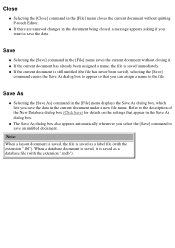
Save q Selecting the [Save] command in the [File] menu saves the current document without quitting P-touch Editor. Save As q Selecting the [Save As] command in the [File] menu displays the Save As dialog box, which lets you can assign a name to ...
Save q Selecting the [Save] command in the [File] menu saves the current document without quitting P-touch Editor. Save As q Selecting the [Save As] command in the [File] menu displays the Save As dialog box, which lets you can assign a name to ...

Users Manual - English
Page 81
... Format Wizard, which allows you to select a pre-formatted template for quickly and easily creating layouts. (The templates that are available differ according to the P-touch model being used.) Category: Select the category which contains the Auto Format template that you wish to use. Click this button to open a different folder...
... Format Wizard, which allows you to select a pre-formatted template for quickly and easily creating layouts. (The templates that are available differ according to the P-touch model being used.) Category: Select the category which contains the Auto Format template that you wish to use. Click this button to open a different folder...


