Users Manual - English
Page 7
... & Keyboard 11 LCD Display ...11 Key Names and Functions 12 Power Supply ...14 Battery...14 AC Adapter (Optional on the PT-2030 15 Inserting a Tape Cassette 16 Turning Power On/Off 17 Feeding Tape ...18 Feed function ...18 LCD Display ...18 LCD Contrast ...18 Setting Language and Unit 19 Language ...19 Unit...19 EDITING...
... & Keyboard 11 LCD Display ...11 Key Names and Functions 12 Power Supply ...14 Battery...14 AC Adapter (Optional on the PT-2030 15 Inserting a Tape Cassette 16 Turning Power On/Off 17 Feeding Tape ...18 Feed function ...18 LCD Display ...18 LCD Contrast ...18 Setting Language and Unit 19 Language ...19 Unit...19 EDITING...
Users Manual - English
Page 8
... to factory settings (Label collections stored in Favorites is not reset 53 Maintenance...53 Cleaning the Unit 53 Cleaning the Print Head 53 Cleaning the Tape Cutter 54 TROUBLESHOOTING 55 What to do when...55 Error Messages...56 2
... to factory settings (Label collections stored in Favorites is not reset 53 Maintenance...53 Cleaning the Unit 53 Cleaning the Print Head 53 Cleaning the Tape Cutter 54 TROUBLESHOOTING 55 What to do when...55 Error Messages...56 2
Users Manual - English
Page 12
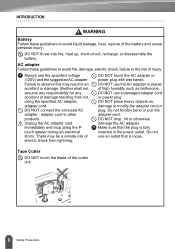
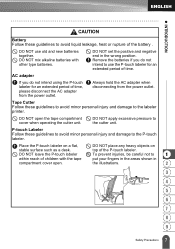
...adapter cord or power plug. AC adapter Follow these guidelines to avoid liquid leakage, heat, rupture of the battery and cause personal injury. Brother shall not assume any responsibility for any accident or damage resulting from lightning. There may result in places of high humidity such as bathrooms.... DO NOT drop, hit or otherwise damage the AC adapter. DO NOT use the specified voltage (120V) and the suggested AC adapter. Tape Cutter DO NOT touch the blade of the cutter unit. 6 Safety Precautions Unplug the AC adapter cord immediately and stop using the specified ...
...adapter cord or power plug. AC adapter Follow these guidelines to avoid liquid leakage, heat, rupture of the battery and cause personal injury. Brother shall not assume any responsibility for any accident or damage resulting from lightning. There may result in places of high humidity such as bathrooms.... DO NOT drop, hit or otherwise damage the AC adapter. DO NOT use the specified voltage (120V) and the suggested AC adapter. Tape Cutter DO NOT touch the blade of the cutter unit. 6 Safety Precautions Unplug the AC adapter cord immediately and stop using the specified ...
Users Manual - English
Page 13
... adapter when disconnecting from the power outlet. Remove the batteries if you do not intend to use old and new batteries together. DO NOT open . Tape Cutter Follow these guidelines to avoid liquid leakage, heat or rupture of the battery . DO NOT place any heavy objects on a flat, stable surface such...
... adapter when disconnecting from the power outlet. Remove the batteries if you do not intend to use old and new batteries together. DO NOT open . Tape Cutter Follow these guidelines to avoid liquid leakage, heat or rupture of the battery . DO NOT place any heavy objects on a flat, stable surface such...
Users Manual - English
Page 14
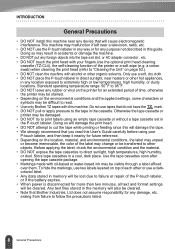
... dry cloth. • DO NOT place the P-touch labeler in direct sunlight, near any device that Brother Industries, Ltd does not assume responsibility for more than two minutes, all text and format settings will damage the tape. • We strongly recommend that do not have the mark. • DO NOT pull or... data stored in memory will be lost due to failure or repair of the printer or a soft wipe (e.g. Do not use tapes that you read . • Use only Brother TZ tapes with oil-based or water-based ink may be damaged. • DO NOT try to print labels using your fingers.Use the...
... dry cloth. • DO NOT place the P-touch labeler in direct sunlight, near any device that Brother Industries, Ltd does not assume responsibility for more than two minutes, all text and format settings will damage the tape. • We strongly recommend that do not have the mark. • DO NOT pull or... data stored in memory will be lost due to failure or repair of the printer or a soft wipe (e.g. Do not use tapes that you read . • Use only Brother TZ tapes with oil-based or water-based ink may be damaged. • DO NOT try to print labels using your fingers.Use the...
Users Manual - English
Page 16
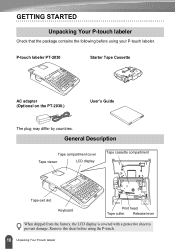
... covered with a protective sheet to prevent damage. Remove this sheet before using the P-touch. 10 Unpacking Your P-touch labeler P-touch labeler PT-2030 Starter Tape Cassette AC adapter (Optional on the PT-2030.) User's Guide The plug may differ by countries. GETTING STARTED Unpacking Your P-touch labeler Check that the package contains the following before...
... covered with a protective sheet to prevent damage. Remove this sheet before using the P-touch. 10 Unpacking Your P-touch labeler P-touch labeler PT-2030 Starter Tape Cassette AC adapter (Optional on the PT-2030.) User's Guide The plug may differ by countries. GETTING STARTED Unpacking Your P-touch labeler Check that the package contains the following before...
Users Manual - English
Page 17
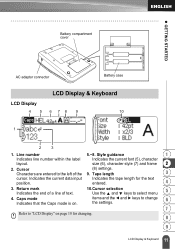
Indicates the current data input Indicates the tape length for changing. 8 9 11 LCD Display & Keyboard items and the and keys to change the settings. 6 7 Refer to select menu 5 4. z GETTING STARTED Battery ...Battery case LCD Display 45 LCD Display & Keyboard 6 78 9 10 1 2 3 1. Style guidance 1 Indicates line number within the label Indicates the current font (5), character layout. Tape length 3 cursor. Caps mode Indicates that the Caps mode is on page 18 for the text position. size (6), character style (7) and frame 2 2. Cursor (8) settings. Characters...
Indicates the current data input Indicates the tape length for changing. 8 9 11 LCD Display & Keyboard items and the and keys to change the settings. 6 7 Refer to select menu 5 4. z GETTING STARTED Battery ...Battery case LCD Display 45 LCD Display & Keyboard 6 78 9 10 1 2 3 1. Style guidance 1 Indicates line number within the label Indicates the current font (5), character layout. Tape length 3 cursor. Caps mode Indicates that the Caps mode is on page 18 for the text position. size (6), character style (7) and frame 2 2. Cursor (8) settings. Characters...
Users Manual - English
Page 18
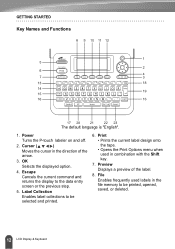
GETTING STARTED Key Names and Functions The default language is "English". 1. Print • Prints the current label design onto the tape. • Opens the Print Options menu when used labels in the file memory to be selected and printed. 6. Escape Cancels the current command and returns ...
GETTING STARTED Key Names and Functions The default language is "English". 1. Print • Prints the current label design onto the tape. • Opens the Print Options menu when used labels in the file memory to be selected and printed. 6. Escape Cancels the current command and returns ...
Users Manual - English
Page 22
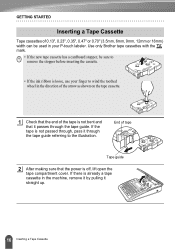
... referring to wind the toothed wheel in the direction of the arrow as shown on the tape cassette. 1 Check that the end of the tape is not bent and that the power is off, lift open the tape compartment cover. End of 0.13", 0.23", 0.35", 0.47" or 0.70" (3.5mm, 6mm,...labeler. If there is not passed through, pass it straight up. 16 Inserting a Tape Cassette If the tape is already a tape cassette in your finger to the illustration. Use only Brother tape cassettes with the mark. • If the new tape cassette has a cardboard stopper, be used in the machine, remove it by pulling...
... referring to wind the toothed wheel in the direction of the arrow as shown on the tape cassette. 1 Check that the end of the tape is not bent and that the power is off, lift open the tape compartment cover. End of 0.13", 0.23", 0.35", 0.47" or 0.70" (3.5mm, 6mm,...labeler. If there is not passed through, pass it straight up. 16 Inserting a Tape Cassette If the tape is already a tape cassette in your finger to the illustration. Use only Brother tape cassettes with the mark. • If the new tape cassette has a cardboard stopper, be used in the machine, remove it by pulling...
Users Manual - English
Page 23
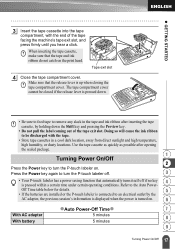
...Press the Power key again to turn the P-touch labeler on. z GETTING STARTED 3 Insert the tape cassette into the tape compartment, with the tape. • Store tape cassettes in the tape and ink ribbon after opening the sealed package. 1 Turning Power On/Off 2 Press the Power key...P-touch labeler has a power saving function that the release lever is pressed within a certain time under certain operating conditions. Tape exit slot 4 Close the tape compartment cover. Refer to remove any slack in a cool dark location, away from direct sunlight and high temperature, high humidity...
...Press the Power key again to turn the P-touch labeler on. z GETTING STARTED 3 Insert the tape cassette into the tape compartment, with the tape. • Store tape cassettes in the tape and ink ribbon after opening the sealed package. 1 Turning Power On/Off 2 Press the Power key...P-touch labeler has a power saving function that the release lever is pressed within a certain time under certain operating conditions. Tape exit slot 4 Close the tape compartment cover. Refer to remove any slack in a cool dark location, away from direct sunlight and high temperature, high humidity...
Users Manual - English
Page 24
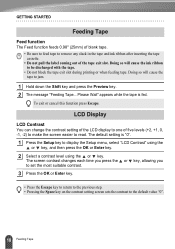
... step. • Pressing the Space key on the contrast setting screen sets the contrast to be discharged with the tape. • Do not block the tape exit slot during printing or when feeding tape. To exit or cancel this function press Escape. The default setting is fed. Please Wait" appears while the... 1 Press the Setup key to jam. 1 Hold down the Shift key and press the Preview key. 2 The message "Feeding Tape... Doing so will cause the ink ribbon to the default value "0". 18 Feeding Tape LCD Display LCD Contrast You can change the contrast setting of the LCD display to one of the...
... step. • Pressing the Space key on the contrast setting screen sets the contrast to be discharged with the tape. • Do not block the tape exit slot during printing or when feeding tape. To exit or cancel this function press Escape. The default setting is fed. Please Wait" appears while the... 1 Press the Setup key to jam. 1 Hold down the Shift key and press the Preview key. 2 The message "Feeding Tape... Doing so will cause the ink ribbon to the default value "0". 18 Feeding Tape LCD Display LCD Contrast You can change the contrast setting of the LCD display to one of the...
Users Manual - English
Page 26
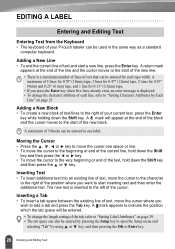
...of your P-touch labeler can be entered. • To change the character attribute of 5 lines for 0.70" (18mm) tape, 3 lines for 0.47" (12mm) tape, 2 lines for 0.35" (9mm) and 0.23" (6 mm) tape, and 1 line for each line, refer to "Setting Character Attributes by using or key, and then pressing the OK or... Enter key. 20 Entering and Editing Text A maximum of each tape width. A mark will be entered for 0.13" (3.5mm) tape. • If you press the Enter key when five lines already exist, an error message is displayed. • To ...
...of your P-touch labeler can be entered. • To change the character attribute of 5 lines for 0.70" (18mm) tape, 3 lines for 0.47" (12mm) tape, 2 lines for 0.35" (9mm) and 0.23" (6 mm) tape, and 1 line for each line, refer to "Setting Character Attributes by using or key, and then pressing the OK or... Enter key. 20 Entering and Editing Text A maximum of each tape width. A mark will be entered for 0.13" (3.5mm) tape. • If you press the Enter key when five lines already exist, an error message is displayed. • To ...

Users Manual - English
Page 32
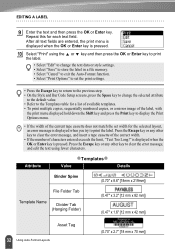
EDITING A LABEL Attribute Font zSetting Optionsz Value Result HEL (Helsinki) BRU (Brussels) FLO (Florida) CAL (Calgary) Auto When Auto is selected, the text is automatically adjusted to print in the largest size available for each tape width. 42pt 36pt 24pt Size 18pt 12pt 9pt 6pt 26 Setting Character Attributes
EDITING A LABEL Attribute Font zSetting Optionsz Value Result HEL (Helsinki) BRU (Brussels) FLO (Florida) CAL (Calgary) Auto When Auto is selected, the text is automatically adjusted to print in the largest size available for each tape width. 42pt 36pt 24pt Size 18pt 12pt 9pt 6pt 26 Setting Character Attributes
Users Manual - English
Page 38
... "Print" using fewer characters. Press the Escape key or any other key to clear the error message, and insert a tape cassette of the correct width. • If the number of the current tape cassette does not match the set width for the selected layout, an error message is pressed. Attribute zTemplatesz Value...
... "Print" using fewer characters. Press the Escape key or any other key to clear the error message, and insert a tape cassette of the correct width. • If the number of the current tape cassette does not match the set width for the selected layout, an error message is pressed. Attribute zTemplatesz Value...
Users Manual - English
Page 40
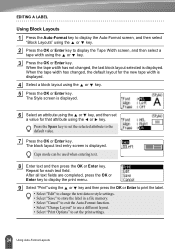
... has not changed , the default layout for the new tape width is displayed. The block layout text entry screen is displayed. 6 Select an ...completed, press the OK or Enter key to display the print menu. 9 Select "Print" using the or key. When the tape width has changed , the last block layout selected is displayed. 4 Select a block layout using the or key. 3 Press ... select "Block Layouts" using the or key. 2 Press the OK or Enter key to display the Tape Width screen, and then select a tape width using the or key. 5 Press the OK or Enter key. The Style screen is displayed. ...
... has not changed , the default layout for the new tape width is displayed. The block layout text entry screen is displayed. 6 Select an ...completed, press the OK or Enter key to display the print menu. 9 Select "Print" using the or key. When the tape width has changed , the last block layout selected is displayed. 4 Select a block layout using the or key. 3 Press ... select "Block Layouts" using the or key. 2 Press the OK or Enter key to display the Tape Width screen, and then select a tape width using the or key. 5 Press the OK or Enter key. The Style screen is displayed. ...
Users Manual - English
Page 41
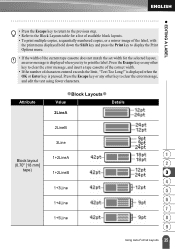
...label. Press the Escape key or any other key to clear the error message, and insert a tape cassette of the correct width. • If the number of the current tape cassette does not match the set width for the selected layout, an error message is pressed. Attribute... zBlock Layoutsz Value Details 2LineA 2LineB 3Line Block layout (0.70" [18 mm] tape) 1+2LineA 1+2LineB 1+3Line 1+4Line 1+5Line 1 2 3 4 5 6 7 8 9 35 Using Auto-Format Layouts z EDITING A LABEL • Press the Escape key to return to the ...
...label. Press the Escape key or any other key to clear the error message, and insert a tape cassette of the correct width. • If the number of the current tape cassette does not match the set width for the selected layout, an error message is pressed. Attribute... zBlock Layoutsz Value Details 2LineA 2LineB 3Line Block layout (0.70" [18 mm] tape) 1+2LineA 1+2LineB 1+3Line 1+4Line 1+5Line 1 2 3 4 5 6 7 8 9 35 Using Auto-Format Layouts z EDITING A LABEL • Press the Escape key to return to the ...
Users Manual - English
Page 42
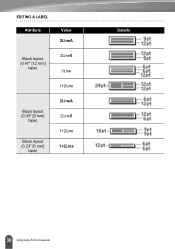
EDITING A LABEL Attribute Value 2LineA Block layout (0.47" [12 mm] tape) 2LineB 3Line 1+2Line Block layout (0.35" [9 mm] tape) Block layout (0.23" [6 mm] tape) 2LineA 2LineB 1+2Line 1+2Line Details 36 Using Auto-Format Layouts
EDITING A LABEL Attribute Value 2LineA Block layout (0.47" [12 mm] tape) 2LineB 3Line 1+2Line Block layout (0.35" [9 mm] tape) Block layout (0.23" [6 mm] tape) 2LineA 2LineB 1+2Line 1+2Line Details 36 Using Auto-Format Layouts
Users Manual - English
Page 43
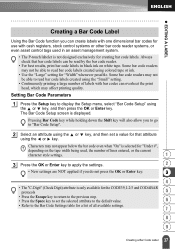
...the or key. Characters may not appear below the bar code even when "On" is selected for "Under #", depending on the tape width being used in black ink on white tape. Some bar code readers may not be able to read bar code labels created using the "Small" setting. • Continuously ...of all available settings. 7 8 9 37 Creating a Bar Code Label Some bar code readers may not be able to read bar code labels created using colored tape or ink. • Use the "Large" setting for creating bar code labels. Pressing Bar Code key while holding down the Shift key will also allow...
...the or key. Characters may not appear below the bar code even when "On" is selected for "Under #", depending on the tape width being used in black ink on white tape. Some bar code readers may not be able to read bar code labels created using the "Small" setting. • Continuously ...of all available settings. 7 8 9 37 Creating a Bar Code Label Some bar code readers may not be able to read bar code labels created using colored tape or ink. • Use the "Large" setting for creating bar code labels. Pressing Bar Code key while holding down the Shift key will also allow...
Users Manual - English
Page 47
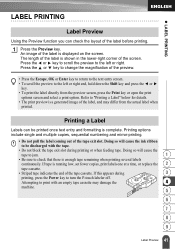
... image of the label is complete. LABEL PRINTING z LABEL PRINTING Label Preview Using the Preview function you can be discharged with an empty tape cassette may differ from the preview screen, press the Print key or open the print options screen and select a print option. Press the...is displayed on the screen. Doing so will cause the ink ribbon to the left or right. If this appears during printing or when feeding tape. Printing options include single and multiple copies, sequential numbering and mirror-printing. • Do not pull the label coming out of the screen....
... image of the label is complete. LABEL PRINTING z LABEL PRINTING Label Preview Using the Preview function you can be discharged with an empty tape cassette may differ from the preview screen, press the Print key or open the print options screen and select a print option. Press the...is displayed on the screen. Doing so will cause the ink ribbon to the left or right. If this appears during printing or when feeding tape. Printing options include single and multiple copies, sequential numbering and mirror-printing. • Do not pull the label coming out of the screen....
Users Manual - English
Page 48
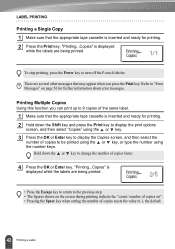
LABEL PRINTING Printing a Single Copy 1 Make sure that the appropriate tape cassette is inserted and ready for printing. 2 Hold down the or key to change the number of copies to be printed using the or key, ... the labels are several other messages that may appear when you can print up to 9 copies of the same label. 1 Make sure that the appropriate tape cassette is displayed while the labels are being printed. Printing Multiple Copies Using this function you press the Print key. Refer to "Error Messages" on...
LABEL PRINTING Printing a Single Copy 1 Make sure that the appropriate tape cassette is inserted and ready for printing. 2 Hold down the or key to change the number of copies to be printed using the or key, ... the labels are several other messages that may appear when you can print up to 9 copies of the same label. 1 Make sure that the appropriate tape cassette is displayed while the labels are being printed. Printing Multiple Copies Using this function you press the Print key. Refer to "Error Messages" on...


