

Accessory Catalog
Page 4
... the clamp screw with just right pressure. 1. Requires Low Shank Adapter for ULT series, PC-6500, PC-8200 and PC-8500 sewing machines. Brother General Sewing Accessories 05 Sew as you like. Screw on the presser foot. 4. Loosen the clamp screw at the back of zipper/piping, and presses the ...avoiding the non-flat parts of the presser foot and slide the presser foot so that the needle fits on the opening on the presser foot and select a straight stitch (left or right. 3. Use these utility presser feet and accessories to add a professional finish to your sewing projects. Sew.
... the clamp screw with just right pressure. 1. Requires Low Shank Adapter for ULT series, PC-6500, PC-8200 and PC-8500 sewing machines. Brother General Sewing Accessories 05 Sew as you like. Screw on the presser foot. 4. Loosen the clamp screw at the back of zipper/piping, and presses the ...avoiding the non-flat parts of the presser foot and slide the presser foot so that the needle fits on the opening on the presser foot and select a straight stitch (left or right. 3. Use these utility presser feet and accessories to add a professional finish to your sewing projects. Sew.

Accessory Catalog
Page 6
...with the wrong side facing up under the presser foot. 2. Position the edge of the fabric. 4. Overlock Foot For vertical bobbin machines only. Increase upper thread tension. 2. Lower the needle into the fabric approximately 1/8" from fraying. 1. Hold the fabric from the back... approximately 1/8" from the back and front and roll it into the curled part of the foot. 5. Brother General Sewing Accessories 09 Narrow Hemmer Foot Non Stick Foot Overlock Foot Picot Foot Brother General Sewing Accessories 10 SA126 ABCDEFJKMN SA127 GHILOP Skirt Innov-is Project Book (See page...
...with the wrong side facing up under the presser foot. 2. Position the edge of the fabric. 4. Overlock Foot For vertical bobbin machines only. Increase upper thread tension. 2. Lower the needle into the fabric approximately 1/8" from fraying. 1. Hold the fabric from the back... approximately 1/8" from the back and front and roll it into the curled part of the foot. 5. Brother General Sewing Accessories 09 Narrow Hemmer Foot Non Stick Foot Overlock Foot Picot Foot Brother General Sewing Accessories 10 SA126 ABCDEFJKMN SA127 GHILOP Skirt Innov-is Project Book (See page...

Operation Manual
Page 2
... be left unattended when plugged in this sewing machine only for its intended use bent needles. 13. Always unplug the sewing machine from the accumulation of burns, fire, electric shock, or injury to break. 14. The sewing machine should always be followed, including the following: "Read all moving parts. Return the sewing machine to break. 12. Replace bulb with...
... be left unattended when plugged in this sewing machine only for its intended use bent needles. 13. Always unplug the sewing machine from the accumulation of burns, fire, electric shock, or injury to break. 14. The sewing machine should always be followed, including the following: "Read all moving parts. Return the sewing machine to break. 12. Replace bulb with...
Operation Manual
Page 7
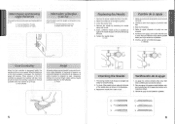
... side facing the back. 6. CD Coin Cambio de la aguja 1. Retire la aguja, aflojando el tornfflo con una moneda. 5. lntroduzca otra aguja, con la parte redonda cara a usted. Vuelva a apretar el tomillo de la aguja. 0 Moneda , KN • .3S•33• Foot Controller When the foot... adentro posible hasta que toque arriba con el pasador. 6. When the pressure on the foot controller when the machine is increased, the machine's speed will run at a low speed. The sewing needle must always be taken that nothing is placed on the foot controller is not in the illustration. 3. ...
... side facing the back. 6. CD Coin Cambio de la aguja 1. Retire la aguja, aflojando el tornfflo con una moneda. 5. lntroduzca otra aguja, con la parte redonda cara a usted. Vuelva a apretar el tomillo de la aguja. 0 Moneda , KN • .3S•33• Foot Controller When the foot... adentro posible hasta que toque arriba con el pasador. 6. When the pressure on the foot controller when the machine is increased, the machine's speed will run at a low speed. The sewing needle must always be taken that nothing is placed on the foot controller is not in the illustration. 3. ...

Operation Manual
Page 15
... WING Y • U - Move the threader to deliver the thread through the eye of the machine straight behind the presser foot. Sacar unos 5 cm (2') de hilo por la aguja. The upper thread... back of the needle. ® Hook Uso del enhebrador Sepuede usarelenhebradorpara enhebrarla aguja mas facilmente. 1. SEWING M CHINE C•N•ZC•1 aNIHOVIA1 aNINGS Elf10A ONIMONN I * - • Using Needle ... de los hilos y paselos entre los salientes del prensatelas, a la derecha, hacia la parte posterior de la maquina. NOTE: Some needle/thread combinations will come up again to the...
... WING Y • U - Move the threader to deliver the thread through the eye of the machine straight behind the presser foot. Sacar unos 5 cm (2') de hilo por la aguja. The upper thread... back of the needle. ® Hook Uso del enhebrador Sepuede usarelenhebradorpara enhebrarla aguja mas facilmente. 1. SEWING M CHINE C•N•ZC•1 aNIHOVIA1 aNINGS Elf10A ONIMONN I * - • Using Needle ... de los hilos y paselos entre los salientes del prensatelas, a la derecha, hacia la parte posterior de la maquina. NOTE: Some needle/thread combinations will come up again to the...

Operation Manual
Page 19
...para los tejidos elasticos. 29 30 C) Thread cutter 5. Pare la maquina. 2. Corte ambos hilos con el cortador ubicado en la parte izquierda de la maquina. Select the Zigzag Stitch then set the stitch length in the "F" range and set in its highest position..."F" y ajuste el ancho deseado. Levante el prensatelas y saque suavemente el tejido por la izquierda. 4. Stop the machine. 2. Triple Stretch Stitch is recommended to sew using the Pattern Selection Dial. OVZOIZ A SVIDal SVCIVINticl ONIH0ILLS OVZOIZ aNv IHDIVELLS STRAIGHT AND ZIGZAG STITCHING PUNTADAS RECTAS Y ...
...para los tejidos elasticos. 29 30 C) Thread cutter 5. Pare la maquina. 2. Corte ambos hilos con el cortador ubicado en la parte izquierda de la maquina. Select the Zigzag Stitch then set the stitch length in the "F" range and set in its highest position..."F" y ajuste el ancho deseado. Levante el prensatelas y saque suavemente el tejido por la izquierda. 4. Stop the machine. 2. Triple Stretch Stitch is recommended to sew using the Pattern Selection Dial. OVZOIZ A SVIDal SVCIVINticl ONIH0ILLS OVZOIZ aNv IHDIVELLS STRAIGHT AND ZIGZAG STITCHING PUNTADAS RECTAS Y ...


