
Installation Guide for KIT CW PRCW1
Page 6
... embroidery can be ironed, such as organza, place water-soluble stabilizer above and below the fabric, and secure the fabric and stabilizer sandwiched within the hoops of the supplied DVD. Instructional movies are included on PC" in the chapter index of the embroidery frame. For details on the pattern, water-soluble...
... embroidery can be ironed, such as organza, place water-soluble stabilizer above and below the fabric, and secure the fabric and stabilizer sandwiched within the hoops of the supplied DVD. Instructional movies are included on PC" in the chapter index of the embroidery frame. For details on the pattern, water-soluble...

Upgrade KIT CW Operation Manual PRCW1
Page 16
... toward you so that is used, some areas may not be fully cut edges will be cleaned up without stretching the fabric. CREATING CUTWORK b Securely hoop the fabric with satin stitching, use scissors to remove excess threads which will create a cleaner finish. • On the 10-needle machine, touch , and then...
... toward you so that is used, some areas may not be fully cut edges will be cleaned up without stretching the fabric. CREATING CUTWORK b Securely hoop the fabric with satin stitching, use scissors to remove excess threads which will create a cleaner finish. • On the 10-needle machine, touch , and then...

Upgrade KIT CW Operation Manual PRCW1
Page 34
... error message appears, set the machine to Cutwork mode. z Use a larger embroidery frame to Cutwork Mode" on page 11. For details, refer to "Switching to hoop the fabric (when a larger frame is available for a cutwork pattern or appliqué piece exceeds the embroidering area z Select a different pattern.
... error message appears, set the machine to Cutwork mode. z Use a larger embroidery frame to Cutwork Mode" on page 11. For details, refer to "Switching to hoop the fabric (when a larger frame is available for a cutwork pattern or appliqué piece exceeds the embroidering area z Select a different pattern.

Operation Manual
Page 11
... away from the material when thread trimming and when changing thread colors (moving to the different needles to be freely determined after the fabric is hooped and the embroidery frame is attached to the machine, regardless of how the fabric is reduced. ■ Automatically pulls and holds the thread tails to...
... away from the material when thread trimming and when changing thread colors (moving to the different needles to be freely determined after the fabric is hooped and the embroidery frame is attached to the machine, regardless of how the fabric is reduced. ■ Automatically pulls and holds the thread tails to...

Operation Manual
Page 16
... in the Embroidery Frame 47 Hooping the fabric in the embroidery frame 47 Attaching the Embroidery Frame to the Machine 49 Attaching the embroidery frame ...49 Checking the Embroidery Area 51 ... the needle...86 Correctly Using the Embroidery Frames 88 Embroidery frame types and applications ...88 Attaching Iron-On Stabilizer (Backing) to Fabric 90 Hooping the Fabric...91 Hooping the fabric in the extra-large and large embroidery frames 91 Using the embroidery sheet...92 Large/small pieces of fabric ...93 Embroidery Frame...
... in the Embroidery Frame 47 Hooping the fabric in the embroidery frame 47 Attaching the Embroidery Frame to the Machine 49 Attaching the embroidery frame ...49 Checking the Embroidery Area 51 ... the needle...86 Correctly Using the Embroidery Frames 88 Embroidery frame types and applications ...88 Attaching Iron-On Stabilizer (Backing) to Fabric 90 Hooping the Fabric...91 Hooping the fabric in the extra-large and large embroidery frames 91 Using the embroidery sheet...92 Large/small pieces of fabric ...93 Embroidery Frame...
Operation Manual
Page 18
... a mark on the fabric 218 Color thread table ...220 Colors of Tajima (.dst) embroidery data ...220 Creating Beautiful Embroidery 221 Threads ...221 Stabilizers (backing) ...222 Hooping techniques...223 Fabric/stabilizer compatibility chart ...224 OPTIONAL ACCESSORIES 225 Using the Optional Cap Frame 225 Cap frame and its accessories...225 Types of caps...
... a mark on the fabric 218 Color thread table ...220 Colors of Tajima (.dst) embroidery data ...220 Creating Beautiful Embroidery 221 Threads ...221 Stabilizers (backing) ...222 Hooping techniques...223 Fabric/stabilizer compatibility chart ...224 OPTIONAL ACCESSORIES 225 Using the Optional Cap Frame 225 Cap frame and its accessories...225 Types of caps...

Operation Manual
Page 33
... Pattern ....... 44 Continuing to the embroidering settings screen 44 5.Specifying Embroidering Setting...... 45 6.Previewing the Image 46 Checking a preview image 46 7.Hooping the Fabric in the Embroidery Frame 47 Hooping the fabric in order-from turning on the machine and sewing a pattern to embroider a pattern and master the operation of the tutorial...
... Pattern ....... 44 Continuing to the embroidering settings screen 44 5.Specifying Embroidering Setting...... 45 6.Previewing the Image 46 Checking a preview image 46 7.Hooping the Fabric in the Embroidery Frame 47 Hooping the fabric in order-from turning on the machine and sewing a pattern to embroider a pattern and master the operation of the tutorial...

Operation Manual
Page 37
... editing the patterns, and refer to function properly. p. 69 The operations to 78. Basic Procedures Basic embroidering procedures are described on the following pages. p. 46 7 Hoop the fabric in order for quick reference. p. 47 p. 34 8 Attach the embroidery frame to start 11 embroidering. (Once embroidering is completed, the machine automatically stops...
... editing the patterns, and refer to function properly. p. 69 The operations to 78. Basic Procedures Basic embroidering procedures are described on the following pages. p. 46 7 Hoop the fabric in order for quick reference. p. 47 p. 34 8 Attach the embroidery frame to start 11 embroidering. (Once embroidering is completed, the machine automatically stops...

Operation Manual
Page 49
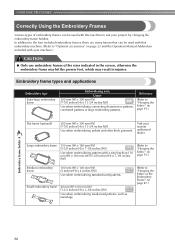
...On Stabilizer (Backing) to use an embroidery frame of embroidery frames indicated in the embroidery frame. Select the appropriate frame, and hoop the fabric and stabilizer in the Embroidery Frame After selecting the pattern to sew the pattern. Note ● The embroidery frame ... × 300 mm (W) (7-7/8 inches (H) × 11-3/4 inches (W)) Large embroidery frame 130 mm (H) × 180 mm (W) (5-1/8 inches (H) × 7-1/8 inches (W)) Hooping the fabric in the embroidery frame Select an embroidery frame. 1 From the sizes of the most suitable size. For details on the uses for each...
...On Stabilizer (Backing) to use an embroidery frame of embroidery frames indicated in the embroidery frame. Select the appropriate frame, and hoop the fabric and stabilizer in the Embroidery Frame After selecting the pattern to sew the pattern. Note ● The embroidery frame ... × 300 mm (W) (7-7/8 inches (H) × 11-3/4 inches (W)) Large embroidery frame 130 mm (H) × 180 mm (W) (5-1/8 inches (H) × 7-1/8 inches (W)) Hooping the fabric in the embroidery frame Select an embroidery frame. 1 From the sizes of the most suitable size. For details on the uses for each...
Operation Manual
Page 50
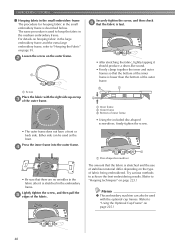
..., firmly tighten the screw. • Be sure that there are no wrinkles in the large embroidery frame and the extra-large embroidery frame, refer to "Hooping techniques" on the outer frame. 2 Securely tighten the screw, and then check 6 that the bottom of the inner frame is used to "Using the ...Optional Cap Frame" on page 91. Try various methods to achieve the best embroidering results. (Refer to "Hooping the Fabric" on page 225.) 48 The same procedure is lower than the bottom of the outer frame. 1 Screw Place the fabric with the optional...
..., firmly tighten the screw. • Be sure that there are no wrinkles in the large embroidery frame and the extra-large embroidery frame, refer to "Hooping techniques" on the outer frame. 2 Securely tighten the screw, and then check 6 that the bottom of the inner frame is used to "Using the ...Optional Cap Frame" on page 91. Try various methods to achieve the best embroidering results. (Refer to "Hooping the Fabric" on page 225.) 48 The same procedure is lower than the bottom of the outer frame. 1 Screw Place the fabric with the optional...

Operation Manual
Page 51
... the embroidery frame. 2 Clip on the 1 embroidery frame holder. If the screw is flashing in the bobbin. Attaching the Embroidery Frame to the Machine After hooping the fabric in red. Loosen the two thumb screws on embroidery frame holder. If the start sewing. 8. CAUTION ● If the embroidery frame is lit...
... the embroidery frame. 2 Clip on the 1 embroidery frame holder. If the screw is flashing in the bobbin. Attaching the Embroidery Frame to the Machine After hooping the fabric in red. Loosen the two thumb screws on embroidery frame holder. If the start sewing. 8. CAUTION ● If the embroidery frame is lit...

Operation Manual
Page 87
... Replacing the needle 86 Correctly Using the Embroidery Frames 88 Embroidery frame types and applications 88 Attaching Iron-On Stabilizer (Backing) to Fabric 90 Hooping the Fabric 91 Hooping the fabric in chapter 2, such as sewing a pattern with Designs of Seven or More Colors 103 Change thread spools message 103 Easily changing...
... Replacing the needle 86 Correctly Using the Embroidery Frames 88 Embroidery frame types and applications 88 Attaching Iron-On Stabilizer (Backing) to Fabric 90 Hooping the Fabric 91 Hooping the fabric in chapter 2, such as sewing a pattern with Designs of Seven or More Colors 103 Change thread spools message 103 Easily changing...
Operation Manual
Page 90
...frame 40 mm (H) × 60 mm (W) (1-1/2 inches (H) × 2-3/8 inches (W)) Use when embroidering small-sized patterns, such as nametags. (Refer to "Hooping the Fabric" on page 91.) Medium embroidery frame 100 mm (H) × 100 mm (W) (4 inches (H) × 4 inches (W)) Use when embroidering standard-sized...many frames that can be used with a size less than 130 mm (H) × 180 mm (W) (5-1/8 inches (H) × 7-1/8 inches (W)) (Refer to "Hooping the Fabric" on page 91.) Flat frame (optional) A 200 mm (H) × 300 mm (W) (7-7/8 inches (H) × 11-3/4 inches (W)) Use when ...
...frame 40 mm (H) × 60 mm (W) (1-1/2 inches (H) × 2-3/8 inches (W)) Use when embroidering small-sized patterns, such as nametags. (Refer to "Hooping the Fabric" on page 91.) Medium embroidery frame 100 mm (H) × 100 mm (W) (4 inches (H) × 4 inches (W)) Use when embroidering standard-sized...many frames that can be used with a size less than 130 mm (H) × 180 mm (W) (5-1/8 inches (H) × 7-1/8 inches (W)) (Refer to "Hooping the Fabric" on page 91.) Flat frame (optional) A 200 mm (H) × 300 mm (W) (7-7/8 inches (H) × 11-3/4 inches (W)) Use when ...

Operation Manual
Page 92
... steam iron, affix the iron-on page 222. 90 Note ● Use a piece of iron-on stabilizer (backing) that is difficult to iron, hoop a layer of the iron-on stabilizer (backing) under the fabric in the embroidery frame without ironing it. 1 Area of embroidery frame 2 Iron-on ...stabilizer (backing) Memo ● When embroidering thin fabrics, such as towels or corduroy, hoop a layer of iron-on stabilizer (backing) under the fabric in the fabric. 1 Adhesive side of iron-on stabilizer (backing) be used while embroidering,...
... steam iron, affix the iron-on page 222. 90 Note ● Use a piece of iron-on stabilizer (backing) that is difficult to iron, hoop a layer of the iron-on stabilizer (backing) under the fabric in the embroidery frame without ironing it. 1 Area of embroidery frame 2 Iron-on ...stabilizer (backing) Memo ● When embroidering thin fabrics, such as towels or corduroy, hoop a layer of iron-on stabilizer (backing) under the fabric in the fabric. 1 Adhesive side of iron-on stabilizer (backing) be used while embroidering,...

Operation Manual
Page 93
... sound. • Firmly clamp together the inner and outer frames so that the fabric is taut, insert the inner frame at corner B. Hooping the Fabric 91 Hooping the Fabric Hooping the fabric in the extra-large and large embroidery frames Loosen the screw on top of inner and outer frames are even •...
... sound. • Firmly clamp together the inner and outer frames so that the fabric is taut, insert the inner frame at corner B. Hooping the Fabric 91 Hooping the Fabric Hooping the fabric in the extra-large and large embroidery frames Loosen the screw on top of inner and outer frames are even •...

Operation Manual
Page 94
... or wrinkles. 92 Press the inner frame into the outer frame. 4 Remove the embroidery sheet. OTHER BASIC PROCEDURES Using the embroidery sheet In order to hoop the fabric so that the pattern will be sewn in the frame.
... or wrinkles. 92 Press the inner frame into the outer frame. 4 Remove the embroidery sheet. OTHER BASIC PROCEDURES Using the embroidery sheet In order to hoop the fabric so that the pattern will be sewn in the frame.

Operation Manual
Page 95
...fabric, such as ribbon When embroidering narrow pieces of fabric, use spray fabric adhesive to attach the fabric to stabilizer (backing), and then hoop the stabilizer (backing) in the embroidery frame. With fabrics where you do not wish to use spray adhesive, clamp both ends of the... the corner of a piece of fabric, use spray fabric adhesive to attach the corner of the fabric to stabilizer (backing), and then hoop the stabilizer (backing) in the embroidery frame. Embroidering with the stabilizer (backing), in the embroidery frame. 1 Ribbon 2 Stabilizer (backing) 1 Fabric 2...
...fabric, such as ribbon When embroidering narrow pieces of fabric, use spray fabric adhesive to attach the fabric to stabilizer (backing), and then hoop the stabilizer (backing) in the embroidery frame. With fabrics where you do not wish to use spray adhesive, clamp both ends of the... the corner of a piece of fabric, use spray fabric adhesive to attach the corner of the fabric to stabilizer (backing), and then hoop the stabilizer (backing) in the embroidery frame. Embroidering with the stabilizer (backing), in the embroidery frame. 1 Ribbon 2 Stabilizer (backing) 1 Fabric 2...

Operation Manual
Page 98
... area moves in the same direction of the arrow. In addition, the angle of the entire pattern can be adjusted if the fabric cannot be hooped evenly within the embroidery frame and the pattern is purchased, it was adjusted so that the beginning of the stitching was from the center of...
... area moves in the same direction of the arrow. In addition, the angle of the entire pattern can be adjusted if the fabric cannot be hooped evenly within the embroidery frame and the pattern is purchased, it was adjusted so that the beginning of the stitching was from the center of...

Operation Manual
Page 101
... embroidering items, such as bags and tubular items, that have limitations to the machine. This will prevent the neck of the T-shirt, not from being hooped in the embroidery frame. also, this operation, fine adjustments can be made to the left before embroidering. 3 Example: When embroidering a T-shirt Rotate the pattern 180...
... embroidering items, such as bags and tubular items, that have limitations to the machine. This will prevent the neck of the T-shirt, not from being hooped in the embroidery frame. also, this operation, fine adjustments can be made to the left before embroidering. 3 Example: When embroidering a T-shirt Rotate the pattern 180...

Operation Manual
Page 120
... ● When is touched, the pattern is moved to the desired position. ● An appliqué piece cannot be used as the appliqué piece. Hoop the appliqué fabric in the embroidery 7 frame, attach the embroidery frame to the color of pattern placement on the garment, and appliqué stitching...
... ● When is touched, the pattern is moved to the desired position. ● An appliqué piece cannot be used as the appliqué piece. Hoop the appliqué fabric in the embroidery 7 frame, attach the embroidery frame to the color of pattern placement on the garment, and appliqué stitching...


