

Users Manual - English
Page 2
..., this sewing machine. G Keep fingers away from the accumulation of electric shock: including the following: G The sewing machine should always be used as threading the needle, changing the needle, threading the bobbin or changing the presser foot etc. G Turn off , then remove plug from... the electrical outlet immediately after using ." G Young children should be left unattended while plugged in a polarized outlet only one way. This appliance has a polarized plug (one blade...
..., this sewing machine. G Keep fingers away from the accumulation of electric shock: including the following: G The sewing machine should always be used as threading the needle, changing the needle, threading the bobbin or changing the presser foot etc. G Turn off , then remove plug from... the electrical outlet immediately after using ." G Young children should be left unattended while plugged in a polarized outlet only one way. This appliance has a polarized plug (one blade...

Users Manual - English
Page 3
Always replace the fuse cover, never use a fuse approved by ASTA to the terminal which is marked with the coloured markings identifying the terminals in your sewing machine is fitted with the ... the plug supplied with this appliance may not correspond with the letter 'N' or coloured black or blue. In the event of replacing the plug fuse, use plugs with a three-pin non-rewireable BS plug then please read the following code: Blue Neutral Brown Live As the colours of this equipment, it...
Always replace the fuse cover, never use a fuse approved by ASTA to the terminal which is marked with the coloured markings identifying the terminals in your sewing machine is fitted with the ... the plug supplied with this appliance may not correspond with the letter 'N' or coloured black or blue. In the event of replacing the plug fuse, use plugs with a three-pin non-rewireable BS plug then please read the following code: Blue Neutral Brown Live As the colours of this equipment, it...

Users Manual - English
Page 4
... G When storing your hands in the back of the finest sewing machines available for your nearest authorized Brother service center. If the problem persists, please consult your authorised Brother service center visit www.brother.com and use our convenient dealer locator. G Plug the machine directly into it, we suggest that a malfunction occurs or adjustment...
... G When storing your hands in the back of the finest sewing machines available for your nearest authorized Brother service center. If the problem persists, please consult your authorised Brother service center visit www.brother.com and use our convenient dealer locator. G Plug the machine directly into it, we suggest that a malfunction occurs or adjustment...

Users Manual - English
Page 5
... Adjustment Knob 5 Changing Needles and Light Bulb 6 Changing the Needle 6 Changing the Feed Pin 6 Changing Light Bulbs 6 Threading 7 Bobbin Winding 7 Bobbin Insertion 9 Upper Threading 10 Using the Automatic Needle Threader 10 Stitch Samples and Needle Chart 12 Stitch Samples 12 Thread Tension 12 Changing Presser Feet 13 Changing Presser Feet (Zipper...
... Adjustment Knob 5 Changing Needles and Light Bulb 6 Changing the Needle 6 Changing the Feed Pin 6 Changing Light Bulbs 6 Threading 7 Bobbin Winding 7 Bobbin Insertion 9 Upper Threading 10 Using the Automatic Needle Threader 10 Stitch Samples and Needle Chart 12 Stitch Samples 12 Thread Tension 12 Changing Presser Feet 13 Changing Presser Feet (Zipper...

Users Manual - English
Page 6
...-001 112797-001 148475-001 XA7258-001 XA7255-201 XA7253-001 XA7256-001 XC1220-051 XC1387-051 Note Foot controller: Model P This foot controller is used for sewing machine model PQ1500S. 1 Accessories 1 2 3 4 5 6 7 8 9 10 11 12 13 14 15 16 17 18 19 20 21 22 No...
...-001 112797-001 148475-001 XA7258-001 XA7255-201 XA7253-001 XA7256-001 XC1220-051 XC1387-051 Note Foot controller: Model P This foot controller is used for sewing machine model PQ1500S. 1 Accessories 1 2 3 4 5 6 7 8 9 10 11 12 13 14 15 16 17 18 19 20 21 22 No...

Users Manual - English
Page 8
...and bobbin threads will then meet on wrong side of the fabric. Upper Thread Tension Loosen Tighten Tension Block Hand Wheel G Position needle using stitch regulator dial. 67 23 Stitch Length Reference Mark 1 Lower number = shorter stitches Higher number = longer stitches 45 Reverse Stitch Lever... G Sewing in reverse is possible when the reverse stitch lever is used for sewing machine model PQ1500S. Note Foot controller: Model P This foot controller is in cord. G To switch power off, flip switch ...
...and bobbin threads will then meet on wrong side of the fabric. Upper Thread Tension Loosen Tighten Tension Block Hand Wheel G Position needle using stitch regulator dial. 67 23 Stitch Length Reference Mark 1 Lower number = shorter stitches Higher number = longer stitches 45 Reverse Stitch Lever... G Sewing in reverse is possible when the reverse stitch lever is used for sewing machine model PQ1500S. Note Foot controller: Model P This foot controller is in cord. G To switch power off, flip switch ...

Users Manual - English
Page 9
...foot easily, leaving both your hands free. Pressure Indicator Needle Fabric Extension Table G Lower table feet and attach fabric extension table as shown in use, it can rest at the bottom of the fabric extension table. 4 Presser Foot Lift Lever Knee Lift Fabric Extension Table Knee Lift Presser Foot... the amount of pressure on the presser foot changes. Presser Foot Pressure Adjustment Dial ✽ See "Thread Tension" on page 5. Knee Lift G Using the convenient knee lift to position the fabric. Setting up the knee lift. ✽ Push the knee lift bar all the way into the socket...
...foot easily, leaving both your hands free. Pressure Indicator Needle Fabric Extension Table G Lower table feet and attach fabric extension table as shown in use, it can rest at the bottom of the fabric extension table. 4 Presser Foot Lift Lever Knee Lift Fabric Extension Table Knee Lift Presser Foot... the amount of pressure on the presser foot changes. Presser Foot Pressure Adjustment Dial ✽ See "Thread Tension" on page 5. Knee Lift G Using the convenient knee lift to position the fabric. Setting up the knee lift. ✽ Push the knee lift bar all the way into the socket...
Users Manual - English
Page 11
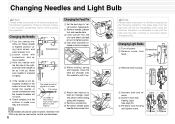
... bent. Changing Needles and Light Bulb Note Please make sure power is off before carrying out the following operations. Raise needle to highest position using the machine, therefore it is in its highest position. 4 Insert small screwdriver (included) as shown in diagram. 5 While holding spring with..., and insert the needle as far as the needle plate or a plate of injury if the machine accidentally starts running during this may also be used under normal circumstances. 6 Changing the Feed Pin 1 Set the feed dogs to "velvet" position. (See page 5.) 2 Remove needle, presser foot and ...
... bent. Changing Needles and Light Bulb Note Please make sure power is off before carrying out the following operations. Raise needle to highest position using the machine, therefore it is in its highest position. 4 Insert small screwdriver (included) as shown in diagram. 5 While holding spring with..., and insert the needle as far as the needle plate or a plate of injury if the machine accidentally starts running during this may also be used under normal circumstances. 6 Changing the Feed Pin 1 Set the feed dogs to "velvet" position. (See page 5.) 2 Remove needle, presser foot and ...
Users Manual - English
Page 12
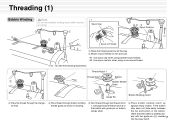
... notch. Threading (1) Bobbin Winding Note Do not move bobbin winding clutch while machine is seated prop- 7 erly with guide pin on the spool pin. ✽1 Use spool cap when using parallel-wound thread. ✽2 Use spool cushion when using cross-wound thread. 5 - 0: See the following illustrations.
... notch. Threading (1) Bobbin Winding Note Do not move bobbin winding clutch while machine is seated prop- 7 erly with guide pin on the spool pin. ✽1 Use spool cap when using parallel-wound thread. ✽2 Use spool cushion when using cross-wound thread. 5 - 0: See the following illustrations.
Users Manual - English
Page 14
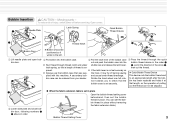
... lower thread breakage. posed. ✽ If the latch lever is ex- To reduce risk of pulling out the thread can set securely on ✽ Always use the bobbin case that was sup- Bobbin Insertion CAUTION - Moving parts - Open covers. 1 Needle Plate Latch Spring Quick Bobbin Thread Device 1 2 Thread Notch Bobbin Door...
... lower thread breakage. posed. ✽ If the latch lever is ex- To reduce risk of pulling out the thread can set securely on ✽ Always use the bobbin case that was sup- Bobbin Insertion CAUTION - Moving parts - Open covers. 1 Needle Plate Latch Spring Quick Bobbin Thread Device 1 2 Thread Notch Bobbin Door...
Users Manual - English
Page 15
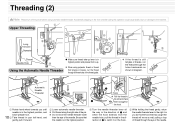
...position. 4 Turn the needle threader lever all three holes of the needle. Threading (2) Note Please turn off the power before using polyester thread or thread that tangles or breaks, run the thread through the holes backwards as well, pulling a loop of thread..., return the needle threader lever to the machine. Upper Threading 1 7 Long Groove Depression 6 8 4 2 3 5 1 6 7 2 4 3 5 8 9 0 A Thread Needle Hole 9 0 A Using the Automatic Needle Threader G Make sure thread take-up lever is in highest position and presser foot is still tangles or breaks, run the thread...
...position. 4 Turn the needle threader lever all three holes of the needle. Threading (2) Note Please turn off the power before using polyester thread or thread that tangles or breaks, run the thread through the holes backwards as well, pulling a loop of thread..., return the needle threader lever to the machine. Upper Threading 1 7 Long Groove Depression 6 8 4 2 3 5 1 6 7 2 4 3 5 8 9 0 A Thread Needle Hole 9 0 A Using the Automatic Needle Threader G Make sure thread take-up lever is in highest position and presser foot is still tangles or breaks, run the thread...

Users Manual - English
Page 16
Needle (HLX5) #9 #11 #14 #16 Thread #20 #30 #50 #60 #20 #30 #20 #30 #20 G The automatic needle threader cannot be used regardless of the chart, providing the needle used with the threadneedle combinations illustrated in the chart to the right. 11 Transparent nylon thread can be used is a #14 or #16. 6 Pull thread loop to the left.
Needle (HLX5) #9 #11 #14 #16 Thread #20 #30 #50 #60 #20 #30 #20 #30 #20 G The automatic needle threader cannot be used regardless of the chart, providing the needle used with the threadneedle combinations illustrated in the chart to the right. 11 Transparent nylon thread can be used is a #14 or #16. 6 Pull thread loop to the left.

Users Manual - English
Page 17
...10045; When sewing on the foot controller to their highest positions. 6 Lift presser foot, remove fabric and then cut thread. ✽ When using thread cutter: 5 Press the thread cutter button while the presser foot lever in raised position, insert a test strip from the garment fabric ...Light weight fabrics Middle weight fabrics Heavy weight fabrics Fabric - While needle is week to increase bobbin tension G Selecting the proper needle for use with the fabric and thread you to raise the needle and thread take-up .) Adjust the upper thread to reduce bobbin tension Bobbin tension ...
...10045; When sewing on the foot controller to their highest positions. 6 Lift presser foot, remove fabric and then cut thread. ✽ When using thread cutter: 5 Press the thread cutter button while the presser foot lever in raised position, insert a test strip from the garment fabric ...Light weight fabrics Middle weight fabrics Heavy weight fabrics Fabric - While needle is week to increase bobbin tension G Selecting the proper needle for use with the fabric and thread you to raise the needle and thread take-up .) Adjust the upper thread to reduce bobbin tension Bobbin tension ...

Users Manual - English
Page 18
... dress shirts, to needle. ✽ Only the zipper foot has a position knob. Use of fabric, such as in relation to fold the edge of the fabric in three while sewing. G 1/4" Foot For quilt and patchwork piecing with the PQ series machines may damage or break the pin feed mechanism. Each foot is... specially designed for this machine and has clearance for the pin at the rear of foot in quilting. 13 G Rolled Hem Foot Use on the edge of other presser feet immediately...
... dress shirts, to needle. ✽ Only the zipper foot has a position knob. Use of fabric, such as in relation to fold the edge of the fabric in three while sewing. G 1/4" Foot For quilt and patchwork piecing with the PQ series machines may damage or break the pin feed mechanism. Each foot is... specially designed for this machine and has clearance for the pin at the rear of foot in quilting. 13 G Rolled Hem Foot Use on the edge of other presser feet immediately...

Users Manual - English
Page 19
... the way through the fabric, then step gently on the foot controller to lower the needle through fabric. 2 Lift presser foot, and turn fabric using needle as an axis. 3 Lower foot continue sewing. Basic Sewing (1) Basic Sewing Before sewing. Backstitches 1 cm Finish Sewing. ✽ When changing... cm 1 Lift foot, pull about 1 cm. 4 Raise needle to highest position. 5 Lift foot, remove fabric and cut thread. ✽ When using thread trimmer: 4 Push thread trimmer button (this will cause the upper and bobbin threads to be joined evenly by activating the pin feed mechanism. 1 Move...
... the way through the fabric, then step gently on the foot controller to lower the needle through fabric. 2 Lift presser foot, and turn fabric using needle as an axis. 3 Lower foot continue sewing. Basic Sewing (1) Basic Sewing Before sewing. Backstitches 1 cm Finish Sewing. ✽ When changing... cm 1 Lift foot, pull about 1 cm. 4 Raise needle to highest position. 5 Lift foot, remove fabric and cut thread. ✽ When using thread trimmer: 4 Push thread trimmer button (this will cause the upper and bobbin threads to be joined evenly by activating the pin feed mechanism. 1 Move...
Users Manual - English
Page 21
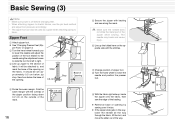
...Fold the seam margin with the stitches. 7 Change position of the way. Slide 0.5 cm " Stop Base of the zipper when sewing. It should be used as a guide when attaching piping to fabric. Zipper Foot 1 Attach zipper foot. ✽ See "Changing Presser Feet (Zip- Basic Sewing (3) Note •...; Make sure power is off before changing feet. • When attaching zippers to stretch fabrics, use the pin feed method and adjust foot pressure accordingly. • The zipper foot can also be set approximately 0.5 cm below the base of the ...
...Fold the seam margin with the stitches. 7 Change position of the way. Slide 0.5 cm " Stop Base of the zipper when sewing. It should be used as a guide when attaching piping to fabric. Zipper Foot 1 Attach zipper foot. ✽ See "Changing Presser Feet (Zip- Basic Sewing (3) Note •...; Make sure power is off before changing feet. • When attaching zippers to stretch fabrics, use the pin feed method and adjust foot pressure accordingly. • The zipper foot can also be set approximately 0.5 cm below the base of the ...

Users Manual - English
Page 22
... the presser foot groove, guide them to prevent them from falling over, and sew to begin, end, or pivot 1/4" from seam. Seam allowance (1/4", 6.4 mm) • Use guides (mark) to the base of the opening approximately 2 cm above the end of the zipper. 3 Baste the zipper position. Beginning of stitching Align this...
... the presser foot groove, guide them to prevent them from falling over, and sew to begin, end, or pivot 1/4" from seam. Seam allowance (1/4", 6.4 mm) • Use guides (mark) to the base of the opening approximately 2 cm above the end of the zipper. 3 Baste the zipper position. Beginning of stitching Align this...
Users Manual - English
Page 23
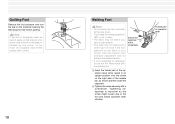
... screwdriver. Quilting Foot Reduce the foot pressure and turn the dial on the fabric is frequently used, be sure to apply a small amount of oil about once a month to keep the sewing speed low (500 r.p.m. Use the presser foot pressure adjustment dial to achieve the desired results. • It is applied, ...not advisable or necessary to the foot and forked operation lever vibration. Forked part 1 of the needle bar, as the screw might loosen due to use the Pin Feed mode with a cloth.) 18 Walking Foot Note • Do not press the foot controller all the way down. Note If the...
... screwdriver. Quilting Foot Reduce the foot pressure and turn the dial on the fabric is frequently used, be sure to apply a small amount of oil about once a month to keep the sewing speed low (500 r.p.m. Use the presser foot pressure adjustment dial to achieve the desired results. • It is applied, ...not advisable or necessary to the foot and forked operation lever vibration. Forked part 1 of the needle bar, as the screw might loosen due to use the Pin Feed mode with a cloth.) 18 Walking Foot Note • Do not press the foot controller all the way down. Note If the...

Users Manual - English
Page 24
Fabric Separator(for joining lining to fabric) ✽ Use this technique for sewing velvet and lining together. 1 Raise needle and foot. 2 Move separator so it sits under presser foot. 3 Make sure it is lined ... sewing feet and feed position to pin feeding position. 6 Pull thread until lower needle catches fabric. ✽ Sew 2-3 reinforcement stitches. 7 When not using the fabric separator. Needle Separator • Use the separator to neatly sew 2 hard to the side as illustrated in a perfect seam. Adjustment 19 Note • Lighten the presser foot...
Fabric Separator(for joining lining to fabric) ✽ Use this technique for sewing velvet and lining together. 1 Raise needle and foot. 2 Move separator so it sits under presser foot. 3 Make sure it is lined ... sewing feet and feed position to pin feeding position. 6 Pull thread until lower needle catches fabric. ✽ Sew 2-3 reinforcement stitches. 7 When not using the fabric separator. Needle Separator • Use the separator to neatly sew 2 hard to the side as illustrated in a perfect seam. Adjustment 19 Note • Lighten the presser foot...
Users Manual - English
Page 25
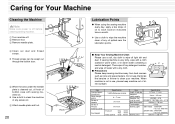
...a neutral detergent. I Precautions Please keep machine out of any detergent residue, and wipe off water with a cloth soaked in warm water, or in use, please keep sewing machine away from heat sources such as irons and space heaters. If sewing machine is very dirty, wipe with a dry cloth. ... cleaning sewing machine. 1 Turn machine off. 2 Remove foot. 3 Remove needle plate. 4 Clean out dust and thread scraps. ✽ Thread scraps can be used SCHMETZ 130/705H #65 - #110 Bed dimensions 439 mm × 178 mm Total weight 11 kg Sewing Light 120V model: 120V/15W Parts code: X53061...
...a neutral detergent. I Precautions Please keep machine out of any detergent residue, and wipe off water with a cloth soaked in warm water, or in use, please keep sewing machine away from heat sources such as irons and space heaters. If sewing machine is very dirty, wipe with a dry cloth. ... cleaning sewing machine. 1 Turn machine off. 2 Remove foot. 3 Remove needle plate. 4 Clean out dust and thread scraps. ✽ Thread scraps can be used SCHMETZ 130/705H #65 - #110 Bed dimensions 439 mm × 178 mm Total weight 11 kg Sewing Light 120V model: 120V/15W Parts code: X53061...


