

Users Manual - English
Page 2
... proper needle plate. only- Return the sewing machine to break. G Do not unplug by the manufacturer as threading the needle, changing the needle, threading the bobbin or changing the presser foot etc. This appliance has a polarized plug (one blade wider than the other user servicing adjustments mentioned in this manual. Replace...
... proper needle plate. only- Return the sewing machine to break. G Do not unplug by the manufacturer as threading the needle, changing the needle, threading the bobbin or changing the presser foot etc. This appliance has a polarized plug (one blade wider than the other user servicing adjustments mentioned in this manual. Replace...

Users Manual - English
Page 5
... Position Button 5 Light Switch 5 Feed Dog Adjustment Knob 5 Changing Needles and Light Bulb 6 Changing the Needle 6 Changing the Feed Pin 6 Changing Light Bulbs 6 Threading 7 Bobbin Winding 7 Bobbin Insertion 9 Upper Threading 10 Using the Automatic Needle Threader 10 Stitch Samples and Needle Chart 12 Stitch Samples 12 Thread Tension 12 Changing Presser Feet...
... Position Button 5 Light Switch 5 Feed Dog Adjustment Knob 5 Changing Needles and Light Bulb 6 Changing the Needle 6 Changing the Feed Pin 6 Changing Light Bulbs 6 Threading 7 Bobbin Winding 7 Bobbin Insertion 9 Upper Threading 10 Using the Automatic Needle Threader 10 Stitch Samples and Needle Chart 12 Stitch Samples 12 Thread Tension 12 Changing Presser Feet...

Users Manual - English
Page 6
... HLX5) 2 Size 11 1 Size 14 1 Size 16 1 Ballpoint Needle 7 Lining Plate Screw (2) 8 Fabric Separator 9 Feed Pin 10 Feed Pin Changer 11 General Purpose Foot 12 Bobbin (5) 13 Spool Cap 14 Rolled Hem Foot 15 Zipper Foot 16 Invisible Zipper Foot 17 1/4" Foot 18 Quilting Foot 19 Walking Foot 20 Seam Guide...
... HLX5) 2 Size 11 1 Size 14 1 Size 16 1 Ballpoint Needle 7 Lining Plate Screw (2) 8 Fabric Separator 9 Feed Pin 10 Feed Pin Changer 11 General Purpose Foot 12 Bobbin (5) 13 Spool Cap 14 Rolled Hem Foot 15 Zipper Foot 16 Invisible Zipper Foot 17 1/4" Foot 18 Quilting Foot 19 Walking Foot 20 Seam Guide...

Users Manual - English
Page 7
... 4) Thread Guide (Page 10) Light Switch (Page 5) Thread Trimmer Sewing Area Light (Page 6) Automatic Needle Threader (Page 10 and 11) Quick Bobbin Thread Device (Page 9) Thread Cutter Button (Page 5) Thread Tension Dial (Page 3 and 12) Feed Dogs (Page 5 and 14) Thread Guide ...Bar (Page 7) Stitch Length Regulator (Page 3) Bobbin Winder (Page 7) Hand Wheel (Page 3) Indicator Lamp Needle Stop Position Button (Page 5) Power Switch (Page 3) Reverse Stitch Lever (Page 3) Power Socket (Page...
... 4) Thread Guide (Page 10) Light Switch (Page 5) Thread Trimmer Sewing Area Light (Page 6) Automatic Needle Threader (Page 10 and 11) Quick Bobbin Thread Device (Page 9) Thread Cutter Button (Page 5) Thread Tension Dial (Page 3 and 12) Feed Dogs (Page 5 and 14) Thread Guide ...Bar (Page 7) Stitch Length Regulator (Page 3) Bobbin Winder (Page 7) Hand Wheel (Page 3) Indicator Lamp Needle Stop Position Button (Page 5) Power Switch (Page 3) Reverse Stitch Lever (Page 3) Power Socket (Page...

Users Manual - English
Page 8
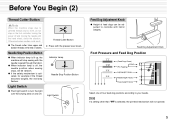
Upper and bobbin threads will then meet on . Before You Begin (1) Power Cord and Foot Controller Note Please use common household current. G Plug foot controller into machine. Power ...
Upper and bobbin threads will then meet on . Before You Begin (1) Power Cord and Foot Controller Note Please use common household current. G Plug foot controller into machine. Power ...
Users Manual - English
Page 10
... G Push light switch to turn the light over the sewing area on the foot controller, turning the power off . G The thread cutter trims upper and bobbin threads at the end of seams. Needle Stop Position Button G When indicator lamp is off, the needle position when sewing stops, will stop sewing with...
... G Push light switch to turn the light over the sewing area on the foot controller, turning the power off . G The thread cutter trims upper and bobbin threads at the end of seams. Needle Stop Position Button G When indicator lamp is off, the needle position when sewing stops, will stop sewing with...
Users Manual - English
Page 12
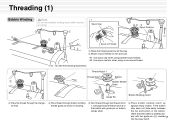
...cross-wound thread. 5 - 0: See the following illustrations. If the bobbin stop does not slide easily between the top and bottom of the bobbin, check that the bobbin is running. 3 1 4 2 ]1 Spool Cap Spool of the bobbin with the guide pin (5) inserted into the lower notch. Thread Notch ...1 Thread Notch 2 Bobbin 3 Bobbin Winder Shaft Guide Pin Bobbin Winding Clutch 3 Pass the thread through the...
...cross-wound thread. 5 - 0: See the following illustrations. If the bobbin stop does not slide easily between the top and bottom of the bobbin, check that the bobbin is running. 3 1 4 2 ]1 Spool Cap Spool of the bobbin with the guide pin (5) inserted into the lower notch. Thread Notch ...1 Thread Notch 2 Bobbin 3 Bobbin Winder Shaft Guide Pin Bobbin Winding Clutch 3 Pass the thread through the...

Users Manual - English
Page 13
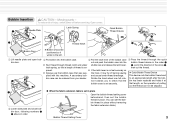
Once enough thread has wound itself in place, release the foot controller and trim the excess thread. Continue to wind the bobbin while pressing down on the foot controller for a few seconds. Take the foot off foot controller. 9 Manually move bobbin winding clutch back to hold itself around the bobbin to original position. 0 Cut thread and remove bobbin. 8 ] Place the thread end so that it does not protrude from the bobbin. Bobbin Winding Clutch 7 While holding the end of the thread, step on the foot controller. 8 Stop winding process when bobbin is full.
Once enough thread has wound itself in place, release the foot controller and trim the excess thread. Continue to wind the bobbin while pressing down on the foot controller for a few seconds. Take the foot off foot controller. 9 Manually move bobbin winding clutch back to hold itself around the bobbin to original position. 0 Cut thread and remove bobbin. 8 ] Place the thread end so that it does not protrude from the bobbin. Bobbin Winding Clutch 7 While holding the end of the thread, step on the foot controller. 8 Stop winding process when bobbin is full.
Users Manual - English
Page 14
...wheel one full rota- 2 tion towards you to the left. 3 2 1 Lift needle plate and open bob- 2 Put bobbin into the ✽ Run thread through the quick bobbin thread device in the order 1 2, pull in place. (You can not be ordered from your dealer. Open covers. 1 Needle... Plate Latch Spring Quick Bobbin Thread Device 1 2 Thread Notch Bobbin Door ✽ Bobbin should be positioned so it at that the bobbin case is set in place Open the bobbin thread setting cover beforehand, then set securely. 4 Pass the thread ...
...wheel one full rota- 2 tion towards you to the left. 3 2 1 Lift needle plate and open bob- 2 Put bobbin into the ✽ Run thread through the quick bobbin thread device in the order 1 2, pull in place. (You can not be ordered from your dealer. Open covers. 1 Needle... Plate Latch Spring Quick Bobbin Thread Device 1 2 Thread Notch Bobbin Door ✽ Bobbin should be positioned so it at that the bobbin case is set in place Open the bobbin thread setting cover beforehand, then set securely. 4 Pass the thread ...

Users Manual - English
Page 17
...knob accord- Proper When it is too tight it is in the down position. 6 Lift foot and remove fabric. 12 Thread Tension ✽ Bobbin thread should feed smoothly. Proper When it may also be used under the foot. 3 Lower presser foot. 4 Turn the hand wheel forward ...to match the bobbin thread. Needles Cloth Thread Velvet Silk, Polyester #30 - #50 Quilt Polyester #20 - #50 Synthetic Suede Polyester #20 - #50 Knit Polyester #20 - ...
...knob accord- Proper When it is too tight it is in the down position. 6 Lift foot and remove fabric. 12 Thread Tension ✽ Bobbin thread should feed smoothly. Proper When it may also be used under the foot. 3 Lower presser foot. 4 Turn the hand wheel forward ...to match the bobbin thread. Needles Cloth Thread Velvet Silk, Polyester #30 - #50 Quilt Polyester #20 - #50 Synthetic Suede Polyester #20 - #50 Knit Polyester #20 - ...

Users Manual - English
Page 19
...with the feed dog's motion to feed all layers of a seam, press down the reverse stitch lever and backstitch about 15 cm of upper and bobbin thread under and behind foot, and position fabric under foot. 2 Lower presser foot lever to lower foot. 3 Turn the hand wheel forward you ...all the way through fabric. 2 Lift presser foot, and turn fabric using thread trimmer: 4 Push thread trimmer button (this will cause the upper and bobbin threads to be joined evenly by activating the pin feed mechanism. 1 Move feed adjustment knob to highest position. 5 Lift foot, remove fabric and cut ...
...with the feed dog's motion to feed all layers of a seam, press down the reverse stitch lever and backstitch about 15 cm of upper and bobbin thread under and behind foot, and position fabric under foot. 2 Lower presser foot lever to lower foot. 3 Turn the hand wheel forward you ...all the way through fabric. 2 Lift presser foot, and turn fabric using thread trimmer: 4 Push thread trimmer button (this will cause the upper and bobbin threads to be joined evenly by activating the pin feed mechanism. 1 Move feed adjustment knob to highest position. 5 Lift foot, remove fabric and cut ...
Users Manual - English
Page 25
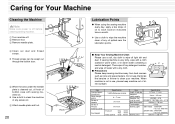
... mm Item Height of feed dog Specification 0.7 mm 1.1 mm Height of lower needle 3 mm - 3.5 mm Needles that HLX5#9 - #18 may be swept out through the bobbin door. 5 When the area under the needle plate is very dirty, wipe with sewing machine oil. ✽ Use a cloth to clean the machine of oil... not use , please keep sewing machine away from heat sources such as irons and space heaters. If sewing machine is cleaned out, oil hook of bobbin case with a cloth soaked in warm water, or in use chemicals like benzine or thinner to wipe the machine clean of any excess oil. 6 Attach...
... mm Item Height of feed dog Specification 0.7 mm 1.1 mm Height of lower needle 3 mm - 3.5 mm Needles that HLX5#9 - #18 may be swept out through the bobbin door. 5 When the area under the needle plate is very dirty, wipe with sewing machine oil. ✽ Use a cloth to clean the machine of oil... not use , please keep sewing machine away from heat sources such as irons and space heaters. If sewing machine is cleaned out, oil hook of bobbin case with a cloth soaked in warm water, or in use chemicals like benzine or thinner to wipe the machine clean of any excess oil. 6 Attach...

Users Manual - English
Page 26
... plate. 9-11.20 Wrong needle. See chart on . Check to use with your fabric and thread. 12 Bobbin case is The area under the needle plate needs to choose the needle that best fits your nearest Brother dealer for the right needle to use of needle threader doesn't pass through... bobbin case correctly. Area under needle plate needs to raise needle. 3 Wrong needle for the right needle to be ...
... plate. 9-11.20 Wrong needle. See chart on . Check to use with your fabric and thread. 12 Bobbin case is The area under the needle plate needs to choose the needle that best fits your nearest Brother dealer for the right needle to use of needle threader doesn't pass through... bobbin case correctly. Area under needle plate needs to raise needle. 3 Wrong needle for the right needle to be ...
User Manual - French
Page 2
... stitching. If the plug does not fit fully in any adjustments in the needle area, such as threading the needle, changing the needle, threading the bobbin or changing the presser foot etc. • Always unplug the sewing machine from outlet. • Do not unplug by the manufacturer as a toy. "IMPORTANT SAFETY...
... stitching. If the plug does not fit fully in any adjustments in the needle area, such as threading the needle, changing the needle, threading the bobbin or changing the presser foot etc. • Always unplug the sewing machine from outlet. • Do not unplug by the manufacturer as a toy. "IMPORTANT SAFETY...

User Manual - French
Page 5
... Position Button 5 Light Switch 5 Feed Dog Adjustment Knob 5 Changing Needles and Light Bulb 6 Changing the Needle 6 Changing the Feed Pin 6 Changing Light Bulbs 6 Threading 7 Bobbin Winding 7 Bobbin Insertion 9 Upper Threading 10 Using the Automatic Needle Threader 10 Stitch Samples and Needle Chart 12 Stitch Samples 12 Thread Tension 12 Changing Presser Feet...
... Position Button 5 Light Switch 5 Feed Dog Adjustment Knob 5 Changing Needles and Light Bulb 6 Changing the Needle 6 Changing the Feed Pin 6 Changing Light Bulbs 6 Threading 7 Bobbin Winding 7 Bobbin Insertion 9 Upper Threading 10 Using the Automatic Needle Threader 10 Stitch Samples and Needle Chart 12 Stitch Samples 12 Thread Tension 12 Changing Presser Feet...

User Manual - French
Page 6
... Plate Screw (2) 062670-812 8 Fabric Separator 184720-001 9 Feed Pin 138483-001 10 Feed Pin Changer XC1407-051 11 General Purpose Foot XA1425-001 12 Bobbin (5) SA159 13 Spool Cap XA2111-000 14 Rolled Hem Foot X57138-001 15 Zipper Foot 112797-001 16 Invisible Zipper Foot 148475-001 17 1/4" Foot...
... Plate Screw (2) 062670-812 8 Fabric Separator 184720-001 9 Feed Pin 138483-001 10 Feed Pin Changer XC1407-051 11 General Purpose Foot XA1425-001 12 Bobbin (5) SA159 13 Spool Cap XA2111-000 14 Rolled Hem Foot X57138-001 15 Zipper Foot 112797-001 16 Invisible Zipper Foot 148475-001 17 1/4" Foot...

User Manual - French
Page 7
...Page 5) Thread Tension Dial (Page 3 and 12) Feed Dogs (Page 5 and 14) Thread Guide Bar (Page 7) Stitch Length Regulator (Page 3) Bobbin Winder (Page 7) Hand Wheel (Page 3) Indicator Lamp Needle Stop Position Button (Page 5) Power Switch (Page 3) Reverse Stitch Lever (Page 3) Power... Socket (Page 3) Feed Dog Adjustment Knob (Page 5) Foot Controller Jack (Page 3) Knee Lift (Page 4) Air Vents Handle Thread Guide for Bobbin Winding (Page 7) Presser Foot Lift Lever (Page 4) Spool Cushion (Page 7) Spool Pin (Page 7) 2 T 7 r-e Presser Foot Pressure Three Holed ...
...Page 5) Thread Tension Dial (Page 3 and 12) Feed Dogs (Page 5 and 14) Thread Guide Bar (Page 7) Stitch Length Regulator (Page 3) Bobbin Winder (Page 7) Hand Wheel (Page 3) Indicator Lamp Needle Stop Position Button (Page 5) Power Switch (Page 3) Reverse Stitch Lever (Page 3) Power... Socket (Page 3) Feed Dog Adjustment Knob (Page 5) Foot Controller Jack (Page 3) Knee Lift (Page 4) Air Vents Handle Thread Guide for Bobbin Winding (Page 7) Presser Foot Lift Lever (Page 4) Spool Cushion (Page 7) Spool Pin (Page 7) 2 T 7 r-e Presser Foot Pressure Three Holed ...

User Manual - French
Page 8
... sure to the left. B an_ Before= Power Cord and Foot Controller 4 ANote Please use common household current. • Plug in reverse is possible ; Upper and bobbin - Loosen threads will then meet on . • To switch power off, flip switch to the right. the fabric. • When looser thread tension is desired...
... sure to the left. B an_ Before= Power Cord and Foot Controller 4 ANote Please use common household current. • Plug in reverse is possible ; Upper and bobbin - Loosen threads will then meet on . • To switch power off, flip switch to the right. the fabric. • When looser thread tension is desired...

User Manual - French
Page 10
... of feed dogs can be random. • If the safety mechanism is off . Otherwise broken needles could result. • The thread cutter trims upper and bobbin threads at the end of four feed dog positions according to your needs. L-Heavyweight Fabrics -D. • Push light switch to turn the light over the...
... of feed dogs can be random. • If the safety mechanism is off . Otherwise broken needles could result. • The thread cutter trims upper and bobbin threads at the end of four feed dog positions according to your needs. L-Heavyweight Fabrics -D. • Push light switch to turn the light over the...

User Manual - French
Page 12
...the following illustrations. h.o!e. (:) Pass thread through bobbin winding iihronri !Hp ac shown in drawing C) Run thread through the triangu1.92- If the bobbin stop does not slide easily between the top and bottom of the bobbin, check that the bobbin is running. *1 Spool Cap *2 Spool Cushion... (esIgizr Spool of the bobbin with the guide pin (C)) inserted into the lower notch. Threadingil) Bobbin Winding Note Do not move bobbin winding clutch while machine is seated prop-...
...the following illustrations. h.o!e. (:) Pass thread through bobbin winding iihronri !Hp ac shown in drawing C) Run thread through the triangu1.92- If the bobbin stop does not slide easily between the top and bottom of the bobbin, check that the bobbin is running. *1 Spool Cap *2 Spool Cushion... (esIgizr Spool of the bobbin with the guide pin (C)) inserted into the lower notch. Threadingil) Bobbin Winding Note Do not move bobbin winding clutch while machine is seated prop-...


