
Users Manual - English
Page 1
SEWING MACHINE MACHINE À COUDRE PQ1500S OPERATION MANUAL MANUEL D'UTILISATION
SEWING MACHINE MACHINE À COUDRE PQ1500S OPERATION MANUAL MANUEL D'UTILISATION

Users Manual - English
Page 2
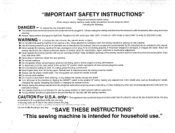
...G Always use as threading the needle, changing the needle, threading the bobbin or changing the presser foot etc. G Always unplug the sewing machine from the electrical outlet when removing covers, lubricating, or when making any object into water. CAUTION For U.S.A. This appliance has a polarized ... fire, electric shock, or injury: G Do not allow this manual. Keep ventilation openings of the sewing machine and foot control free from outlet. G This sewing machine is not working properly, if it to the nearest authorized dealer or service center for household use outdoors....
...G Always use as threading the needle, changing the needle, threading the bobbin or changing the presser foot etc. G Always unplug the sewing machine from the electrical outlet when removing covers, lubricating, or when making any object into water. CAUTION For U.S.A. This appliance has a polarized ... fire, electric shock, or injury: G Do not allow this manual. Keep ventilation openings of the sewing machine and foot control free from outlet. G This sewing machine is not working properly, if it to the nearest authorized dealer or service center for household use outdoors....

Users Manual - English
Page 3
... with the coloured markings identifying the terminals in your plug, proceed as follows. FOR USERS IN THE UK, EIRE, MALTA AND CYPRUS ONLY If your sewing machine is fitted with a three-pin non-rewireable BS plug then please read the following code: Blue Neutral Brown Live As the colours of the wiring...
... with the coloured markings identifying the terminals in your plug, proceed as follows. FOR USERS IN THE UK, EIRE, MALTA AND CYPRUS ONLY If your sewing machine is fitted with a three-pin non-rewireable BS plug then please read the following code: Blue Neutral Brown Live As the colours of the wiring...

Users Manual - English
Page 4
... the placement of your hands in the back of the finest sewing machines available for your authorised Brother service center visit www.brother.com and use . For a longer service life G When storing your nearest authorized Brother service center. Do not use G Maintaining the machine G Leaving the machine unattended G Do not place anything on the foot controller. G Always...
... the placement of your hands in the back of the finest sewing machines available for your authorised Brother service center visit www.brother.com and use . For a longer service life G When storing your nearest authorized Brother service center. Do not use G Maintaining the machine G Leaving the machine unattended G Do not place anything on the foot controller. G Always...

Users Manual - English
Page 6
...-001 148475-001 XA7258-001 XA7255-201 XA7253-001 XA7256-001 XC1220-051 XC1387-051 Note Foot controller: Model P This foot controller is used for sewing machine model PQ1500S. 1 Accessories 1 2 3 4 5 6 7 8 9 10 11 12 13 14 15 16 17 18 19 20 21 22 No...
...-001 148475-001 XA7258-001 XA7255-201 XA7253-001 XA7256-001 XC1220-051 XC1387-051 Note Foot controller: Model P This foot controller is used for sewing machine model PQ1500S. 1 Accessories 1 2 3 4 5 6 7 8 9 10 11 12 13 14 15 16 17 18 19 20 21 22 No...

Users Manual - English
Page 8
...to turn tension dial to push the lever all the way down when reverse sewing is desired. ✽ When the feed adjustment dial is set between 5-7mm, the reverse stitch length is used for sewing machine model PQ1500S. Hand Wheel Stitch Length Regulator G Adjust desired stitch length using... hand wheel. ✽ Always turn the tension dial to "O" position. G Plug foot controller into machine. Upper and lower threads will meet on wrong ...
...to turn tension dial to push the lever all the way down when reverse sewing is desired. ✽ When the feed adjustment dial is set between 5-7mm, the reverse stitch length is used for sewing machine model PQ1500S. Hand Wheel Stitch Length Regulator G Adjust desired stitch length using... hand wheel. ✽ Always turn the tension dial to "O" position. G Plug foot controller into machine. Upper and lower threads will meet on wrong ...
Users Manual - English
Page 11
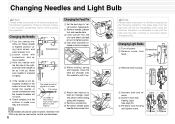
...screw from head. 3 Remove bulb housing. 4 Unscrew bulb and remove. 5 Screw in tightly. Make sure needle is a chance of injury if the machine accidentally starts running during this may also be used under normal circumstances. 6 Changing the Feed Pin 1 Set the feed dogs to "velvet" position. ... needle should be used ; Sewing Light: See page 20. 6 Re-attach bulb housing and tighten screw. 230V 120V Light Bulb Light Bulb Flat surface Lay needle on a flat surface to make sure they are not bent. Changing the Needle 1 Turn the sewing machine off power. There is screwed...
...screw from head. 3 Remove bulb housing. 4 Unscrew bulb and remove. 5 Screw in tightly. Make sure needle is a chance of injury if the machine accidentally starts running during this may also be used under normal circumstances. 6 Changing the Feed Pin 1 Set the feed dogs to "velvet" position. ... needle should be used ; Sewing Light: See page 20. 6 Re-attach bulb housing and tighten screw. 230V 120V Light Bulb Light Bulb Flat surface Lay needle on a flat surface to make sure they are not bent. Changing the Needle 1 Turn the sewing machine off power. There is screwed...

Users Manual - English
Page 17
...of fabric Right side of Fabric Lower Thread to reduce needle thread tension Incorrect thread tension can lead to the chart on the sewing machine. ✽ When sewing on the foot controller to begin. 5 Turn the hand wheel towards you are working with knit fabrics. however, Schmetz 130...: 5 Press the thread cutter button while the presser foot lever in raised position, insert a test strip from the garment fabric under normal sewing conditions. ✽ Adjust the pressure adjustment dial and the feed dog adjustment knob accord- Stitch Samples and Needle Chart Stitch Samples 1 Set ...
...of fabric Right side of Fabric Lower Thread to reduce needle thread tension Incorrect thread tension can lead to the chart on the sewing machine. ✽ When sewing on the foot controller to begin. 5 Turn the hand wheel towards you are working with knit fabrics. however, Schmetz 130...: 5 Press the thread cutter button while the presser foot lever in raised position, insert a test strip from the garment fabric under normal sewing conditions. ✽ Adjust the pressure adjustment dial and the feed dog adjustment knob accord- Stitch Samples and Needle Chart Stitch Samples 1 Set ...

Users Manual - English
Page 22
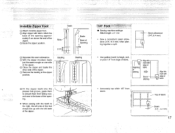
... line up with edge of the zipper. 3 Baste the zipper position. Top of fabric. Mark the base of the opening . ✽ When sewing with the teeth to begin, end, or pivot 1/4" from seam. Slide 2 cm Teeth Baste Base of Opening 4 Separate the seam allowance. 5...seam margin on one side of the zipper. 6 Close the zipper and baste the other side of the zipper. 1/4" Foot G Sewing machine settings: Stitch length = 2 - 2.5 • Sew a consistent seam allowance (1/4", 6.4 mm) when piecing together a quilt. Invisible Zipper Foot 1 Attach invisible zipper foot. 2 Align zipper with fabric....
... line up with edge of the zipper. 3 Baste the zipper position. Top of fabric. Mark the base of the opening . ✽ When sewing with the teeth to begin, end, or pivot 1/4" from seam. Slide 2 cm Teeth Baste Base of Opening 4 Separate the seam allowance. 5...seam margin on one side of the zipper. 6 Close the zipper and baste the other side of the zipper. 1/4" Foot G Sewing machine settings: Stitch length = 2 - 2.5 • Sew a consistent seam allowance (1/4", 6.4 mm) when piecing together a quilt. Invisible Zipper Foot 1 Attach invisible zipper foot. 2 Align zipper with fabric....
Users Manual - English
Page 25
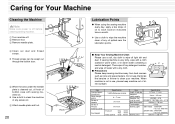
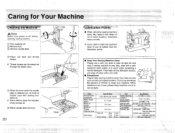
... needle plate is cleaned out, oil hook of bobbin case with sewing machine oil. ✽ Use a cloth to clean the machine of any excess oil. 6 Attach needle plate and foot. 20 Hook Lubrication Points G When using the sewing machine every day, apply a few drops of oil to each location... with a cloth soaked in warm water, or in use, please keep sewing machine away from heat sources such as irons and space heaters. Caring for Your Machine Cleaning the Machine Note Make sure power is off before cleaning sewing machine. 1 Turn machine off. 2 Remove foot. 3 Remove needle plate. 4 Clean out dust...
... needle plate is cleaned out, oil hook of bobbin case with sewing machine oil. ✽ Use a cloth to clean the machine of any excess oil. 6 Attach needle plate and foot. 20 Hook Lubrication Points G When using the sewing machine every day, apply a few drops of oil to each location... with a cloth soaked in warm water, or in use, please keep sewing machine away from heat sources such as irons and space heaters. Caring for Your Machine Cleaning the Machine Note Make sure power is off before cleaning sewing machine. 1 Turn machine off. 2 Remove foot. 3 Remove needle plate. 4 Clean out dust...

Users Manual - English
Page 26
...oil. Clean feed dog and bobbin case. 20 Bobbin case is getting tangled. Trouble Shooting ✽ Before taking your sewing machine in heavyweight position. Reinsert. 6 Thread is scratched. Change needles. 6 Improper fabric/needle/ thread combination. Thread Cutter ... needle. Rethread machine. Rethread machine. 9-11 You're sewing a lightweight fabric with your fabric and thread. 12 Sewing Machine Doesn't Run The power isn't on . Adjust stitch length. 3 Wrong needle for the fabric and thread you purchased it, or your nearest Brother dealer for the...
...oil. Clean feed dog and bobbin case. 20 Bobbin case is getting tangled. Trouble Shooting ✽ Before taking your sewing machine in heavyweight position. Reinsert. 6 Thread is scratched. Change needles. 6 Improper fabric/needle/ thread combination. Thread Cutter ... needle. Rethread machine. Rethread machine. 9-11 You're sewing a lightweight fabric with your fabric and thread. 12 Sewing Machine Doesn't Run The power isn't on . Adjust stitch length. 3 Wrong needle for the fabric and thread you purchased it, or your nearest Brother dealer for the...
User Manual - French
Page 2
...type rated 120V 15 watts for 120V model or rated 240V 15 watts for household use the proper needle plate. When using ." "This sewing machine is being used or where oxygen is intended for 220-240V model. WARNING To reduce the risk of electric shock: including the following: ...use bent needles. • Do not pull or push fabric while stitching. "IMPORTANT SAFETY INSTRUCTIONS" "Read all moving parts. Always unplug the sewing machine from all instructions before changing the light bulb. only - If the plug does not fit fully in any air openings blocked. Replace bulb ...
...type rated 120V 15 watts for 120V model or rated 240V 15 watts for household use the proper needle plate. When using ." "This sewing machine is being used or where oxygen is intended for 220-240V model. WARNING To reduce the risk of electric shock: including the following: ...use bent needles. • Do not pull or push fabric while stitching. "IMPORTANT SAFETY INSTRUCTIONS" "Read all moving parts. Always unplug the sewing machine from all instructions before changing the light bulb. only - If the plug does not fit fully in any air openings blocked. Replace bulb ...

User Manual - French
Page 3
... replace the fuse cover, never use a fuse approved by ASTA to the terminal which is marked with the coloured markings identifying the terminals in your sewing machine is not suitable for the plug supplied with the fuse cover omitted. The wires in this main lead are coloured in the main lead of...
... replace the fuse cover, never use a fuse approved by ASTA to the terminal which is marked with the coloured markings identifying the terminals in your sewing machine is not suitable for the plug supplied with the fuse cover omitted. The wires in this main lead are coloured in the main lead of...
User Manual - French
Page 4
... • When storing your nearest authorized Brother service center. • CONGRATULATIONS ON CHOOSING A BROTHER SEWING MACHINE Your machine is one of the operation manual to inspect and adjust the machine yourself. Benzene, thinner, and scouring powders can damage the case and machine, and should never be used. •... neutral soaps or detergents to watch the placement of your hands in the back of the finest sewing machines available for your authorised Brother service center visit www.brother.com and use extension cords. To find out the name and phone number for home use &#...
... • When storing your nearest authorized Brother service center. • CONGRATULATIONS ON CHOOSING A BROTHER SEWING MACHINE Your machine is one of the operation manual to inspect and adjust the machine yourself. Benzene, thinner, and scouring powders can damage the case and machine, and should never be used. •... neutral soaps or detergents to watch the placement of your hands in the back of the finest sewing machines available for your authorised Brother service center visit www.brother.com and use extension cords. To find out the name and phone number for home use &#...

User Manual - French
Page 6
... Seam Guide XA7256-001 21 Foot Controller XC1220-051 22 Fabric Extension Table XC1387-051 Note Foot controller: Model P This foot controller is used for sewing machine model PQ1500S. 1
... Seam Guide XA7256-001 21 Foot Controller XC1220-051 22 Fabric Extension Table XC1387-051 Note Foot controller: Model P This foot controller is used for sewing machine model PQ1500S. 1

User Manual - French
Page 8
... thread tension is possible ; the way down when reverse sew- ing is desired. * When the feed adjustment dial is set between 5-7mm, the reverse I stitch length is in cord. • Plug foot controller into machine. B an_ Before= Power Cord and Foot Controller 4 ANote...side of fabric. t Power Cord Foot Controller 0 Power Switch I I ThreadTension Upper Thread Tension • When tighter thread tension is used for sewing machine model PO15005. - _ Power Switch • Flip power switch to "I StitchLength Flegulat • Adjust desired stitch length using hand wheel. * ...
... thread tension is possible ; the way down when reverse sew- ing is desired. * When the feed adjustment dial is set between 5-7mm, the reverse I stitch length is in cord. • Plug foot controller into machine. B an_ Before= Power Cord and Foot Controller 4 ANote...side of fabric. t Power Cord Foot Controller 0 Power Switch I I ThreadTension Upper Thread Tension • When tighter thread tension is used for sewing machine model PO15005. - _ Power Switch • Flip power switch to "I StitchLength Flegulat • Adjust desired stitch length using hand wheel. * ...

User Manual - French
Page 17
...*60 #9 0 Silk Georgette Silk #50 Wool Georgette Silk, Polyester #50 l Gingham Cotton #60 - #80 - ing to the chart on the sewing machine. * When sewing on the foot controller to desired stitch length. 0 Make sure approximately 15 cm of upper thread. (If bobbin 0 thread is in the down position.... Press the thread cutter button while the presser foot lever in raised position, insert a test strip from the garment fabric under normal sewing conditions. * Adjust the pressure adjustment dial and the feed dog adjustment knob accord- amplestid14e- While needle is too tight it may ...
...*60 #9 0 Silk Georgette Silk #50 Wool Georgette Silk, Polyester #50 l Gingham Cotton #60 - #80 - ing to the chart on the sewing machine. * When sewing on the foot controller to desired stitch length. 0 Make sure approximately 15 cm of upper thread. (If bobbin 0 thread is in the down position.... Press the thread cutter button while the presser foot lever in raised position, insert a test strip from the garment fabric under normal sewing conditions. * Adjust the pressure adjustment dial and the feed dog adjustment knob accord- amplestid14e- While needle is too tight it may ...
User Manual - French
Page 22
Basting Basting • Sewing machine settings: Stitch length = 2 - 2.5 • Sew a consistent seam allowance (1/4", 6.4 mm) when piecing together a quilt. " •11KOPOTIMAN:•••Ii•I fe .:,,,....e-,:4C.L.e.maelbaMtaltIldOWLSINNIMI • Accurately top stitch 1/8" from ... stitching p--at the zipper I ) Remove the basting at , End of stitching Align this J mark with fabric. Mark the base of the opening . * When sewing with the left side of the foot should line up with the teeth to begin, end, or pivot 1/4" from seam. it-Align this mark with...
Basting Basting • Sewing machine settings: Stitch length = 2 - 2.5 • Sew a consistent seam allowance (1/4", 6.4 mm) when piecing together a quilt. " •11KOPOTIMAN:•••Ii•I fe .:,,,....e-,:4C.L.e.maelbaMtaltIldOWLSINNIMI • Accurately top stitch 1/8" from ... stitching p--at the zipper I ) Remove the basting at , End of stitching Align this J mark with fabric. Mark the base of the opening . * When sewing with the left side of the foot should line up with the teeth to begin, end, or pivot 1/4" from seam. it-Align this mark with...
User Manual - French
Page 25
...When the area under the needle plate is cleaned out, oil hook of bobbin case with a dry cloth. • Precautions Please keep sewing machine away from heat sources such as irons and space heaters. Then wipe off any excess oil. ® Attach needle plate and foot. ...containing a neutral detergent. CaringAor ipur =bine ing the lilaehTne AO. Note Make sure power is off before cleaning sewing machine. ()Turn machine off water with sewing machine oil. * Use a cloth to clean the machine of any detergent residue, and wipe off . (1) Remove foot. ® Remove needle plate. ©Clean ...
...When the area under the needle plate is cleaned out, oil hook of bobbin case with a dry cloth. • Precautions Please keep sewing machine away from heat sources such as irons and space heaters. Then wipe off any excess oil. ® Attach needle plate and foot. ...containing a neutral detergent. CaringAor ipur =bine ing the lilaehTne AO. Note Make sure power is off before cleaning sewing machine. ()Turn machine off water with sewing machine oil. * Use a cloth to clean the machine of any detergent residue, and wipe off . (1) Remove foot. ® Remove needle plate. ©Clean ...

User Manual - French
Page 26
... bobbin case. Rethread. • • = O "O< • ri) CD O •o O • 5 O o. Trouble Shooting Before taking your sewing machine in for the thread you are using . serf bobbin properly. Wrong needle for the right needle to use with your ferric and thread You're...tip is getting tangled. •Encase ma ne. Improper fabric/needle/ thread combination. echine is out of the auto- Machine is out of sewing foot is getting tangled. Thread Breakage Upper threading is scratched. Bobbin case is not threaded correctly. Bobbin thread is incorrect....
... bobbin case. Rethread. • • = O "O< • ri) CD O •o O • 5 O o. Trouble Shooting Before taking your sewing machine in for the thread you are using . serf bobbin properly. Wrong needle for the right needle to use with your ferric and thread You're...tip is getting tangled. •Encase ma ne. Improper fabric/needle/ thread combination. echine is out of the auto- Machine is out of sewing foot is getting tangled. Thread Breakage Upper threading is scratched. Bobbin case is not threaded correctly. Bobbin thread is incorrect....


