Operation Manual
Page 1
We recommend that you keep this document before using the machine. Operation Manual Embroidery Machine Product Code: 888-M36/M37 Be sure to read this document nearby for future reference.
We recommend that you keep this document before using the machine. Operation Manual Embroidery Machine Product Code: 888-M36/M37 Be sure to read this document nearby for future reference.

Operation Manual
Page 6
... 34 Embroidering linked characters 34 Using the Memory Function 35 Saving embroidery patterns 36 Retrieving embroidery patterns 36 Chapter 3 APPENDIX 37 Care and Maintenance 37 Restrictions on oiling 37 Precautions on storing the machine 37 Cleaning the race 37 Touch panel is malfunctioning 38 Adjusting... the bobbin thread tension 38 Replacing the Embroidery Foot 39 If the thread becomes tangled under the bobbin winder seat ...
... 34 Embroidering linked characters 34 Using the Memory Function 35 Saving embroidery patterns 36 Retrieving embroidery patterns 36 Chapter 3 APPENDIX 37 Care and Maintenance 37 Restrictions on oiling 37 Precautions on storing the machine 37 Cleaning the race 37 Touch panel is malfunctioning 38 Adjusting... the bobbin thread tension 38 Replacing the Embroidery Foot 39 If the thread becomes tangled under the bobbin winder seat ...

Operation Manual
Page 7
... I Air vent The air vent allows the air surrounding the motor to raise and lower the presser foot. 1 Chapter Names of Machine Parts GETTING READY Names of Machine Parts ■ Main parts bcd a e f l k g j i m t s h n o p 1 Bobbin winding ...thread guide and pretension disk (page 13) 2 Thread guide (page 12) 3 Spool cap (page 11) 4 Spool pin (page 11) 5 Bobbin winder (page 11) 6 LCD (liquid crystal display) (page 10) 7 Operation panel (page 6) 8 Operation buttons (page 6) 9 Embroidery...
... I Air vent The air vent allows the air surrounding the motor to raise and lower the presser foot. 1 Chapter Names of Machine Parts GETTING READY Names of Machine Parts ■ Main parts bcd a e f l k g j i m t s h n o p 1 Bobbin winding ...thread guide and pretension disk (page 13) 2 Thread guide (page 12) 3 Spool cap (page 11) 4 Spool pin (page 11) 5 Bobbin winder (page 11) 6 LCD (liquid crystal display) (page 10) 7 Operation panel (page 6) 8 Operation buttons (page 6) 9 Embroidery...

Operation Manual
Page 8
...8226; The operation keys of this key before changing the needle, the presser foot, etc. The machine is winding the bobbin thread, or the bobbin winder shaft is 8 mm or more . 6 Embroidery key Press to display the pattern type selection screen. 7 Back key Press to return to the... previous screen. 8 Presser foot/Needle exchange key Press this machine are capacitive touch sensors. Names of Machine Parts ■ Needle and presser foot section a &#...
...8226; The operation keys of this key before changing the needle, the presser foot, etc. The machine is winding the bobbin thread, or the bobbin winder shaft is 8 mm or more . 6 Embroidery key Press to display the pattern type selection screen. 7 Back key Press to return to the... previous screen. 8 Presser foot/Needle exchange key Press this machine are capacitive touch sensors. Names of Machine Parts ■ Needle and presser foot section a &#...
Operation Manual
Page 9
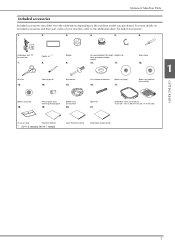
... net 21. Thread spool insert (mini king thread spool) 19. For more details on machine) 1 GETTING READY Spool cap (small) 18. Screwdriver 15. Bobbin case (on machine) 7. Embroidery frame set *1 8. Spool cap (large) 17. Q Embroidery foot "Q" (on machine) 20. Names of your machine, refer to the additional sheet "Included Accessories". 1. 2. 3. 4. 5. 6. Cleaning brush 14. Pre-wound bobbin...
... net 21. Thread spool insert (mini king thread spool) 19. For more details on machine) 1 GETTING READY Spool cap (small) 18. Screwdriver 15. Bobbin case (on machine) 7. Embroidery frame set *1 8. Spool cap (large) 17. Q Embroidery foot "Q" (on machine) 20. Names of your machine, refer to the additional sheet "Included Accessories". 1. 2. 3. 4. 5. 6. Cleaning brush 14. Pre-wound bobbin...
Operation Manual
Page 10
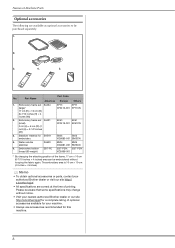
... EBT-PEN: EBT-PEN XC5996-001 * By changing the attaching position of Machine Parts Optional accessories The following are correct at the time of optional accessories available for your nearest authorized Brother dealer or our site http://s.brother/cpjaf for SA519 embroidery 4. Embroidery frame set SA434 (large)* 17 cm (H) × 10 cm (W) (6-7/10 inches (H) ×...
... EBT-PEN: EBT-PEN XC5996-001 * By changing the attaching position of Machine Parts Optional accessories The following are correct at the time of optional accessories available for your nearest authorized Brother dealer or our site http://s.brother/cpjaf for SA519 embroidery 4. Embroidery frame set SA434 (large)* 17 cm (H) × 10 cm (W) (6-7/10 inches (H) ×...
Operation Manual
Page 12
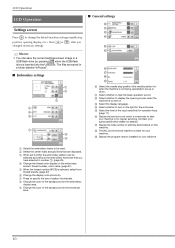
... color of the background for the embroidery display area. 9 Change the color of stitches embroidered on this machine. E Select the level of the input sensitivity for operation keys. (page 11) F Display the service count which is the internal machine number for the thumbnail area. 10.... B Select whether to be selected according to take your authorized Brother dealer for details.) G Display the total number of the background for your machine. D Select whether to turn on your machine. 1 Select the embroidery frame to display the opening display, etc.). thread number, color ...
... color of the background for the embroidery display area. 9 Change the color of stitches embroidered on this machine. E Select the level of the input sensitivity for operation keys. (page 11) F Display the service count which is the internal machine number for the thumbnail area. 10.... B Select whether to be selected according to take your authorized Brother dealer for details.) G Display the total number of the background for your machine. D Select whether to turn on your machine. 1 Select the embroidery frame to display the opening display, etc.). thread number, color ...
Operation Manual
Page 13
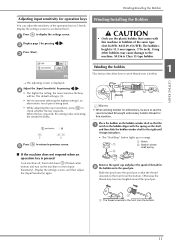
.... Press e to return to 5 levels. c Winding/Installing the Bobbin CAUTION • Only use the recommended 90 weight embroidery bobbin thread for this machine or bobbins of the operation keys to previous screen. ■ If the machine does not respond when an operation key is displayed. The default setting is [3]. • We recommend selecting...
.... Press e to return to 5 levels. c Winding/Installing the Bobbin CAUTION • Only use the recommended 90 weight embroidery bobbin thread for this machine or bobbins of the operation keys to previous screen. ■ If the machine does not respond when an operation key is displayed. The default setting is [3]. • We recommend selecting...

Operation Manual
Page 17
...to "Memo" on page 12. When threading the upper thread, carefully follow the instructions. Turn on page 26, and prepare embroidery threads in the embroidery pattern. Pass the thread under the thread guide, then under the f thread guide cover and to raise the presser foot. Upper Threading Remove...raised when the mark on the left. 1 GETTING READY CAUTION • Choose a spool cap that the thread unwinds to "Embroidering a pattern" on the machine. b • If the spool or the spool cap is not correct, the thread may bend or break. Note • If the presser foot is...
...to "Memo" on page 12. When threading the upper thread, carefully follow the instructions. Turn on page 26, and prepare embroidery threads in the embroidery pattern. Pass the thread under the thread guide, then under the f thread guide cover and to raise the presser foot. Upper Threading Remove...raised when the mark on the left. 1 GETTING READY CAUTION • Choose a spool cap that the thread unwinds to "Embroidering a pattern" on the machine. b • If the spool or the spool cap is not correct, the thread may bend or break. Note • If the presser foot is...

Operation Manual
Page 20
... may result. the higher the needle number, the larger the needle. ■ Embroidery needles It is pressed and the machine starts. Checking the needle Before using three full bobbins of the machine may be damaged. Using the screwdriver tighten the needle clamp screw by turning it clockwise..." on heavy weight fabric, please try a 90/14 needle. However, if the machine cannot make embroidery very well when embroidering on page 18. CAUTION • Only use a 75/11 home sewing machine needle. Hold the needle with the screwdriver, otherwise the needle may break or damage ...
... may result. the higher the needle number, the larger the needle. ■ Embroidery needles It is pressed and the machine starts. Checking the needle Before using three full bobbins of the machine may be damaged. Using the screwdriver tighten the needle clamp screw by turning it clockwise..." on heavy weight fabric, please try a 90/14 needle. However, if the machine cannot make embroidery very well when embroidering on page 18. CAUTION • Only use a 75/11 home sewing machine needle. Hold the needle with the screwdriver, otherwise the needle may break or damage ...

Operation Manual
Page 21
... if one of the embroidery. 8 Embroidery Set up on the embroidery carriage, and do not forcefully move the machine with the embroidery unit in the embroidery unit until it snaps into place. 1 Connection port 2 Embroidery unit connector c 3 Carriage EMBROIDERY 2 a b Note • Make sure that there is set it in the embroidery frame. 5 Embroidery frame attachment Attach the embroidery frame 23 to...
... if one of the embroidery. 8 Embroidery Set up on the embroidery carriage, and do not forcefully move the machine with the embroidery unit in the embroidery unit until it snaps into place. 1 Connection port 2 Embroidery unit connector c 3 Carriage EMBROIDERY 2 a b Note • Make sure that there is set it in the embroidery frame. 5 Embroidery frame attachment Attach the embroidery frame 23 to...

Operation Manual
Page 22
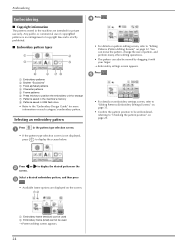
... the instructions below . ■ Thread Upper thread Bobbin thread Use embroidery thread intended for selecting the embroidery pattern type is displayed. ■ Removing the embroidery unit Make sure that the machine is the appropriateness of the d embroidery unit, and slowly pull the embroidery unit to "Removing the embroidery frame" on . b There are two important factors mentioned earlier...
... the instructions below . ■ Thread Upper thread Bobbin thread Use embroidery thread intended for selecting the embroidery pattern type is displayed. ■ Removing the embroidery unit Make sure that the machine is the appropriateness of the d embroidery unit, and slowly pull the embroidery unit to "Removing the embroidery frame" on . b There are two important factors mentioned earlier...

Operation Manual
Page 23
... is difficult, position the stabilizer material under the fabric without fusing it, then position the fabric and stabilizer in the embroidery frame, or check with your machine. Otherwise, the needle may break and cause injury. ■ Attaching iron-on stabilizers (backing) to the fabric For... needle to the stabilizer material, hoop it with a basting stitch. Using fabrics thicker than 2 mm (1/16 inch) may damage your authorized Brother dealer for embroidery. Insert the fabric on a level surface, and gently pull the fabric taut in the frame, being used. 1 Fusible side of stabilizer ...
... is difficult, position the stabilizer material under the fabric without fusing it, then position the fabric and stabilizer in the embroidery frame, or check with your machine. Otherwise, the needle may break and cause injury. ■ Attaching iron-on stabilizers (backing) to the fabric For... needle to the stabilizer material, hoop it with a basting stitch. Using fabrics thicker than 2 mm (1/16 inch) may damage your authorized Brother dealer for embroidery. Insert the fabric on a level surface, and gently pull the fabric taut in the frame, being used. 1 Fusible side of stabilizer ...
Operation Manual
Page 26
...machine are displayed on page 32. d • For details on pattern editing screen, refer to be used Pattern editing screen appears. 24 You can move the pattern, change the size of copyright law and is strictly prohibited. ■ Embroidery pattern types a b c e f d gh 1 Embroidery patterns 2 Brother... "Exclusives" 3 Floral alphabet patterns 4 Character patterns 5 Frame patterns 6 Press this key to position the embroidery unit for private use of copyrighted ...
...machine are displayed on page 32. d • For details on pattern editing screen, refer to be used Pattern editing screen appears. 24 You can move the pattern, change the size of copyright law and is strictly prohibited. ■ Embroidery pattern types a b c e f d gh 1 Embroidery patterns 2 Brother... "Exclusives" 3 Floral alphabet patterns 4 Character patterns 5 Frame patterns 6 Press this key to position the embroidery unit for private use of copyrighted ...

Operation Manual
Page 29
... then trim the excess thread. Cut the excess thread jumps within the color. Press a and use or to stop the machine. Use or of the thread colors or embroidery thread number. Memo • Colors on the display. Press . Trim the thread at the end of the thread colors ...is displayed. 2 EMBROIDERY • When [#123] is selected, the embroidery thread number is finished will return to the initial screen. Repeat the same steps for the first color from actual spool colors...
... then trim the excess thread. Cut the excess thread jumps within the color. Press a and use or to stop the machine. Use or of the thread colors or embroidery thread number. Memo • Colors on the display. Press . Trim the thread at the end of the thread colors ...is displayed. 2 EMBROIDERY • When [#123] is selected, the embroidery thread number is finished will return to the initial screen. Repeat the same steps for the first color from actual spool colors...

Operation Manual
Page 30
...on the wrong side (bottom) of the fabric. 1 Right side (top) of fabric 2 Wrong side (bottom) of the bobbin thread. When doing machine embroidery, the tension dial should be achieved after turning off the power The current color and stitch number are saved when...and press the "Start/Stop" e button to continue embroidering. ■ Resuming embroidery after adjusting the tension of thread during embroidering Press the "Start/Stop" button to 6. a Press b and set somewhere between 2 to stop the machine. If the correct thread tension cannot be achieved, rethread the upper thread and ...
...on the wrong side (bottom) of the fabric. 1 Right side (top) of fabric 2 Wrong side (bottom) of the bobbin thread. When doing machine embroidery, the tension dial should be achieved after turning off the power The current color and stitch number are saved when...and press the "Start/Stop" e button to continue embroidering. ■ Resuming embroidery after adjusting the tension of thread during embroidering Press the "Start/Stop" button to 6. a Press b and set somewhere between 2 to stop the machine. If the correct thread tension cannot be achieved, rethread the upper thread and ...

Operation Manual
Page 31
...in step a of appliqué 2 Appliqué material Note • If the appliqué piece is attached, attach the b embroidery frame to the machine. Therefore, carefully cut out the appliqué piece along the sewn cutting line. Embroidering the appliqué patterns When the color embroidering ...to embroider the appliqué. c 29 Remove the b fabric for the appliqué piece, reinforce and secure it in place with the embroidery thread, lower the presser foot lever, and then press the "Start/Stop" button to the fabric. Creating an appliqué piece Attach ...
...in step a of appliqué 2 Appliqué material Note • If the appliqué piece is attached, attach the b embroidery frame to the machine. Therefore, carefully cut out the appliqué piece along the sewn cutting line. Embroidering the appliqué patterns When the color embroidering ...to embroider the appliqué. c 29 Remove the b fabric for the appliqué piece, reinforce and secure it in place with the embroidery thread, lower the presser foot lever, and then press the "Start/Stop" button to the fabric. Creating an appliqué piece Attach ...

Operation Manual
Page 34
... the pattern vertically. : Decreases the pattern vertically. : Returns the pattern to its original position. 6 Press this key to save patterns to the machine's memory or USB flash drive. To return to the original color, press . 7 Press this key to select a part of the pattern Pattern select...12 34 E 5 D 6 C 7 8 B A09 Memo • If a key display is light gray, you have revised the pattern, check the display of available embroidery frames and use this key to delete the selected Delete key pattern (the pattern outlined by the red box. Press to return the pattern to...
... the pattern vertically. : Decreases the pattern vertically. : Returns the pattern to its original position. 6 Press this key to save patterns to the machine's memory or USB flash drive. To return to the original color, press . 7 Press this key to select a part of the pattern Pattern select...12 34 E 5 D 6 C 7 8 B A09 Memo • If a key display is light gray, you have revised the pattern, check the display of available embroidery frames and use this key to delete the selected Delete key pattern (the pattern outlined by the red box. Press to return the pattern to...

Operation Manual
Page 35
... 1 Press these keys to move the pattern in the direction shown by pressing editing screen. 12 3 4 on the pattern Editing Patterns (Embroidery Settings Screen) Display No. Depending on the line, press . 3 Press this key to select a part of the Font key selected characters...they can increase or decrease the incline. Since the machine stops at the end of the arc. Editing Patterns (Embroidery Settings Screen) When is outlined by character Multi color key in the editing screen, the embroidery settings screen appears. To arrange the spacing between characters...
... 1 Press these keys to move the pattern in the direction shown by pressing editing screen. 12 3 4 on the pattern Editing Patterns (Embroidery Settings Screen) Display No. Depending on the line, press . 3 Press this key to select a part of the Font key selected characters...they can increase or decrease the incline. Since the machine stops at the end of the arc. Editing Patterns (Embroidery Settings Screen) When is outlined by character Multi color key in the editing screen, the embroidery settings screen appears. To arrange the spacing between characters...

Operation Manual
Page 36
... Example: Aligning the lower left corner of Trial key the pattern. (page 25) 6 Press this key to begin embroidering the pattern. c Press . Embroidery key 4 Press this key to the machine's memory or USB flash drive. Memory key (page 36) 5 Press this key to save patterns to check the position of the pattern...
... Example: Aligning the lower left corner of Trial key the pattern. (page 25) 6 Press this key to begin embroidering the pattern. c Press . Embroidery key 4 Press this key to the machine's memory or USB flash drive. Memory key (page 36) 5 Press this key to save patterns to check the position of the pattern...


