
Basic Users Guide
Page 28
...printer driver window appears. 3 Click the 2-sided / Booklet drop-down list and select the 2-sided option. 4 Click the 2-sided Settings button. 5 Select an option from Your Computer (Windows®) Print a Document (Windows®) Print on Both Sides of the Paper (Windows®) 1 Select the print command in your application. 2 Select Brother MFC...option. 1 Select the print command in your application. Related Models: DCP-L2520DW/DCP-L2540DW/MFC-L2685DW/ MFC-L2700DW/MFC-L2705DW/MFC-L2707DW 2 Select Brother MFC-XXXX series (where XXXX is the name of your model). 3 Click OK. 4 Complete...
...printer driver window appears. 3 Click the 2-sided / Booklet drop-down list and select the 2-sided option. 4 Click the 2-sided Settings button. 5 Select an option from Your Computer (Windows®) Print a Document (Windows®) Print on Both Sides of the Paper (Windows®) 1 Select the print command in your application. 2 Select Brother MFC...option. 1 Select the print command in your application. Related Models: DCP-L2520DW/DCP-L2540DW/MFC-L2685DW/ MFC-L2700DW/MFC-L2705DW/MFC-L2707DW 2 Select Brother MFC-XXXX series (where XXXX is the name of your model). 3 Click OK. 4 Complete...
Basic Users Guide
Page 29
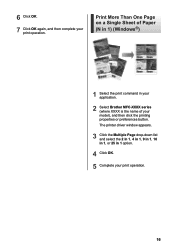
Print More Than One Page on a Single Sheet of Paper (N in 1) (Windows®) 1 Select the print command in 1 option. 4 Click OK. 5 Complete your print operation. 16 6 Click OK. 7 Click OK again, and then complete your model), and then click the printing properties or preferences button. The printer driver window appears. 3 Click the Multiple Page drop-down list and select the 2 in 1, 4 in 1, 9 in 1, 16 in 1, or 25 in your application. 2 Select Brother MFC-XXXX series (where XXXX is the name of your print operation.
Print More Than One Page on a Single Sheet of Paper (N in 1) (Windows®) 1 Select the print command in 1 option. 4 Click OK. 5 Complete your print operation. 16 6 Click OK. 7 Click OK again, and then complete your model), and then click the printing properties or preferences button. The printer driver window appears. 3 Click the Multiple Page drop-down list and select the 2 in 1, 4 in 1, 9 in 1, 16 in 1, or 25 in your application. 2 Select Brother MFC-XXXX series (where XXXX is the name of your print operation.

Basic Users Guide
Page 31
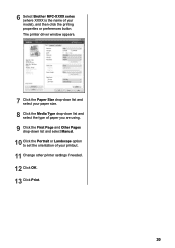
The printer driver window appears. 8 Click the Paper Size drop-down list and select your paper size. 9 Click the Media Type drop-down lists and select Manual. ... Click the Portrait or Landscape option to their original positions. 6 Select the print command in your application. 7 Select Brother MFC-XXXX series (where XXXX is the name of your printout. 12 Change other printer settings if needed. 13 Click OK. 14 Click Print. 15 (For printing envelopes) When you are using. 10 Click...
The printer driver window appears. 8 Click the Paper Size drop-down list and select your paper size. 9 Click the Media Type drop-down lists and select Manual. ... Click the Portrait or Landscape option to their original positions. 6 Select the print command in your application. 7 Select Brother MFC-XXXX series (where XXXX is the name of your printout. 12 Change other printer settings if needed. 13 Click OK. 14 Click Print. 15 (For printing envelopes) When you are using. 10 Click...
Basic Users Guide
Page 33
The printer driver window appears. 7 Click the Paper Size drop-down list and select your paper size. 8 Click the Media Type drop-down list and select the type of paper you are using. 9 Click the First Page and Other Pages drop-down list and select Manual. 10 Click the Portrait or Landscape option to set the orientation of your printout. 11 Change other printer settings if needed. 12 Click OK. 13 Click Print. 20 6 Select Brother MFC-XXXX series (where XXXX is the name of your model), and then click the printing properties or preferences button.
The printer driver window appears. 7 Click the Paper Size drop-down list and select your paper size. 8 Click the Media Type drop-down list and select the type of paper you are using. 9 Click the First Page and Other Pages drop-down list and select Manual. 10 Click the Portrait or Landscape option to set the orientation of your printout. 11 Change other printer settings if needed. 12 Click OK. 13 Click Print. 20 6 Select Brother MFC-XXXX series (where XXXX is the name of your model), and then click the printing properties or preferences button.
Basic Users Guide
Page 61
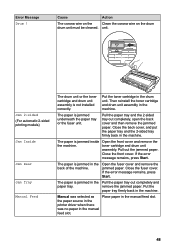
... the paper tray and the 2‑sided tray out completely, open the back cover and then remove the jammed paper. the paper source in the printer driver when there was selected as Place paper in the machine. Manual was no paper in the machine. toner cartridge and drum unit assembly. Pull...
... the paper tray and the 2‑sided tray out completely, open the back cover and then remove the jammed paper. the paper source in the printer driver when there was selected as Place paper in the machine. Manual was no paper in the machine. toner cartridge and drum unit assembly. Pull...
Basic Users Guide
Page 64
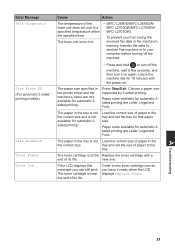
.... tray and set the tray for that paper size. Leave the machine idle for automatic 2sided printing. new one. The paper in the printer driver and the machine's menu are Letter, Legal and Folio. Paper sizes available for automatic 2sided printing are not available for 15 minutes with...still print. If the LCD displays this message you have it on . The paper in the tray is too hot. • (MFC-L2680W/MFC-L2685DW/ MFC-L2700DW/MFC-L2705DW/ MFC-L2707DW) To prevent you from losing the received fax data in the the correct size. Error Message Self-Diagnostic Size Error DX (...
.... tray and set the tray for that paper size. Leave the machine idle for automatic 2sided printing. new one. The paper in the printer driver and the machine's menu are Letter, Legal and Folio. Paper sizes available for automatic 2sided printing are not available for 15 minutes with...still print. If the LCD displays this message you have it on . The paper in the tray is too hot. • (MFC-L2680W/MFC-L2685DW/ MFC-L2700DW/MFC-L2705DW/ MFC-L2707DW) To prevent you from losing the received fax data in the the correct size. Error Message Self-Diagnostic Size Error DX (...
Basic Users Guide
Page 68
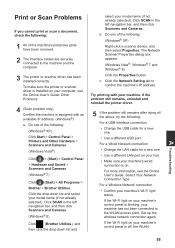
.... Print or Scan Problems If you cannot print or scan a document, check the following : (Windows® XP) Click Start > Control Panel > Printers and Other Hardware > Scanners and Cameras. (Windows Vista®) Click > (Start) > Control Panel > Hardware and Sound > Scanners and Cameras. (...Windows® 7) Click (Start) > All Programs > Brother > Brother Utilities. For a Wired Network connection • Change the LAN cable for a new one of the following : 1 All of the following : For a...
.... Print or Scan Problems If you cannot print or scan a document, check the following : (Windows® XP) Click Start > Control Panel > Printers and Other Hardware > Scanners and Cameras. (Windows Vista®) Click > (Start) > Control Panel > Hardware and Sound > Scanners and Cameras. (...Windows® 7) Click (Start) > All Programs > Brother > Brother Utilities. For a Wired Network connection • Change the LAN cable for a new one of the following : 1 All of the following : For a...
Basic Users Guide
Page 69
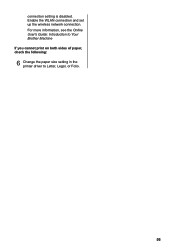
connection setting is disabled. Enable the WLAN connection and set up the wireless network connection. For more information, see the Online User's Guide: Introduction to Your Brother Machine If you cannot print on both sides of paper, check the following: 6 Change the paper size setting in the printer driver to Letter, Legal, or Folio. 56
connection setting is disabled. Enable the WLAN connection and set up the wireless network connection. For more information, see the Online User's Guide: Introduction to Your Brother Machine If you cannot print on both sides of paper, check the following: 6 Change the paper size setting in the printer driver to Letter, Legal, or Folio. 56


