
Quick Setup Guide - English
Page 15
...2 USB e The installation will continue automatically. The installation screens appear one after another. Windows® Macintosh USB 19 Connect the USB cable a Lift the scanner cover until it locks securely into the cable channel and out the back of the screens during the installation. Note For ...Windows Vista® and Windows® 7, when the Windows® Security screen appears, click the check box and click Install to release the lock a. c Carefully guide the USB cable into the open position. d Lift the scanner cover to complete the installation correctly. 15
...2 USB e The installation will continue automatically. The installation screens appear one after another. Windows® Macintosh USB 19 Connect the USB cable a Lift the scanner cover until it locks securely into the cable channel and out the back of the screens during the installation. Note For ...Windows Vista® and Windows® 7, when the Windows® Security screen appears, click the check box and click Install to release the lock a. c Carefully guide the USB cable into the open position. d Lift the scanner cover to complete the installation correctly. 15
Quick Setup Guide - English
Page 19
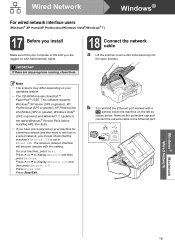
...® Service Pack before installing MFL-Pro Suite. • If you have previously set up on with Administrator rights. 18 Connect the network cable a Lift the scanner cover until it locks securely into the open position. On your operating system. • The CD-ROM includes ScanSoft™ ...Windows® XP Home/XP Professional/Windows Vista®/Windows® 7) 17 Before you install Make sure that your computer is ON and you should check that the machine's Network I /F. This software supports Windows® XP Home (SP3 or greater), XP Professional (SP3 or greater), XP Professional ...
...® Service Pack before installing MFL-Pro Suite. • If you have previously set up on with Administrator rights. 18 Connect the network cable a Lift the scanner cover until it locks securely into the open position. On your operating system. • The CD-ROM includes ScanSoft™ ...Windows® XP Home/XP Professional/Windows Vista®/Windows® 7) 17 Before you install Make sure that your computer is ON and you should check that the machine's Network I /F. This software supports Windows® XP Home (SP3 or greater), XP Professional (SP3 or greater), XP Professional ...
Quick Setup Guide - English
Page 23
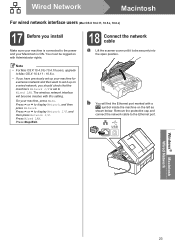
....4.11, 10.5.x, 10.6.x) 17 Before you should check that the machine's Network I /F. The wireless network interface will find the Ethernet port marked with a symbol inside the machine on with this setting. Press Stop/Exit. 18 Connect the network cable a Lift the scanner cover until it up on a wired network, ...you install Make sure your machine is connected to the power and your Macintosh is set to Wired LAN. USB Windows®...
....4.11, 10.5.x, 10.6.x) 17 Before you should check that the machine's Network I /F. The wireless network interface will find the Ethernet port marked with a symbol inside the machine on with this setting. Press Stop/Exit. 18 Connect the network cable a Lift the scanner cover until it up on a wired network, ...you install Make sure your machine is connected to the power and your Macintosh is set to Wired LAN. USB Windows®...
Software Users Manual - English
Page 127
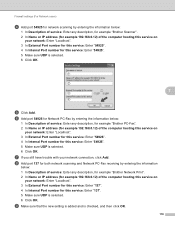
...Click Add. g If you still have trouble with your network connection, click Add. h Add port 137 for both network scanning and Network PC-Fax receiving by entering the information below: 1 In Description of service: Enter any description, for example "Brother Network Print". 2 In Name or IP address (for example ...Brother Scanner". 2 In Name or IP address (for example 192.168.0.12) of the computer hosting this service on your network: Enter "Localhost". 3 In External Port number for this service: Enter "54925". 4 In Internal Port number for this service: Enter "54925". 5 Make sure UDP is checked...
...Click Add. g If you still have trouble with your network connection, click Add. h Add port 137 for both network scanning and Network PC-Fax receiving by entering the information below: 1 In Description of service: Enter any description, for example "Brother Network Print". 2 In Name or IP address (for example ...Brother Scanner". 2 In Name or IP address (for example 192.168.0.12) of the computer hosting this service on your network: Enter "Localhost". 3 In External Port number for this service: Enter "54925". 4 In Internal Port number for this service: Enter "54925". 5 Make sure UDP is checked...
Software Users Manual - English
Page 132
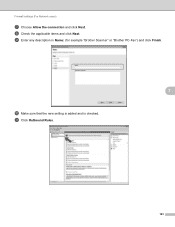
Firewall settings (For Network users) g Choose Allow the connection and click Next. k Click Outbound Rules. 123 i Enter any description in Name: (for example "Brother Scanner" or "Brother PC-Fax") and click Finish. 7 j Make sure that the new setting is added and is checked. h Check the applicable items and click Next.
Firewall settings (For Network users) g Choose Allow the connection and click Next. k Click Outbound Rules. 123 i Enter any description in Name: (for example "Brother Scanner" or "Brother PC-Fax") and click Finish. 7 j Make sure that the new setting is added and is checked. h Check the applicable items and click Next.

Software Users Manual - English
Page 134
Firewall settings (For Network users) o Choose Allow the connection and click Next. p Check the applicable items and click Next. q Enter any description in Name: (for example "Brother Scanner" or "Brother PC-Fax") and click Finish. 7 r Make sure that the new setting is added and is checked. 125
Firewall settings (For Network users) o Choose Allow the connection and click Next. p Check the applicable items and click Next. q Enter any description in Name: (for example "Brother Scanner" or "Brother PC-Fax") and click Finish. 7 r Make sure that the new setting is added and is checked. 125


