Users Manual - English
Page 6
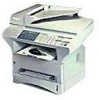
... the right to supply refurbished or remanufactured replacement products provided that the replacement products conform to you for consumable items, such as "this Product has no defects in this warranty as Toner, Drums, etc. After contacting the Brother Authorized Service Center, you purchased this product. BROTHER ONE YEAR LIMITED WARRANTY and EXCHANGE SERVICE (For USA..., plus an additional thirty (30) days. What is given only to the enduse purchaser of the accompanying product (referred to the cost of a new iv MFC LIMITED WARRANTY (USA) is VOID -
... the right to supply refurbished or remanufactured replacement products provided that the replacement products conform to you for consumable items, such as "this Product has no defects in this warranty as Toner, Drums, etc. After contacting the Brother Authorized Service Center, you purchased this product. BROTHER ONE YEAR LIMITED WARRANTY and EXCHANGE SERVICE (For USA..., plus an additional thirty (30) days. What is given only to the enduse purchaser of the accompanying product (referred to the cost of a new iv MFC LIMITED WARRANTY (USA) is VOID -

Users Manual - English
Page 17
... the Interface Cable 21-3 Industry Canada Compliance Statement (For Canada Only) .... 21-3 Laser Safety (For 110-120V Models Only 21-3 FDA Regulations 21-3 Manufacturing Information 21-3 ...22 Troubleshooting and Routine Maintenance 22-1 Troubleshooting 22-1 Brother fax-back system 22-1 Frequently Asked Questions (FAQs 22-1 Brother Bulletin Board 22-1 Error Messages 22-1 Document Jams...MFC 22-7 Packing and Shipping the MFC 22-14 Look the Scanner Lock 22-14 Routine Maintenance 22-17 Cleaning the Scanner 22-17 Cleaning the Printer 22-18 Cleaning the Drum Unit 22-19 Replacing...
... the Interface Cable 21-3 Industry Canada Compliance Statement (For Canada Only) .... 21-3 Laser Safety (For 110-120V Models Only 21-3 FDA Regulations 21-3 Manufacturing Information 21-3 ...22 Troubleshooting and Routine Maintenance 22-1 Troubleshooting 22-1 Brother fax-back system 22-1 Frequently Asked Questions (FAQs 22-1 Brother Bulletin Board 22-1 Error Messages 22-1 Document Jams...MFC 22-7 Packing and Shipping the MFC 22-14 Look the Scanner Lock 22-14 Routine Maintenance 22-17 Cleaning the Scanner 22-17 Cleaning the Printer 22-18 Cleaning the Drum Unit 22-19 Replacing...

Users Manual - English
Page 176
... FAIL COOLING DOWN COVER OPEN DISCONNECTED The drum unit is too it again. Open the front cover and press Clear . 2. MFC cassette cover is open or MFC cassette is locked. The other party or other party's polling setup. Use the drum unit until you will pause its life....The temperature of paper or paper is not in the paper cassette. then replace the drum unit with a new one. 1. Try the call Customer Service for the drum unit. Error Messages Error Message Cause Action CHANGE DRUM SOON CHECK PAPER CHECK PAPER #1 CHECK PAPER #2 CHECK CASSETTE CHECK SCAN LOCK...
... FAIL COOLING DOWN COVER OPEN DISCONNECTED The drum unit is too it again. Open the front cover and press Clear . 2. MFC cassette cover is open or MFC cassette is locked. The other party or other party's polling setup. Use the drum unit until you will pause its life....The temperature of paper or paper is not in the paper cassette. then replace the drum unit with a new one. 1. Try the call Customer Service for the drum unit. Error Messages Error Message Cause Action CHANGE DRUM SOON CHECK PAPER CHECK PAPER #1 CHECK PAPER #2 CHECK CASSETTE CHECK SCAN LOCK...

Users Manual - English
Page 186
... white stripes or faint images and the display shows CHANGE DRUM SOON, replace the drum unit with a new one. conditions such as high humidity may be damaged. 22 - 12 T R O U B L E S H O O T I N G A N D R O U T I N E M A I N T E N A N C E Remove the drum unit and clean the machine's interior. (See Routine Maintenance, Cleaning the Printer and Cleaning the Drum Unit, on pages 22-17 and 22-19.) Make...
... white stripes or faint images and the display shows CHANGE DRUM SOON, replace the drum unit with a new one. conditions such as high humidity may be damaged. 22 - 12 T R O U B L E S H O O T I N G A N D R O U T I N E M A I N T E N A N C E Remove the drum unit and clean the machine's interior. (See Routine Maintenance, Cleaning the Printer and Cleaning the Drum Unit, on pages 22-17 and 22-19.) Make...
Users Manual - English
Page 187
... that you select the appropriate media type in the printer driver. Blurred Page Ghost images appear on pages 22-18 and 22-19.) If a blurred page occurs after cleaning and the display shows CHANGE DRUM SOON, replace the drum unit with a new one. Certain environmental conditions such...Difficulty Print Quality Difficulties (Cont.) Nothing is printed on the scanner window. You must then replace the drum unit with a clean soft cloth. (See Routine Maintenance, Cleaning the Printer and Cleaning the Drum Unit, on printed page. White Page Printed pages are blurred at the center or at ...
... that you select the appropriate media type in the printer driver. Blurred Page Ghost images appear on pages 22-18 and 22-19.) If a blurred page occurs after cleaning and the display shows CHANGE DRUM SOON, replace the drum unit with a new one. Certain environmental conditions such...Difficulty Print Quality Difficulties (Cont.) Nothing is printed on the scanner window. You must then replace the drum unit with a clean soft cloth. (See Routine Maintenance, Cleaning the Printer and Cleaning the Drum Unit, on printed page. White Page Printed pages are blurred at the center or at ...

Users Manual - English
Page 193
...powder does not spill out of them separate from right to left several times. 2 Return the tab and snap it into the machine. (See Replacing the Drum Unit on page 22-22.) 4 Close the front cover. 5 Plug in the power cord first, then the telephone cord. We recommend that...toner cartridge is not at Home position, printed pages may have vertical stripes. 3 Reinstall the drum unit into the home position (w). If you replace the toner cartridge. Cleaning the Drum Unit We recommend placing the drum unit on a drop cloth or large disposable paper to avoid spilling and scattering toner. 1 Clean...
...powder does not spill out of them separate from right to left several times. 2 Return the tab and snap it into the machine. (See Replacing the Drum Unit on page 22-22.) 4 Close the front cover. 5 Plug in the power cord first, then the telephone cord. We recommend that...toner cartridge is not at Home position, printed pages may have vertical stripes. 3 Reinstall the drum unit into the home position (w). If you replace the toner cartridge. Cleaning the Drum Unit We recommend placing the drum unit on a drop cloth or large disposable paper to avoid spilling and scattering toner. 1 Clean...

Users Manual - English
Page 194
...display shows TONER LOW and the Toner Empty icon on the control panel flashes on and off to Replace the Toner Cartridge WARNING Just after you use the machine, some internal parts of the machine will not resume printing until you install a new toner cartridge. Once this ... indicate the toner is empty, the Toner Empty icon appears and the display shows TONER EMPTY. HOT! 1 Open the front cover and pull out the drum unit. 22 - 20 T R O U B L E S H O O T I N G A N D R O U T I N E M A I N T E N A N C E So, never touch the shaded parts shown in the illustration. Display Toner Empty Icon...
...display shows TONER LOW and the Toner Empty icon on the control panel flashes on and off to Replace the Toner Cartridge WARNING Just after you use the machine, some internal parts of the machine will not resume printing until you install a new toner cartridge. Once this ... indicate the toner is empty, the Toner Empty icon appears and the display shows TONER EMPTY. HOT! 1 Open the front cover and pull out the drum unit. 22 - 20 T R O U B L E S H O O T I N G A N D R O U T I N E M A I N T E N A N C E So, never touch the shaded parts shown in the illustration. Display Toner Empty Icon...

Users Manual - English
Page 196
... to the home position before CHANGE DRUM SOON is shown), then the drum unit should clean the machine when you may be replaced. You should be able to continue printing without having to replace the drum unit for a while. If the screen displays CHANGE DRUM SOON, the drum unit is near the end of... if there is time to create print images on paper. Even if the display shows CHANGE DRUM SOON, you replace the drum unit. (See page 22-18 to left several times. 6 Install the new toner cartridge into the drum unit until it clicks into place. 7 Clean the primary corona wire inside the...
... to the home position before CHANGE DRUM SOON is shown), then the drum unit should clean the machine when you may be replaced. You should be able to continue printing without having to replace the drum unit for a while. If the screen displays CHANGE DRUM SOON, the drum unit is near the end of... if there is time to create print images on paper. Even if the display shows CHANGE DRUM SOON, you replace the drum unit. (See page 22-18 to left several times. 6 Install the new toner cartridge into the drum unit until it clicks into place. 7 Clean the primary corona wire inside the...

Users Manual - English
Page 197
... are many factors that determine the actual drum life, we have used the machine, some internal parts of the machine are not sure of pages your drum will be printed by your local Sanitation Department. HOT! Be sure to seal the drum unit tightly so toner powder does not spill... guarantee a minimum number of pages that determine the actual drum life, such as temperature, humidity, type of the drum unit assembly. (See Replacing the Toner Cartridge, page 22-19.) Lock Lever Discard the used drum units, keep them , call your drum. The drum unit is a consumable item, and it is up to...
... are many factors that determine the actual drum life, we have used the machine, some internal parts of the machine are not sure of pages your drum will be printed by your local Sanitation Department. HOT! Be sure to seal the drum unit tightly so toner powder does not spill... guarantee a minimum number of pages that determine the actual drum life, such as temperature, humidity, type of the drum unit assembly. (See Replacing the Toner Cartridge, page 22-19.) Lock Lever Discard the used drum units, keep them , call your drum. The drum unit is a consumable item, and it is up to...

Users Manual - English
Page 198
... , 0 , 3 . 2 For five seconds, the screen displays the available percentage of drum life. DRUM LIFE REMAINING:70% Even if the remaining drum life is 0%, you may continue to use the drum unit until you have a print quality problem. For Customer Service USA: 1-800-284-4329 (... (voice) 1-514-685-4898 (fax) From within Montreal: 1-514-685-6464 (voice) 22 - 24 T R O U B L E S H O O T I N G A N D R O U T I N E M A I N T E N A N C E REPLACE DRUM? 1.YES 2.NO Caution If toner scatters and your hands or clothes get dirty, immediately wipe off or wash with cold water. 6 Reinstall the new...
... , 0 , 3 . 2 For five seconds, the screen displays the available percentage of drum life. DRUM LIFE REMAINING:70% Even if the remaining drum life is 0%, you may continue to use the drum unit until you have a print quality problem. For Customer Service USA: 1-800-284-4329 (... (voice) 1-514-685-4898 (fax) From within Montreal: 1-514-685-6464 (voice) 22 - 24 T R O U B L E S H O O T I N G A N D R O U T I N E M A I N T E N A N C E REPLACE DRUM? 1.YES 2.NO Caution If toner scatters and your hands or clothes get dirty, immediately wipe off or wash with cold water. 6 Reinstall the new...

Users Manual - English
Page 218
... up at MFC 8-2 Fax Receive Code 5-5 Fax Storage printing from a remote site 8-5 I-2 INDEX See troubleshooting document jam 22-4 drivers fax 16-4 installing iMac™/Macintosh® G3 23-1 Windows® Parallel 12-12 Windows® USB 12-4 printing 14-1 TWAIN compliant 17-6 drum unit cleaning 22-19 installing 2-4 life remaining 22-24 replacing 22-22 dual...
... up at MFC 8-2 Fax Receive Code 5-5 Fax Storage printing from a remote site 8-5 I-2 INDEX See troubleshooting document jam 22-4 drivers fax 16-4 installing iMac™/Macintosh® G3 23-1 Windows® Parallel 12-12 Windows® USB 12-4 printing 14-1 TWAIN compliant 17-6 drum unit cleaning 22-19 installing 2-4 life remaining 22-24 replacing 22-22 dual...

Service Manual
Page 175
... shorter than fifty percent of the white level data is faulty. (This message may appear only in the maintenance mode.) The controller, which monitors the internal resistance of a document after the document has been fed by the maintenance-mode function code 05 (refer to Chapter V, Section 3.5.) (Both the document front ... ions. (This happens if the corona wire becomes dirty, superimposing noise components on pages VI-4 and VI-5. Refer to clean the corona wire of the laser-sensitive drum. - When the specified number of pages has been printed after the replacement of the lasersensitive...
... shorter than fifty percent of the white level data is faulty. (This message may appear only in the maintenance mode.) The controller, which monitors the internal resistance of a document after the document has been fed by the maintenance-mode function code 05 (refer to Chapter V, Section 3.5.) (Both the document front ... ions. (This happens if the corona wire becomes dirty, superimposing noise components on pages VI-4 and VI-5. Refer to clean the corona wire of the laser-sensitive drum. - When the specified number of pages has been printed after the replacement of the lasersensitive...
Service Manual
Page 193
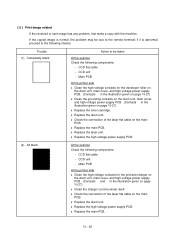
... given on page VI-27) l Clean the charger (corona wires) itself. Main PCB At the printer side l Clean the high-voltage contacts for the developer roller on the drum unit, main cover, and high-voltage power supply PCB. (Contacts ƒ in the illustration given on...to the following checks: Trouble (1) Completely blank Action to the remote terminal; l Check the connection of the laser flat cable on the main PCB. l Replace the laser unit. l Replace the main PCB. l Replace the drum unit. CCD flat cable - [ 5 ] Print-image related If the received or sent image has any ...
... given on page VI-27) l Clean the charger (corona wires) itself. Main PCB At the printer side l Clean the high-voltage contacts for the developer roller on the drum unit, main cover, and high-voltage power supply PCB. (Contacts ƒ in the illustration given on...to the following checks: Trouble (1) Completely blank Action to the remote terminal; l Check the connection of the laser flat cable on the main PCB. l Replace the laser unit. l Replace the main PCB. l Replace the drum unit. CCD flat cable - [ 5 ] Print-image related If the received or sent image has any ...

Service Manual
Page 194
...and high-voltage power supply PCB. l Replace the high-voltage power supply PCB. l Replace the laser unit. VI - 21 If the problem persists, proceed to clean the corona wire inside the drum unit. l Replace the engine PCB. l Replace the engine PCB. l Clean the ...high-voltage contacts for the transfer roller on page VI-27) l Replace the toner cartridge. l Replace the main PCB. Main PCB At the printer...
...and high-voltage power supply PCB. l Replace the high-voltage power supply PCB. l Replace the laser unit. VI - 21 If the problem persists, proceed to clean the corona wire inside the drum unit. l Replace the engine PCB. l Replace the engine PCB. l Clean the ...high-voltage contacts for the transfer roller on page VI-27) l Replace the toner cartridge. l Replace the main PCB. Main PCB At the printer...

Service Manual
Page 195
...wire cleaner is returned to be contaminated with toner. l Replace the drum unit. l If they appear at 79-mm intervals, replace the heat-fixing unit. l Replace the laser unit. (7) Black and blurred horizontal stripes (8) Horizontal lines At the printer side l Slide the wire cleaner to clean the corona wire...voltage power supply PCB. l If they appear at 94-mm intervals, replace the drum unit. l Slide the wire cleaner to clean the corona wire inside the drum unit. At the printer side l Clean the laser beam window (glass) on gray background Action to its home position. l...
...wire cleaner is returned to be contaminated with toner. l Replace the drum unit. l If they appear at 79-mm intervals, replace the heat-fixing unit. l Replace the laser unit. (7) Black and blurred horizontal stripes (8) Horizontal lines At the printer side l Slide the wire cleaner to clean the corona wire...voltage power supply PCB. l If they appear at 94-mm intervals, replace the drum unit. l Slide the wire cleaner to clean the corona wire inside the drum unit. At the printer side l Clean the laser beam window (glass) on gray background Action to its home position. l...

Service Manual
Page 196
...-voltage power supply PCB. VI - 23 At the printer side l Replace the drum unit. (11) Dropout, white spots, or hollow print At the printer side l Check the connection of the photo-sensitive drum with a cotton swab. CCD unit At the printer side l Clean the laser beam window on the laser unit. l Replace the toner cartridge. l Gently wipe off the...
...-voltage power supply PCB. VI - 23 At the printer side l Replace the drum unit. (11) Dropout, white spots, or hollow print At the printer side l Check the connection of the photo-sensitive drum with a cotton swab. CCD unit At the printer side l Clean the laser beam window on the laser unit. l Replace the toner cartridge. l Gently wipe off the...

Service Manual
Page 198
... off the surface of the heater thermistor. l Replace the drum unit. l Replace the high-voltage power supply PCB. l Clean the toner sensors (LED and light-receiver). l Replace the low-voltage power supply PCB. l Replace the high-voltage power supply PCB. l Replace the heat-fixing unit. At the printer side l Replace the drum unit. l Replace the high-voltage power supply PCB...
... off the surface of the heater thermistor. l Replace the drum unit. l Replace the high-voltage power supply PCB. l Clean the toner sensors (LED and light-receiver). l Replace the low-voltage power supply PCB. l Replace the high-voltage power supply PCB. l Replace the heat-fixing unit. At the printer side l Replace the drum unit. l Replace the high-voltage power supply PCB...

Service Manual
Page 199
...Centronics interface (3) Video printing is impossible. • VC connector PCB • Main PCB VI - 26 l Replace the high-voltage power supply PCB. l Replace the toner cartridge. At the printer side l Instruct the user to use paper of the recommended weight (less than 36 lb./m2). Trouble (...(less than 36 lb./m2). l Replace the high-voltage power supply PCB. (21) Gray background (22) Toner specks At the printer side l Instruct the user to be taken At the printer side l Replace the toner cartridge. l Replace the toner cartridge. l Replace the drum unit. l Clean the toner sensors...
...Centronics interface (3) Video printing is impossible. • VC connector PCB • Main PCB VI - 26 l Replace the high-voltage power supply PCB. l Replace the toner cartridge. At the printer side l Instruct the user to use paper of the recommended weight (less than 36 lb./m2). Trouble (...(less than 36 lb./m2). l Replace the high-voltage power supply PCB. (21) Gray background (22) Toner specks At the printer side l Instruct the user to be taken At the printer side l Replace the toner cartridge. l Replace the toner cartridge. l Replace the drum unit. l Clean the toner sensors...


