
Users Manual - English
Page 4
...you have a Visa, MasterCard, Discover, or American Express credit card, you can order accessories directly from Brother. (In the USA, you can visit us online for a complete selection of Brother accessories and supplies available for purchase.) USA: 1-888-879-3232 (voice) 1-800-947-1445 (fax)... http://www.brothermall.com From within 1-800-668-2768 (voice) Canada: Description Laser Fax Toner Laser Fax Drum * 8 MB Expandable Memory Board * 16 MB...
...you have a Visa, MasterCard, Discover, or American Express credit card, you can order accessories directly from Brother. (In the USA, you can visit us online for a complete selection of Brother accessories and supplies available for purchase.) USA: 1-888-879-3232 (voice) 1-800-947-1445 (fax)... http://www.brothermall.com From within 1-800-668-2768 (voice) Canada: Description Laser Fax Toner Laser Fax Drum * 8 MB Expandable Memory Board * 16 MB...
Users Manual - English
Page 6
...to you at 1-800-284-4329, or if you suspect a defect in materials or workmanship in most instances by the balance of a new iv MFC LIMITED WARRANTY (USA) Your credit card will be charged up to the cost of a possible defect to determine whether a defect exists, and if ...'s specifications for new products. You must call 1-800-521-2846. This warranty is covered: Brother warrants to you for the Warranty Period that performs the same functions and performs as well as Toner, Drums, etc. What is NOT covered: This warranty is shorter. The refurbished or remanufactured Product you...
...to you at 1-800-284-4329, or if you suspect a defect in materials or workmanship in most instances by the balance of a new iv MFC LIMITED WARRANTY (USA) Your credit card will be charged up to the cost of a possible defect to determine whether a defect exists, and if ...'s specifications for new products. You must call 1-800-521-2846. This warranty is covered: Brother warrants to you for the Warranty Period that performs the same functions and performs as well as Toner, Drums, etc. What is NOT covered: This warranty is shorter. The refurbished or remanufactured Product you...

Users Manual - English
Page 8
... or consumable items that are non-Brother products. Within Montreal, please call 1-800-853-6660. Internet support: support@brother.ca or browse Brother's Web Site: www.brother.com We're at Brother Authorized Service Centers throughout Canada. Brother International Corporation (Canada) Ltd. 1 Rue...the MFC/Facsimile machine in material or workmanship. For laser products: Failure to remove the Toner Cartridge (and Toner Drum Unit on applicable models) during shipping. This warranty states Brother's entire liability and your Operation Manual for proper packaging.) BROTHER DISCLAIMS ...
... or consumable items that are non-Brother products. Within Montreal, please call 1-800-853-6660. Internet support: support@brother.ca or browse Brother's Web Site: www.brother.com We're at Brother Authorized Service Centers throughout Canada. Brother International Corporation (Canada) Ltd. 1 Rue...the MFC/Facsimile machine in material or workmanship. For laser products: Failure to remove the Toner Cartridge (and Toner Drum Unit on applicable models) during shipping. This warranty states Brother's entire liability and your Operation Manual for proper packaging.) BROTHER DISCLAIMS ...
Users Manual - English
Page 9
... MFC 9600 Control Panel Overview 1-2 About Fax Machines 1-4 Fax Tones and Handshake 1-4 ECM (Error Correction Mode 1-4 2 Assembly and Connections 2-1 Packing List 2-1 Make sure you have the following items 2-1 Choosing a Location 2-2 IMPORTANT SAFETY INSTRUCTIONS 2-3 Release the Scanner Lock 2-3 Assembly 2-4 Installing the Drum ...Line Phone System 2-11 Converting Telephone Wall Outlets 2-11 Installing MFC, External Two-Line TAD, and Two-Line Telephone 2-12 Multi-Line Connections (PBX 2-13 If you are installing the MFC to work with a PBX 2-13 Custom Features on a...
... MFC 9600 Control Panel Overview 1-2 About Fax Machines 1-4 Fax Tones and Handshake 1-4 ECM (Error Correction Mode 1-4 2 Assembly and Connections 2-1 Packing List 2-1 Make sure you have the following items 2-1 Choosing a Location 2-2 IMPORTANT SAFETY INSTRUCTIONS 2-3 Release the Scanner Lock 2-3 Assembly 2-4 Installing the Drum ...Line Phone System 2-11 Converting Telephone Wall Outlets 2-11 Installing MFC, External Two-Line TAD, and Two-Line Telephone 2-12 Multi-Line Connections (PBX 2-13 If you are installing the MFC to work with a PBX 2-13 Custom Features on a...

Users Manual - English
Page 17
...-About the Interface Cable 21-3 Industry Canada Compliance Statement (For Canada Only) .... 21-3 Laser Safety (For 110-120V Models Only 21-3 FDA Regulations 21-3 Manufacturing Information 21-3 Important Safety...-6 22 Troubleshooting and Routine Maintenance 22-1 Troubleshooting 22-1 Brother fax-back system 22-1 Frequently Asked Questions (FAQs 22-1 Brother Bulletin Board 22-1 Error Messages 22-1 Document Jams and...MFC 22-7 Packing and Shipping the MFC 22-14 Look the Scanner Lock 22-14 Routine Maintenance 22-17 Cleaning the Scanner 22-17 Cleaning the Printer 22-18 Cleaning the Drum...
...-About the Interface Cable 21-3 Industry Canada Compliance Statement (For Canada Only) .... 21-3 Laser Safety (For 110-120V Models Only 21-3 FDA Regulations 21-3 Manufacturing Information 21-3 Important Safety...-6 22 Troubleshooting and Routine Maintenance 22-1 Troubleshooting 22-1 Brother fax-back system 22-1 Frequently Asked Questions (FAQs 22-1 Brother Bulletin Board 22-1 Error Messages 22-1 Document Jams and...MFC 22-7 Packing and Shipping the MFC 22-14 Look the Scanner Lock 22-14 Routine Maintenance 22-17 Cleaning the Scanner 22-17 Cleaning the Printer 22-18 Cleaning the Drum...

Users Manual - English
Page 23
... Quick Reference Card If an item is missing, call Brother Customer Service at 1-800-284-4329 (USA), 1-800-853-6660 (from within Canada) or 1-514-685-6464 (from within Montreal). Whenever you may void your MFC. See Ordering Accessories and Supplies on page ii for the... correct item numbers. ASSEMBLY AND CONNECTIONS 2-1 2 Assembly and Connections Packing List Make sure you have the following items: Telephone Line Cord CD-ROM Drum Unit Assembly (With free Standard Toner ...
... Quick Reference Card If an item is missing, call Brother Customer Service at 1-800-284-4329 (USA), 1-800-853-6660 (from within Canada) or 1-514-685-6464 (from within Montreal). Whenever you may void your MFC. See Ordering Accessories and Supplies on page ii for the... correct item numbers. ASSEMBLY AND CONNECTIONS 2-1 2 Assembly and Connections Packing List Make sure you have the following items: Telephone Line Cord CD-ROM Drum Unit Assembly (With free Standard Toner ...

Users Manual - English
Page 26
Assembly Installing the Drum Unit Assembly (with Toner Cartridge) 1 Unpack the drum unit assembly, including the toner cartridge, and gently rock it to distribute the toner evenly inside the cartridge. To prevent damage to the drum, do not expose it from side to side five or six times to light for longer than a few minutes. 2 Open the front cover of the machine. 3 Insert the drum unit assembly into the machine. 4 Close the front cover. 2-4 ASSEMBLY AND CONNECTIONS
Assembly Installing the Drum Unit Assembly (with Toner Cartridge) 1 Unpack the drum unit assembly, including the toner cartridge, and gently rock it to distribute the toner evenly inside the cartridge. To prevent damage to the drum, do not expose it from side to side five or six times to light for longer than a few minutes. 2 Open the front cover of the machine. 3 Insert the drum unit assembly into the machine. 4 Close the front cover. 2-4 ASSEMBLY AND CONNECTIONS

Users Manual - English
Page 41
TEL. FAX FWD/PAGING Set MFC to register the ring pattern with the MFC. CASSETTE #2 Use with phone company's Distinctive Ring service to forward a OFF 8-1 fax -OR- USER SETTINGS 6. DISTINCTIVE 2. INDEX ... IDs stored in Chapter 9) Factory Set Page OFF 9-2 INTERVAL: OFF 9-2 - 9-1 - 9-1 - 9-1 - 9-1 7. ALL DIAL 4. REMOTE ACCESS Set code for remote retrieval. DRUM LIFE 4. OFF 5-8 - 5-9 - 22-24 OFF 5-2 ON-SCREEN PROGRAMMING 3-5 Turn CASSETTE #2 ON if you purchased the optional Cassette #2. PRINT REPORTS Function Description 1. to call...
TEL. FAX FWD/PAGING Set MFC to register the ring pattern with the MFC. CASSETTE #2 Use with phone company's Distinctive Ring service to forward a OFF 8-1 fax -OR- USER SETTINGS 6. DISTINCTIVE 2. INDEX ... IDs stored in Chapter 9) Factory Set Page OFF 9-2 INTERVAL: OFF 9-2 - 9-1 - 9-1 - 9-1 - 9-1 7. ALL DIAL 4. REMOTE ACCESS Set code for remote retrieval. DRUM LIFE 4. OFF 5-8 - 5-9 - 22-24 OFF 5-2 ON-SCREEN PROGRAMMING 3-5 Turn CASSETTE #2 ON if you purchased the optional Cassette #2. PRINT REPORTS Function Description 1. to call...

Users Manual - English
Page 176
... line. During the cooling down mode. Try to reset. The drum counter was not completely closed. Press 1 to transmit or receive again. 22 - 2 TROUBLESHOOTING AND ROUTINE MAINTENANCE MFC cassette cover is open or MFC cassette is locked. The scanner lock is not installed properly. The... machine will hear the cooling fan running while the display on the machine shows COOLING DOWN. then replace the drum unit with a new one. ...
... line. During the cooling down mode. Try to reset. The drum counter was not completely closed. Press 1 to transmit or receive again. 22 - 2 TROUBLESHOOTING AND ROUTINE MAINTENANCE MFC cassette cover is open or MFC cassette is locked. The scanner lock is not installed properly. The... machine will hear the cooling fan running while the display on the machine shows COOLING DOWN. then replace the drum unit with a new one. ...
Users Manual - English
Page 177
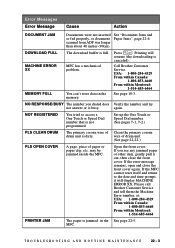
... FF/Cont . again. Set up the One Touch or Speed Dial number. (See pages 7-1, 7-2.) PLS CLEAN DRUM The primary corona wire of paper or paper clip, etc. MFC. Error Messages Error Message Cause Action DOCUMENT JAM Documents were not inserted See "Document Jams and or fed properly, or... DOWNLOAD FULL MACHINE ERROR XX MEMORY FULL The download buffer is not programmed. Call Brother Customer Service. USA: 1-800-284-4329 From within Canada: 1-800-853-6660 From within Montreal: 1-514-685-6464 PRINTER JAM The paper is dirty. NO RESPONSE/BUSY The number you see any jammed paper...
... FF/Cont . again. Set up the One Touch or Speed Dial number. (See pages 7-1, 7-2.) PLS CLEAN DRUM The primary corona wire of paper or paper clip, etc. MFC. Error Messages Error Message Cause Action DOCUMENT JAM Documents were not inserted See "Document Jams and or fed properly, or... DOWNLOAD FULL MACHINE ERROR XX MEMORY FULL The download buffer is not programmed. Call Brother Customer Service. USA: 1-800-284-4329 From within Canada: 1-800-853-6660 From within Montreal: 1-514-685-6464 PRINTER JAM The paper is dirty. NO RESPONSE/BUSY The number you see any jammed paper...

Users Manual - English
Page 180
Paper is Jammed near the Drum Unit 1 Open the front cover. 2 Remove the drum unit but do not force it if it in the paper cassette. 5 Reinstall the paper cassette. When you have to pull paper out the back ... Multi-purpose Paper Cassette 1 Pull the paper cassette out of the jammed paper from the paper cassette. 3 Gently pull out the jammed paper. 4 Reinstall the drum unit. 5 Close the front cover.
Paper is Jammed near the Drum Unit 1 Open the front cover. 2 Remove the drum unit but do not force it if it in the paper cassette. 5 Reinstall the paper cassette. When you have to pull paper out the back ... Multi-purpose Paper Cassette 1 Pull the paper cassette out of the jammed paper from the paper cassette. 3 Gently pull out the jammed paper. 4 Reinstall the drum unit. 5 Close the front cover.

Users Manual - English
Page 182
... a separate line with no custom features is not recognizing the printer's first couple of your MFC, it is dirty. If avoiding a slight interruption is crucial ...interface cable is securely connected between the machine and computer. (See page 12-2 to 12-3 or 12-10.) • Check to reduce the complexity of pages input buffer...Brother's ECM feature should help overcome this problem. Check the primary settings in . (See page 2-8.) • The toner cartridge and drum unit are using Windows® 3.1x, Windows® 95/98 or Windows NT® Workstation Version 4.0 with the supplied printer...
... a separate line with no custom features is not recognizing the printer's first couple of your MFC, it is dirty. If avoiding a slight interruption is crucial ...interface cable is securely connected between the machine and computer. (See page 12-2 to 12-3 or 12-10.) • Check to reduce the complexity of pages input buffer...Brother's ECM feature should help overcome this problem. Check the primary settings in . (See page 2-8.) • The toner cartridge and drum unit are using Windows® 3.1x, Windows® 95/98 or Windows NT® Workstation Version 4.0 with the supplied printer...

Users Manual - English
Page 186
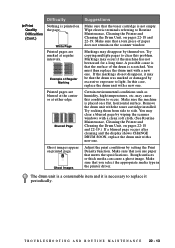
... . It has been factory set to occur. Check the machine's environment. Remove the drum unit and clean the machine's interior. (See Routine Maintenance, Cleaning the Printer and Cleaning the Drum Unit, on pages 22-17 and 22-19.) If you still have vertical stripes. ... are still black or the display shows CHANGE DRUM SOON, replace the drum unit with a new one . may be damaged. 22 - 12 T R O U B L E S H O O T I N G A N D R O U T I N E M A I N T E N A N C E Dark Stripes or Toner Stains Clean the machine's interior and the primary wire of the drum unit. (See page 22-19.) Also,...
... . It has been factory set to occur. Check the machine's environment. Remove the drum unit and clean the machine's interior. (See Routine Maintenance, Cleaning the Printer and Cleaning the Drum Unit, on pages 22-17 and 22-19.) If you still have vertical stripes. ... are still black or the display shows CHANGE DRUM SOON, replace the drum unit with a new one . may be damaged. 22 - 12 T R O U B L E S H O O T I N G A N D R O U T I N E M A I N T E N A N C E Dark Stripes or Toner Stains Clean the machine's interior and the primary wire of the drum unit. (See page 22-19.) Also,...
Users Manual - English
Page 187
... If the markings do not disappear, it may be that you select the appropriate media type in the printer driver. Make sure that the drum was marked or damaged by setting the Print Density function. Difficulty Print Quality Difficulties (Cont.) Nothing is ... O U B L E S H O O T I N G A N D R O U T I N E M A I N T E N A N C E 22 - 13 In this case, replace the drum unit with a new one. Remove the drum unit with a clean soft cloth. (See Routine Maintenance, Cleaning the Printer and Cleaning the Drum Unit, on pages 22-18 and 22-19. Try rocking them from side to Routine Maintenance...
... If the markings do not disappear, it may be that you select the appropriate media type in the printer driver. Make sure that the drum was marked or damaged by setting the Print Density function. Difficulty Print Quality Difficulties (Cont.) Nothing is ... O U B L E S H O O T I N G A N D R O U T I N E M A I N T E N A N C E 22 - 13 In this case, replace the drum unit with a new one. Remove the drum unit with a clean soft cloth. (See Routine Maintenance, Cleaning the Printer and Cleaning the Drum Unit, on pages 22-18 and 22-19. Try rocking them from side to Routine Maintenance...

Users Manual - English
Page 188
... your warranty. 4 Open the front cover. 5 Remove the drum unit. 22 - 14 T R O U B L E S H O O T I N G A N D R O U T I N E M A I N T E N A N C E WARNING Do not unplug the MFC after a print job until you transport the MFC, use the packing materials that came with your warranty. 1 Unplug the MFC from the telephone wall jack. 2 Unplug the MFC from the AC outlet. Lock the Scanner Lock Push...
... your warranty. 4 Open the front cover. 5 Remove the drum unit. 22 - 14 T R O U B L E S H O O T I N G A N D R O U T I N E M A I N T E N A N C E WARNING Do not unplug the MFC after a print job until you transport the MFC, use the packing materials that came with your warranty. 1 Unplug the MFC from the telephone wall jack. 2 Unplug the MFC from the AC outlet. Lock the Scanner Lock Push...

Users Manual - English
Page 189
Fold down the front output bin extension. T R O U B L E S H O O T I N G A N D R O U T I N E M A I N T E N A N C E 22 - 15 Remove the telephone line cord. 8 Wrap the machine in the plastic bag and place it in the drum unit. 6 Place the drum unit and toner cartridge assembly into the plastic bag and seal the bag. 7 Close the front cover. Leave the toner cartridge installed in the original carton box with the original packing material. Caution Remove the drum unit and toner cartridge assembly.
Fold down the front output bin extension. T R O U B L E S H O O T I N G A N D R O U T I N E M A I N T E N A N C E 22 - 15 Remove the telephone line cord. 8 Wrap the machine in the plastic bag and place it in the drum unit. 6 Place the drum unit and toner cartridge assembly into the plastic bag and seal the bag. 7 Close the front cover. Leave the toner cartridge installed in the original carton box with the original packing material. Caution Remove the drum unit and toner cartridge assembly.

Users Manual - English
Page 190
9 Place documents (manual and printed material) and the drum unit and toner cartridge assembly into the original carton as shown below: 10 Close the carton and tape it shut. 22 - 16 T R O U B L E S H O O T I N G A N D R O U T I N E M A I N T E N A N C E
9 Place documents (manual and printed material) and the drum unit and toner cartridge assembly into the original carton as shown below: 10 Close the carton and tape it shut. 22 - 16 T R O U B L E S H O O T I N G A N D R O U T I N E M A I N T E N A N C E

Users Manual - English
Page 192
s Do not touch the scanner window with a clean soft dry cloth. When you have used the machine, some internal parts of the machine, never touch the shaded parts as shown in the diagram below. Scanner Window 22 - 18 T R O U B L E S H O O T I N G A N D R O U T I N E M A I N T E N A N C E It may crack.... WARNING Just after you open the front cover of the machine are extremely HOT! Cleaning the Printer Caution s Do not use isopropyl alcohol to clean the scanner window or toner sensor. s The drum unit contains toner, so handle it off with cold water. 1 Open the front cover. 2...
s Do not touch the scanner window with a clean soft dry cloth. When you have used the machine, some internal parts of the machine, never touch the shaded parts as shown in the diagram below. Scanner Window 22 - 18 T R O U B L E S H O O T I N G A N D R O U T I N E M A I N T E N A N C E It may crack.... WARNING Just after you open the front cover of the machine are extremely HOT! Cleaning the Printer Caution s Do not use isopropyl alcohol to clean the scanner window or toner sensor. s The drum unit contains toner, so handle it off with cold water. 1 Open the front cover. 2...

Users Manual - English
Page 193
... does not spill out of them separate from right to left several times. 2 Return the tab and snap it into the machine. (See Replacing the Drum Unit on page 22-22.) 4 Close the front cover. 5 Plug in the power cord first, then the telephone cord. If you replace the toner ...not sure of the cartridge. Corona Wire Tab Home Position ( ) Caution If the tab is running low, the display shows TONER LOW. Cleaning the Drum Unit We recommend placing the drum unit on a drop cloth or large disposable paper to avoid spilling and scattering toner. 1 Clean the primary corona wire inside the...
... does not spill out of them separate from right to left several times. 2 Return the tab and snap it into the machine. (See Replacing the Drum Unit on page 22-22.) 4 Close the front cover. 5 Plug in the power cord first, then the telephone cord. If you replace the toner ...not sure of the cartridge. Corona Wire Tab Home Position ( ) Caution If the tab is running low, the display shows TONER LOW. Cleaning the Drum Unit We recommend placing the drum unit on a drop cloth or large disposable paper to avoid spilling and scattering toner. 1 Clean the primary corona wire inside the...

Users Manual - English
Page 194
... indicate the toner is empty, the Toner Empty icon appears and the display shows TONER EMPTY. HOT! 1 Open the front cover and pull out the drum unit. 22 - 20 T R O U B L E S H O O T I N G A N D R O U T I N E M A I N T E N A N C E So, never touch the shaded parts shown in the illustration. Once this icon appears, your machine will be extremely HOT! ...Toner Empty icon on the control panel flashes on and off to Replace the Toner Cartridge WARNING Just after you use the machine, some internal parts of the machine will not resume printing until you install a new toner cartridge.
... indicate the toner is empty, the Toner Empty icon appears and the display shows TONER EMPTY. HOT! 1 Open the front cover and pull out the drum unit. 22 - 20 T R O U B L E S H O O T I N G A N D R O U T I N E M A I N T E N A N C E So, never touch the shaded parts shown in the illustration. Once this icon appears, your machine will be extremely HOT! ...Toner Empty icon on the control panel flashes on and off to Replace the Toner Cartridge WARNING Just after you use the machine, some internal parts of the machine will not resume printing until you install a new toner cartridge.


