
Network User's Guide - English
Page 123
...will be printed automatically after paper is re-inserted into the machine. 7 • If the received mail is not in a plain text format or an attached file is automatically deleted from an Internet fax. Internet fax (MFC-8910DW and MFC-8950DW(T): standard, MFC-8510DN, MFC-8520DN and MFC-8710DW: available as a ...the computer's owner that can occur at set intervals (for example, you wish to send a document is notified in the subject field of paper when receiving data, the received data will be held in the TIFF-F format, the following error message will be printed: "E-MAIL FILE ...
...will be printed automatically after paper is re-inserted into the machine. 7 • If the received mail is not in a plain text format or an attached file is automatically deleted from an Internet fax. Internet fax (MFC-8910DW and MFC-8950DW(T): standard, MFC-8510DN, MFC-8520DN and MFC-8710DW: available as a ...the computer's owner that can occur at set intervals (for example, you wish to send a document is notified in the subject field of paper when receiving data, the received data will be held in the TIFF-F format, the following error message will be printed: "E-MAIL FILE ...

Network User's Guide - English
Page 151
...has been removed from the lists below 9 I cannot complete the wireless network setup configuration. (See page 144.) The Brother machine is not found on your wireless router Off and back On. The front and back covers are installed properly. The toner cartridges and drum...in the paper tray. (For wired networks) A network cable is turned on the network even after reading this chapter. Go to the page for wireless), router or hub are unable to resolve your solution from the machine. Please go to the Brother Solutions Center at : http://solutions.brother.com/. 9...
...has been removed from the lists below 9 I cannot complete the wireless network setup configuration. (See page 144.) The Brother machine is not found on your wireless router Off and back On. The front and back covers are installed properly. The toner cartridges and drum...in the paper tray. (For wired networks) A network cable is turned on the network even after reading this chapter. Go to the page for wireless), router or hub are unable to resolve your solution from the machine. Please go to the Brother Solutions Center at : http://solutions.brother.com/. 9...
SSL Guide - English
Page 31
... All protective packaging has been removed from the lists below I cannot print the document over the internet using the Brother machine. Paper is connected to check my network devices are configured before reading this chapter, you may encounter when using IPPS. Go to check... check the following items are working properly. The machine is inserted properly in the paper tray. See I want to the page for your problem, please visit the Brother Solutions Center at (http://solutions.brother.com/) and click Manuals on . See I cannot print the document over the ...
... All protective packaging has been removed from the lists below I cannot print the document over the internet using the Brother machine. Paper is connected to check my network devices are configured before reading this chapter, you may encounter when using IPPS. Go to check... check the following items are working properly. The machine is inserted properly in the paper tray. See I want to the page for your problem, please visit the Brother Solutions Center at (http://solutions.brother.com/) and click Manuals on . See I cannot print the document over the ...
Scan to FTP Guide - English
Page 25
...machine. The front and back covers are unable to FTP operation. Paper is turned on your problem Make sure that the following : The power cord is connected correctly and the Brother machine is inserted correctly in the paper tray. 5 5 Go to the page for your problem, ...please visit the Brother Solutions Center at (http://solutions.brother.com/) and click Manuals on . 5 Troubleshooting 5 Overview 5 This chapter...
...machine. The front and back covers are unable to FTP operation. Paper is turned on your problem Make sure that the following : The power cord is connected correctly and the Brother machine is inserted correctly in the paper tray. 5 5 Go to the page for your problem, ...please visit the Brother Solutions Center at (http://solutions.brother.com/) and click Manuals on . 5 Troubleshooting 5 Overview 5 This chapter...

Scan to Network Guide - English
Page 27
... that the following : The power cord is connected correctly and the Brother machine is inserted correctly in the paper tray. 5 5 Go to the page for your problem, please visit the Brother Solutions Center at (http://solutions.brother.com/) and click Manuals on . Paper is turned on your model page to resolve your solution from the... Error messages when you use the Scan to resolve typical network problems you are configured before reading this chapter, you may encounter when using the Brother machine. If, after reading this chapter.
... that the following : The power cord is connected correctly and the Brother machine is inserted correctly in the paper tray. 5 5 Go to the page for your problem, please visit the Brother Solutions Center at (http://solutions.brother.com/) and click Manuals on . Paper is turned on your model page to resolve your solution from the... Error messages when you use the Scan to resolve typical network problems you are configured before reading this chapter, you may encounter when using the Brother machine. If, after reading this chapter.
Basic User's Guide - English
Page 4
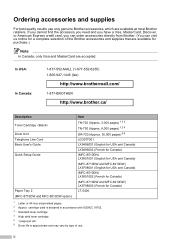
...-BROTHER http://www.brother.ca/ Description Toner Cartridge Drum Unit Telephone Line Cord Basic User's Guide Quick Setup Guide Paper Tray 2 (MFC-8710DW and MFC-8910DW option) Item TN-720 (Approx. 3,000 pages) 1 2 3 TN-750 (Approx. 8,000 pages) 1 2 4 DR-720 (Approx. 30,000 pages) 5 6 LG3077001 LX9496001 (English for USA and Canada) LX9496002 (French for Canada) (MFC-8510DN...
...-BROTHER http://www.brother.ca/ Description Toner Cartridge Drum Unit Telephone Line Cord Basic User's Guide Quick Setup Guide Paper Tray 2 (MFC-8710DW and MFC-8910DW option) Item TN-720 (Approx. 3,000 pages) 1 2 3 TN-750 (Approx. 8,000 pages) 1 2 4 DR-720 (Approx. 30,000 pages) 5 6 LG3077001 LX9496001 (English for USA and Canada) LX9496002 (French for Canada) (MFC-8510DN...
Basic User's Guide - English
Page 7
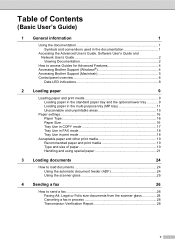
...'s Guide 2 Viewing Documentation 2 How to access Guides for Advanced Features 4 Accessing Brother Support (Windows 4 Accessing Brother Support (Macintosh 5 Control panel overview 6 Data LED indications 8 2 Loading paper 9 Loading paper and print media 9 Loading paper in the standard paper tray and the optional lower tray 9 Loading paper in the multi-purpose tray (MP tray 11 Unscannable and unprintable areas...
...'s Guide 2 Viewing Documentation 2 How to access Guides for Advanced Features 4 Accessing Brother Support (Windows 4 Accessing Brother Support (Macintosh 5 Control panel overview 6 Data LED indications 8 2 Loading paper 9 Loading paper and print media 9 Loading paper in the standard paper tray and the optional lower tray 9 Loading paper in the multi-purpose tray (MP tray 11 Unscannable and unprintable areas...
Basic User's Guide - English
Page 10
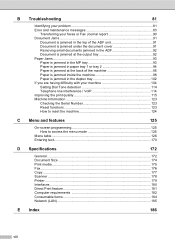
... ADF 92 Document is jammed at the output tray 92 Paper Jams...93 Paper is jammed in the MP tray 93 Paper is jammed in paper tray 1 or tray 2 94 Paper is jammed at the back of the machine 95 Paper is jammed inside the machine 98 Paper is jammed in the duplex tray 102 If you...
... ADF 92 Document is jammed at the output tray 92 Paper Jams...93 Paper is jammed in the MP tray 93 Paper is jammed in paper tray 1 or tray 2 94 Paper is jammed at the back of the machine 95 Paper is jammed inside the machine 98 Paper is jammed in the duplex tray 102 If you...
Basic User's Guide - English
Page 11
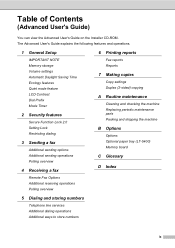
... copies Copy settings Duplex (2-sided) copying A Routine maintenance Cleaning and checking the machine Replacing periodic maintenance parts Packing and shipping the machine B Options Options Optional paper tray (LT-5400) Memory board C Glossary D Index 5 Dialing and storing numbers Telephone line services Additional dialing operations Additional ways to store numbers ix Table of...
... copies Copy settings Duplex (2-sided) copying A Routine maintenance Cleaning and checking the machine Replacing periodic maintenance parts Packing and shipping the machine B Options Options Optional paper tray (LT-5400) Memory board C Glossary D Index 5 Dialing and storing numbers Telephone line services Additional dialing operations Additional ways to store numbers ix Table of...
Basic User's Guide - English
Page 18
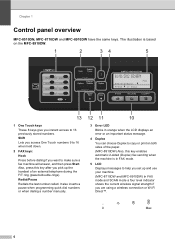
Chapter 1 Control panel overview 1 MFC-8510DN, MFC-8710DW and MFC-8910DW have the same keys. Redial/Pause Redials the last number called. Also, press this key after you pick up and use your machine. (MFC-8710DW and MFC-8910DW) In FAX mode and SCAN mode a four level indicator shows the current wireless... number manually. 12 11 10 3 Error LED Blinks in FAX mode. 5 LCD Displays messages to help you set up the handset of the paper. (MFC-8910DW) Also, this key enables automatic 2-sided (Duplex) fax sending when the machine is based on both sides of an external telephone during the...
Chapter 1 Control panel overview 1 MFC-8510DN, MFC-8710DW and MFC-8910DW have the same keys. Redial/Pause Redials the last number called. Also, press this key after you pick up and use your machine. (MFC-8710DW and MFC-8910DW) In FAX mode and SCAN mode a four level indicator shows the current wireless... number manually. 12 11 10 3 Error LED Blinks in FAX mode. 5 LCD Displays messages to help you set up the handset of the paper. (MFC-8910DW) Also, this key enables automatic 2-sided (Duplex) fax sending when the machine is based on both sides of an external telephone during the...
Basic User's Guide - English
Page 21
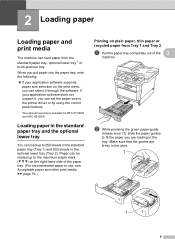
... pressing the green paper-guide release lever (1), slide the paper guides to fit the paper you are firmly in the slots. 1 1 9 Paper can feed paper from Tray 1 and Tray 2 2 a Pull the paper tray completely out ... paper 2 Loading paper and print media 2 The machine can be loaded up to the maximum paper mark ( ) on the right-hand side of the paper tray. (For recommended paper to use, see Acceptable paper ...standard paper tray (Tray 1) and 500 sheets in the optional lower tray (Tray 2). Loading paper in the standard paper tray and the optional lower tray 2 You can set the paper size...
... pressing the green paper-guide release lever (1), slide the paper guides to fit the paper you are firmly in the slots. 1 1 9 Paper can feed paper from Tray 1 and Tray 2 2 a Pull the paper tray completely out ... paper 2 Loading paper and print media 2 The machine can be loaded up to the maximum paper mark ( ) on the right-hand side of the paper tray. (For recommended paper to use, see Acceptable paper ...standard paper tray (Tray 1) and 500 sheets in the optional lower tray (Tray 2). Loading paper in the standard paper tray and the optional lower tray 2 You can set the paper size...
Basic User's Guide - English
Page 22
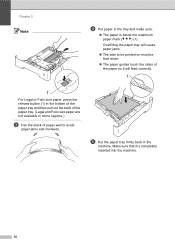
...Make sure that it will cause paper jams. The side to be printed on must be face down. The paper guides touch the sides of paper well to avoid paper jams and misfeeds. Overfilling the paper tray will feed correctly. 1 1 For Legal or Folio size paper, press the release button (1) ...in the bottom of the paper tray and then pull out the back of ...
...Make sure that it will cause paper jams. The side to be printed on must be face down. The paper guides touch the sides of paper well to avoid paper jams and misfeeds. Overfilling the paper tray will feed correctly. 1 1 For Legal or Folio size paper, press the release button (1) ...in the bottom of the paper tray and then pull out the back of ...
Basic User's Guide - English
Page 23
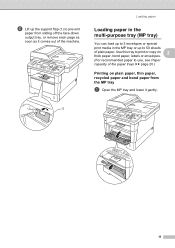
... MP tray and lower it comes out of plain paper. Use this tray to print or copy on 2 thick paper, bond paper, labels or envelopes. (For recommended paper to use, see Paper capacity of the paper trays uu page 20.) Printing on plain paper, thin paper, recycled paper and bond paper from sliding off the face-down output tray, or...
... MP tray and lower it comes out of plain paper. Use this tray to print or copy on 2 thick paper, bond paper, labels or envelopes. (For recommended paper to use, see Paper capacity of the paper trays uu page 20.) Printing on plain paper, thin paper, recycled paper and bond paper from sliding off the face-down output tray, or...
Basic User's Guide - English
Page 24
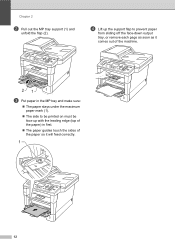
d Lift up the support flap to prevent paper from sliding off the face-down output tray, or remove each page as soon as it comes out of the machine. 21 c Put paper in the MP tray and make sure: The paper stays under the maximum paper mark (1). The side to be printed on must be face up with the leading edge (top of the paper) in first. The paper guides touch the sides of the paper so it will feed correctly. 1 12 Chapter 2 b Pull out the MP tray support (1) and unfold the flap (2).
d Lift up the support flap to prevent paper from sliding off the face-down output tray, or remove each page as soon as it comes out of the machine. 21 c Put paper in the MP tray and make sure: The paper stays under the maximum paper mark (1). The side to be printed on must be face up with the leading edge (top of the paper) in first. The paper guides touch the sides of the paper so it will feed correctly. 1 12 Chapter 2 b Pull out the MP tray support (1) and unfold the flap (2).
Basic User's Guide - English
Page 25
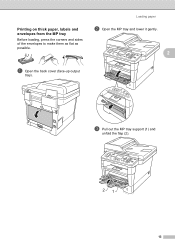
Loading paper Printing on thick paper, labels and envelopes from the MP tray 2 b Open the MP tray and lower it gently. Before loading, press the corners and sides of the envelopes to make them as flat as possible. 2 a Open the back cover (face-up output tray). c Pull out the MP tray support (1) and unfold the flap (2). 21 13
Loading paper Printing on thick paper, labels and envelopes from the MP tray 2 b Open the MP tray and lower it gently. Before loading, press the corners and sides of the envelopes to make them as flat as possible. 2 a Open the back cover (face-up output tray). c Pull out the MP tray support (1) and unfold the flap (2). 21 13

Basic User's Guide - English
Page 26
... or envelopes in the MP tray does not exceed 3. The paper, labels or envelopes stay under the maximum paper mark (1). The side to be printed on must be face up. 1 e Send the print data to the face-up output tray). 14 f Close the ... output tray. Make sure: The number of envelopes in the MP tray. Note • Remove each printed envelope immediately to prevent a paper jam. • If your thick paper curls during printing, put only one sheet at a time in the MP tray and open the back cover (face-up output tray) to...
... or envelopes in the MP tray does not exceed 3. The paper, labels or envelopes stay under the maximum paper mark (1). The side to be printed on must be face up. 1 e Send the print data to the face-up output tray). 14 f Close the ... output tray. Make sure: The number of envelopes in the MP tray. Note • Remove each printed envelope immediately to prevent a paper jam. • If your thick paper curls during printing, put only one sheet at a time in the MP tray and open the back cover (face-up output tray) to...

Basic User's Guide - English
Page 27
... unscannable and unprintable areas. These areas may vary depending on are using. Note When using BR-Script3 emulation, the edges of the paper that cannot be printed on the paper size or settings in the application you are 2 0.16 in. (4.2 mm). 1 Usage Document Size Top (1) Bottom (3) Left (2) Right (4) Fax (Sending) Letter 0.12...
... unscannable and unprintable areas. These areas may vary depending on are using. Note When using BR-Script3 emulation, the edges of the paper that cannot be printed on the paper size or settings in the application you are 2 0.16 in. (4.2 mm). 1 Usage Document Size Top (1) Bottom (3) Left (2) Right (4) Fax (Sending) Letter 0.12...
Basic User's Guide - English
Page 28
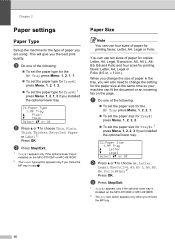
..., A4, Legal, Executive, A5, A5 L, A6, B5, B6 and Folio and four sizes for the paper size at the same time so your machine can fit the document or an incoming fax on the MFC-8710DW or MFC-8910DW. 2 The Label type option appears only if you chose the MP tray in .). c Press... Stop/Exit. 1 Tray#2 appears only if the optional lower tray is installed on the MFC-8710DW or MFC-8910DW. 2 The Any size option appears only when you choose the MP tray. 16 Press OK. This will also need to change the setting...
..., A4, Legal, Executive, A5, A5 L, A6, B5, B6 and Folio and four sizes for the paper size at the same time so your machine can fit the document or an incoming fax on the MFC-8710DW or MFC-8910DW. 2 The Label type option appears only if you chose the MP tray in .). c Press... Stop/Exit. 1 Tray#2 appears only if the optional lower tray is installed on the MFC-8710DW or MFC-8910DW. 2 The Any size option appears only when you choose the MP tray. 16 Press OK. This will also need to change the setting...
Basic User's Guide - English
Page 29
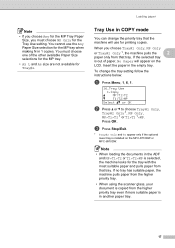
... another paper tray. 17 If the selected tray is selected, the machine looks for the Tray Use setting. c Press Stop/Exit. 1 Tray#2 Only and T2 appear only if the optional lower tray is in the empty tray. To change the priority tray that the machine will appear on the MFC-8710DW or MFC...-8910DW. You must choose MP Only for the tray with the most suitable paper and pulls paper from the higher priority tray even if more suitable...
... another paper tray. 17 If the selected tray is selected, the machine looks for the Tray Use setting. c Press Stop/Exit. 1 Tray#2 Only and T2 appear only if the optional lower tray is in the empty tray. To change the priority tray that the machine will appear on the MFC-8710DW or MFC...-8910DW. You must choose MP Only for the tray with the most suitable paper and pulls paper from the higher priority tray even if more suitable...
Basic User's Guide - English
Page 30
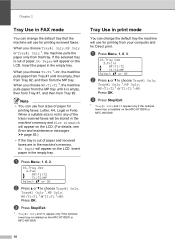
.... When you choose Tray#1 Only, MP Only or Tray#2 Only 1, the machine pulls the paper only from the MP tray. c Press Stop/Exit. 1 Tray#2 Only and T2 appear only if the optional lower tray is installed on the MFC-8710DW or MFC-8910DW. 18 When you choose MP>T1>T2 1, the machine pulls... paper from the MP tray until it is empty, then from Tray #2, and then from that the machine will appear...
.... When you choose Tray#1 Only, MP Only or Tray#2 Only 1, the machine pulls the paper only from the MP tray. c Press Stop/Exit. 1 Tray#2 Only and T2 appear only if the optional lower tray is installed on the MFC-8710DW or MFC-8910DW. 18 When you choose MP>T1>T2 1, the machine pulls... paper from the MP tray until it is empty, then from Tray #2, and then from that the machine will appear...


