Users Manual - English
Page 4
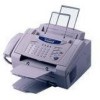
..., you can order accessories directly from Brother. (In the USA, you can visit us online for a complete selection of Brother accessories and supplies available for purchase.) USA...Laser Fax Toner TN5000PF Laser Fax Drum DR200 Telephone Line Cord UG3565001 Telephone Handset UF6857010 Handset Curled Cord UL8019009 Wire Extensions for trays UL6856000 Paper Tray and Document Tray UU7114001 Operations Manual LH0409001 MFC Manual (For MFC 4600 Only) LH0436001 IEEE-1284 Bi-directional Parallel Cable UG4558001 * MFL Pro, ScanSoft™ PaperPort®/ TextBridge®, and Printer...
..., you can order accessories directly from Brother. (In the USA, you can visit us online for a complete selection of Brother accessories and supplies available for purchase.) USA...Laser Fax Toner TN5000PF Laser Fax Drum DR200 Telephone Line Cord UG3565001 Telephone Handset UF6857010 Handset Curled Cord UL8019009 Wire Extensions for trays UL6856000 Paper Tray and Document Tray UU7114001 Operations Manual LH0409001 MFC Manual (For MFC 4600 Only) LH0436001 IEEE-1284 Bi-directional Parallel Cable UG4558001 * MFL Pro, ScanSoft™ PaperPort®/ TextBridge®, and Printer...
Users Manual - English
Page 6
... a valid major credit card number. The "Warranty Period" for the Warranty Period that performs the same functions and performs as well as Toner, Drums, Ribbons, etc. if: (1) you must call 1-800-521-2846. For the name of the accompanying product (referred to in the materials, ...has been transported without the proper preparation and packaging. Your credit card will be covered by anyone other than an Authorized Service Representative of Brother, (3) the serial number has been modified, defaced or removed from the date you for consumable items, such as the original Product. ...
... a valid major credit card number. The "Warranty Period" for the Warranty Period that performs the same functions and performs as well as Toner, Drums, Ribbons, etc. if: (1) you must call 1-800-521-2846. For the name of the accompanying product (referred to in the materials, ...has been transported without the proper preparation and packaging. Your credit card will be covered by anyone other than an Authorized Service Representative of Brother, (3) the serial number has been modified, defaced or removed from the date you for consumable items, such as the original Product. ...
Users Manual - English
Page 8
...also have other than a Brother Authorized Service Representative, or from Providence to Providence. For laser products: Failure to remove the Toner Cartridge (and Toner Drum Unit on applicable models) during shipping. Internet support: support@brother.ca or browse Brother's Web Site: www.brother.com Brother International Corporation (Canada) Ltd. ...damages. This Limited Warranty gives you specific legal rights and you may not apply to you. Operation of the MFC/Facsimile machine in excess of the specifications or with the Serial Number or Rating Label removed shall be deemed abuse...
...also have other than a Brother Authorized Service Representative, or from Providence to Providence. For laser products: Failure to remove the Toner Cartridge (and Toner Drum Unit on applicable models) during shipping. Internet support: support@brother.ca or browse Brother's Web Site: www.brother.com Brother International Corporation (Canada) Ltd. ...damages. This Limited Warranty gives you specific legal rights and you may not apply to you. Operation of the MFC/Facsimile machine in excess of the specifications or with the Serial Number or Rating Label removed shall be deemed abuse...
Users Manual - English
Page 11
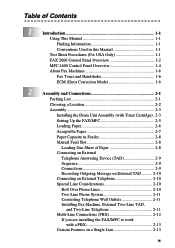
...Only 1-1 FAX 2600 Control Panel Overview 1-2 MFC 4600 Control Panel Overview 1-4 About Fax Machines 1-6 Fax Tones and Handshake 1-6 ECM (Error Correction Mode 1-6 2 Assembly and Connections 2-1 Packing List 2-1 Choosing a Location 2-2 Assembly 2-3 Installing the Drum Unit Assembly (with Toner Cartridge) . 2-3 Setting Up the FAX/MFC 2-5 Loading Paper 2-6 Acceptable Paper 2-7 Paper ... Two-Line TAD, and Two-Line Telephone 2-11 Multi-Line Connections (PBX 2-12 If you are installing the FAX/MFC to work with a PBX 2-13 Custom Features on a Single Line 2-13 ix
...Only 1-1 FAX 2600 Control Panel Overview 1-2 MFC 4600 Control Panel Overview 1-4 About Fax Machines 1-6 Fax Tones and Handshake 1-6 ECM (Error Correction Mode 1-6 2 Assembly and Connections 2-1 Packing List 2-1 Choosing a Location 2-2 Assembly 2-3 Installing the Drum Unit Assembly (with Toner Cartridge) . 2-3 Setting Up the FAX/MFC 2-5 Loading Paper 2-6 Acceptable Paper 2-7 Paper ... Two-Line TAD, and Two-Line Telephone 2-11 Multi-Line Connections (PBX 2-12 If you are installing the FAX/MFC to work with a PBX 2-13 Custom Features on a Single Line 2-13 ix

Users Manual - English
Page 15
...Questions (FAQs 11-1 Brother Bulletin Board 11-1 Error Messages 11-2 Document Jam 11-6 Printer Jam 11-6 Paper is Jammed in the Multi-purpose Sheet Feeder.....11-7 Paper is Jammed near the Drum Unit or in the Fuser Unit 11-7 If You Are Having Difficulty with Your FAX/MFC.........11-8 Packing and ...Shipping the FAX/MFC 11-15 Routine Maintenance 11-17 Cleaning the Document Scanner 11-17 Cleaning the Printer 11-18 Cleaning the Drum Unit 11-19 Replacing the Toner Cartridge 11-20 How to Replace...
...Questions (FAQs 11-1 Brother Bulletin Board 11-1 Error Messages 11-2 Document Jam 11-6 Printer Jam 11-6 Paper is Jammed in the Multi-purpose Sheet Feeder.....11-7 Paper is Jammed near the Drum Unit or in the Fuser Unit 11-7 If You Are Having Difficulty with Your FAX/MFC.........11-8 Packing and ...Shipping the FAX/MFC 11-15 Routine Maintenance 11-17 Cleaning the Document Scanner 11-17 Cleaning the Printer 11-18 Cleaning the Drum Unit 11-19 Replacing the Toner Cartridge 11-20 How to Replace...

Users Manual - English
Page 23
If you do not pack the FAX/MFC properly, you transport the FAX/MFC, use the packing materials that came with FAX/MFC. See Ordering Accessories and Supplies on page ii for the correct item numbers. Whenever you may void your warranty. ASSEMBLY AND ...Compliant Bi-directional Parallel Cable (For MFC 4600 Only) Document Tray Paper Tray CD-ROM (For MFC 4600 Only) Operations Manual Test Sheet (For USA Only) MFC Manual (For MFC 4600 Only) Drum Unit Assembly (With free Starter Toner Cartridge) Brother StartCard If an item is missing, call Brother Customer Service at 1-800-284-4329 ...
If you do not pack the FAX/MFC properly, you transport the FAX/MFC, use the packing materials that came with FAX/MFC. See Ordering Accessories and Supplies on page ii for the correct item numbers. Whenever you may void your warranty. ASSEMBLY AND ...Compliant Bi-directional Parallel Cable (For MFC 4600 Only) Document Tray Paper Tray CD-ROM (For MFC 4600 Only) Operations Manual Test Sheet (For USA Only) MFC Manual (For MFC 4600 Only) Drum Unit Assembly (With free Starter Toner Cartridge) Brother StartCard If an item is missing, call Brother Customer Service at 1-800-284-4329 ...
Users Manual - English
Page 25
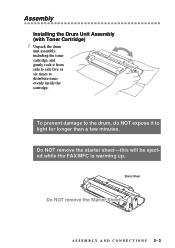
Assembly Installing the Drum Unit Assembly (with Toner Cartridge) 1 Unpack the drum unit assembly, including the toner cartridge, and gently rock it to distribute toner evenly inside the cartridge. Starter Sheet ASSEMBLY AND CONNECTIONS 2-3 To prevent damage to the drum, do NOT expose it from side to side five or six times to light for longer than a few minutes. Do NOT remove the starter sheet-this will be ejected while the FAX/MFC is warming up.
Assembly Installing the Drum Unit Assembly (with Toner Cartridge) 1 Unpack the drum unit assembly, including the toner cartridge, and gently rock it to distribute toner evenly inside the cartridge. Starter Sheet ASSEMBLY AND CONNECTIONS 2-3 To prevent damage to the drum, do NOT expose it from side to side five or six times to light for longer than a few minutes. Do NOT remove the starter sheet-this will be ejected while the FAX/MFC is warming up.
Users Manual - English
Page 26
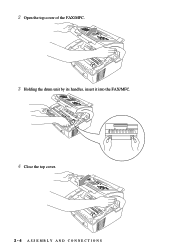
2 Open the top cover of the FAX/MFC. 3 Holding the drum unit by its handles, insert it into the FAX/MFC. 4 Close the top cover. 2-4 ASSEMBLY AND CONNECTIONS
2 Open the top cover of the FAX/MFC. 3 Holding the drum unit by its handles, insert it into the FAX/MFC. 4 Close the top cover. 2-4 ASSEMBLY AND CONNECTIONS
Users Manual - English
Page 89
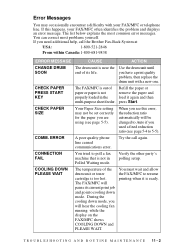
.... ERROR A poor quality phone line caused communications error. Try the call the Brother Fax-Back System at USA: 1-800-521-2846 From within Canada:1-800-681-9838 ERROR MESSAGE CAUSE ACTION CHANGE DRUM SOON The drum unit is near the end of its current print job and go into cooling...it is not in Polled Waiting mode. COMM. Verify the other party's polling setup. Use the drum unit until you have a print quality problem, then replace the drum unit with your FAX/MFC often identifies the problem and displays an error message. If this error, the reduction ratio automatically ...
.... ERROR A poor quality phone line caused communications error. Try the call the Brother Fax-Back System at USA: 1-800-521-2846 From within Canada:1-800-681-9838 ERROR MESSAGE CAUSE ACTION CHANGE DRUM SOON The drum unit is near the end of its current print job and go into cooling...it is not in Polled Waiting mode. COMM. Verify the other party's polling setup. Use the drum unit until you have a print quality problem, then replace the drum unit with your FAX/MFC often identifies the problem and displays an error message. If this error, the reduction ratio automatically ...
Users Manual - English
Page 94
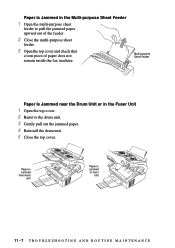
Paper is jammed in fuser unit 11 - 7 T R O U B L E S H O O T I N G A N D R O U T I N E M A I N T E N A N C E Paper is jammed near the Drum Unit or in the Multi-purpose Sheet Feeder 1 Open the multi-purpose sheet feeder to pull the jammed paper upward out of the feeder. 2 Close ... the top cover and check that a torn piece of paper does not remain inside the fax machine. Multi-purpose Sheet Feeder Paper is Jammed near drum unit Paper is Jammed in the Fuser Unit 1 Open the top cover. 2 Remove the...
Paper is jammed in fuser unit 11 - 7 T R O U B L E S H O O T I N G A N D R O U T I N E M A I N T E N A N C E Paper is jammed near the Drum Unit or in the Multi-purpose Sheet Feeder 1 Open the multi-purpose sheet feeder to pull the jammed paper upward out of the feeder. 2 Close ... the top cover and check that a torn piece of paper does not remain inside the fax machine. Multi-purpose Sheet Feeder Paper is Jammed near drum unit Paper is Jammed in the Fuser Unit 1 Open the top cover. 2 Remove the...
Users Manual - English
Page 98
...8226; The toner cartridge and drum unit are installed properly. • The interface cable is not recognizing the printer's first couple of the page. A MEMORY FULL error message occurs. (For MFC 4600 only) •Reduce the printer resolution. Reduce the graphic quality... The MFC prints unexpectedely or it is plugged in several ways. Check the following: • The FAX/MFC is set up to allow for this. 11 - 11 T R O U B L E S H O O T I N G A N D R O U T I N E M A I print them. (For MFC 4600 only) Most laser printers have text missing. (For MFC 4600 only) The MFC cannot print...
...8226; The toner cartridge and drum unit are installed properly. • The interface cable is not recognizing the printer's first couple of the page. A MEMORY FULL error message occurs. (For MFC 4600 only) •Reduce the printer resolution. Reduce the graphic quality... The MFC prints unexpectedely or it is plugged in several ways. Check the following: • The FAX/MFC is set up to allow for this. 11 - 11 T R O U B L E S H O O T I N G A N D R O U T I N E M A I print them. (For MFC 4600 only) Most laser printers have text missing. (For MFC 4600 only) The MFC cannot print...
Users Manual - English
Page 100
... the display shows CHANGE DRUM SOON, replace the drum unit with a new one . If after cleaning, you still have vertical stripes. Remove the drum unit and clean the FAX/MFC's interior (See Routine Maintenance, page 11-17, Cleaning the Printer, page 11-18 and Cleaning the Drum Unit, page 11-19....). Dark Stripes or Toner Stains Clean the FAX/MFC's interior and the primary corona wire of...
... the display shows CHANGE DRUM SOON, replace the drum unit with a new one . If after cleaning, you still have vertical stripes. Remove the drum unit and clean the FAX/MFC's interior (See Routine Maintenance, page 11-17, Cleaning the Printer, page 11-18 and Cleaning the Drum Unit, page 11-19....). Dark Stripes or Toner Stains Clean the FAX/MFC's interior and the primary corona wire of...
Users Manual - English
Page 101
...drum...drum unit is a consumable item and it will cause this case, replace the drum...Printer, page 11-18 and Cleaning the Drum Unit, page 11-19.) If a blurred page occurs after cleaning and the display shows CHANGE DRUM SOON, replace the drum... unit with a new one . Ghost images appear on a flat, horizontal surface. In this problem. Remove the drum unit with a new one . You must then replace the drum...A I N T E N A N C E 11 - 14 Make sure that the drum was marked or damaged by themselves. Black Page Wipe the electric terminals referring to clear this ...
...drum...drum unit is a consumable item and it will cause this case, replace the drum...Printer, page 11-18 and Cleaning the Drum Unit, page 11-19.) If a blurred page occurs after cleaning and the display shows CHANGE DRUM SOON, replace the drum... unit with a new one . Ghost images appear on a flat, horizontal surface. In this problem. Remove the drum unit with a new one . You must then replace the drum...A I N T E N A N C E 11 - 14 Make sure that the drum was marked or damaged by themselves. Black Page Wipe the electric terminals referring to clear this ...
Users Manual - English
Page 102
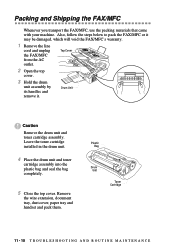
...S H O O T I N G A N D R O U T I N E M A I N T E N A N C E Top Cover 2 Open the top cover. 3 Hold the drum unit assembly by its handles and remove it may be damaged, which will void the FAX/MFC's warranty. 1 Remove the line cord and unplug the FAX/MFC from the AC outlet. Remove the wire extension, document tray, dust cover, paper.... 5 Close the top cover. Packing and Shipping the FAX/MFC Whenever you transport the FAX/MFC, use the packing materials that came with your machine. Drum Unit Caution Remove the drum unit and toner cartridge assembly. Also, follow the steps below ...
...S H O O T I N G A N D R O U T I N E M A I N T E N A N C E Top Cover 2 Open the top cover. 3 Hold the drum unit assembly by its handles and remove it may be damaged, which will void the FAX/MFC's warranty. 1 Remove the line cord and unplug the FAX/MFC from the AC outlet. Remove the wire extension, document tray, dust cover, paper.... 5 Close the top cover. Packing and Shipping the FAX/MFC Whenever you transport the FAX/MFC, use the packing materials that came with your machine. Drum Unit Caution Remove the drum unit and toner cartridge assembly. Also, follow the steps below ...
Users Manual - English
Page 103
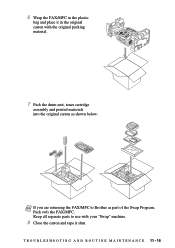
Keep all separate parts to use with your "Swap" machine. 8 Close the carton and tape it in the original carton with the original packing material. 7 Pack the drum unit, toner cartridge assembly and printed materials into the original carton as shown below: Note If you are returning the FAX/MFC to Brother as part of the Swap Program, Pack only the FAX/MFC. 6 Wrap the FAX/MFC in the plastic bag and place it shut. T R O U B L E S H O O T I N G A N D R O U T I N E M A I N T E N A N C E 11 - 16
Keep all separate parts to use with your "Swap" machine. 8 Close the carton and tape it in the original carton with the original packing material. 7 Pack the drum unit, toner cartridge assembly and printed materials into the original carton as shown below: Note If you are returning the FAX/MFC to Brother as part of the Swap Program, Pack only the FAX/MFC. 6 Wrap the FAX/MFC in the plastic bag and place it shut. T R O U B L E S H O O T I N G A N D R O U T I N E M A I N T E N A N C E 11 - 16
Users Manual - English
Page 104
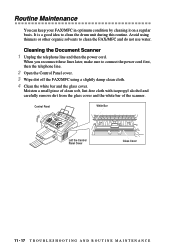
...connect the power cord first, then the telephone line. 2 Open the Control Panel cover. 3 Wipe dirt off the FAX/MFC using thinners or other organic solvents to clean the drum unit during this routine. Moisten a small piece of clean soft, lint-free cloth with isopropyl alcohol and carefully remove dirt... from the glass cover and the white bar of the scanner. Routine Maintenance You can keep your FAX/MFC in optimum condition by ...
...connect the power cord first, then the telephone line. 2 Open the Control Panel cover. 3 Wipe dirt off the FAX/MFC using thinners or other organic solvents to clean the drum unit during this routine. Moisten a small piece of clean soft, lint-free cloth with isopropyl alcohol and carefully remove dirt... from the glass cover and the white bar of the scanner. Routine Maintenance You can keep your FAX/MFC in optimum condition by ...
Users Manual - English
Page 105
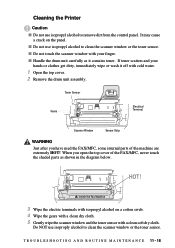
... Sensor Gears Electrical Terminal Scanner Window Sensor Strip WARNING Just after you open the top cover of the machine are extremely HOT! Cleaning the Printer Caution s Do not use isopropyl alcohol to clean the scanner window or the toner sensor. Inside the Fax Machine 3 Wipe the electric terminals... a clean dry cloth. 5 Gently wipe the scanner window and the toner sensor with cold water. 1 Open the top cover. 2 Remove the drum unit assembly. When you have used the FAX/MFC, some internal parts of the FAX/MFC, never touch the shaded parts as it off with a clean soft dry cloth.
... Sensor Gears Electrical Terminal Scanner Window Sensor Strip WARNING Just after you open the top cover of the machine are extremely HOT! Cleaning the Printer Caution s Do not use isopropyl alcohol to clean the scanner window or the toner sensor. Inside the Fax Machine 3 Wipe the electric terminals... a clean dry cloth. 5 Gently wipe the scanner window and the toner sensor with cold water. 1 Open the top cover. 2 Remove the drum unit assembly. When you have used the FAX/MFC, some internal parts of the FAX/MFC, never touch the shaded parts as it off with a clean soft dry cloth.
Users Manual - English
Page 106
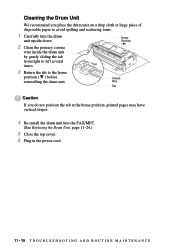
... We recommend you do not position the tab at the home position, printed pages may have vertical stripes. 4 Re-install the drum unit into the FAX/MFC. (See Replacing the Drum Unit, page 11-24.) 5 Close the top cover. 6 Plug in the power cord. 11 - 19 T R O U B L E S H O O T I N G A N D R O U T I N E M A I N T E N A N C E Home Position (w) 3 Return the tab to left...
... We recommend you do not position the tab at the home position, printed pages may have vertical stripes. 4 Re-install the drum unit into the FAX/MFC. (See Replacing the Drum Unit, page 11-24.) 5 Close the top cover. 6 Plug in the power cord. 11 - 19 T R O U B L E S H O O T I N G A N D R O U T I N E M A I N T E N A N C E Home Position (w) 3 Return the tab to left...
Users Manual - English
Page 108
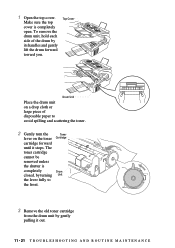
...to the front. 3 Remove the old toner cartridge from the drum unit by gently pulling it stops. Top Cover Drum Unit Place the drum unit on a drop cloth or large piece of the drum by turning Unit the lever fully to avoid spilling and scattering ... cartridge forward until it out. 11 - 21 T R O U B L E S H O O T I N G A N D R O U T I N E M A I N T E N A N C E Make sure the top cover is completely Drum closed, by its handles and gently lift the drum forward toward you. The toner cartridge cannot be removed unless the shutter is completely open. 1 Open the top cover.
...to the front. 3 Remove the old toner cartridge from the drum unit by gently pulling it stops. Top Cover Drum Unit Place the drum unit on a drop cloth or large piece of the drum by turning Unit the lever fully to avoid spilling and scattering ... cartridge forward until it out. 11 - 21 T R O U B L E S H O O T I N G A N D R O U T I N E M A I N T E N A N C E Make sure the top cover is completely Drum closed, by its handles and gently lift the drum forward toward you. The toner cartridge cannot be removed unless the shutter is completely open. 1 Open the top cover.
Users Manual - English
Page 110
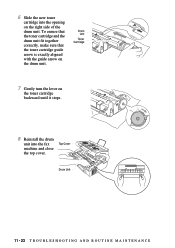
To ensure that the toner cartridge and the drum unit fit together correctly, make sure that the toner cartridge guide arrow is exactly aligned with the guide arrow on the right side of the drum unit. 6 Slide the new toner cartridge into the fax machine and close the top cover. Drum Unit Toner Cartridge 7 Gently turn the lever on the toner cartridge backward until it stops. 8 Reinstall the drum unit into the opening on the drum unit. Top Cover Drum Unit 11 - 23 T R O U B L E S H O O T I N G A N D R O U T I N E M A I N T E N A N C E
To ensure that the toner cartridge and the drum unit fit together correctly, make sure that the toner cartridge guide arrow is exactly aligned with the guide arrow on the right side of the drum unit. 6 Slide the new toner cartridge into the fax machine and close the top cover. Drum Unit Toner Cartridge 7 Gently turn the lever on the toner cartridge backward until it stops. 8 Reinstall the drum unit into the opening on the drum unit. Top Cover Drum Unit 11 - 23 T R O U B L E S H O O T I N G A N D R O U T I N E M A I N T E N A N C E

