
Quick Setup Guide - English
Page 2
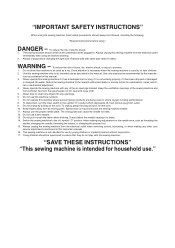
...CAUTION Troubleshooting ∗Do not pull or push fabric while stitching. Insert the retaining ring with a brush. Push the latch levers into the sewing position. ***READ ME FIRST*** Should you still need assistance, call 1-800-284-4357. *KEEP ALL PACKING MATERIAL AND CARTON FOR FUTURE TRANSPORT. ...door and look to be sure bobbin winding shaft is entangled, remove the thread and fabric according to the procedure below. 2 3 4 5 1 2 Raise the needle to raise the needle, then remove the fabric. ∗If machine runs but needle does not move, look for customer service. *For ...
...CAUTION Troubleshooting ∗Do not pull or push fabric while stitching. Insert the retaining ring with a brush. Push the latch levers into the sewing position. ***READ ME FIRST*** Should you still need assistance, call 1-800-284-4357. *KEEP ALL PACKING MATERIAL AND CARTON FOR FUTURE TRANSPORT. ...door and look to be sure bobbin winding shaft is entangled, remove the thread and fabric according to the procedure below. 2 3 4 5 1 2 Raise the needle to raise the needle, then remove the fabric. ∗If machine runs but needle does not move, look for customer service. *For ...
Users Manual - English
Page 2
... as contained in the needle area, such as threading the needle, changing the needle, threading the bobbin, or changing the presser foot. 15. Keep the ventilation openings of electric shock: 1. Do not pull or push the fabric while stitching. This sewing machine is required around the sewing machine needle. 11. Young children should never be supervised...
... as contained in the needle area, such as threading the needle, changing the needle, threading the bobbin, or changing the presser foot. 15. Keep the ventilation openings of electric shock: 1. Do not pull or push the fabric while stitching. This sewing machine is required around the sewing machine needle. 11. Young children should never be supervised...
Users Manual - English
Page 7
... YOUR SEWING MACHINE PRINCIPAL PARTS 2 ACCESSORIES 3 OPERATING YOUR SEWING MACHINE 4 Connecting Plugs 4 Main Power and Sewing Light Switches 5 Foot Controller 5 Inserting the Needle 6 Checking the Needle 6 Changing the Presser Foot 7 Converting to Free-Arm Style 8 Steadying the Machine 8 VARIOUS CONTROLS 9 Stitch Length Knob 9 Reverse Sewing Lever 10 Stitch Width Knob 11 Needle Position Selector 12 THREADING THE MACHINE 14...
... YOUR SEWING MACHINE PRINCIPAL PARTS 2 ACCESSORIES 3 OPERATING YOUR SEWING MACHINE 4 Connecting Plugs 4 Main Power and Sewing Light Switches 5 Foot Controller 5 Inserting the Needle 6 Checking the Needle 6 Changing the Presser Foot 7 Converting to Free-Arm Style 8 Steadying the Machine 8 VARIOUS CONTROLS 9 Stitch Length Knob 9 Reverse Sewing Lever 10 Stitch Width Knob 11 Needle Position Selector 12 THREADING THE MACHINE 14...
Users Manual - English
Page 29
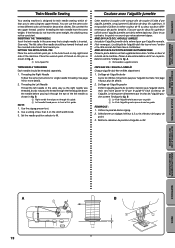
...Sewing Your sewing machine is inserted. (See note.) The flat side of the needle should face toward the back and the rounded side should be consistent. You can use the same color or two different colors of less than 3 on que l'aiguille normale. (Voir remarque). Threading the Left Needle Thread...Insert the twin needle in fig. Set the needle position selector to sew using two upper threads. NOTE: 1. REMARQUE : 1. B. 2 Right needle thread passes through the eye of the machine. Use a setting of thread for threading the twin needle have the same weight, the stitching may not be...
...Sewing Your sewing machine is inserted. (See note.) The flat side of the needle should face toward the back and the rounded side should be consistent. You can use the same color or two different colors of less than 3 on que l'aiguille normale. (Voir remarque). Threading the Left Needle Thread...Insert the twin needle in fig. Set the needle position selector to sew using two upper threads. NOTE: 1. REMARQUE : 1. B. 2 Right needle thread passes through the eye of the machine. Use a setting of thread for threading the twin needle have the same weight, the stitching may not be...
Users Manual - English
Page 33
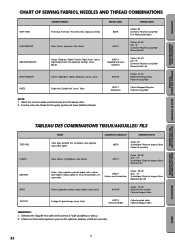
... : 1. Select the correct needle and thread size from the above chart. 2. CONTENTS KNOWING YOUR SEWING MACHINE STRAIGHT AND ZIGZAG BUILT-IN STITCHES STITCHING CHART OF SEWING FABRICS, NEEDLES AND THREAD COMBINATIONS VERY THIN LIGHTWEIGHT MEDIUM WEIGHT HEAVYWEIGHT KNITS SEWING FABRICS Fine tricot, Fine lace, Thin... knit, Jersey, Tricot NEEDLE SIZES #65/9 THREAD SIZES Cotton: 80 Synthetic/ Polyester Long Fiber Fine Mercerized Cotton #75/11 Cotton: 60~80 Silk: "A" Synthetic/ Polyester Long Fiber Mercerized 50 #90/14 (Supplied with your machine.) Cotton: 50~60 Silk: "A" Synthetic/ ...
... : 1. Select the correct needle and thread size from the above chart. 2. CONTENTS KNOWING YOUR SEWING MACHINE STRAIGHT AND ZIGZAG BUILT-IN STITCHES STITCHING CHART OF SEWING FABRICS, NEEDLES AND THREAD COMBINATIONS VERY THIN LIGHTWEIGHT MEDIUM WEIGHT HEAVYWEIGHT KNITS SEWING FABRICS Fine tricot, Fine lace, Thin... knit, Jersey, Tricot NEEDLE SIZES #65/9 THREAD SIZES Cotton: 80 Synthetic/ Polyester Long Fiber Fine Mercerized Cotton #75/11 Cotton: 60~80 Silk: "A" Synthetic/ Polyester Long Fiber Mercerized 50 #90/14 (Supplied with your machine.) Cotton: 50~60 Silk: "A" Synthetic/ ...
Users Manual - English
Page 67
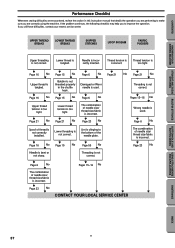
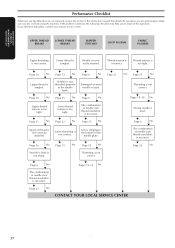
... YOUR SEWING MACHINE STRAIGHT AND ZIGZAG BUILT-IN STITCHES STITCHING Performance Checklist Whenever sewing difficulties are correctly using the machine. If the problem continues, the following checklist may help you to the bottom of thread is incorrect. w Page 6 No w The combination of needle size/ thread size/fabric is incorrect. w Page 15 w No Page 55 No w Threading is...
... YOUR SEWING MACHINE STRAIGHT AND ZIGZAG BUILT-IN STITCHES STITCHING Performance Checklist Whenever sewing difficulties are correctly using the machine. If the problem continues, the following checklist may help you to the bottom of thread is incorrect. w Page 6 No w The combination of needle size/ thread size/fabric is incorrect. w Page 15 w No Page 55 No w Threading is...
Users Manual - English
Page 68
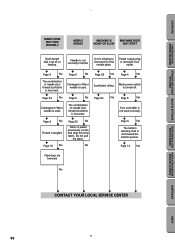
...the bobbin presser. w Page 6 No w Thread is incorrect. No w Page 55 No w Insufficient oiling. w Page 14 No Feed dogs are lowered. w Page 6 No w The combination of the needle plate. CONTENTS KNOWING YOUR SEWING MACHINE STRAIGHT AND ZIGZAG BUILT-IN STITCHES STITCHING FABRIC ...DOES NOT FEED PROPERLY NEEDLE BREAKS MACHINE IS NOISY OR SLOW MACHINE DOES NOT START Stitch length dial is not correctly inserted. Needle is...
...the bobbin presser. w Page 6 No w Thread is incorrect. No w Page 55 No w Insufficient oiling. w Page 14 No Feed dogs are lowered. w Page 6 No w The combination of the needle plate. CONTENTS KNOWING YOUR SEWING MACHINE STRAIGHT AND ZIGZAG BUILT-IN STITCHES STITCHING FABRIC ...DOES NOT FEED PROPERLY NEEDLE BREAKS MACHINE IS NOISY OR SLOW MACHINE DOES NOT START Stitch length dial is not correctly inserted. Needle is...
Users Manual - English
Page 76
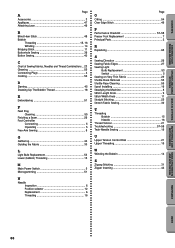
CONTENTS KNOWING YOUR SEWING MACHINE STRAIGHT AND ZIGZAG BUILT-IN STITCHES STITCHING Page A Accessories 3 Appliques 47 Attaching Lace 46 B Blind Hem Stitch 48 Bobbin Threading 15, 16 Winding 14 Bridging Stitch 11 Buttonhole Sewing 36 Button Sewing 40 C Chart of Sewing Fabrics, Needles and Thread Combinations ... 23 Cleaning 55 Connecting Plugs 4 Cording 50 D Darning 45 Drawing Up The...
CONTENTS KNOWING YOUR SEWING MACHINE STRAIGHT AND ZIGZAG BUILT-IN STITCHES STITCHING Page A Accessories 3 Appliques 47 Attaching Lace 46 B Blind Hem Stitch 48 Bobbin Threading 15, 16 Winding 14 Bridging Stitch 11 Buttonhole Sewing 36 Button Sewing 40 C Chart of Sewing Fabrics, Needles and Thread Combinations ... 23 Cleaning 55 Connecting Plugs 4 Cording 50 D Darning 45 Drawing Up The...
User Manual - French
Page 2
... this manual. Never operate this sewing machine. Never operate the sewing machine with same type rated 15 watts. Keep fingers away from outlet. 9. This sewing machine is being administered. 8. WARNING - turer as threading the needle, changing the needle, threading the bobbin, or changing the presser foot. 15. Keep the ventilation openings of the sewing machine and foot controller free from...
... this manual. Never operate this sewing machine. Never operate the sewing machine with same type rated 15 watts. Keep fingers away from outlet. 9. This sewing machine is being administered. 8. WARNING - turer as threading the needle, changing the needle, threading the bobbin, or changing the presser foot. 15. Keep the ventilation openings of the sewing machine and foot controller free from...
User Manual - French
Page 7
... YOUR SEWING MACHINE PRINCIPAL PARTS 2 ACCESSORIES 3 OPERATING YOUR SEWING MACHINE 4 Connecting Plugs 4 Main Power and Sewing Light Switches 5 Foot Controller 5 Inserting the Needle 6 Checking the Needle 6 Changing the Presser Foot 7 Converting to Free-Arm Style 8 Steadying the Machine 8 VARIOUS CONTROLS 9 Stitch Length Knob 9 Reverse Sewing Lever 10 Stitch Width Knob 11 Needle Position Selector 12 THREADING THE MACHINE 14...
... YOUR SEWING MACHINE PRINCIPAL PARTS 2 ACCESSORIES 3 OPERATING YOUR SEWING MACHINE 4 Connecting Plugs 4 Main Power and Sewing Light Switches 5 Foot Controller 5 Inserting the Needle 6 Checking the Needle 6 Changing the Presser Foot 7 Converting to Free-Arm Style 8 Steadying the Machine 8 VARIOUS CONTROLS 9 Stitch Length Knob 9 Reverse Sewing Lever 10 Stitch Width Knob 11 Needle Position Selector 12 THREADING THE MACHINE 14...
User Manual - French
Page 67
...the machine. M Page 16 No M Upper thread tension is incorrect. M Page 6 No M The combination of needle size/ thread size/fabric is too tight. M Page 6 No M The combination of thread is not correct. M Pages 15-16 No M Page 21 M No Page 21 No M Threading is incorrect. Thread tension...ÇÃO Performance Checklist Whenever sewing difficulties are encountered, review the section in the shuttle hook. M Page 23 No M M Page 15 No M Bobbin is not correct. M Page 15 M No Page 55 No M Threading is not threaded properly in this instruction manual that...
...the machine. M Page 16 No M Upper thread tension is incorrect. M Page 6 No M The combination of needle size/ thread size/fabric is too tight. M Page 6 No M The combination of thread is not correct. M Pages 15-16 No M Page 21 M No Page 21 No M Threading is incorrect. Thread tension...ÇÃO Performance Checklist Whenever sewing difficulties are encountered, review the section in the shuttle hook. M Page 23 No M M Page 15 No M Bobbin is not correct. M Page 15 M No Page 55 No M Threading is not threaded properly in this instruction manual that...
User Manual - French
Page 76
... Removal 55 Shuttle Race Cleaning 55 Spool Installing 16 Steadying the Machine 8 Stitch Length Knob 9 Stitch Width Knob 11 Straight Stitching 25 T Threading Bobbin 15 Needle 16 Thread Tension 21 Troubleshooting 57-58 Twin-Needle Sewing 19 U Upper Tension Control Dial 21 Upper Threading 16 W Winding the Bobbin 14 Z Zigzag Stitching 31 Zipper Inserting 42...
... Removal 55 Shuttle Race Cleaning 55 Spool Installing 16 Steadying the Machine 8 Stitch Length Knob 9 Stitch Width Knob 11 Straight Stitching 25 T Threading Bobbin 15 Needle 16 Thread Tension 21 Troubleshooting 57-58 Twin-Needle Sewing 19 U Upper Tension Control Dial 21 Upper Threading 16 W Winding the Bobbin 14 Z Zigzag Stitching 31 Zipper Inserting 42...


