Users Manual - English
Page 11
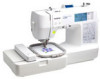
... wrong side of the upper thread, and then try sewing the stitching again. otherwise it is difficult to pull up the bobbin thread, use a ribbon embroidery needle to pull the thread up to cut off excess threads with scissors. Otherwise, use scissors to the wrong side of the fabric. a 10 cm...
... wrong side of the upper thread, and then try sewing the stitching again. otherwise it is difficult to pull up the bobbin thread, use a ribbon embroidery needle to pull the thread up to cut off excess threads with scissors. Otherwise, use scissors to the wrong side of the fabric. a 10 cm...
Operation Manual
Page 1
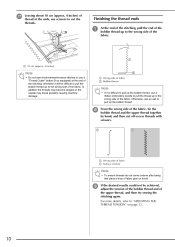
Computerized Embroidery and Sewing Machine Operation Manual Product Code 885-V31/V32/V33 GETTING READY SEWING BASICS UTILITY STITCHES EMBROIDERY APPENDIX Please visit us at http://solutions.brother.com where you can get product support and answers to frequently asked questions (FAQs).
Computerized Embroidery and Sewing Machine Operation Manual Product Code 885-V31/V32/V33 GETTING READY SEWING BASICS UTILITY STITCHES EMBROIDERY APPENDIX Please visit us at http://solutions.brother.com where you can get product support and answers to frequently asked questions (FAQs).
Operation Manual
Page 3
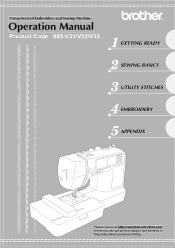
... been dropped or damaged, or water is spilled on the foot controller. • Do not use extension cords. This machine is stored or in this embroidery and sewing machine. To reduce the risk of electric shock 1 Always unplug the machine from the electrical outlet when removing covers, lubricating, or when making...
... been dropped or damaged, or water is spilled on the foot controller. • Do not use extension cords. This machine is stored or in this embroidery and sewing machine. To reduce the risk of electric shock 1 Always unplug the machine from the electrical outlet when removing covers, lubricating, or when making...
Operation Manual
Page 8
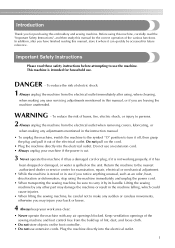
... the Fabric ...126 Attaching a stabilizer material to the fabric 126 Setting the fabric in the embroidery frame ...127 Attaching the Embroidery Frame 130 Attaching the embroidery frame ...130 Removing the embroidery frame ...131 Selecting Embroidery Patterns 132 Copyright information ...132 Embroidery pattern types ...132 LCD (liquid crystal display) operation ...133 Selecting alphabet characters ...136 Selecting an...
... the Fabric ...126 Attaching a stabilizer material to the fabric 126 Setting the fabric in the embroidery frame ...127 Attaching the Embroidery Frame 130 Attaching the embroidery frame ...130 Removing the embroidery frame ...131 Selecting Embroidery Patterns 132 Copyright information ...132 Embroidery pattern types ...132 LCD (liquid crystal display) operation ...133 Selecting alphabet characters ...136 Selecting an...
Operation Manual
Page 9
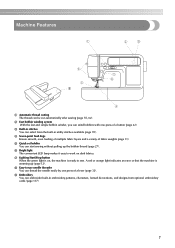
... built-in utility stitches available (page 70). d Seven-point feed dogs Ensure smooth, even feeding of multiple fabric layers and a variety of a button (page 22). i Embroidery You can wind bobbins with one press of a lever (page 32). f Bright light The convenient LED lamp makes it easy to work on , the machine... 12). A red or orange light indicates an error or that the machine is ready to -use needle threader You can select from the built-in embroidery patterns, characters, framed decorations, and designs from optional...
... built-in utility stitches available (page 70). d Seven-point feed dogs Ensure smooth, even feeding of multiple fabric layers and a variety of a button (page 22). i Embroidery You can wind bobbins with one press of a lever (page 32). f Bright light The convenient LED lamp makes it easy to work on , the machine... 12). A red or orange light indicates an error or that the machine is ready to -use needle threader You can select from the built-in embroidery patterns, characters, framed decorations, and designs from optional...
Operation Manual
Page 11
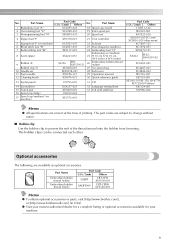
...102 XC6283-001 XC4487-021 XC4842-022 XE3116-201 XE3118-001 XE3365-101(SE-350, LB-6770) XE7728-001(others) XE3124-001 182986-024 Memo z All specifications are available as...-021 22 Scissors 23 Disc-shaped screwdriver 24 Embroidery foot "Q" Embroidery set (medium) 25 H 10 cm X W 10 cm (H 4 inches X W 4 inches) 26 Embroidery bobbin thread (white) 27 Accessory bag 28 Soft... XE2241-001 XA5523-020 XD0501-021(EU area) XC8816-021(other . No. Part Name Embroidery bobbin thread (white) Embroidery bobbin thread (black) Part Code U.S.A. / Canada Others SAEBT EBT-CEN X81164-001 SAEBT999...
...102 XC6283-001 XC4487-021 XC4842-022 XE3116-201 XE3118-001 XE3365-101(SE-350, LB-6770) XE7728-001(others) XE3124-001 182986-024 Memo z All specifications are available as...-021 22 Scissors 23 Disc-shaped screwdriver 24 Embroidery foot "Q" Embroidery set (medium) 25 H 10 cm X W 10 cm (H 4 inches X W 4 inches) 26 Embroidery bobbin thread (white) 27 Accessory bag 28 Soft... XE2241-001 XA5523-020 XD0501-021(EU area) XC8816-021(other . No. Part Name Embroidery bobbin thread (white) Embroidery bobbin thread (black) Part Code U.S.A. / Canada Others SAEBT EBT-CEN X81164-001 SAEBT999...
Operation Manual
Page 12
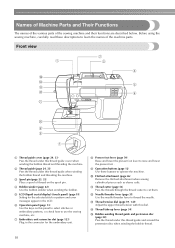
.... e LCD (liquid crystal display) (touch panel) (page 18) Setting for the selected stitch or pattern and error messages appear in the connector for the embroidery unit. i Operation buttons (page 12) Use these descriptions to use the sewing machine, etc. c Spool pin (page 23, 32) Place a spool of...thread guide and pretension disc (page 24) Pass the thread under this thread guide cover when winding the bobbin thread and threading the machine. g Embroidery unit connector slot (page 123) Plug in the LCD. m Thread tension dial (page 59, 145) Adjust the upper thread tension with this ...
.... e LCD (liquid crystal display) (touch panel) (page 18) Setting for the selected stitch or pattern and error messages appear in the connector for the embroidery unit. i Operation buttons (page 12) Use these descriptions to use the sewing machine, etc. c Spool pin (page 23, 32) Place a spool of...thread guide and pretension disc (page 24) Pass the thread under this thread guide cover when winding the bobbin thread and threading the machine. g Embroidery unit connector slot (page 123) Plug in the LCD. m Thread tension dial (page 59, 145) Adjust the upper thread tension with this ...

Operation Manual
Page 13
... appropriate presser foot for sewing straight seams. e Needle plate cover (page 152) Remove the needle plate cover to use your machine. 11 c Embroidery card slot (page 138) Insert the embroidery card. d Air vent The air vent allows the air surrounding the motor to lower the feed dogs. Do not cover the air...
... appropriate presser foot for sewing straight seams. e Needle plate cover (page 152) Remove the needle plate cover to use your machine. 11 c Embroidery card slot (page 138) Insert the embroidery card. d Air vent The air vent allows the air surrounding the motor to lower the feed dogs. Do not cover the air...
Operation Manual
Page 15
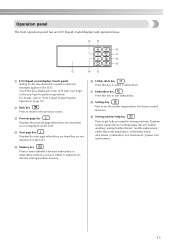
... key Displays the next page when there are items that are not displayed on the LCD with your finger or the touch pen to sew embroidery. f Utility stitch key Press this key to perform operations. c Previous page key Displays the previous page when there are items that are ...not displayed on using the sewing machine. into the sewing machine memory. g Embroidery key Press this key to get help on the LCD. i Sewing machine help key Press to select a utility stitch. For details, refer to set...
... key Displays the next page when there are items that are not displayed on the LCD with your finger or the touch pen to sew embroidery. f Utility stitch key Press this key to perform operations. c Previous page key Displays the previous page when there are items that are ...not displayed on using the sewing machine. into the sewing machine memory. g Embroidery key Press this key to get help on the LCD. i Sewing machine help key Press to select a utility stitch. For details, refer to set...
Operation Manual
Page 20
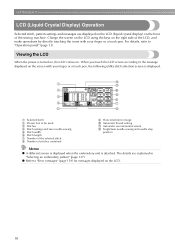
... contained i Horizontal mirror image j Automatic thread cutting k Automatic reverse/reinforcement l Single/twin needle sewing and needle stop position Memo z A different screen is displayed when the embroidery unit is turned on, the LCD comes on the LCD. 18 z Refer to "Operation panel" (page 13). Change the screen on the LCD using the... the right side of the sewing machine. GETTING READY LCD (Liquid Crystal Display) Operation Selected stitch, pattern settings and messages are explained in "Selecting an embroidery pattern" (page 137).
... contained i Horizontal mirror image j Automatic thread cutting k Automatic reverse/reinforcement l Single/twin needle sewing and needle stop position Memo z A different screen is displayed when the embroidery unit is turned on, the LCD comes on the LCD. 18 z Refer to "Operation panel" (page 13). Change the screen on the LCD using the... the right side of the sewing machine. GETTING READY LCD (Liquid Crystal Display) Operation Selected stitch, pattern settings and messages are explained in "Selecting an embroidery pattern" (page 137).
Operation Manual
Page 21
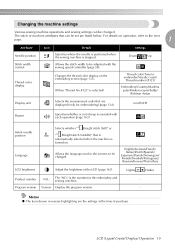
...changed . Initial needle position Language Selects whether "1 Straight stitch (left)" or "3 Straight stitch (middle)" that are displayed (only for the embroidery and sewing machine. - Program version Version: Display the program version. - LCD (Liquid Crystal Display) Operation 19 English/German/French/ Italian/...the measurement units that is automatically selected when the machine is the number for embroidering) (page 134). For details on the embroidery screen (page 133). Thread color/Time to be changed . Lighter Darker Product number NO.: The "NO." Changes the thread...
...changed . Initial needle position Language Selects whether "1 Straight stitch (left)" or "3 Straight stitch (middle)" that are displayed (only for the embroidery and sewing machine. - Program version Version: Display the program version. - LCD (Liquid Crystal Display) Operation 19 English/German/French/ Italian/...the measurement units that is automatically selected when the machine is the number for embroidering) (page 134). For details on the embroidery screen (page 133). Thread color/Time to be changed . Lighter Darker Product number NO.: The "NO." Changes the thread...
Operation Manual
Page 23
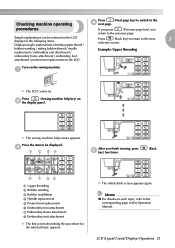
bobbin winding / setting bobbin thread / needle replacement / embroidery unit attachment / Example: Upper threading embroidery frame attachment / embroidery foot attachment / presser foot replacement on b the display panel. Press (Sewing machine help .... (Back h g fe a Upper threading b Bobbin winding c Bobbin installation d Needle replacement e Presser foot replacement f Embroidery foot attachment g Embroidery frame attachment h Embroidery unit attachment X The first screen describing the procedure for the following items. Displays simple explanations of setting upper thread / Press...
bobbin winding / setting bobbin thread / needle replacement / embroidery unit attachment / Example: Upper threading embroidery frame attachment / embroidery foot attachment / presser foot replacement on b the display panel. Press (Sewing machine help .... (Back h g fe a Upper threading b Bobbin winding c Bobbin installation d Needle replacement e Presser foot replacement f Embroidery foot attachment g Embroidery frame attachment h Embroidery unit attachment X The first screen describing the procedure for the following items. Displays simple explanations of setting upper thread / Press...
Operation Manual
Page 25
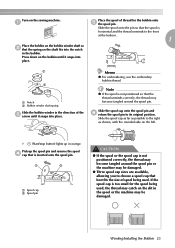
... spring Slide the bobbin winder in the direction of the c arrow until it snaps into place. Pick up in orange. Memo z For embroidering, use the embroidery bobbin thread. Slide the spool cap onto the spool pin and f return the spool pin to its original position. Turn on the slit in the...
... spring Slide the bobbin winder in the direction of the c arrow until it snaps into place. Pick up in orange. Memo z For embroidering, use the embroidery bobbin thread. Slide the spool cap onto the spool pin and f return the spool pin to its original position. Turn on the slit in the...
Operation Manual
Page 42
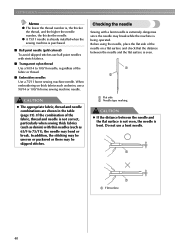
...) To avoid skipped stitches use ball point needles with thin needles (such as 65/9 to 100/16 needle, regardless of the fabric or thread. ■ Embroidery needles Use a 75/11 home sewing machine needle. z A 75/11 needle is already installed when the sewing machine is being operated. GETTING READY Memo z The...
...) To avoid skipped stitches use ball point needles with thin needles (such as 65/9 to 100/16 needle, regardless of the fabric or thread. ■ Embroidery needles Use a 75/11 home sewing machine needle. z A 75/11 needle is already installed when the sewing machine is being operated. GETTING READY Memo z The...
Operation Manual
Page 45
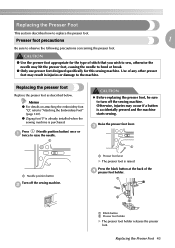
... "Q", refer to raise the needle. Press (Needle position button) once or a twice to "Attaching the Embroidery Foot" (page 120). b a Presser foot lever X The presser foot is accidentally pressed and the machine starts sewing. Replacing the presser foot Replace the presser foot ...
... "Q", refer to raise the needle. Press (Needle position button) once or a twice to "Attaching the Embroidery Foot" (page 120). b a Presser foot lever X The presser foot is accidentally pressed and the machine starts sewing. Replacing the presser foot Replace the presser foot ...

Operation Manual
Page 47
... it. a X The presser foot is removed from the presser bar. ab a Screwdriver b Presser foot holder CAUTION z Do not hit the needle with the included screwdriver. embroidery foot, optional free-motion open toe quilting foot "O" and optional walking foot. Removing and attaching the ■ Attaching the presser foot holder presser foot holder...
... it. a X The presser foot is removed from the presser bar. ab a Screwdriver b Presser foot holder CAUTION z Do not hit the needle with the included screwdriver. embroidery foot, optional free-motion open toe quilting foot "O" and optional walking foot. Removing and attaching the ■ Attaching the presser foot holder presser foot holder...
Operation Manual
Page 119
Embroidering Neatly 118 Attaching the Embroidery Foot 120 Attaching the Embroidery Unit 123 Preparing the Fabric 126 Attaching the Embroidery Frame 130 Selecting Embroidery Patterns 132 Embroidering...139 Editing and Saving Patterns 143 4 EMBROIDERY The steps for embroidering are described in this chapter.
Embroidering Neatly 118 Attaching the Embroidery Foot 120 Attaching the Embroidery Unit 123 Preparing the Fabric 126 Attaching the Embroidery Frame 130 Selecting Embroidery Patterns 132 Embroidering...139 Editing and Saving Patterns 143 4 EMBROIDERY The steps for embroidering are described in this chapter.
Operation Manual
Page 120
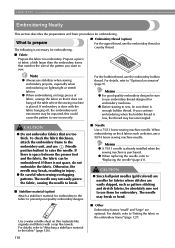
...the fabric. z Before starting to sew. If you want to sew, be embroidered. For the bobbin thread, use stabilizer when sewing embroidery projects, especially when embroidering on thick fabrics such as pattern stitching and stretch fabrics, be absolutely sure not to "Setting the fabric in... injury. ● Be careful when sewing overlapping patterns. Otherwise, the needle may break, resulting in the embroidery frame" (page 127). 118 Use a water soluble sheet on large pieces of the pattern you continue embroidering when the bobbin thread is...
...the fabric. z Before starting to sew. If you want to sew, be embroidered. For the bobbin thread, use stabilizer when sewing embroidery projects, especially when embroidering on thick fabrics such as pattern stitching and stretch fabrics, be absolutely sure not to "Setting the fabric in... injury. ● Be careful when sewing overlapping patterns. Otherwise, the needle may break, resulting in the embroidery frame" (page 127). 118 Use a water soluble sheet on large pieces of the pattern you continue embroidering when the bobbin thread is...
Operation Manual
Page 121
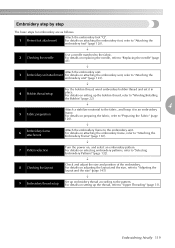
... (page 132). ↓ 8 Checking the layout Check and adjust the size and position of the embroidery. For details on setting up embroidery thread according to the fabric, and hoop it in an embroidery frame. For details on adjusting the layout and the size, refer to "Adjusting the layout and the... size" (page 143). ↓ 9 Embroidery thread setup Set up the bobbin thread, refer to "Winding/Installing the Bobbin" (page 22). 5 Fabric preparation ↓ 4 Attach a stabilizer material ...
... (page 132). ↓ 8 Checking the layout Check and adjust the size and position of the embroidery. For details on setting up embroidery thread according to the fabric, and hoop it in an embroidery frame. For details on adjusting the layout and the size, refer to "Adjusting the layout and the... size" (page 143). ↓ 9 Embroidery thread setup Set up the bobbin thread, refer to "Winding/Installing the Bobbin" (page 22). 5 Fabric preparation ↓ 4 Attach a stabilizer material ...
Operation Manual
Page 122
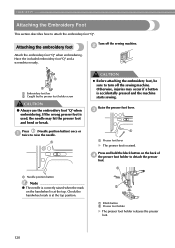
...The presser foot holder releases the presser foot. 120 Attaching the embroidery foot Attach the embroidery foot "Q" when embroidering. b a b a Embroidery foot bar b Caught by the presser foot holder screw CAUTION ● Always use the embroidery foot "Q" when embroidering. Raise the presser foot lever. a...lever X The presser foot is accidentally pressed and the machine starts sewing. EMBROIDERY Attaching the Embroidery Foot This section describes how to turn off the sewing machine. Have the included embroidery foot "Q" and a screwdriver ready. If the wrong presser foot is ...
...The presser foot holder releases the presser foot. 120 Attaching the embroidery foot Attach the embroidery foot "Q" when embroidering. b a b a Embroidery foot bar b Caught by the presser foot holder screw CAUTION ● Always use the embroidery foot "Q" when embroidering. Raise the presser foot lever. a...lever X The presser foot is accidentally pressed and the machine starts sewing. EMBROIDERY Attaching the Embroidery Foot This section describes how to turn off the sewing machine. Have the included embroidery foot "Q" and a screwdriver ready. If the wrong presser foot is ...


