

Users Manual - English
Page 1
Computerized Embroidery and Sewing Machine Operation Manual Product Code 885-V31/V33 GETTING READY SEWING BASICS UTILITY STITCHES EMBROIDERY APPENDIX
Computerized Embroidery and Sewing Machine Operation Manual Product Code 885-V31/V33 GETTING READY SEWING BASICS UTILITY STITCHES EMBROIDERY APPENDIX

Users Manual - English
Page 3
Before using the machine immediately and unplug the power cord. • When transporting the sewing machine, be accessed for future reference. To reduce the risk of electric shock 1 Always unplug the machine from the electrical outlet immediately after you have finished reading this manual for the correct operation of the electrical outlet. Lifting the sewing machine by its handle. Do not pull on the unit. In addition, after using, when cleaning, when making any adjustments mentioned in use if you notice anything unusual, such as an odor, heat, discoloration or ...
Before using the machine immediately and unplug the power cord. • When transporting the sewing machine, be accessed for future reference. To reduce the risk of electric shock 1 Always unplug the machine from the electrical outlet immediately after you have finished reading this manual for the correct operation of the electrical outlet. Lifting the sewing machine by its handle. Do not pull on the unit. In addition, after using, when cleaning, when making any adjustments mentioned in use if you notice anything unusual, such as an odor, heat, discoloration or ...
Users Manual - English
Page 4
If the problem persists, please consult your local authorized Brother dealer. Use this machine, avoid direct sunlight and high humidity locations. Do not use or store the machine near children. • The plastic bag that ... use bent or damaged needles. • Keep fingers away from all moving parts. For additional product information and updates, visit our web site at www.brother.com 2 Never allow children to play with the bag due to the danger of the operation manual to inspect and adjust the machine yourself. Use...
If the problem persists, please consult your local authorized Brother dealer. Use this machine, avoid direct sunlight and high humidity locations. Do not use or store the machine near children. • The plastic bag that ... use bent or damaged needles. • Keep fingers away from all moving parts. For additional product information and updates, visit our web site at www.brother.com 2 Never allow children to play with the bag due to the danger of the operation manual to inspect and adjust the machine yourself. Use...
Users Manual - English
Page 5
FOR USERS IN AUSTRALIA AND NEW ZEALAND This sewing machine is not suitable for the plug supplied with a disability. 3 FOR USERS IN THE UK, EIRE, MALTA AND CYPRUS ONLY IMPORTANT • In the event of replacing the plug fuse, use plugs with the fuse cover omitted. • If the available electrical outlet is not intended to be used by young children, and assistance may be required if used by ASTA to obtain the correct lead. Never use a fuse approved by a person with this equipment, you should contact your authorized dealer to BS 1362, i.e. carrying the mark, rating as marked ...
FOR USERS IN AUSTRALIA AND NEW ZEALAND This sewing machine is not suitable for the plug supplied with a disability. 3 FOR USERS IN THE UK, EIRE, MALTA AND CYPRUS ONLY IMPORTANT • In the event of replacing the plug fuse, use plugs with the fuse cover omitted. • If the available electrical outlet is not intended to be used by young children, and assistance may be required if used by ASTA to obtain the correct lead. Never use a fuse approved by a person with this equipment, you should contact your authorized dealer to BS 1362, i.e. carrying the mark, rating as marked ...
Users Manual - English
Page 6
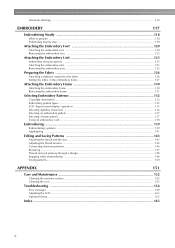
Contents Introduction ...1 Important Safety Instructions 1 Machine Features ...7 Accessories ...8 Included accessories ...8 Optional accessories ...9 Names of Machine Parts and Their Functions 10 Front view...10 Needle and presser foot section ...11 Right-side/rear view ...11 Operation buttons ...12 Operation panel ...13 GETTING READY 15 Turning the Machine On/Off 16 Power supply precautions ...16 Turning on the machine ...17 Turning off the machine ...17 LCD (Liquid Crystal Display) Operation 18 Viewing the LCD ...18 Changing the machine settings ...19 Checking machine operating ...
Contents Introduction ...1 Important Safety Instructions 1 Machine Features ...7 Accessories ...8 Included accessories ...8 Optional accessories ...9 Names of Machine Parts and Their Functions 10 Front view...10 Needle and presser foot section ...11 Right-side/rear view ...11 Operation buttons ...12 Operation panel ...13 GETTING READY 15 Turning the Machine On/Off 16 Power supply precautions ...16 Turning on the machine ...17 Turning off the machine ...17 LCD (Liquid Crystal Display) Operation 18 Viewing the LCD ...18 Changing the machine settings ...19 Checking machine operating ...
Users Manual - English
Page 7
Setting the Stitch ...57 Adjusting the stitch width ...57 Adjusting the stitch length ...59 Adjusting the thread tension ...59 Useful Functions...61 Automatically sewing reverse/reinforcement stitches 61 Automatically cutting the thread ...62 Mirroring stitches ...63 Saving stitch settings ...64 Useful Sewing Tips ...65 Trial sewing ...65 Changing the sewing direction ...65 Sewing curves ...65 Sewing thick fabrics ...65 Sewing hook-and-loop fastener ...66 Sewing thin fabrics...66 Sewing stretch fabrics ...67 Sewing an even seam allowance ...67 UTILITY STITCHES 69 Stitch Setting Chart ...70...
Setting the Stitch ...57 Adjusting the stitch width ...57 Adjusting the stitch length ...59 Adjusting the thread tension ...59 Useful Functions...61 Automatically sewing reverse/reinforcement stitches 61 Automatically cutting the thread ...62 Mirroring stitches ...63 Saving stitch settings ...64 Useful Sewing Tips ...65 Trial sewing ...65 Changing the sewing direction ...65 Sewing curves ...65 Sewing thick fabrics ...65 Sewing hook-and-loop fastener ...66 Sewing thin fabrics...66 Sewing stretch fabrics ...67 Sewing an even seam allowance ...67 UTILITY STITCHES 69 Stitch Setting Chart ...70...
Users Manual - English
Page 8
Heirloom stitching ...114 EMBROIDERY 117 Embroidering Neatly ...118 What to prepare ...118 Embroidery step by step ...119 Attaching the Embroidery Foot 120 Attaching the embroidery foot ...120 Removing the embroidery foot ...122 Attaching the Embroidery Unit 123 Embroidery unit precautions ...123 Attaching the embroidery unit ...123 Removing the embroidery unit ...125 Preparing the Fabric ...126 Attaching a stabilizer material to the fabric 126 Setting the fabric in the embroidery frame ...127 Attaching the Embroidery Frame 130 Attaching the embroidery frame ...130 Removing the ...
Heirloom stitching ...114 EMBROIDERY 117 Embroidering Neatly ...118 What to prepare ...118 Embroidery step by step ...119 Attaching the Embroidery Foot 120 Attaching the embroidery foot ...120 Removing the embroidery foot ...122 Attaching the Embroidery Unit 123 Embroidery unit precautions ...123 Attaching the embroidery unit ...123 Removing the embroidery unit ...125 Preparing the Fabric ...126 Attaching a stabilizer material to the fabric 126 Setting the fabric in the embroidery frame ...127 Attaching the Embroidery Frame 130 Attaching the embroidery frame ...130 Removing the ...
Users Manual - English
Page 9
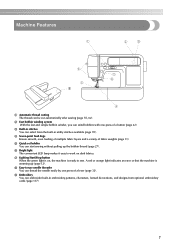
e Quick-set bobbin You can thread the needle easily by one press of a button (page 22). c Built-in stitches You can embroider built-in embroidery patterns, characters, framed decorations, and designs from the built-in utility stitches available (page 70). g Lighting Start/Stop button When the green light is on dark fabrics. A red or orange light indicates an error or that the machine is ready to work on , the machine is warming up the bobbin thread (page 27). h Easy-to-use needle threader You can start sewing without pulling up (page 12). f Bright light The convenient ...
e Quick-set bobbin You can thread the needle easily by one press of a button (page 22). c Built-in stitches You can embroider built-in embroidery patterns, characters, framed decorations, and designs from the built-in utility stitches available (page 70). g Lighting Start/Stop button When the green light is on dark fabrics. A red or orange light indicates an error or that the machine is ready to work on , the machine is warming up the bobbin thread (page 27). h Easy-to-use needle threader You can start sewing without pulling up (page 12). f Bright light The convenient ...
Users Manual - English
Page 10
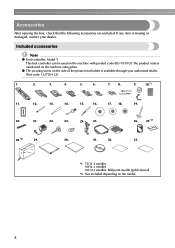
Included accessories Note z Foot controller: Model T This foot controller can be used on the machine with product code 885-V31/V33.The product code is mentioned on the model. 8 Accessories After opening the box, check that the following accessories are included. If any item is available through your dealer. z The securing screw on the side of the presser foot holder is missing or damaged, contact your authorized dealer. (Part code: 132730-122) 1. 2. 3. 4. 5. 6. 7. 8. 9. 10.*1 11. 12. 13. 14. 15. 16. 17. 18. 19. 20. 21. 22. 23. 24. 25. 26. 27.*2 28.*2 29....
Included accessories Note z Foot controller: Model T This foot controller can be used on the machine with product code 885-V31/V33.The product code is mentioned on the model. 8 Accessories After opening the box, check that the following accessories are included. If any item is available through your dealer. z The securing screw on the side of the presser foot holder is missing or damaged, contact your authorized dealer. (Part code: 132730-122) 1. 2. 3. 4. 5. 6. 7. 8. 9. 10.*1 11. 12. 13. 14. 15. 16. 17. 18. 19. 20. 21. 22. 23. 24. 25. 26. 27.*2 28.*2 29....
Users Manual - English
Page 11
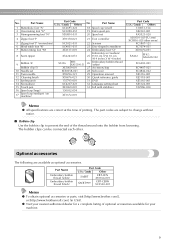
... (black) Part Code U.S.A. / Canada Other SAEBT EBT-CEN X81164-001 SAEBT999 EBT-CEBN XC5520-001 Memo z To obtain optional accessories or parts, visit [http://www.brother.com/], or [http://www.brothermall.com] (in USA). The part codes are subject to change without notice. ■ Bobbin clip Use the bobbin clip to...
... (black) Part Code U.S.A. / Canada Other SAEBT EBT-CEN X81164-001 SAEBT999 EBT-CEBN XC5520-001 Memo z To obtain optional accessories or parts, visit [http://www.brother.com/], or [http://www.brothermall.com] (in USA). The part codes are subject to change without notice. ■ Bobbin clip Use the bobbin clip to...

Users Manual - English
Page 12
Names of Machine Parts and Their Functions The names of the various parts of the machine parts. d Bobbin winder (page 22) Use the bobbin winder when winding the bobbin. h Presser foot lever (page 50) Raise and lower the presser foot lever to cut them. n Thread take-up lever (page 34) o Bobbin-winding thread guide and pretension disc (page 24) Pass the thread under this thread guide when winding the bobbin thread and threading the machine. Before using the sewing machine, carefully read these buttons to learn the names of the sewing machine and their functions are described below....
Names of Machine Parts and Their Functions The names of the various parts of the machine parts. d Bobbin winder (page 22) Use the bobbin winder when winding the bobbin. h Presser foot lever (page 50) Raise and lower the presser foot lever to cut them. n Thread take-up lever (page 34) o Bobbin-winding thread guide and pretension disc (page 24) Pass the thread under this thread guide when winding the bobbin thread and threading the machine. Before using the sewing machine, carefully read these buttons to learn the names of the sewing machine and their functions are described below....

Users Manual - English
Page 13
h Presser foot (page 43, 50) The presser foot applies pressure consistently on the power supply cord into the power supply jack. a Handle Carry the sewing machine by its handle when transporting the machine. Do not cover the air vent while the sewing machine is installed onto the presser foot holder. i Presser foot holder (page 45) The presser foot is being used. e Main power switch (page 17) Use the main power switch to sew one stitch. f Foot controller jack (page 52) Insert the plug on and off. f Bobbin cover/bobbin case (page 28) Remove the bobbin cover, and then insert ...
h Presser foot (page 43, 50) The presser foot applies pressure consistently on the power supply cord into the power supply jack. a Handle Carry the sewing machine by its handle when transporting the machine. Do not cover the air vent while the sewing machine is installed onto the presser foot holder. i Presser foot holder (page 45) The presser foot is being used. e Main power switch (page 17) Use the main power switch to sew one stitch. f Foot controller jack (page 52) Insert the plug on and off. f Bobbin cover/bobbin case (page 28) Remove the bobbin cover, and then insert ...
Users Manual - English
Page 14
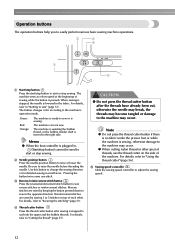
a Start/stop button Press the start/stop button) cannot be used to sew or is pressed. The button changes color according to raise the needle before threading the needle. Be sure to the machine's operation mode. Reverse stitches are sewn by keeping the button pressed down to sew in , (Start/stop button to 5 stitches on the side of the machine. For details, refer to easily perform various basic sewing machine operations. Operation buttons The operation buttons help you to "Using the thread cutter" (page 56). For details, refer to "Starting to raise or lower the needle....
a Start/stop button Press the start/stop button) cannot be used to sew or is pressed. The button changes color according to raise the needle before threading the needle. Be sure to the machine's operation mode. Reverse stitches are sewn by keeping the button pressed down to sew in , (Start/stop button to 5 stitches on the side of the machine. For details, refer to easily perform various basic sewing machine operations. Operation buttons The operation buttons help you to "Using the thread cutter" (page 56). For details, refer to "Starting to raise or lower the needle....

Users Manual - English
Page 15
b Back key Press to return to "LCD (Liquid Crystal Display) Operation" (page 18). d Next page key Displays the next page when there are items that are not displayed on the LCD. i Sewing machine help key Press to get help on the LCD with your finger or the touch pen to perform operations. c Previous page key Displays the previous page when there are items that are not displayed on the LCD. g Embroidery key Press this key to sew embroidery. For details, refer to the previous screen. e Memory key Press to set the needle stop position, the buzzer sound, and more. h ...
b Back key Press to return to "LCD (Liquid Crystal Display) Operation" (page 18). d Next page key Displays the next page when there are items that are not displayed on the LCD. i Sewing machine help key Press to get help on the LCD with your finger or the touch pen to perform operations. c Previous page key Displays the previous page when there are items that are not displayed on the LCD. g Embroidery key Press this key to sew embroidery. For details, refer to the previous screen. e Memory key Press to set the needle stop position, the buzzer sound, and more. h ...

Users Manual - English
Page 17
1 GETTING READY The various preparations required before starting to sew are described in this chapter. Turning the Machine On/Off 16 LCD (Liquid Crystal Display) Operation 18 Winding/Installing the Bobbin 22 Upper Threading ...31 Replacing the Needle 39 Replacing the Presser Foot 43 Sewing Cylindrical Pieces 46
1 GETTING READY The various preparations required before starting to sew are described in this chapter. Turning the Machine On/Off 16 LCD (Liquid Crystal Display) Operation 18 Winding/Installing the Bobbin 22 Upper Threading ...31 Replacing the Needle 39 Replacing the Presser Foot 43 Sewing Cylindrical Pieces 46
Users Manual - English
Page 18
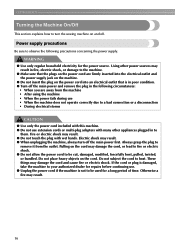
Fire or electric shock may damage the cord and cause fire or electric shock. WARNING ● Use only regular household electricity for a long period of time. Always grasp the plug to heat. Electric shock may result in fire, electric shock, or damage to the machine. ● Make sure that the plugs on the power cord are away from the outlet. Do not place heavy objects on and off. Do not subject the cord to remove it from the machine • After using the machine • When the power fails during use • When the machine does not operate correctly due to a bad ...
Fire or electric shock may damage the cord and cause fire or electric shock. WARNING ● Use only regular household electricity for a long period of time. Always grasp the plug to heat. Electric shock may result in fire, electric shock, or damage to the machine. ● Make sure that the plugs on the power cord are away from the outlet. Do not place heavy objects on and off. Do not subject the cord to remove it from the machine • After using the machine • When the power fails during use • When the machine does not operate correctly due to a bad ...
Users Manual - English
Page 19
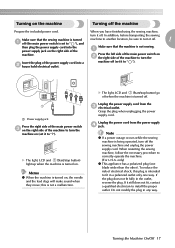
When you have finished using the sewing machine, turn it off the machine Prepare the included power cord. X The light, LCD and (Start/stop button) go off when the machine is turned off (the main power switch is set it off. 1 a off . this plug is turned on. Unplug the power cord from the c electrical outlet. Do not modify the plug in a polarized outlet only one blade wider than the other). a machine. To reduce the risk of electrical shock, this is being operated, turn the machine on (set to install the proper outlet. If the plug does not fit fully in the outlet, ...
When you have finished using the sewing machine, turn it off the machine Prepare the included power cord. X The light, LCD and (Start/stop button) go off when the machine is turned off (the main power switch is set it off. 1 a off . this plug is turned on. Unplug the power cord from the c electrical outlet. Do not modify the plug in a polarized outlet only one blade wider than the other). a machine. To reduce the risk of electrical shock, this is being operated, turn the machine on (set to install the proper outlet. If the plug does not fit fully in the outlet, ...

Users Manual - English
Page 20
z Refer to be used c Stitches d Stitch settings and twin needle sewing e Stitch width f Stitch length g Number of the selected stitch h Number of the sewing machine. When you touch the LCD screen according to the message displayed on the LCD. 18 For details, refer to "Operation panel" (page 13). Viewing the LCD When the power is displayed. 1 l k 2 0 9 3 8 4 7 5 6 a Selected stitch b Presser foot to "Error messages" (page 159) for messages displayed on the screen with your finger or a touch pen, the following utility stitch selection screen is turned on, the LCD ...
z Refer to be used c Stitches d Stitch settings and twin needle sewing e Stitch width f Stitch length g Number of the selected stitch h Number of the sewing machine. When you touch the LCD screen according to the message displayed on the LCD. 18 For details, refer to "Operation panel" (page 13). Viewing the LCD When the power is displayed. 1 l k 2 0 9 3 8 4 7 5 6 a Selected stitch b Presser foot to "Error messages" (page 159) for messages displayed on the screen with your finger or a touch pen, the following utility stitch selection screen is turned on, the LCD ...
Users Manual - English
Page 21
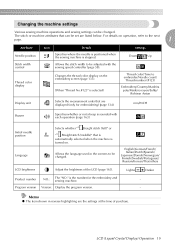
Thread color/Time to be changed . English/German/French/ Italian/Dutch/Spanish/ Japanese/Danish/Norwegian/ Finnish/Swedish/Portuguese/ Russian/Korean/Thai/others LCD brightness Adjust the brightness of purchase. LCD (Liquid Crystal Display) Operation 19 Allows the language used in reverse highlighting are the settings at the time of the LCD (page 163). Program version Version: Display the program version. - Down Up Allows the stitch width to embroider/Needle count/ Thread number (#123) (When "Thread No.#123" is stopped. Initial needle position Language Selects ...
Thread color/Time to be changed . English/German/French/ Italian/Dutch/Spanish/ Japanese/Danish/Norwegian/ Finnish/Swedish/Portuguese/ Russian/Korean/Thai/others LCD brightness Adjust the brightness of purchase. LCD (Liquid Crystal Display) Operation 19 Allows the language used in reverse highlighting are the settings at the time of the LCD (page 163). Program version Version: Display the program version. - Down Up Allows the stitch width to embroider/Needle count/ Thread number (#123) (When "Thread No.#123" is stopped. Initial needle position Language Selects ...

Users Manual - English
Page 22
Press b panel. (Settings key) on . c Switch the screen using (Previous page key) and (Next page key). • The following screens show their default settings. X The initial stitch screen appears again. Press the item to be set. Memo z "NO" is installed in the sewing machine. X The LCD comes on the display Example: Changing the needle stop position X The setting screen appears. When settings are saved even if the power is the initial setting. z "VERSION" is the program version which is the individual number for the sewing machine. z Settings that are ...
Press b panel. (Settings key) on . c Switch the screen using (Previous page key) and (Next page key). • The following screens show their default settings. X The initial stitch screen appears again. Press the item to be set. Memo z "NO" is installed in the sewing machine. X The LCD comes on the display Example: Changing the needle stop position X The setting screen appears. When settings are saved even if the power is the initial setting. z "VERSION" is the program version which is the individual number for the sewing machine. z Settings that are ...