
Users Manual - English
Page 3
... the sewing machine, be accessed for future reference. Lifting the sewing machine by its handle. In addition, after using, when cleaning, when making any other part may damage the machine or result in this manual, or if you may injure your back or knees. 4 Always keep your machine if the power...
... the sewing machine, be accessed for future reference. Lifting the sewing machine by its handle. In addition, after using, when cleaning, when making any other part may damage the machine or result in this manual, or if you may injure your back or knees. 4 Always keep your machine if the power...
Users Manual - English
Page 4
... may fall, resulting in the manual. The contents of this manual. For additional product information and updates, visit our web site at www.brother.com 2 Benzene, thinner, and scouring powders can damage the case and machine, and should never be used by the manufacturer as contained in... in the needle area. • Do not use bent or damaged needles. • Keep fingers away from all moving parts. If the problem persists, please consult your local authorized Brother dealer. Do not use a damaged or incorrect needle plate, as described in injuries. 5 Special care is required when sewing...
... may fall, resulting in the manual. The contents of this manual. For additional product information and updates, visit our web site at www.brother.com 2 Benzene, thinner, and scouring powders can damage the case and machine, and should never be used by the manufacturer as contained in... in the needle area. • Do not use bent or damaged needles. • Keep fingers away from all moving parts. If the problem persists, please consult your local authorized Brother dealer. Do not use a damaged or incorrect needle plate, as described in injuries. 5 Special care is required when sewing...
Users Manual - English
Page 6
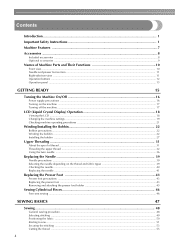
Contents Introduction ...1 Important Safety Instructions 1 Machine Features ...7 Accessories ...8 Included accessories ...8 Optional accessories ...9 Names of Machine Parts and Their Functions 10 Front view...10 Needle and presser foot section ...11 Right-side/rear view ...11 Operation buttons ...12 Operation panel ...13 GETTING ...
Contents Introduction ...1 Important Safety Instructions 1 Machine Features ...7 Accessories ...8 Included accessories ...8 Optional accessories ...9 Names of Machine Parts and Their Functions 10 Front view...10 Needle and presser foot section ...11 Right-side/rear view ...11 Operation buttons ...12 Operation panel ...13 GETTING ...
Users Manual - English
Page 10
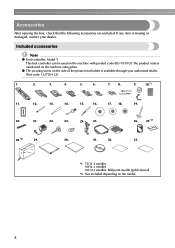
... foot controller can be used on the machine with product code 885-V31/V33.The product code is missing or damaged, contact your authorized dealer. (Part code: 132730-122) 1. 2. 3. 4. 5. 6. 7. 8. 9. 10.*1 11. 12. 13. 14. 15. 16. 17. 18. 19. 20. 21. 22. 23. 24. 25. 26. 27.*2 28.*2 29. 30. 31...
... foot controller can be used on the machine with product code 885-V31/V33.The product code is missing or damaged, contact your authorized dealer. (Part code: 132730-122) 1. 2. 3. 4. 5. 6. 7. 8. 9. 10.*1 11. 12. 13. 14. 15. 16. 17. 18. 19. 20. 21. 22. 23. 24. 25. 26. 27.*2 28.*2 29. 30. 31...
Users Manual - English
Page 11
...specifications are available as optional accessories. Part Name Embroidery bobbin thread (white) Embroidery bobbin thread (black) Part Code U.S.A. / Canada Other SAEBT EBT-CEN X81164-001 SAEBT999 EBT-CEBN XC5520-001 Memo z To obtain optional accessories or parts, visit [http://www.brother.com/], or [http://www.brothermall....com] (in USA). The part codes are subject to change without notice. ■ Bobbin clip Use the bobbin clip ...
...specifications are available as optional accessories. Part Name Embroidery bobbin thread (white) Embroidery bobbin thread (black) Part Code U.S.A. / Canada Other SAEBT EBT-CEN X81164-001 SAEBT999 EBT-CEBN XC5520-001 Memo z To obtain optional accessories or parts, visit [http://www.brother.com/], or [http://www.brothermall....com] (in USA). The part codes are subject to change without notice. ■ Bobbin clip Use the bobbin clip ...

Users Manual - English
Page 12
... (page 24, 33) Pass the thread under this panel to select stitches or embroidery patterns, or check how to learn the names of the machine parts. e LCD (liquid crystal display) (touch panel) (page 18) Setting for the embroidery unit. h Presser foot lever (page 50) Raise and lower the presser...sewing machine and their functions are described below. Before using the sewing machine, carefully read these buttons to cut them. Names of Machine Parts and Their Functions The names of the various parts of thread on this thread guide cover when winding the bobbin thread and threading the machine.
... (page 24, 33) Pass the thread under this panel to select stitches or embroidery patterns, or check how to learn the names of the machine parts. e LCD (liquid crystal display) (touch panel) (page 18) Setting for the embroidery unit. h Presser foot lever (page 50) Raise and lower the presser...sewing machine and their functions are described below. Before using the sewing machine, carefully read these buttons to cut them. Names of Machine Parts and Their Functions The names of the various parts of thread on this thread guide cover when winding the bobbin thread and threading the machine.
Users Manual - English
Page 24
... will not operate correctly. GETTING READY Winding/Installing the Bobbin This section describes how to prepare the bobbin thread. Use of the same type (part code: SA156, SFB (XA5539-151)). 11.5 mm (7/16 inch) Actual size This model Other model Winding the bobbin Wind the thread around ...the bobbin to wind the thread onto the bobbin, and then insert the bobbin thread. CAUTION ● Only use the Bobbin (part code: SA156, SFB (XA5539-151)) designed specifically for this sewing machine. Bobbin precautions Be sure to the machine. ● The included bobbin was...
... will not operate correctly. GETTING READY Winding/Installing the Bobbin This section describes how to prepare the bobbin thread. Use of the same type (part code: SA156, SFB (XA5539-151)). 11.5 mm (7/16 inch) Actual size This model Other model Winding the bobbin Wind the thread around ...the bobbin to wind the thread onto the bobbin, and then insert the bobbin thread. CAUTION ● Only use the Bobbin (part code: SA156, SFB (XA5539-151)) designed specifically for this sewing machine. Bobbin precautions Be sure to the machine. ● The included bobbin was...
Users Manual - English
Page 29
... bobbin wound with scissors beside the bobbinb winding thread guide. e Note z Make sure that the thread passes under the pretension disk of the same type (part code: SA156, SFB (XA5539-151)).
... bobbin wound with scissors beside the bobbinb winding thread guide. e Note z Make sure that the thread passes under the pretension disk of the same type (part code: SA156, SFB (XA5539-151)).
Users Manual - English
Page 38
..., possibly resulting in injuries. Manually thread the left needle b eye. Thread the machine to the needle bar thread a guide according to use the twin needle (part code: X59296-121). CAUTION ● The needle threader cannot be damaged. 36 Be sure to steps a through k on installing a needle, refer to "Stitch Setting Chart...
..., possibly resulting in injuries. Manually thread the left needle b eye. Thread the machine to the needle bar thread a guide according to use the twin needle (part code: X59296-121). CAUTION ● The needle threader cannot be damaged. 36 Be sure to steps a through k on installing a needle, refer to "Stitch Setting Chart...
Users Manual - English
Page 43
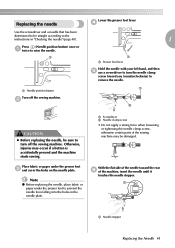
.... a Lower the presser foot lever. a Screwdriver b Needle clamp screw • Do not apply a strong force when loosening or tightening the needle clamp screw, otherwise certain parts of the machine, insert the needle until it touches the needle stopper. Replacing the needle Use the screwdriver and a needle that has been determined to...
.... a Lower the presser foot lever. a Screwdriver b Needle clamp screw • Do not apply a strong force when loosening or tightening the needle clamp screw, otherwise certain parts of the machine, insert the needle until it touches the needle stopper. Replacing the needle Use the screwdriver and a needle that has been determined to...
Users Manual - English
Page 48
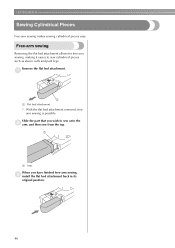
a a a Flat bed attachment X With the flat bed attachment removed, freearm sewing is possible. a a Arm When you wish to sew cylindrical pieces such as sleeve cuffs and pant legs. Remove the flat bed attachment. Free-arm sewing Removing the flat bed attachment allows for free-arm sewing, making it easier to sew onto the b arm, and then sew from the top. Slide the part that you have finished free-arm sewing, c install the flat bed attachment back in its original position. 46 GETTING READY Sewing Cylindrical Pieces Free-arm sewing makes sewing cylindrical pieces easy.
a a a Flat bed attachment X With the flat bed attachment removed, freearm sewing is possible. a a Arm When you wish to sew cylindrical pieces such as sleeve cuffs and pant legs. Remove the flat bed attachment. Free-arm sewing Removing the flat bed attachment allows for free-arm sewing, making it easier to sew onto the b arm, and then sew from the top. Slide the part that you have finished free-arm sewing, c install the flat bed attachment back in its original position. 46 GETTING READY Sewing Cylindrical Pieces Free-arm sewing makes sewing cylindrical pieces easy.
Users Manual - English
Page 50
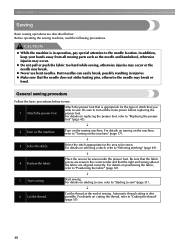
In addition, keep your hands away from all moving parts such as the needle and handwheel, otherwise injuries may break. General sewing procedure Follow the basic procedures below . Be sure that the fabric pieces are ...
In addition, keep your hands away from all moving parts such as the needle and handwheel, otherwise injuries may break. General sewing procedure Follow the basic procedures below . Be sure that the fabric pieces are ...
Users Manual - English
Page 83
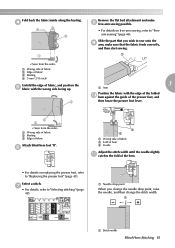
... the edge of the folded j hem against the guide of fabric Attach blind hem foot "R". Select a stitch. a a Stitch width Blind Hem Stitching 81 Slide the part that you change the needle drop point, raise the needle, and then change the stitch width. f R 3 a Arm Position the fabric with the wrong side facing...
... the edge of the folded j hem against the guide of fabric Attach blind hem foot "R". Select a stitch. a a Stitch width Blind Hem Stitching 81 Slide the part that you change the needle drop point, raise the needle, and then change the stitch width. f R 3 a Arm Position the fabric with the wrong side facing...
Users Manual - English
Page 86
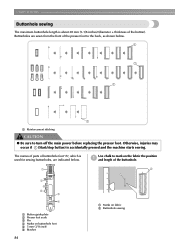
... to the back, as shown below . Buttonholes are indicated below . 1 1 1 1 a Reinforcement stitching CAUTION ● Be sure to mark on fabric b Buttonhole sewing The names of parts of buttonhole foot "A", which is about 28 mm (1-1/8 inches) (diameter + thickness of the button). Otherwise, injuries may occur if (Start/stop button) is accidentally pressed...
... to the back, as shown below . Buttonholes are indicated below . 1 1 1 1 a Reinforcement stitching CAUTION ● Be sure to mark on fabric b Buttonhole sewing The names of parts of buttonhole foot "A", which is about 28 mm (1-1/8 inches) (diameter + thickness of the button). Otherwise, injuries may occur if (Start/stop button) is accidentally pressed...

Users Manual - English
Page 89
Hook the gimp thread onto the part of a buttonhole foot "A" shown in any slack. b 3 Memo z For details, refer to the thickness of the e gimp thread. Attach buttonhole foot "A". When sewing is intended. &#...
Hook the gimp thread onto the part of a buttonhole foot "A" shown in any slack. b 3 Memo z For details, refer to the thickness of the e gimp thread. Attach buttonhole foot "A". When sewing is intended. &#...

Users Manual - English
Page 128
... embroidery to the fabric to the fabric Prepare stabilizer material that is larger than a the embroidery frame being used. To obtain optional accessories or parts, visit [http://www.brother.com/], or [http:// www.brothermall.com] (in the embroidery frame without using stabilizers with adhesive, place b the adhesive surface of the stabilizer material...
... embroidery to the fabric to the fabric Prepare stabilizer material that is larger than a the embroidery frame being used. To obtain optional accessories or parts, visit [http://www.brother.com/], or [http:// www.brothermall.com] (in the embroidery frame without using stabilizers with adhesive, place b the adhesive surface of the stabilizer material...
Users Manual - English
Page 133
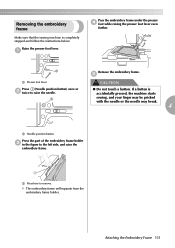
... accidentally pressed, the machine starts sewing, and your finger may be pricked with the needle or the needle may break. 4 a Needle position button Press the part of the embroidery frame holder c in the figure to the left side, and raise the embroidery frame. 1 a Press here to raise the needle. e CAUTION ●...
... accidentally pressed, the machine starts sewing, and your finger may be pricked with the needle or the needle may break. 4 a Needle position button Press the part of the embroidery frame holder c in the figure to the left side, and raise the embroidery frame. 1 a Press here to raise the needle. e CAUTION ●...
Users Manual - English
Page 141
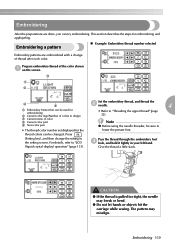
... setting screen. Note z Before using the needle threader, be changed. Give the thread a little slack. Embroidering 139 Prepare embroidery thread of color d Current color part e Next color part • Refer to "LCD Pass the thread through the embroidery foot c hole, and hold it lightly in your left hand. (liquid crystal display) operation...
... setting screen. Note z Before using the needle threader, be changed. Give the thread a little slack. Embroidering 139 Prepare embroidery thread of color d Current color part e Next color part • Refer to "LCD Pass the thread through the embroidery foot c hole, and hold it lightly in your left hand. (liquid crystal display) operation...
Users Manual - English
Page 155
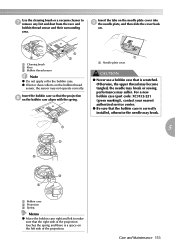
... collects on the bobbin case aligns with the spring. Insert the bobbin case so that the right side of the projection. For a new bobbin case (part code: XC3152-221 (green marking)), contact your nearest authorized service center. ● Be sure that is scratched. a a Needle plate cover CAUTION ● Never use a bobbin...
... collects on the bobbin case aligns with the spring. Insert the bobbin case so that the right side of the projection. For a new bobbin case (part code: XC3152-221 (green marking)), contact your nearest authorized service center. ● Be sure that is scratched. a a Needle plate cover CAUTION ● Never use a bobbin...

Accessory Catalog
Page 4
...-use sewing machines www.brother.com Loosen the clamp screw at the back of zipper/piping, and presses the fabric with a screwdriver. 5. Its position can be adjusted exactly on the edge of zipper/piping, avoiding the non-flat parts of the presser foot and slide the presser foot so that ...the needle fits on the opening on either left ). 2. Check the needle does not hit the presser foot, and then tighten the clamp screw with just right pressure. 1. Adjustable Zipper & Piping Foot Brother General Sewing ...
...-use sewing machines www.brother.com Loosen the clamp screw at the back of zipper/piping, and presses the fabric with a screwdriver. 5. Its position can be adjusted exactly on the edge of zipper/piping, avoiding the non-flat parts of the presser foot and slide the presser foot so that ...the needle fits on the opening on either left ). 2. Check the needle does not hit the presser foot, and then tighten the clamp screw with just right pressure. 1. Adjustable Zipper & Piping Foot Brother General Sewing ...


