Operation Manual
Page 1
We recommend that you keep this document before using the machine. Operation Manual Embroidery Machine Product Code: 882-D83 Be sure to read this document nearby for future reference.
We recommend that you keep this document before using the machine. Operation Manual Embroidery Machine Product Code: 882-D83 Be sure to read this document nearby for future reference.

Operation Manual
Page 7
... sensor function) Try the new function using the supplied sensor pen Page B-52 E Embroidering This section provides instruction to read this machine. Chapter 1 Embroidery Maximum 30 cm × 20 cm (approx. 12 inches × 8 inches) for operating this section first. Page A-14... Page E-56 A Appendix This section provides important information for large embroidery designs Page E-2 Chapter 2 Embroidery Edit Designs can be sure to embroider designs with this machine's more useful functions. Chapter 2, "Embroidery Edit", provides details on the initial setup procedures as well as ...
... sensor function) Try the new function using the supplied sensor pen Page B-52 E Embroidering This section provides instruction to read this machine. Chapter 1 Embroidery Maximum 30 cm × 20 cm (approx. 12 inches × 8 inches) for operating this section first. Page A-14... Page E-56 A Appendix This section provides important information for large embroidery designs Page E-2 Chapter 2 Embroidery Edit Designs can be sure to embroider designs with this machine's more useful functions. Chapter 2, "Embroidery Edit", provides details on the initial setup procedures as well as ...
Operation Manual
Page 8
... Pen 56 USING SENSOR FUNCTIONS IN "EMBROIDERY"/"EMBROIDERY EDIT" MODE ... 58 Specifying the Embroidering Position With the Sensor Pen ... 58 E Embroidering Chapter1 Embroidery 2 SELECTING PATTERNS 3 Selecting Embroidery Patterns/Brother "Exclusives"/Floral Alphabet/Bobbin Work Patterns ...MACHINE 49 Using USB Media or Embroidery Card Reader/USB Card Writer Module 49 Connecting the Machine to Make an Appliqué (2 52 Sewing Split Embroidery Patterns 53 Chapter2 Embroidery Edit 56 EXPLANATION OF FUNCTIONS 57 SELECTING PATTERNS TO EDIT 58 Selecting Embroidery Patterns/Brother...
... Pen 56 USING SENSOR FUNCTIONS IN "EMBROIDERY"/"EMBROIDERY EDIT" MODE ... 58 Specifying the Embroidering Position With the Sensor Pen ... 58 E Embroidering Chapter1 Embroidery 2 SELECTING PATTERNS 3 Selecting Embroidery Patterns/Brother "Exclusives"/Floral Alphabet/Bobbin Work Patterns ...MACHINE 49 Using USB Media or Embroidery Card Reader/USB Card Writer Module 49 Connecting the Machine to Make an Appliqué (2 52 Sewing Split Embroidery Patterns 53 Chapter2 Embroidery Edit 56 EXPLANATION OF FUNCTIONS 57 SELECTING PATTERNS TO EDIT 58 Selecting Embroidery Patterns/Brother...

Operation Manual
Page 9
... 80 Editing Combined Patterns 80 Sewing Combined Patterns 83 VARIOUS EMBROIDERING FUNCTIONS ......... 84 Uninterrupted Embroidering (Monochrome - Using a Single Color 84 Basting Embroidery 84 USING THE MEMORY FUNCTION 85 A Appendix Chapter1 How to Create Bobbin Work 2 ABOUT BOBBIN WORK 3 PREPARING FOR BOBBIN WORK 3 Required... Maintenance and Troubleshooting 14 CARE AND MAINTENANCE 15 Restrictions on oiling 15 Precautions on storing the machine 15 Cleaning the LCD Screen 15 Cleaning the Machine Casing 15 Cleaning the Race 15 Cleaning the Cutter in the Bobbin Case Area 17 About...
... 80 Editing Combined Patterns 80 Sewing Combined Patterns 83 VARIOUS EMBROIDERING FUNCTIONS ......... 84 Uninterrupted Embroidering (Monochrome - Using a Single Color 84 Basting Embroidery 84 USING THE MEMORY FUNCTION 85 A Appendix Chapter1 How to Create Bobbin Work 2 ABOUT BOBBIN WORK 3 PREPARING FOR BOBBIN WORK 3 Required... Maintenance and Troubleshooting 14 CARE AND MAINTENANCE 15 Restrictions on oiling 15 Precautions on storing the machine 15 Cleaning the LCD Screen 15 Cleaning the Machine Casing 15 Cleaning the Race 15 Cleaning the Cutter in the Bobbin Case Area 17 About...

Operation Manual
Page 10
... the bobbin thread. (page B-31) d Spool pin Place a spool of the machine parts. Before using the machine, carefully read these buttons to operate the machine. (page B-10) k Embroidery unit Attach the embroidery unit to circulate. Machine ■ Front View ■ Right-side/Rear View a Top cover Open the... In order to import/export patterns between a computer and the machine, plug the USB cable into the USB port. (page B-49, E-47) j USB port for the presser foot Connect the embroidery foot "W+" with LED pointer. (The embroidery foot "W+" with mouse. (page B-50) k Handwheel Rotate ...
... the bobbin thread. (page B-31) d Spool pin Place a spool of the machine parts. Before using the machine, carefully read these buttons to operate the machine. (page B-10) k Embroidery unit Attach the embroidery unit to circulate. Machine ■ Front View ■ Right-side/Rear View a Top cover Open the... In order to import/export patterns between a computer and the machine, plug the USB cable into the USB port. (page B-49, E-47) j USB port for the presser foot Connect the embroidery foot "W+" with LED pointer. (The embroidery foot "W+" with mouse. (page B-50) k Handwheel Rotate ...

Operation Manual
Page 11
... sure the frame-securing lever is set in place. (page B-42) b Embroidery foot The embroidery foot helps control fabric flexibility for better stitch consistency. B-9 NAMES OF MACHINE PARTS AND THEIR FUNCTIONS Needle and Presser Foot Section Embroidery Unit a Embroidery foot screw Use the embroidery foot screw to hold the frame in place. (page E-17) d Frame-securing...
... sure the frame-securing lever is set in place. (page B-42) b Embroidery foot The embroidery foot helps control fabric flexibility for better stitch consistency. B-9 NAMES OF MACHINE PARTS AND THEIR FUNCTIONS Needle and Presser Foot Section Embroidery Unit a Embroidery foot screw Use the embroidery foot screw to hold the frame in place. (page E-17) d Frame-securing...

Operation Manual
Page 12
...Cutter" button Press this button after the threads have been cut. B-10 The button changes color according to the machine may become tangled, or damage to the machine's operation mode. CAUTION • Do not press the thread cutter button after embroidering to begin embroidering. The ...needle may break and threads may occur. Green: The machine is embroidering. Press this button to lower the embroidery foot and apply pressure to the fabric. d "Presser Foot Lifter" button Press this button again to...
...Cutter" button Press this button after the threads have been cut. B-10 The button changes color according to the machine may become tangled, or damage to the machine's operation mode. CAUTION • Do not press the thread cutter button after embroidering to begin embroidering. The ...needle may break and threads may occur. Green: The machine is embroidering. Press this button to lower the embroidery foot and apply pressure to the fabric. d "Presser Foot Lifter" button Press this button again to...

Operation Manual
Page 13
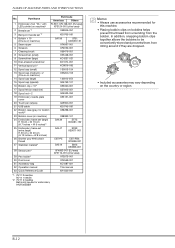
B-11 Included Accessories 1* 2 3 4 75/11 3 needles 90/14 1 needle 75/11 2 needles: Ball point needle for embroidery HAX130EBBR 9 10 11* 12 NAMES OF MACHINE PARTS AND THEIR FUNCTIONS 5 6 7 8 13 14 15 16* 17 18 19 20 21 22* 23 24* 25 26 27* 28* 29* 30 31 32 33 *Included accessories vary depending on the countries or regions.
B-11 Included Accessories 1* 2 3 4 75/11 3 needles 90/14 1 needle 75/11 2 needles: Ball point needle for embroidery HAX130EBBR 9 10 11* 12 NAMES OF MACHINE PARTS AND THEIR FUNCTIONS 5 6 7 8 13 14 15 16* 17 18 19 20 21 22* 23 24* 25 26 27* 28* 29* 30 31 32 33 *Included accessories vary depending on the countries or regions.
Operation Manual
Page 14
...Bobbin cover (on machine) XE8992-101 24 Embroidery frame set (large) H 18 cm × W 13 cm (H 7 inches × W 5 inches)* SA439 EF75: XC8481-152 25 Embroidery frame set (extra large) H 30 cm × W 20 cm (H 12 inches × W 8 inches) SA447 EF92: XE5071-001 26 Brother poly #90 bobbin...Guide XH4420-001 *1 75/11 3 needles 90/14 1 needle *2 75/11 2 needles Ball point needle for embroidery HAX130EBBR Memo • Always use accessories recommended for this machine. • Placing bobbin clips on bobbins helps prevent the thread from unwinding from rolling around if they are dropped...
...Bobbin cover (on machine) XE8992-101 24 Embroidery frame set (large) H 18 cm × W 13 cm (H 7 inches × W 5 inches)* SA439 EF75: XC8481-152 25 Embroidery frame set (extra large) H 30 cm × W 20 cm (H 12 inches × W 8 inches) SA447 EF92: XE5071-001 26 Brother poly #90 bobbin...Guide XH4420-001 *1 75/11 3 needles 90/14 1 needle *2 75/11 2 needles Ball point needle for embroidery HAX130EBBR Memo • Always use accessories recommended for this machine. • Placing bobbin clips on bobbins helps prevent the thread from unwinding from rolling around if they are dropped...

Operation Manual
Page 15
... • All specifications are available as optional accessories to be purchased separately from your machine. Part Name Part Code Americas Others 1 Square embroidery frame H 15 cm x W 15 cm (H 6 inches x W 6 inches) SA448 (U.S.A.) SA448C (Canada) SEF150: XF4163-001 2 Embroidery foot "W+" with your machine. • Visit your dealer or nearest authorized Brother dealer for a complete listing of printing.
... • All specifications are available as optional accessories to be purchased separately from your machine. Part Name Part Code Americas Others 1 Square embroidery frame H 15 cm x W 15 cm (H 6 inches x W 6 inches) SA448 (U.S.A.) SA448C (Canada) SEF150: XF4163-001 2 Embroidery foot "W+" with your machine. • Visit your dealer or nearest authorized Brother dealer for a complete listing of printing.

Operation Manual
Page 18
... the Display Language 26 ■ Changing the Background Colors of the Embroidery Patterns... 26 ■ Specifying the Size of Pattern Thumbnails 27 ■ Saving a Settings Screen Image to USB Media 28 Using the Machine Help Key 29 LOWER THREADING 31 Winding the Bobbin 31 ■ ... the Needle 46 BEFORE EMBROIDERING 46 Embroidery Step by Step 46 About the Embroidery Unit 47 ■ Removing the Embroidery Unit 47 ■ Attaching the Embroidery Unit 47 USING FUNCTIONS BY CONNECTING THE ACCESSORY TO THE MACHINE 49 Using USB Media or Embroidery Card Reader/USB Card Writer Module...
... the Display Language 26 ■ Changing the Background Colors of the Embroidery Patterns... 26 ■ Specifying the Size of Pattern Thumbnails 27 ■ Saving a Settings Screen Image to USB Media 28 Using the Machine Help Key 29 LOWER THREADING 31 Winding the Bobbin 31 ■ ... the Needle 46 BEFORE EMBROIDERING 46 Embroidery Step by Step 46 About the Embroidery Unit 47 ■ Removing the Embroidery Unit 47 ■ Attaching the Embroidery Unit 47 USING FUNCTIONS BY CONNECTING THE ACCESSORY TO THE MACHINE 49 Using USB Media or Embroidery Card Reader/USB Card Writer Module...

Operation Manual
Page 23
...No. b Clock key Press this key to set the clock to page reference number listed above. B-29 e Machine setting Press this key anytime it is displayed to return to use the machine. For additional operational information, refer to your local time. B-18 c Presser foot/Needle Press this key to ... to prevent operation of B-22 mode key operation sound, adjust the pattern or screen, and change the volume of the machine. Basic operations B-21 "Embroidery" or "Embroidery Edit". B-45 d Machine help key Press this key before changing the needle, the presser foot, etc.
...No. b Clock key Press this key to set the clock to page reference number listed above. B-29 e Machine setting Press this key anytime it is displayed to return to use the machine. For additional operational information, refer to your local time. B-18 c Presser foot/Needle Press this key to ... to prevent operation of B-22 mode key operation sound, adjust the pattern or screen, and change the volume of the machine. Basic operations B-21 "Embroidery" or "Embroidery Edit". B-45 d Machine help key Press this key before changing the needle, the presser foot, etc.

Operation Manual
Page 24
...Stitch Placement" button from the following two sequences. e Change the speaker volume. g Select the initial screen that is displayed when the machine is used with tangled thread may cause damage. Memo • Press or next to the page numbers, to display a different settings... Select the needle stop position, embroidery speed, opening display, etc.). Each press of the "Needle Position - LCD SCREEN Using the Machine Setting Mode Key Press to change the default machine settings (needle stop position (the needle position when the machine is not operating) to be up...
...Stitch Placement" button from the following two sequences. e Change the speaker volume. g Select the initial screen that is displayed when the machine is used with tangled thread may cause damage. Memo • Press or next to the page numbers, to display a different settings... Select the needle stop position, embroidery speed, opening display, etc.). Each press of the "Needle Position - LCD SCREEN Using the Machine Setting Mode Key Press to change the default machine settings (needle stop position (the needle position when the machine is not operating) to be up...

Operation Manual
Page 27
...page 2 of time. ■ Selecting the "Eco Mode" or "Shutoff Support Mode" You can be selected for about 5 seconds before turning on the machine again. Machine will enter lower power modes after set period of the settings screen. Press the "Start/Stop" button or touch the screen display to choose the... details on changing the background color, refer to select mode. c Use from the three that appears when a USB mouse is turned off the machine while the machine is in one of the Embroidery Patterns" on page B-26. a Press . The settings screen appears.
...page 2 of time. ■ Selecting the "Eco Mode" or "Shutoff Support Mode" You can be selected for about 5 seconds before turning on the machine again. Machine will enter lower power modes after set period of the settings screen. Press the "Start/Stop" button or touch the screen display to choose the... details on changing the background color, refer to select mode. c Use from the three that appears when a USB mouse is turned off the machine while the machine is in one of the Embroidery Patterns" on page B-26. a Press . The settings screen appears.
Operation Manual
Page 40
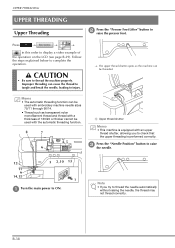
... button to raise a Turn the main power to complete the operation. Memo • The automatic threading function can be used with embroidery machine needle sizes 75/11 through 90/14. • Thread such as transparent nylon monofilament thread and thread with a thickness of the ...needle. Note • If you to check that the upper threading is performed correctly. B-38 a Upper thread shutter Memo • This machine is equipped with the automatic threading function. UPPER THREADING UPPER THREADING Upper Threading b Press the "Presser Foot raise the presser foot.
... button to raise a Turn the main power to complete the operation. Memo • The automatic threading function can be used with embroidery machine needle sizes 75/11 through 90/14. • Thread such as transparent nylon monofilament thread and thread with a thickness of the ...needle. Note • If you to check that the upper threading is performed correctly. B-38 a Upper thread shutter Memo • This machine is equipped with the automatic threading function. UPPER THREADING UPPER THREADING Upper Threading b Press the "Presser Foot raise the presser foot.
Operation Manual
Page 47
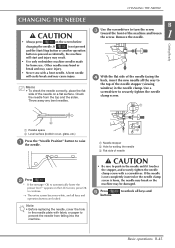
...THE NEEDLE CAUTION • Always press on a flat surface. Remove the needle. Position" button to the top of the turn the screw machine and loosen 1 the screw. If is not pressed and the Start/Stop button or another operation button is loose, the needle may break.... e Press buttons. If the needle is not completely inserted or the needle clamp screw is pressed accidentally, the machine will easily break and may result. • Use only embroidery machine needles made for setting the needle c Flat side of the needle on the screen before changing the needle. Getting...
...THE NEEDLE CAUTION • Always press on a flat surface. Remove the needle. Position" button to the top of the turn the screw machine and loosen 1 the screw. If is not pressed and the Start/Stop button or another operation button is loose, the needle may break.... e Press buttons. If the needle is not completely inserted or the needle clamp screw is pressed accidentally, the machine will easily break and may result. • Use only embroidery machine needles made for setting the needle c Flat side of the needle on the screen before changing the needle. Getting...
Operation Manual
Page 85
Another important point is purchased. Bobbin thread Use embroidery bobbin thread intended for use with this machine. Bobbin case (for the embroidery machine) The bobbin case (no color on the screw. purchased. for prewound or other embroidery bobbin threads (no color on the screw) Bobbin case (for the embroidery and sewing machine) Standard bobbin case (green marking on...
Another important point is purchased. Bobbin thread Use embroidery bobbin thread intended for use with this machine. Bobbin case (for the embroidery machine) The bobbin case (no color on the screw. purchased. for prewound or other embroidery bobbin threads (no color on the screw) Bobbin case (for the embroidery and sewing machine) Standard bobbin case (green marking on...
Operation Manual
Page 108
... sewing three or more overlapping stitches. CAUTION • When using embroidery data other than that created and saved in this machine. Even after inserting USB devices/media, and it meets these specifications. • Embroidery data stored in a folder created in the file names. Using ...8226; The processing speed may cause the embroidery machine to rotate the pattern 90 degrees. If this occurs, change the name of the embroidery data file/folder cannot be used with this machine. The combined design can be usable with this machine. Please visit our website for example,...
... sewing three or more overlapping stitches. CAUTION • When using embroidery data other than that created and saved in this machine. Even after inserting USB devices/media, and it meets these specifications. • Embroidery data stored in a folder created in the file names. Using ...8226; The processing speed may cause the embroidery machine to rotate the pattern 90 degrees. If this occurs, change the name of the embroidery data file/folder cannot be used with this machine. The combined design can be usable with this machine. Please visit our website for example,...
Operation Manual
Page 111
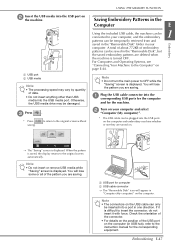
...For details on the position of embroidery patterns can be saved in your computer and select "Computer (My computer)". * The USB cable can be plugged into the USB ports on the computer and embroidery machine whether or not they are deleted when the machine is displayed. to return to... the original screen without Saving Embroidery Patterns in the Computer E Using the included USB cable, the machine can be damaged. a Plug the USB cable ...
...For details on the position of embroidery patterns can be saved in your computer and select "Computer (My computer)". * The USB cable can be plugged into the USB ports on the computer and embroidery machine whether or not they are deleted when the machine is displayed. to return to... the original screen without Saving Embroidery Patterns in the Computer E Using the included USB cable, the machine can be damaged. a Plug the USB cable ...

Operation Manual
Page 175
Maintenance and Troubleshooting A 2 Appendix A-25 SPECIFICATIONS SPECIFICATIONS Item Embroidery Machine and Accessories Dimensions of machine (Box 1 of 2) Dimensions of box Embroidery Unit (Box 2 of 2) Weight of machine Weight of box (for shipping) Embroidering speed Dimensions of embroidery unit Dimensions of machine with embroidery unit attached Dimensions of box Weight of embroidery unit Weight of box (for shipping) Total Shipping Weight...
Maintenance and Troubleshooting A 2 Appendix A-25 SPECIFICATIONS SPECIFICATIONS Item Embroidery Machine and Accessories Dimensions of machine (Box 1 of 2) Dimensions of box Embroidery Unit (Box 2 of 2) Weight of machine Weight of box (for shipping) Embroidering speed Dimensions of embroidery unit Dimensions of machine with embroidery unit attached Dimensions of box Weight of embroidery unit Weight of box (for shipping) Total Shipping Weight...


