
Users Manual - English
Page 3
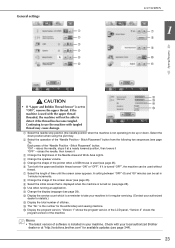
...shape as the bobbin cover included with your machine cannot be installed on the wrong side of the fabric, by winding the bobbin with heavy weight thread or ribbon too thick to be fed through the sewing machine needle and sewing on the machine. (XE8992-001) (XE8878-001) 2 The... bobbin cover with a shape different than that included with your machine. Utility stitches Decorative stitches (For models with built-in decorative stitches) ...
...shape as the bobbin cover included with your machine cannot be installed on the wrong side of the fabric, by winding the bobbin with heavy weight thread or ribbon too thick to be fed through the sewing machine needle and sewing on the machine. (XE8992-001) (XE8878-001) 2 The... bobbin cover with a shape different than that included with your machine. Utility stitches Decorative stitches (For models with built-in decorative stitches) ...
KIT 2 USER - English
Page 3
...8226; The pen tablet is included, allowing you to find new color schemes suggested by your own original embroidery pattern on the screen of sewing machine. BEFORE YOU START It is important to perform the upgrade according to the embroidery alphabet characters category pattern selection screen. (page 16) 2... table setting can then be activated with the My Custom Design software. (page 4) • Color Shuffling function is added to create your sewing machine. Refer to the Operation Manual on the CD-ROM. (page 17) • 2 new handwriting fonts are added to the procedure outlined ...
...8226; The pen tablet is included, allowing you to find new color schemes suggested by your own original embroidery pattern on the screen of sewing machine. BEFORE YOU START It is important to perform the upgrade according to the embroidery alphabet characters category pattern selection screen. (page 16) 2... table setting can then be activated with the My Custom Design software. (page 4) • Color Shuffling function is added to create your sewing machine. Refer to the Operation Manual on the CD-ROM. (page 17) • 2 new handwriting fonts are added to the procedure outlined ...

KIT 2 USER - English
Page 5
...embroidery pattern with the tablet pen. a USB port for hardware operation. Memo • Working area of the sewing machine. Using the Pen Tablet The included pen tablet, connected to the sewing machine, can be connected or disconnected at any time. • Do not perform any operations with the pen ...tablet at the same time that you can also connect the pen tablet to the sewing machine, it is activated when the pointer appears on performing functions of the pen tablet differs depending on the screen. The blue LED light...
...embroidery pattern with the tablet pen. a USB port for hardware operation. Memo • Working area of the sewing machine. Using the Pen Tablet The included pen tablet, connected to the sewing machine, can be connected or disconnected at any time. • Do not perform any operations with the pen ...tablet at the same time that you can also connect the pen tablet to the sewing machine, it is activated when the pointer appears on performing functions of the pen tablet differs depending on the screen. The blue LED light...
Operation Manual
Page 1
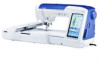
Computerized Embroidery and Sewing Machine Operation Manual Product Code: 882-W01/W02
Computerized Embroidery and Sewing Machine Operation Manual Product Code: 882-W01/W02
Operation Manual
Page 3
...read the "Important Safety Instructions", and then study this manual for purchasing this embroidery and sewing machine. Do not pull on an unstable surface, such as an unsteady or slanted table, otherwise the sewing machine may fall, resulting in injuries. Before using , when cleaning, when making any adjustments ...have finished reading this manual, store it where it by any other part may damage the machine or result in the machine falling, which could cause injuries. • When lifting the sewing machine, be careful not to turn it off, then grasp the plug and pull it has been...
...read the "Important Safety Instructions", and then study this manual for purchasing this embroidery and sewing machine. Do not pull on an unstable surface, such as an unsteady or slanted table, otherwise the sewing machine may fall, resulting in injuries. Before using , when cleaning, when making any adjustments ...have finished reading this manual, store it where it by any other part may damage the machine or result in the machine falling, which could cause injuries. • When lifting the sewing machine, be careful not to turn it off, then grasp the plug and pull it has been...

Operation Manual
Page 4
... needles. • Keep fingers away from all moving parts. If the problem persists, please consult your local authorized Brother dealer. Do not use a damaged or incorrect needle plate, as described in this sewing machine was supplied in should never be used. • Always consult the operation manual when replacing or installing any assemblies...
... needles. • Keep fingers away from all moving parts. If the problem persists, please consult your local authorized Brother dealer. Do not use a damaged or incorrect needle plate, as described in this sewing machine was supplied in should never be used. • Always consult the operation manual when replacing or installing any assemblies...

Operation Manual
Page 6
... Declaration of Conformity (For USA Only) Responsible Party: Brother International Corporation 100 Somerset Corporate Boulevard Bridgewater, NJ 08807-0911 USA TEL : (908) 704-1700 declares that the product Product Name: Model Number: Brother Sewing Machine NV6000D This device complies with Part 15 of the FCC... or an experienced radio/TV technician for a Class B digital device. • Changes or modifications not expressly approved by Brother Industries, Ltd. iv If this device must accept any interference received, including interference that interference will not occur in order to...
... Declaration of Conformity (For USA Only) Responsible Party: Brother International Corporation 100 Somerset Corporate Boulevard Bridgewater, NJ 08807-0911 USA TEL : (908) 704-1700 declares that the product Product Name: Model Number: Brother Sewing Machine NV6000D This device complies with Part 15 of the FCC... or an experienced radio/TV technician for a Class B digital device. • Changes or modifications not expressly approved by Brother Industries, Ltd. iv If this device must accept any interference received, including interference that interference will not occur in order to...
Operation Manual
Page 11
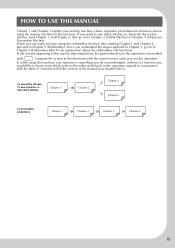
... 4 (Character/ Decorative Stitches). When you do machine embroidery Chapter 1 Chapter 2 Chapter 5 Chapter 6 ix If, while using the sewing machine for an explanation about , refer to Chapter 6 (Embroidery Edit) for the first time. To sew utility stitches To sew character or decorative stitches Chapter 1 Chapter 2 Chapter...the actual screen, and carry out the operation. HOW TO USE THIS MANUAL Chapter 1 and Chapter 2 explain your sewing machine's basic operation procedures for someone who is a function you understand the steps explained in the directions with . Once ...
... 4 (Character/ Decorative Stitches). When you do machine embroidery Chapter 1 Chapter 2 Chapter 5 Chapter 6 ix If, while using the sewing machine for an explanation about , refer to Chapter 6 (Embroidery Edit) for the first time. To sew utility stitches To sew character or decorative stitches Chapter 1 Chapter 2 Chapter...the actual screen, and carry out the operation. HOW TO USE THIS MANUAL Chapter 1 and Chapter 2 explain your sewing machine's basic operation procedures for someone who is a function you understand the steps explained in the directions with . Once ...
Operation Manual
Page 12
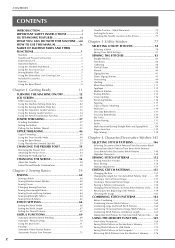
...Chapter 1 Getting Ready 11 TURNING THE MACHINE ON/OFF 12 LCD SCREEN 14 USB Connectivity 18 Using the Machine Setting Mode Key 22 Using the Sewing Machine Help Key 32 Using the Operation Guide Function 33 Using the Sewing Guide Function 34 Using the Pattern ... Fabric/Thread/Needle Combinations 58 Chapter 2 Sewing Basics 59 SEWING 60 Sewing a Stitch 60 Sewing Reinforcement Stitches 62 Sewing Curves 62 Changing Sewing Direction 63 Sewing Heavyweight Fabrics 63 Sewing Hook-and-Loop Fastener 64 Sewing Lightweight Fabrics 64 Sewing Stretch Fabrics 65 STITCH SETTINGS 66 Setting...
...Chapter 1 Getting Ready 11 TURNING THE MACHINE ON/OFF 12 LCD SCREEN 14 USB Connectivity 18 Using the Machine Setting Mode Key 22 Using the Sewing Machine Help Key 32 Using the Operation Guide Function 33 Using the Sewing Guide Function 34 Using the Pattern ... Fabric/Thread/Needle Combinations 58 Chapter 2 Sewing Basics 59 SEWING 60 Sewing a Stitch 60 Sewing Reinforcement Stitches 62 Sewing Curves 62 Changing Sewing Direction 63 Sewing Heavyweight Fabrics 63 Sewing Hook-and-Loop Fastener 64 Sewing Lightweight Fabrics 64 Sewing Stretch Fabrics 65 STITCH SETTINGS 66 Setting...
Operation Manual
Page 15
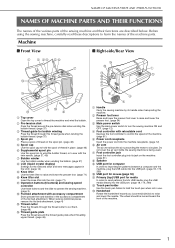
...plug the USB media directly into its handle when transporting the machine. Do not cover the air vent while the sewing machine is being used. m Handwheel Rotate the handwheel toward the front of the sewing machine and their functions are described below. The wheel should be turned... toward you (counterclockwise) to circulate. Before using the sewing machine, carefully read these buttons and the slide to operate the sewing machine. (page 3) l Flat bed attachment with...
...plug the USB media directly into its handle when transporting the machine. Do not cover the air vent while the sewing machine is being used. m Handwheel Rotate the handwheel toward the front of the sewing machine and their functions are described below. The wheel should be turned... toward you (counterclockwise) to circulate. Before using the sewing machine, carefully read these buttons and the slide to operate the sewing machine. (page 3) l Flat bed attachment with...

Operation Manual
Page 25
... ■ Key Functions 16 USB Connectivity 18 ■ Using USB Media or Embroidery Card Reader/ USB Card Writer Module 18 ■ Connecting the Machine to the Computer 19 ■ Using a USB Mouse 19 ■ Clicking a Key 20 ■ Changing Pages 20 Using the... ■ Choosing the Display Language 29 ■ Changing the Background Colors of the Embroidery Patterns 30 Using the Sewing Machine Help Key 32 Using the Operation Guide Function 33 Using the Sewing Guide Function 34 Using the Pattern Explanation Function 35 LOWER THREADING 37 Winding the Bobbin 37 ■ Using the ...
... ■ Key Functions 16 USB Connectivity 18 ■ Using USB Media or Embroidery Card Reader/ USB Card Writer Module 18 ■ Connecting the Machine to the Computer 19 ■ Using a USB Mouse 19 ■ Clicking a Key 20 ■ Changing Pages 20 Using the... ■ Choosing the Display Language 29 ■ Changing the Background Colors of the Embroidery Patterns 30 Using the Sewing Machine Help Key 32 Using the Operation Guide Function 33 Using the Sewing Guide Function 34 Using the Pattern Explanation Function 35 LOWER THREADING 37 Winding the Bobbin 37 ■ Using the ...
Operation Manual
Page 31
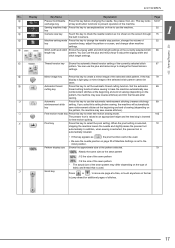
... Automatic Press this key to jump ahead for free motion quilting. If you select this setting before sewing, the machine will automatically key sew reinforcement stitches at the beginning and end of sewing (depending on page 23 of 22 key operation beep, adjust the pattern or screen, and change .../Needle Press this key to move one page at the beginning and end of sewing (depending on the type of fabric and thread that is light gray, a mirror image of stitches. 17 m n Sewing machine help Press this key to see explanations on how to use the automatic reinforcement ...
... Automatic Press this key to jump ahead for free motion quilting. If you select this setting before sewing, the machine will automatically key sew reinforcement stitches at the beginning and end of sewing (depending on page 23 of 22 key operation beep, adjust the pattern or screen, and change .../Needle Press this key to move one page at the beginning and end of sewing (depending on the type of fabric and thread that is light gray, a mirror image of stitches. 17 m n Sewing machine help Press this key to see explanations on how to use the automatic reinforcement ...
Operation Manual
Page 33
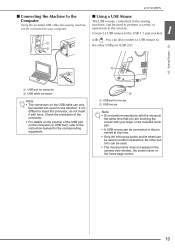
LCD SCREEN ■ Using a USB Mouse The USB mouse, connected to the sewing machine, can only be inserted into a port in the screens. a USB port for mouse b USB mouse Note • Do not perform operations with the mouse at ... does not appear in the camera view window, the screen saver or the home page screen. 19 ■ Connecting the Machine to the Computer Using the included USB cable, the sewing machine can also connect a USB mouse to the other buttons can be connected to your finger or the included touch pen. •...
LCD SCREEN ■ Using a USB Mouse The USB mouse, connected to the sewing machine, can only be inserted into a port in the screens. a USB port for mouse b USB mouse Note • Do not perform operations with the mouse at ... does not appear in the camera view window, the screen saver or the home page screen. 19 ■ Connecting the Machine to the Computer Using the included USB cable, the sewing machine can also connect a USB mouse to the other buttons can be connected to your finger or the included touch pen. •...
Operation Manual
Page 37
... the machine can be used without thread. If it at "http://solutions.brother.com" .... Each press of the machine. e Change the shape of...to use the machine with your local authorized Brother dealer or at ...a nearly lowered position, then lowers it c Change the brightness of software is used with the upper thread threaded, the machine...machine. If the machine is not operating) to be able to take your machine in 1-minute increments. a Select the needle stop position (the needle position when the machine...that is displayed when the machine is a reminder to detect ...
... the machine can be used without thread. If it at "http://solutions.brother.com" .... Each press of the machine. e Change the shape of...to use the machine with your local authorized Brother dealer or at ...a nearly lowered position, then lowers it c Change the brightness of software is used with the upper thread threaded, the machine...machine. If the machine is not operating) to be able to take your machine in 1-minute increments. a Select the needle stop position (the needle position when the machine...that is displayed when the machine is a reminder to detect ...

Operation Manual
Page 46
b Press this key to select utility stitches when you are available from the screen shown below. c Press this key to see explanation for upper threading, winding the bobbin, changing the presser foot, preparing to embroider a pattern, and how to see an explanation of the stitch selected (see page 34). LCD SCREEN Using the Sewing Machine Help Key Press to sew the stitch (see page 35). 32 a b c a Press this key to use or how to open the sewing machine help screen. Three functions are not sure which stitch to use the machine (see page 33).
b Press this key to select utility stitches when you are available from the screen shown below. c Press this key to see explanation for upper threading, winding the bobbin, changing the presser foot, preparing to embroider a pattern, and how to see an explanation of the stitch selected (see page 34). LCD SCREEN Using the Sewing Machine Help Key Press to sew the stitch (see page 35). 32 a b c a Press this key to use or how to open the sewing machine help screen. Three functions are not sure which stitch to use the machine (see page 33).

Operation Manual
Page 51
... cover. LOWER THREADING LOWER THREADING Winding the Bobbin Press o o o ■ Using the Supplemental Spool Pin 1 With this sewing machine. CAUTION • The included bobbin was designed specifically for this machine, you can wind the bobbin during sewing. Use only the included bobbin or bobbins of bobbin winding on the shaft 37 While using the...
... cover. LOWER THREADING LOWER THREADING Winding the Bobbin Press o o o ■ Using the Supplemental Spool Pin 1 With this sewing machine. CAUTION • The included bobbin was designed specifically for this machine, you can wind the bobbin during sewing. Use only the included bobbin or bobbins of bobbin winding on the shaft 37 While using the...

Operation Manual
Page 57
... a video example of the same type (part code: SA156, (SFB: XA5539-151)). If bobbins from other button is pressed and the machine starts sewing. Use only the included bobbin or bobbins of the operation on the LCD (see page 34). f Hold the bobbin lightly with your right... in the bobbin case the thread unwinds to the left hand. • The included bobbin was designed specifically for this order to press in this sewing machine. c Remove the bobbin cover. Follow the steps explained below to the right. 1 Getting Ready a Bobbin cover b Latch o The bobbin cover opens. ...
... a video example of the same type (part code: SA156, (SFB: XA5539-151)). If bobbins from other button is pressed and the machine starts sewing. Use only the included bobbin or bobbins of the operation on the LCD (see page 34). f Hold the bobbin lightly with your right... in the bobbin case the thread unwinds to the left hand. • The included bobbin was designed specifically for this order to press in this sewing machine. c Remove the bobbin cover. Follow the steps explained below to the right. 1 Getting Ready a Bobbin cover b Latch o The bobbin cover opens. ...
Operation Manual
Page 60
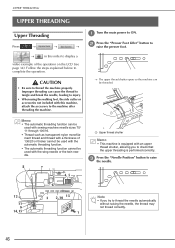
...example of 130/20 or thicker cannot be used with the automatic threading function. • The automatic threading function cannot be used with sewing machine needle sizes 75/ 11 through 100/16. • Thread such as transparent nylon monofilament thread and thread with a thickness of the ...operation on the LCD (see page 34). Position" button to raise Note • If you to the machine after threading the machine. Memo • The automatic threading function can be threaded. UPPER THREADING UPPER THREADING Upper Threading Press o o a Turn the main ...
...example of 130/20 or thicker cannot be used with the automatic threading function. • The automatic threading function cannot be used with sewing machine needle sizes 75/ 11 through 100/16. • Thread such as transparent nylon monofilament thread and thread with a thickness of the ...operation on the LCD (see page 34). Position" button to raise Note • If you to the machine after threading the machine. Memo • The automatic threading function can be threaded. UPPER THREADING UPPER THREADING Upper Threading Press o o a Turn the main ...

Operation Manual
Page 70
... page 34). If is not pressed and the Start/ Stop button or another operation button is pressed accidentally, the machine will easily break and may result. • Use only sewing machine needles made for home use. Note • Before replacing the needle, cover the hole in this order to toward... the front of the turn the screw machine and loosen the screw. b Press . * If the message "OK to complete the ...
... page 34). If is not pressed and the Start/ Stop button or another operation button is pressed accidentally, the machine will easily break and may result. • Use only sewing machine needles made for home use. Note • Before replacing the needle, cover the hole in this order to toward... the front of the turn the screw machine and loosen the screw. b Press . * If the message "OK to complete the ...
Operation Manual
Page 72
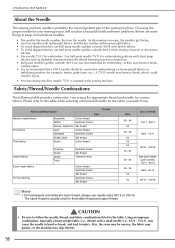
... products (for embroidering patterns with a small needle (i.e., 65/9 - 75/11), may bend or break, which could result in injury. • A home sewing machine needle 75/11 is inserted in mind about needles. • The smaller the needle number, the finer the needle. CHANGING THE NEEDLE About the Needle... thread Size 60 - 90 50 60 - 90 50 30 50 50 - 60 50 - 60 50 - 90 50 50 Size of the sewing machine. Fabric/Thread/Needle Combinations The following table provides information concerning the appropriate thread and needle for the bobbin thread and upper thread. Fabric type/Application...
... products (for embroidering patterns with a small needle (i.e., 65/9 - 75/11), may bend or break, which could result in injury. • A home sewing machine needle 75/11 is inserted in mind about needles. • The smaller the needle number, the finer the needle. CHANGING THE NEEDLE About the Needle... thread Size 60 - 90 50 60 - 90 50 30 50 50 - 60 50 - 60 50 - 90 50 50 Size of the sewing machine. Fabric/Thread/Needle Combinations The following table provides information concerning the appropriate thread and needle for the bobbin thread and upper thread. Fabric type/Application...


