Operation Manual
Page 1
We recommend that you keep this document before using the machine. GETTING READY SEWING BASICS UTILITY STITCHES APPENDIX Operation Manual Computerized Sewing Machine Product Code: 888-V15 Be sure to read this document nearby for future reference.
We recommend that you keep this document before using the machine. GETTING READY SEWING BASICS UTILITY STITCHES APPENDIX Operation Manual Computerized Sewing Machine Product Code: 888-V15 Be sure to read this document nearby for future reference.
Operation Manual
Page 3
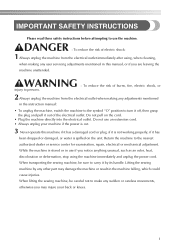
... the nearest authorized dealer or service center for examination, repair, electrical or mechanical adjustment. WARNING - When lifting the sewing machine, be sure to persons. 2 Always unplug the machine from the electrical outlet immediately after using the machine immediately and unplug the power cord. DANGER - To reduce the risk of electric shock: 1 Always unplug the...
... the nearest authorized dealer or service center for examination, repair, electrical or mechanical adjustment. WARNING - When lifting the sewing machine, be sure to persons. 2 Always unplug the machine from the electrical outlet immediately after using the machine immediately and unplug the power cord. DANGER - To reduce the risk of electric shock: 1 Always unplug the...
Operation Manual
Page 4
...Do not store objects on an unstable surface, such as a stove or iron; Keep ventilation openings of the sewing machine and foot control free from all moving parts. Plug the machine directly into the electrical outlet. • Never drop or insert any object into any adjustments in the needle...Do not use outdoors. 7 For a longer service life: • When storing this sewing machine was supplied in injuries. 5 Special care is required when sewing: • Always pay close attention is necessary when the machine is used by or near children. • The plastic bag that you do not ...
...Do not store objects on an unstable surface, such as a stove or iron; Keep ventilation openings of the sewing machine and foot control free from all moving parts. Plug the machine directly into the electrical outlet. • Never drop or insert any object into any adjustments in the needle...Do not use outdoors. 7 For a longer service life: • When storing this sewing machine was supplied in injuries. 5 Special care is required when sewing: • Always pay close attention is necessary when the machine is used by or near children. • The plastic bag that you do not ...
Operation Manual
Page 10
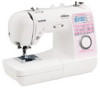
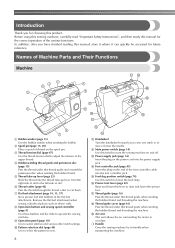
...the correct operation of thread on the end of the upper thread. t Handle Carry the sewing machine by its handle when transporting the machine. In addition, after you to sew one stitch or to turn the sewing machine on the power cord into the power supply jack. Remove the flat bed attachment when... slot to raise and lower the presser foot. s Air vent This vent allows the air surrounding the motor to operate the sewing machine. Before using this sewing machine, carefully read "Important Safety Instructions", and then study this thread guide when winding the bobbin thread and threading the...
...the correct operation of thread on the end of the upper thread. t Handle Carry the sewing machine by its handle when transporting the machine. In addition, after you to sew one stitch or to turn the sewing machine on the power cord into the power supply jack. Remove the flat bed attachment when... slot to raise and lower the presser foot. s Air vent This vent allows the air surrounding the motor to operate the sewing machine. Before using this sewing machine, carefully read "Important Safety Instructions", and then study this thread guide when winding the bobbin thread and threading the...
Operation Manual
Page 11
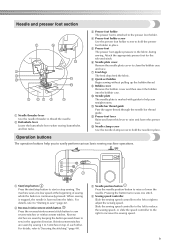
Needle and presser foot section a Needle threader lever Use the needle threader to easily perform various basic sewing machine operations. b Buttonhole lever Lower the buttonhole lever when sewing buttonholes and bar tacks. Attach the appropriate presser foot for the selected stitch. g Feed dogs The feed dogs feed ...Use the needle clamp screw to the presser foot holder. Pressing the button twice sews one stitch. j Needle plate The needle plate is attached to hold the presser foot holder in place. The machine sews at a low speed at the beginning of each other. For details, refer...
Needle and presser foot section a Needle threader lever Use the needle threader to easily perform various basic sewing machine operations. b Buttonhole lever Lower the buttonhole lever when sewing buttonholes and bar tacks. Attach the appropriate presser foot for the selected stitch. g Feed dogs The feed dogs feed ...Use the needle clamp screw to the presser foot holder. Pressing the button twice sews one stitch. j Needle plate The needle plate is attached to hold the presser foot holder in place. The machine sews at a low speed at the beginning of each other. For details, refer...
Operation Manual
Page 12
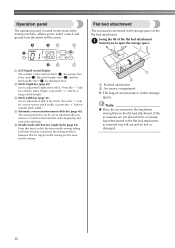
...the flat bed attachment, accessories may fall out and be lost or damaged. 10 Operation panel The operation panel, located on the front of the sewing machine, allows you to select a stitch and specify how the stitch will be sewn. Swing the lid of the stitch. (Press the "-" side... 40) Use to adjust the length of accessories is pressed, the setting switches between that for single needle sewing and for a wider stitch width.) d Automatic reverse/reinforcement stitch key (page 46) The sewing machine can be used (2), the stitch length (mm) (3), and the stitch width (mm) (4) are stored ...
...the flat bed attachment, accessories may fall out and be lost or damaged. 10 Operation panel The operation panel, located on the front of the sewing machine, allows you to select a stitch and specify how the stitch will be sewn. Swing the lid of the stitch. (Press the "-" side... 40) Use to adjust the length of accessories is pressed, the setting switches between that for single needle sewing and for a wider stitch width.) d Automatic reverse/reinforcement stitch key (page 46) The sewing machine can be used (2), the stitch length (mm) (3), and the stitch width (mm) (4) are stored ...
Operation Manual
Page 15
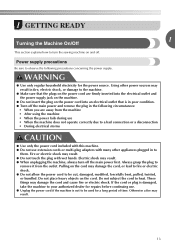
... poor condition. ● Turn off the main power and remove the plug in to them. Electric shock may result. ● When unplugging the machine, always turn the sewing machine on the cord may result. ● Do not touch the plug with many other appliances plugged in the following precautions concerning the power supply...
... poor condition. ● Turn off the main power and remove the plug in to them. Electric shock may result. ● When unplugging the machine, always turn the sewing machine on the cord may result. ● Do not touch the plug with many other appliances plugged in the following precautions concerning the power supply...
Operation Manual
Page 16
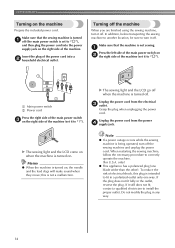
... make sound when they move; Note ● If a power outage occurs while the sewing machine is turned off the sewing machine and unplug the power cord. X The sewing light and the LCD go off when the machine is being operated, turn off . Do not modify the plug in the outlet, reverse... the power cord. In addition, before transporting the sewing machine to another location, be sure to install the proper outlet. X The sewing light and the LCD come on the machine Prepare the included power cord. GETTING READY Turning on when the machine is set it still does not fit, contact a...
... make sound when they move; Note ● If a power outage occurs while the sewing machine is turned off the sewing machine and unplug the power cord. X The sewing light and the LCD go off when the machine is being operated, turn off . Do not modify the plug in the outlet, reverse... the power cord. In addition, before transporting the sewing machine to another location, be sure to install the proper outlet. X The sewing light and the LCD come on the machine Prepare the included power cord. GETTING READY Turning on when the machine is set it still does not fit, contact a...
Operation Manual
Page 17
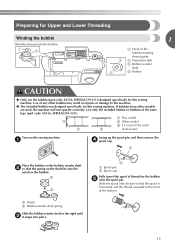
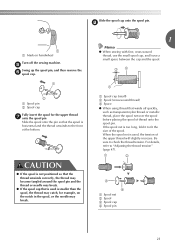
...size) Turn on the bobbin winder shaft b so that the spool is horizontal and the thread unwinds to the machine. ● The included bobbin was designed specifically for this sewing machine. a Notch b Bobbin winder shaft spring Slide the bobbin winder shaft to the right until c it snaps into...)). a b b a Spool pin b Spool cap Fully insert the spool of thread for this sewing machine. a Swing up the spool pin, and then remove the d spool cap. a Place the bobbin on the sewing machine. Preparing for Upper and Lower Threading Winding the bobbin Wind the thread onto the bobbin. 1 a...
...size) Turn on the bobbin winder shaft b so that the spool is horizontal and the thread unwinds to the machine. ● The included bobbin was designed specifically for this sewing machine. a Notch b Bobbin winder shaft spring Slide the bobbin winder shaft to the right until c it snaps into...)). a b b a Spool pin b Spool cap Fully insert the spool of thread for this sewing machine. a Swing up the spool pin, and then remove the d spool cap. a Place the bobbin on the sewing machine. Preparing for Upper and Lower Threading Winding the bobbin Wind the thread onto the bobbin. 1 a...
Operation Manual
Page 19
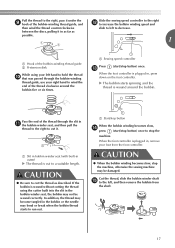
... foot controller is plugged in the bobbin or the needle may be wound correctly. CAUTION ● When the bobbin winding becomes slow, stop the machine, otherwise the sewing machine may bend or break when the bobbin thread starts to run out. When the foot controller is plugged in the bobbin winder seat, the...
... foot controller is plugged in the bobbin or the needle may be wound correctly. CAUTION ● When the bobbin winding becomes slow, stop the machine, otherwise the sewing machine may bend or break when the bobbin thread starts to run out. When the foot controller is plugged in the bobbin winder seat, the...
Operation Manual
Page 20
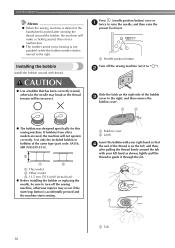
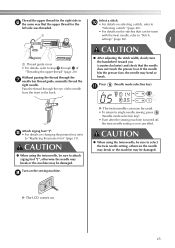
...the thread tension will be sure to turn off the sewing machine (set it through the slit. a Needle position button Turn off the sewing machine, otherwise injuries may occur if the start/stop button is accidentally pressed and the machine starts sewing. a b ● The bobbin was designed specifically... or a twice to the right. GETTING READY Memo ● When the sewing machine is started or the handwheel is turned after pulling the thread firmly around the bobbin, the machine will make a clicking sound; this sewing machine. b CAUTION ● Use a bobbin that d the end of the...
...the thread tension will be sure to turn off the sewing machine (set it through the slit. a Needle position button Turn off the sewing machine, otherwise injuries may occur if the start/stop button is accidentally pressed and the machine starts sewing. a b ● The bobbin was designed specifically... or a twice to the right. GETTING READY Memo ● When the sewing machine is started or the handwheel is turned after pulling the thread firmly around the bobbin, the machine will make a clicking sound; this sewing machine. b CAUTION ● Use a bobbin that d the end of the...

Operation Manual
Page 22
.... a Presser foot lever CAUTION ● If the presser foot is not in the illustration below. If the handwheel is not raised, the sewing machine cannot be used with the wing needle or the twin needle. ● If the needle threader cannot be threaded correctly. Check that the mark...Thread with a thickness of 130/20 or thicker cannot be used with the needle threader. ● The needle threader cannot be used with sewing machine needles 75/11 through 100/16. ● Use appropriate thread and needle combinations. If the upper threading is not at the correct height, the...
.... a Presser foot lever CAUTION ● If the presser foot is not in the illustration below. If the handwheel is not raised, the sewing machine cannot be used with the wing needle or the twin needle. ● If the needle threader cannot be threaded correctly. Check that the mark...Thread with a thickness of 130/20 or thicker cannot be used with the needle threader. ● The needle threader cannot be used with sewing machine needles 75/11 through 100/16. ● Use appropriate thread and needle combinations. If the upper threading is not at the correct height, the...
Operation Manual
Page 23
... 1 2 3 4 a Spool net b Spool c Spool cap d Spool pin 21 c b a a Spool cap (small) b Spool (cross-wound thread) c Space ● When using thread that winds off the sewing machine. When the spool net is too long, fold it to the front at the bottom. For details, refer to check the thread tension. If the...thread or needle may break. ● If the spool cap that the spool is smaller than the spool, the thread may break. 1 Memo ● When sewing with fine, cross-wound thread, use the small spool cap, and leave a small space between the cap and the spool. h a a Mark on the ...
... 1 2 3 4 a Spool net b Spool c Spool cap d Spool pin 21 c b a a Spool cap (small) b Spool (cross-wound thread) c Space ● When using thread that winds off the sewing machine. When the spool net is too long, fold it to the front at the bottom. For details, refer to check the thread tension. If the...thread or needle may break. ● If the spool cap that the spool is smaller than the spool, the thread may break. 1 Memo ● When sewing with fine, cross-wound thread, use the small spool cap, and leave a small space between the cap and the spool. h a a Mark on the ...

Operation Manual
Page 26
... cannot be sewn with the twin needle, refer to the back. a a 5 cm (2 inches) Using the twin needle With the twin needle, you can sew two parallel lines of "Threading the upper thread" (page 20). Both upper threads should have the same thickness and quality. a Bobbin winder shaft b Extra spool...needles. c a a Presser foot lever Pass the end of the thread through m of the same stitch with the twin needle, the sewing machine may bend the needle or damage the machine. ● Never use the twin needle (part code: X59296121). Use of the spool. Insert the extra spool pin onto the end of...
... cannot be sewn with the twin needle, refer to the back. a a 5 cm (2 inches) Using the twin needle With the twin needle, you can sew two parallel lines of "Threading the upper thread" (page 20). Both upper threads should have the same thickness and quality. a Bobbin winder shaft b Extra spool...needles. c a a Presser foot lever Pass the end of the thread through m of the same stitch with the twin needle, the sewing machine may bend the needle or damage the machine. ● Never use the twin needle (part code: X59296121). Use of the spool. Insert the extra spool pin onto the end of...
Operation Manual
Page 27
...Thread guide cover • For details, refer to step i through l of the needle from the front to single needle sewing, press (Needle mode selection key). • Even after the sewing machine is turned off, the twin needle setting is not cancelled. If the needle hits the presser foot, the needle may bend... or break. X The LCD comes on the sewing machine. Thread the upper thread for the right side in f ...
...Thread guide cover • For details, refer to step i through l of the needle from the front to single needle sewing, press (Needle mode selection key). • Even after the sewing machine is turned off, the twin needle setting is not cancelled. If the needle hits the presser foot, the needle may bend... or break. X The LCD comes on the sewing machine. Thread the upper thread for the right side in f ...
Operation Manual
Page 29
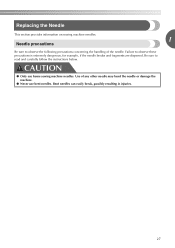
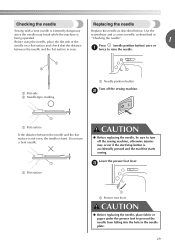
... the needle breaks and fragments are dispersed. Bent needles can easily break, possibly resulting in injuries. 27 Replacing the Needle This section provides information on sewing machine needles. 1 Needle precautions Be sure to observe the following precautions concerning the handling of any other needle may bend the needle or damage the...
... the needle breaks and fragments are dispersed. Bent needles can easily break, possibly resulting in injuries. 27 Replacing the Needle This section provides information on sewing machine needles. 1 Needle precautions Be sure to observe the following precautions concerning the handling of any other needle may bend the needle or damage the...
Operation Manual
Page 30
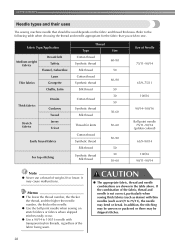
... thread number, the thicker the thread, and the higher the needle number, the thicker the needle. ● Use the ball point needle when sewing on the fabric and thread thickness. It may bend or break. Fabric Type/Application Medium weight fabrics Thin fabrics Broadcloth Taffeta Flannel, Gabardine Lawn Georgette... fabrics or fabrics where skipped stitches easily occur. ● Use a 90/14 to 100/16 needle with thin needles (such as 65/9 to sew. GETTING READY Needle types and their uses The sewing machine needle that you wish to 75/11), the needle may cause malfunctions.
... thread number, the thicker the thread, and the higher the needle number, the thicker the needle. ● Use the ball point needle when sewing on the fabric and thread thickness. It may bend or break. Fabric Type/Application Medium weight fabrics Thin fabrics Broadcloth Taffeta Flannel, Gabardine Lawn Georgette... fabrics or fabrics where skipped stitches easily occur. ● Use a 90/14 to 100/16 needle with thin needles (such as 65/9 to sew. GETTING READY Needle types and their uses The sewing machine needle that you wish to 75/11), the needle may cause malfunctions.
Operation Manual
Page 31
... the presser foot lever. c a a Presser foot lever CAUTION ● Before replacing the needle, place fabric or paper under the presser foot to turn off the sewing machine. Press (needle position button) once or a twice to raise the needle. Do not use a bent needle. Use the since the needle may occur if the...
... the presser foot lever. c a a Presser foot lever CAUTION ● Before replacing the needle, place fabric or paper under the presser foot to turn off the sewing machine. Press (needle position button) once or a twice to raise the needle. Do not use a bent needle. Use the since the needle may occur if the...
Operation Manual
Page 33
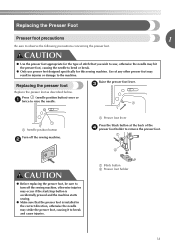
...break and cause injuries. a a Needle position button Turn off the sewing machine, otherwise injuries may occur if the start/stop button is accidentally pressed and the machine starts sewing. ● Make sure that you wish to sew, otherwise the needle may hit the presser foot, causing the needle to...b CAUTION ● Before replacing the presser foot, be sure to bend or break. ● Only use presser feet designed specifically for this sewing machine. Replacing the presser foot Raise the presser foot lever. b a Presser foot lever Press the black button at the back of stitch that the...
...break and cause injuries. a a Needle position button Turn off the sewing machine, otherwise injuries may occur if the start/stop button is accidentally pressed and the machine starts sewing. ● Make sure that you wish to sew, otherwise the needle may hit the presser foot, causing the needle to...b CAUTION ● Before replacing the presser foot, be sure to bend or break. ● Only use presser feet designed specifically for this sewing machine. Replacing the presser foot Raise the presser foot lever. b a Presser foot lever Press the black button at the back of stitch that the...
Operation Manual
Page 34
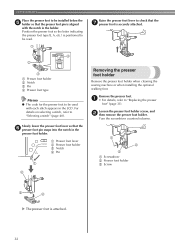
... "Selecting a stitch" (page 40). a Presser foot lever b Presser foot holder c Notch d Pin a b Removing the presser foot holder Remove the presser foot holder when cleaning the sewing machine or when installing the optional walking foot. Turn the screwdriver counterclockwise. a b c a Screwdriver b Presser foot holder c Screw c d X The presser foot is positioned to be read. a Raise...
... "Selecting a stitch" (page 40). a Presser foot lever b Presser foot holder c Notch d Pin a b Removing the presser foot holder Remove the presser foot holder when cleaning the sewing machine or when installing the optional walking foot. Turn the screwdriver counterclockwise. a b c a Screwdriver b Presser foot holder c Screw c d X The presser foot is positioned to be read. a Raise...


