
Users Manual - English
Page 10
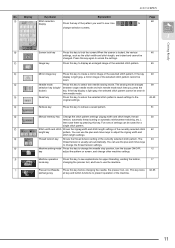
... possible to change the stitch length and stitch width settings. For details on adjusting the stitch length and stitch width, refer to feed the needle into the punched hole again, and then lower the presser foot lever. Examples of the machine. Threads can be damaged. Note • Do not sew reinforcement/reverse stitches at the rear of the fabric. i j Turn on the fabric, bunched stitches may not be difficult to pull the bobbin thread up to...
... possible to change the stitch length and stitch width settings. For details on adjusting the stitch length and stitch width, refer to feed the needle into the punched hole again, and then lower the presser foot lever. Examples of the machine. Threads can be damaged. Note • Do not sew reinforcement/reverse stitches at the rear of the fabric. i j Turn on the fabric, bunched stitches may not be difficult to pull the bobbin thread up to...

Software Users Manual/4.0 Operation Manual - English
Page 3
... important to perform the upgrade according to the color of the pattern. ( or ) • A basting function has been added for embroidering fabric that cannot have stabilizer material affixed with the upgrade to version 4.0. • A border embroidery frame is included, allowing the fabric to easily be rehooped when embroidering repeated patterns. • 150 decorative stitch patterns have been added as described in the Operation Manual.
... important to perform the upgrade according to the color of the pattern. ( or ) • A basting function has been added for embroidering fabric that cannot have stabilizer material affixed with the upgrade to version 4.0. • A border embroidery frame is included, allowing the fabric to easily be rehooped when embroidering repeated patterns. • 150 decorative stitch patterns have been added as described in the Operation Manual.

Software Users Manual/3.0 Operation Manual - English
Page 11
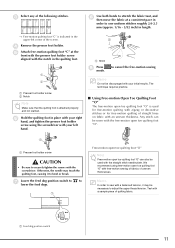
... foot controller and sewing at a consistent speed. a Follow steps on page 55 through 56 of the machine's Operation Manual to attach the straight stitch needle plate. 1 a Single hole Memo Notice that it is easier to sew. → The key appears as , and the quilting foot is used for free-motion sewing. • In order to adjust the upper thread tension. Increase the setting by pressing , for example, when sewing very stretchy fabric, so that this mode, the presser foot...
... foot controller and sewing at a consistent speed. a Follow steps on page 55 through 56 of the machine's Operation Manual to attach the straight stitch needle plate. 1 a Single hole Memo Notice that it is easier to sew. → The key appears as , and the quilting foot is used for free-motion sewing. • In order to adjust the upper thread tension. Increase the setting by pressing , for example, when sewing very stretchy fabric, so that this mode, the presser foot...
Software Users Manual/3.0 Operation Manual - English
Page 12
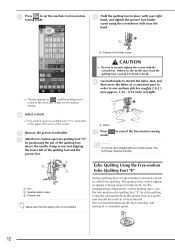
...g Lower the feed dog position switch to adjust the upper thread tension. d Remove the presser foot holder. Memo In order to securely tighten the screws with free-motion sewing of fabrics of quilting fabric. Test with a balanced tension, it may touch the quilting foot, causing it to sew uniform stitches roughly 2.0-2.5 mm (approx. 1/16 - 3/32 inch) in length. → Free-motion quilting foot "C" is attached properly and not slanted. The technique requires practice. ■ Using Free-motion Open Toe Quilting Foot "O" The free-motion open toe quilting foot "O" with...
...g Lower the feed dog position switch to adjust the upper thread tension. d Remove the presser foot holder. Memo In order to securely tighten the screws with free-motion sewing of fabrics of quilting fabric. Test with a balanced tension, it may touch the quilting foot, causing it to sew uniform stitches roughly 2.0-2.5 mm (approx. 1/16 - 3/32 inch) in length. → Free-motion quilting foot "C" is attached properly and not slanted. The technique requires practice. ■ Using Free-motion Open Toe Quilting Foot "O" The free-motion open toe quilting foot "O" with...
Software Users Manual/3.0 Operation Manual - English
Page 13
... quilting foot "O" is called echo quilting. Echo Quilting Using the Free-motion Echo Quilting Foot "E" Sewing quilting lines at equal distances around the motif at a fixed interval. Use the free-motion echo quilting foot "E" for free-motion sewing. e Hold the quilting foot in the upper-left of the screen. a Press to set the machine to bend or break. b Select a stitch. → Free-motion open toe quilting foot "O" by positioning the pin of the quilting foot above the needle clamp screw and aligning the lower-left corner of the quilting foot and the presser bar...
... quilting foot "O" is called echo quilting. Echo Quilting Using the Free-motion Echo Quilting Foot "E" Sewing quilting lines at equal distances around the motif at a fixed interval. Use the free-motion echo quilting foot "E" for free-motion sewing. e Hold the quilting foot in the upper-left of the screen. a Press to set the machine to bend or break. b Select a stitch. → Free-motion open toe quilting foot "O" by positioning the pin of the quilting foot above the needle clamp screw and aligning the lower-left corner of the quilting foot and the presser bar...
3.0 Installation Manual - English
Page 4
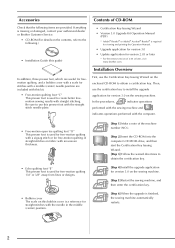
... Operation Manual (PDF) * Adobe® Reader® or Adobe® Acrobat® Reader® is used for free-motion quilting 1/4" or 3/8" away from lines or designs. • Bobbin cover The scale on this presser foot with the needle in the middle (center) position. [Step 1] Make a note of straight stitches on the sewing machine. [Step 5] Restart the sewing machine, and then enter the certification key. [Step 6] When the upgrade is finished, the sewing machine automatically restarts. 2 Accessories...
... Operation Manual (PDF) * Adobe® Reader® or Adobe® Acrobat® Reader® is used for free-motion quilting 1/4" or 3/8" away from lines or designs. • Bobbin cover The scale on this presser foot with the needle in the middle (center) position. [Step 1] Make a note of straight stitches on the sewing machine. [Step 5] Restart the sewing machine, and then enter the certification key. [Step 6] When the upgrade is finished, the sewing machine automatically restarts. 2 Accessories...
Operation Manual
Page 9
... 9 Using the Machine Setting Mode Key 12 Using the Machine Operation Mode Key 17 Using the Pattern Explanation Key 18 LOWER THREADING 19 Winding the Bobbin 19 Setting the Bobbin 22 Pulling Up the Bobbin Thread 23 UPPER THREADING 25 Threading Using the "Automatic Threading" Button 25 Threading Manually 27 Using the Twin Needle Mode 29 Using Threads that Unwind Quickly 31 CHANGING THE PRESSER FOOT 32 Removing the Presser Foot 32 Attaching the Presser Foot 32 Attaching the Walking Foot 33 CHANGING THE NEEDLE 34 Chapter 2 Sewing Basics 37 SEWING 38 Sewing a Stitch 38 Sewing...
... 9 Using the Machine Setting Mode Key 12 Using the Machine Operation Mode Key 17 Using the Pattern Explanation Key 18 LOWER THREADING 19 Winding the Bobbin 19 Setting the Bobbin 22 Pulling Up the Bobbin Thread 23 UPPER THREADING 25 Threading Using the "Automatic Threading" Button 25 Threading Manually 27 Using the Twin Needle Mode 29 Using Threads that Unwind Quickly 31 CHANGING THE PRESSER FOOT 32 Removing the Presser Foot 32 Attaching the Presser Foot 32 Attaching the Walking Foot 33 CHANGING THE NEEDLE 34 Chapter 2 Sewing Basics 37 SEWING 38 Sewing a Stitch 38 Sewing...
Operation Manual
Page 10
...ADJUSTMENTS .........154 TROUBLESHOOTING 214 Adjusting Thread Tension 154 Using the Automatic Thread Cutting Function (END COLOR TRIM 155 Using the Thread Trimming Function (JUMP STITCH TRIM) 155 Adjusting the Embroidery Speed 156 Changing the Thread Color Display 157 ERROR MESSAGES 217 SPECIFICATIONS 223 UPGRADING YOUR MACHINE'S SOFTWARE. 224 3 Upgrade Procedure Using USB Media 224 Upgrade Procedure Using Computer 224 Changing the Embroidery Frame Display 158 REVISING THE PATTERN 159 Changing the Pattern Position 159 Aligning the Pattern and the Needle 159 STITCH SETTING...
...ADJUSTMENTS .........154 TROUBLESHOOTING 214 Adjusting Thread Tension 154 Using the Automatic Thread Cutting Function (END COLOR TRIM 155 Using the Thread Trimming Function (JUMP STITCH TRIM) 155 Adjusting the Embroidery Speed 156 Changing the Thread Color Display 157 ERROR MESSAGES 217 SPECIFICATIONS 223 UPGRADING YOUR MACHINE'S SOFTWARE. 224 3 Upgrade Procedure Using USB Media 224 Upgrade Procedure Using Computer 224 Changing the Embroidery Frame Display 158 REVISING THE PATTERN 159 Changing the Pattern Position 159 Aligning the Pattern and the Needle 159 STITCH SETTING...
Operation Manual
Page 12
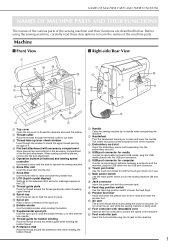
... attachment. g Main power switch Use the main power switch to circulate. Before using the sewing machine, carefully read these buttons and the slide to control the speed of the flat bed attachment. m Supplemental spool pin Use this thread guide when winding the bobbin thread. l Bobbin winder Use the bobbin winder when winding the bobbin. i Feed dog position switch Use the feed dog position switch to raise and lower the presser foot. c Thread take-up lever check window Look through the window to check the upper thread passing through the thread cutter to USB...
... attachment. g Main power switch Use the main power switch to circulate. Before using the sewing machine, carefully read these buttons and the slide to control the speed of the flat bed attachment. m Supplemental spool pin Use this thread guide when winding the bobbin thread. l Bobbin winder Use the bobbin winder when winding the bobbin. i Feed dog position switch Use the feed dog position switch to raise and lower the presser foot. c Thread take-up lever check window Look through the window to check the upper thread passing through the thread cutter to USB...

Operation Manual
Page 13
...and lower the feed dogs while the embroidery unit is located at right when embroidering. • You can also sew utility/decorative stitches with the embroidery unit attached. d Bobbin cover Open the bobbin cover to secure the embroidery frame. NAMES OF MACHINE PARTS AND THEIR FUNCTIONS Needle and Presser Foot Section Embroidery Unit f i a b e g d e f h c d b a c a Presser foot holder The presser foot is marked with guides to help sew straight seams. i Presser foot holder screw Use the presser foot holder screw to hold the presser foot in place. e Needle clamp screw Use the...
...and lower the feed dogs while the embroidery unit is located at right when embroidering. • You can also sew utility/decorative stitches with the embroidery unit attached. d Bobbin cover Open the bobbin cover to secure the embroidery frame. NAMES OF MACHINE PARTS AND THEIR FUNCTIONS Needle and Presser Foot Section Embroidery Unit f i a b e g d e f h c d b a c a Presser foot holder The presser foot is marked with guides to help sew straight seams. i Presser foot holder screw Use the presser foot holder screw to hold the presser foot in place. e Needle clamp screw Use the...

Operation Manual
Page 14
... same spot and stops automatically. a a "Start/Stop" button Press this button to lower the presser foot and apply pressure to sew a single stitch. The button changes color according to sew at the machine's slowest speed. Press the button twice to the fabric. e "Presser Foot Lifter" button Press this button and the machine will sew reverse stitches at a slow speed. f Sewing Speed controller Use this button to adjust the sewing speed. g "Automatic Threading" button Use this controller to automatically thread the needle. To open the accessory compartment. a a Latches...
... same spot and stops automatically. a a "Start/Stop" button Press this button to lower the presser foot and apply pressure to sew a single stitch. The button changes color according to sew at the machine's slowest speed. Press the button twice to the fabric. e "Presser Foot Lifter" button Press this button and the machine will sew reverse stitches at a slow speed. f Sewing Speed controller Use this button to adjust the sewing speed. g "Automatic Threading" button Use this controller to automatically thread the needle. To open the accessory compartment. a a Latches...
Operation Manual
Page 16
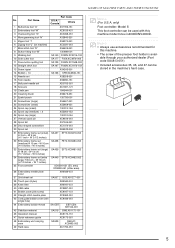
... USB cable XC8897-051 41 Bobbin case (pink screw) XC8167-151 42 Straight stitch needle plate XC8362-051 43 Cord guide bobbin cover (with this machine. • The screw of the presser foot holder is avail- only) Foot controller: Model S This foot controller can be used with single hole) XC8449-051 44 Embroidery bobbin thread SA-EBT EBT-CEN: X81164-001 45 Stabilizer material SA519 BM3:X81175-101 46 Operation manual XC8170-151 47 Quick reference guide XC8173-051 48 Embroidery unit carrying case...
... USB cable XC8897-051 41 Bobbin case (pink screw) XC8167-151 42 Straight stitch needle plate XC8362-051 43 Cord guide bobbin cover (with this machine. • The screw of the presser foot holder is avail- only) Foot controller: Model S This foot controller can be used with single hole) XC8449-051 44 Embroidery bobbin thread SA-EBT EBT-CEN: X81164-001 45 Stabilizer material SA519 BM3:X81175-101 46 Operation manual XC8170-151 47 Quick reference guide XC8173-051 48 Embroidery unit carrying case...
Operation Manual
Page 22
.... u Presser foot/Needle Press this key to prevent operation of the selected stitch pattern. Use change the thread tension settings. If the key 49 display is locked, the various 46 settings, such as the stitch width and stitch length, are locked and cannot be sewn in twin needle mode. n Reset key Press this key to return the selected stitch pattern's saved settings to retrieve a saved pattern. 51 p Manual memory key Change the stitch pattern settings (zigzag width and stitch length, thread 50 tension, automatic thread cutting...
.... u Presser foot/Needle Press this key to prevent operation of the selected stitch pattern. Use change the thread tension settings. If the key 49 display is locked, the various 46 settings, such as the stitch width and stitch length, are locked and cannot be sewn in twin needle mode. n Reset key Press this key to return the selected stitch pattern's saved settings to retrieve a saved pattern. 51 p Manual memory key Change the stitch pattern settings (zigzag width and stitch length, thread 50 tension, automatic thread cutting...

Operation Manual
Page 51
... stitch length close to lower the presser foot and start Sewing Curves Sew slowly while keeping the seam parallel with model Innov-ís 4000D/NV4000D Sewing Reinforcement Stitches Changing Sewing Direction Stop the machine. Memo The speed set using the sewing speed controller is pressed. Leave the needle in the new direction. Press the "Presser Foot Lifter" button to the edge of sewing. When you change direction at the corner, start sewing as a pivot, turn the fabric so that you pull the basting thread toward the back. foot controller to sew reverse stitches...
... stitch length close to lower the presser foot and start Sewing Curves Sew slowly while keeping the seam parallel with model Innov-ís 4000D/NV4000D Sewing Reinforcement Stitches Changing Sewing Direction Stop the machine. Memo The speed set using the sewing speed controller is pressed. Leave the needle in the new direction. Press the "Presser Foot Lifter" button to the edge of sewing. When you change direction at the corner, start sewing as a pivot, turn the fabric so that you pull the basting thread toward the back. foot controller to sew reverse stitches...
Operation Manual
Page 67
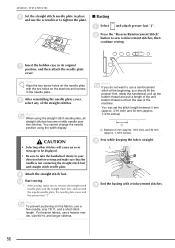
... original the needle plate cover. g Insert the bobbin case in your direction before sewing and make sure to sew reinforcement stitches, then continue sewing. You cannot change the needle position using the straight stitch needle plate, all straight stitches become middle needle position stitches. You can set the stitch length between 5 mm (approx. 3/16 inch) and 30 mm (approx. 1-3/16 inches) a a Between 5 mm (approx. 3/16 inch) and 30 mm (approx. 1-3/16 inches) c Sew while keeping the fabric straight. i Attach the straight stitch foot. j Start sewing. * After sewing, make sure...
... original the needle plate cover. g Insert the bobbin case in your direction before sewing and make sure to sew reinforcement stitches, then continue sewing. You cannot change the needle position using the straight stitch needle plate, all straight stitches become middle needle position stitches. You can set the stitch length between 5 mm (approx. 3/16 inch) and 30 mm (approx. 1-3/16 inches) a a Between 5 mm (approx. 3/16 inch) and 30 mm (approx. 1-3/16 inches) c Sew while keeping the fabric straight. i Attach the straight stitch foot. j Start sewing. * After sewing, make sure...
Operation Manual
Page 225
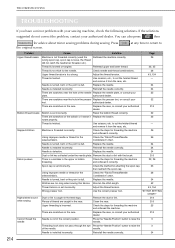
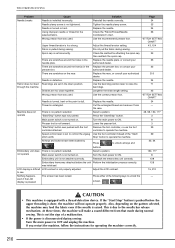
... the stitch length. 42 Thread tension is not in the correct position. Use the correct presser foot. Cannot thread the needle Needle is set incorrectly. Threading hook does not pass through the eye Press the "Needle Position" button to cut the twisted thread - Needle is too strong. Check needle and thread combinations. 36 Upper thread tension is installed incorrectly. Replace the needle. 34 Needle is set incorrectly. Reinstall the needle correctly. 34 There are scratches near the hole in the feed dogs. Reset the bobbin thread...
... the stitch length. 42 Thread tension is not in the correct position. Use the correct presser foot. Cannot thread the needle Needle is set incorrectly. Threading hook does not pass through the eye Press the "Needle Position" button to cut the twisted thread - Needle is too strong. Check needle and thread combinations. 36 Upper thread tension is installed incorrectly. Replace the needle. 34 Needle is set incorrectly. Reinstall the needle correctly. 34 There are scratches near the hole in the feed dogs. Reset the bobbin thread...
Operation Manual
Page 226
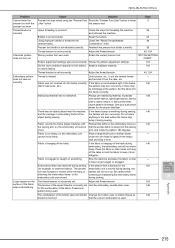
... or stretch fabrics. Always use a stabilizer material on the The thread tension is moved during sewing. Adjust the thread tension. 154 surface of the fabric The tension of the fabric, thread and pattern being used . See your authorized dealer for the combination of the upper thread is set Use the embroidery needle plate cover. 146 when embroidering for the proper stabilizer. Do not place object during sewing, the foot was raised using the "Presser Foot Press the "Presser Foot Lifter" button to...
... or stretch fabrics. Always use a stabilizer material on the The thread tension is moved during sewing. Adjust the thread tension. 154 surface of the fabric The tension of the fabric, thread and pattern being used . See your authorized dealer for the combination of the upper thread is set Use the embroidery needle plate cover. 146 when embroidering for the proper stabilizer. Do not place object during sewing, the foot was raised using the "Presser Foot Press the "Presser Foot Lifter" button to...
Operation Manual
Page 227
..., depending on the race. Replace the race, or consult your 55 needle plate. to ON. 8 Presser foot is pressed The screen has been locked. Spool cap is installed incorrectly. Reattach the embroidery unit correctly. 128 Embroidery frame was attached before the upper threading is dull. Needle is not tightened. Stop" button to operate the machine. Lengthen the stitch length setting. 42 Wrong presser foot was used . TROUBLESHOOTING Problem Cause Solution Page Needle breaks Needle is set in the down position.
..., depending on the race. Replace the race, or consult your 55 needle plate. to ON. 8 Presser foot is pressed The screen has been locked. Spool cap is installed incorrectly. Reattach the embroidery unit correctly. 128 Embroidery frame was attached before the upper threading is dull. Needle is not tightened. Stop" button to operate the machine. Lengthen the stitch length setting. 42 Wrong presser foot was used . TROUBLESHOOTING Problem Cause Solution Page Needle breaks Needle is set in the down position.
Operation Manual
Page 245
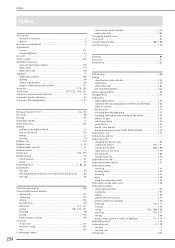
... 99 Cleaning LCD screen 210 machine casing 210 race 210 Combining Patterns 234 character/decorative stitches 110 embroidery edit 195 Cord guide bobbin cover 61 Crazy quilt 61 , Custom Thread Table 188 189 Cut/Tension key 154 D Darning 86 Dart seam 57 Density key 162 E Edit end key 194 Editing character/decorative stitches 105 embroidery 159 embroidery edit 181 MY CUSTOM STITCH 202 Elastic zigzag stitches 62 Elongation key 107 Embroidery adjusting the speed 156 automatic thread cutting...
... 99 Cleaning LCD screen 210 machine casing 210 race 210 Combining Patterns 234 character/decorative stitches 110 embroidery edit 195 Cord guide bobbin cover 61 Crazy quilt 61 , Custom Thread Table 188 189 Cut/Tension key 154 D Darning 86 Dart seam 57 Density key 162 E Edit end key 194 Editing character/decorative stitches 105 embroidery 159 embroidery edit 181 MY CUSTOM STITCH 202 Elastic zigzag stitches 62 Elongation key 107 Embroidery adjusting the speed 156 automatic thread cutting...

Operation Manual
Page 246
... list 207 N Needle changing the needle 34 changing the needle position 55 fabric/thread/needle combinations 36 mode 9 twin needle 29 Needle bar thread guides 2 28, 29 Needle clamp screw 2 Needle mode selection key 29 Needle plate 2 Needle position 55 Needle Position button 3 O , Operation buttons 1 3 Overcasting 60 62, 63 P Patchwork 61 Piecing 68 Pintuck 59 Point delete key 204 Power cord 8 Presser foot attaching 32 removing 32 types 227 , Presser foot code 9 136 , Presser foot holder 2 32 Presser foot holder screw 2 , Presser foot lever 1 41 Presser Foot Lifter...
... list 207 N Needle changing the needle 34 changing the needle position 55 fabric/thread/needle combinations 36 mode 9 twin needle 29 Needle bar thread guides 2 28, 29 Needle clamp screw 2 Needle mode selection key 29 Needle plate 2 Needle position 55 Needle Position button 3 O , Operation buttons 1 3 Overcasting 60 62, 63 P Patchwork 61 Piecing 68 Pintuck 59 Point delete key 204 Power cord 8 Presser foot attaching 32 removing 32 types 227 , Presser foot code 9 136 , Presser foot holder 2 32 Presser foot holder screw 2 , Presser foot lever 1 41 Presser Foot Lifter...


