Users Manual - English
Page 2
... THREAD TENSION...13 Adjusting the Upper Thread Tension ...13 Adjusting the Tension of the Bobbin Thread ...13 TROUBLESHOOTING...14 1 This manual describes the procedures for machine embroidering. The images and patterns used in this manual are for illustration purposes and may differ from the actual items. This is a kit used for... for sewing (utility stitches, decorative stitches or free-motion sewing). BEFORE YOU START Thank you for choosing our product. For specific details on operating the machine, refer to the Operation Manual provided with your...
... THREAD TENSION...13 Adjusting the Upper Thread Tension ...13 Adjusting the Tension of the Bobbin Thread ...13 TROUBLESHOOTING...14 1 This manual describes the procedures for machine embroidering. The images and patterns used in this manual are for illustration purposes and may differ from the actual items. This is a kit used for... for sewing (utility stitches, decorative stitches or free-motion sewing). BEFORE YOU START Thank you for choosing our product. For specific details on operating the machine, refer to the Operation Manual provided with your...

Users Manual - English
Page 3
Use the bobbin cover with the same shape as the bobbin cover included with your machine cannot be installed on the wrong side of the fabric, by winding the bobbin with heavy weight thread or ribbon too thick to be included, ...: XE9382-001, Other areas: XE9501-001) Note • Two bobbin covers may be fed through the sewing machine needle and sewing on the machine. (XE8992-001) (XE8878-001) 2 Utility stitches Decorative stitches (For models with your machine. Bobbin case (gray) (XE8298-001) Bobbin cover with this kit was purchased. The bobbin cover with...
Use the bobbin cover with the same shape as the bobbin cover included with your machine cannot be installed on the wrong side of the fabric, by winding the bobbin with heavy weight thread or ribbon too thick to be included, ...: XE9382-001, Other areas: XE9501-001) Note • Two bobbin covers may be fed through the sewing machine needle and sewing on the machine. (XE8992-001) (XE8878-001) 2 Utility stitches Decorative stitches (For models with your machine. Bobbin case (gray) (XE8298-001) Bobbin cover with this kit was purchased. The bobbin cover with...
Users Manual - English
Page 6
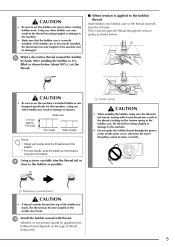
CAUTION • Be sure to the machine. • Make sure that the bobbin case is incorrectly installed, the thread may become tangled or the machine may result in the thread becoming tangled or damage to use the bobbin case (gray) when creating bobbin work. h Using any other bobbin case may be damaged. If the bobbin case is correctly installed.
CAUTION • Be sure to the machine. • Make sure that the bobbin case is incorrectly installed, the thread may become tangled or the machine may result in the thread becoming tangled or damage to use the bobbin case (gray) when creating bobbin work. h Using any other bobbin case may be damaged. If the bobbin case is correctly installed.
Users Manual - English
Page 8
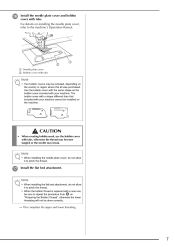
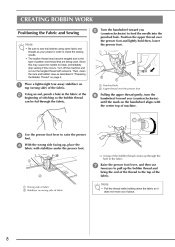
... not allow it to repeat the procedure from a on "Preparing the Bobbin Thread", otherwise the lower threading will not be installed on the machine. q Install the flat bed attachment. p Install the needle plate cover and bobbin cover with tabs, otherwise the thread may become tangled or... the needle may be included, depending on installing the needle plate cover, refer to the machine's Operation Manual. CAUTION • When creating bobbin work, use the bobbin cover with tabs. Note • When installing the needle plate ...
... not allow it to repeat the procedure from a on "Preparing the Bobbin Thread", otherwise the lower threading will not be installed on the machine. q Install the flat bed attachment. p Install the needle plate cover and bobbin cover with tabs, otherwise the thread may become tangled or... the needle may be included, depending on installing the needle plate cover, refer to the machine's Operation Manual. CAUTION • When creating bobbin work, use the bobbin cover with tabs. Note • When installing the needle plate ...
Users Manual - English
Page 9
a b e Turn the handwheel toward you (counterclockwise) to the top of machine. f a Punched hole b Upper thread over the presser foot and lightly hold then, lower the presser foot. g Raise the presser foot lever, and then use tweezers ...to pull up the bobbin thread and bring the end of the bobbin thread comes up , place the fabric with scissors. Turn off the machine and cut out the tangled thread with stabilizer under the presser foot. → A loop of the thread to feed the needle into the punched hole...
a b e Turn the handwheel toward you (counterclockwise) to the top of machine. f a Punched hole b Upper thread over the presser foot and lightly hold then, lower the presser foot. g Raise the presser foot lever, and then use tweezers ...to pull up the bobbin thread and bring the end of the bobbin thread comes up , place the fabric with scissors. Turn off the machine and cut out the tangled thread with stabilizer under the presser foot. → A loop of the thread to feed the needle into the punched hole...

Users Manual - English
Page 10
...sewing is higher than the standard setting. k Adjust the upper thread tension. For details on adjusting the stitch length and stitch width, refer to the machine's Operation Manual. • Depending on , the thread may become tangled or the needle may result. Raise the needle and presser foot. 9 p ...can be damaged. h Align the upper thread and bobbin thread, and then pass them under the presser foot toward the rear of the machine, turn the handwheel to feed the needle into the punched hole again, and then lower the presser foot lever. m While gently holding ...
...sewing is higher than the standard setting. k Adjust the upper thread tension. For details on adjusting the stitch length and stitch width, refer to the machine's Operation Manual. • Depending on , the thread may become tangled or the needle may result. Raise the needle and presser foot. 9 p ...can be damaged. h Align the upper thread and bobbin thread, and then pass them under the presser foot toward the rear of the machine, turn the handwheel to feed the needle into the punched hole again, and then lower the presser foot lever. m While gently holding ...
Users Manual - English
Page 11
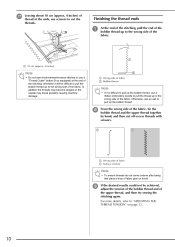
... the bobbin thread up to "ADJUSTING THE THREAD TENSION" on knots. In addition the threads may become tangled or the needle may break possibly causing machine damage. b From the wrong side of the upper thread, and then try sewing the stitching again. q Leaving about 10 cm (approx. 4 inches) of thread at...
... the bobbin thread up to "ADJUSTING THE THREAD TENSION" on knots. In addition the threads may become tangled or the needle may break possibly causing machine damage. b From the wrong side of the upper thread, and then try sewing the stitching again. q Leaving about 10 cm (approx. 4 inches) of thread at...
Users Manual - English
Page 12
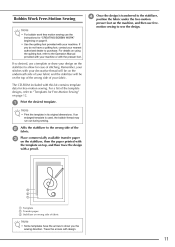
...side of the fabric. If an enlarged template is transferred to the stabilizer, position the fabric under the free-motion presser foot on the machine, and then use freemotion sewing to "Templates for Free-Motion Sewing" on page 12. d Once the design is used, the bobbin ...have the arrows to purchase. b c Affix the stabilizer to allow for ease of fabric Note • Some templates have a quilting foot, contact your machine. a Template b Transfer paper c Stabilizer on wrong side of stitching. Bobbin Work Free-Motion Sewing Note • For bobbin work free motion sewing use...
...side of the fabric. If an enlarged template is transferred to the stabilizer, position the fabric under the free-motion presser foot on the machine, and then use freemotion sewing to "Templates for Free-Motion Sewing" on page 12. d Once the design is used, the bobbin ...have the arrows to purchase. b c Affix the stabilizer to allow for ease of fabric Note • Some templates have a quilting foot, contact your machine. a Template b Transfer paper c Stabilizer on wrong side of stitching. Bobbin Work Free-Motion Sewing Note • For bobbin work free motion sewing use...
Users Manual - English
Page 14
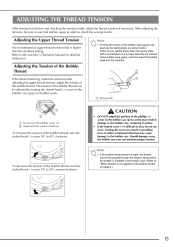
...-head (-) screw 30° to 45° clockwise. To increase the tension of the bobbin case (gray), and then insert the bobbin case into the machine. Note • If the bobbin thread tension is tight, the thread cannot be sure to sew trial stitches again in damage to the bobbin case... NOT adjust the position of the bobbin thread. Adjusting the Upper Thread Tension We recommend an upper thread tension that is not applied to the machine's Operation Manual for bobbin work. Note • Turning the screw on the bobbin case (gray) as shown below.
...-head (-) screw 30° to 45° clockwise. To increase the tension of the bobbin case (gray), and then insert the bobbin case into the machine. Note • If the bobbin thread tension is tight, the thread cannot be sure to sew trial stitches again in damage to the bobbin case... NOT adjust the position of the bobbin thread. Adjusting the Upper Thread Tension We recommend an upper thread tension that is not applied to the machine's Operation Manual for bobbin work. Note • Turning the screw on the bobbin case (gray) as shown below.
Users Manual - English
Page 1
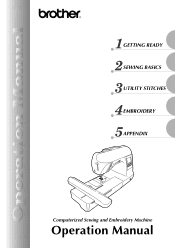
GETTING READY SEWING BASICS UTILITY STITCHES EMBROIDERY APPENDIX CPS5XV[Y Computerized Sewing and Embroidery Machine Operation Manual
GETTING READY SEWING BASICS UTILITY STITCHES EMBROIDERY APPENDIX CPS5XV[Y Computerized Sewing and Embroidery Machine Operation Manual
Users Manual - English
Page 2
... digital device, pursuant to radio communications. Operation is no guarantee that the product Product Name: Model Number: Brother Sewing Machine NV1200 This device complies with the instructions, may cause undesired operation. These limits are designed to operate the equipment... in a residential installation. Federal Communications Commission (FCC) Declaration of Conformity (For USA Only) Responsible Party: Brother International Corporation 100 Somerset Corporate Boulevard Bridgewater, NJ 08807-0911 USA TEL : (908) 704-1700 declares that interference will not ...
... digital device, pursuant to radio communications. Operation is no guarantee that the product Product Name: Model Number: Brother Sewing Machine NV1200 This device complies with the instructions, may cause undesired operation. These limits are designed to operate the equipment... in a residential installation. Federal Communications Commission (FCC) Declaration of Conformity (For USA Only) Responsible Party: Brother International Corporation 100 Somerset Corporate Boulevard Bridgewater, NJ 08807-0911 USA TEL : (908) 704-1700 declares that interference will not ...
Users Manual - English
Page 3
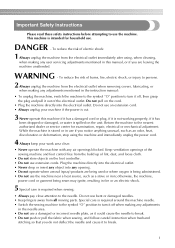
...nearest authorized dealer or service center for household use bent or damaged needles. • Keep fingers away from all moving parts. Return the machine to use if you do not deflect the needle and cause it to turn it off , then grasp the plug and pull it ...lubricating, or when making any opening. • Do not operate where aerosol (spray) products are leaving the machine unattended. Special care is required around the machine needle. • Switch the sewing machine to the symbol "O" position to turn it off when making any adjustments in the instruction manual: • To...
...nearest authorized dealer or service center for household use bent or damaged needles. • Keep fingers away from all moving parts. Return the machine to use if you do not deflect the needle and cause it to turn it off , then grasp the plug and pull it ...lubricating, or when making any opening. • Do not operate where aerosol (spray) products are leaving the machine unattended. Special care is required around the machine needle. • Switch the sewing machine to the symbol "O" position to turn it off when making any adjustments in the instruction manual: • To...
Users Manual - English
Page 4
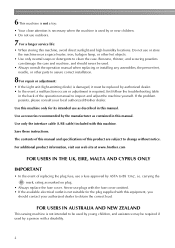
...longer service life: • When storing this manual. Use accessories recommended by ASTA to inspect and adjust the machine yourself. For additional product information, visit our web site at www.brother.com FOR USERS IN THE UK, EIRE, MALTA AND CYPRUS ONLY IMPORTANT • In the event of the ...not intended to obtain the correct lead. Benzene, thinner, and scouring powders can damage the case and machine, and should contact your local authorized Brother dealer. Do not use or store the machine near children. • Do not use as marked on plug. • Always replace the fuse ...
...longer service life: • When storing this manual. Use accessories recommended by ASTA to inspect and adjust the machine yourself. For additional product information, visit our web site at www.brother.com FOR USERS IN THE UK, EIRE, MALTA AND CYPRUS ONLY IMPORTANT • In the event of the ...not intended to obtain the correct lead. Benzene, thinner, and scouring powders can damage the case and machine, and should contact your local authorized Brother dealer. Do not use or store the machine near children. • Do not use as marked on plug. • Always replace the fuse ...
Users Manual - English
Page 5
... buttons ...13 Operation panel ...14 GETTING READY 15 Turning the Machine On/Off 16 Power supply precautions ...16 Turning on the machine ...17 Turning off the machine ...17 LCD (Liquid Crystal Display) Operation 18 Viewing the LCD...18 Changing the machine settings...19 Checking machine operating procedures ...21 Winding/Installing the Bobbin 23 Bobbin precautions...
... buttons ...13 Operation panel ...14 GETTING READY 15 Turning the Machine On/Off 16 Power supply precautions ...16 Turning on the machine ...17 Turning off the machine ...17 LCD (Liquid Crystal Display) Operation 18 Viewing the LCD...18 Changing the machine settings...19 Checking machine operating procedures ...21 Winding/Installing the Bobbin 23 Bobbin precautions...

Users Manual - English
Page 8
APPENDIX 179 Care and Maintenance ...180 Cleaning the machine surface ...180 Cleaning the race ...180 Troubleshooting ...182 Error messages ...187 Adjusting the LCD...190 Operation beep...190 Canceling the operation beep ...191 Upgrading Your Machine's Software 192 Index ...193 6
APPENDIX 179 Care and Maintenance ...180 Cleaning the machine surface ...180 Cleaning the race ...180 Troubleshooting ...182 Error messages ...187 Adjusting the LCD...190 Operation beep...190 Canceling the operation beep ...191 Upgrading Your Machine's Software 192 Index ...193 6
Users Manual - English
Page 9
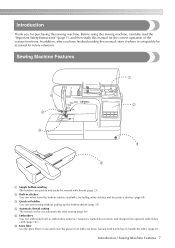
...page 68). c Quick-set bobbin You can be cut automatically after you for the correct operation of the various functions. Introduction / Sewing Machine Features 7 In addition, after sewing (page 60). d Automatic thread cutting The thread can start sewing without pulling up the bobbin thread... both hands free to handle the fabric (page 65). b Built-in stitches You can quickly and easily be accessed for future reference. Sewing Machine Features 1 2 4 3 6 5 a Simple bobbin-winding The bobbin can select from the built-in embroidery patterns, characters, framed decorations, ...
...page 68). c Quick-set bobbin You can be cut automatically after you for the correct operation of the various functions. Introduction / Sewing Machine Features 7 In addition, after sewing (page 60). d Automatic thread cutting The thread can start sewing without pulling up the bobbin thread... both hands free to handle the fabric (page 65). b Built-in stitches You can quickly and easily be accessed for future reference. Sewing Machine Features 1 2 4 3 6 5 a Simple bobbin-winding The bobbin can select from the built-in embroidery patterns, characters, framed decorations, ...

Users Manual - English
Page 10
... Included accessories After opening the box, check that the following accessories are included. only) z Foot controller: Model T This foot controller can be used on this machine model NV1200. z The screw for the presser foot holder is available through your dealer. Note (For U.S.A. If any item is available through your authorized dealer...
... Included accessories After opening the box, check that the following accessories are included. only) z Foot controller: Model T This foot controller can be used on this machine model NV1200. z The screw for the presser foot holder is available through your dealer. Note (For U.S.A. If any item is available through your authorized dealer...
Users Manual - English
Page 11
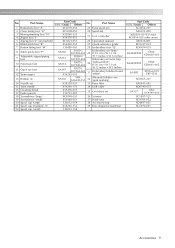
... 23 Extra spool pin 2 Overcasting foot "G" XC3098-051 24 Spool net 3 Monogramming foot "N" 4 Zipper foot "I" X53840-351 X59370-051 25 Foot controller 5 Zigzag foot "J" (on machine) XC3021-051 26 Operation manual 6 Blind stitch foot "R" X56409-051 27 Quick reference guide 7 Button fitting foot "M" 130489-001 28 Embroidery foot "Q" 8 Stitch guide foot...
... 23 Extra spool pin 2 Overcasting foot "G" XC3098-051 24 Spool net 3 Monogramming foot "N" 4 Zipper foot "I" X53840-351 X59370-051 25 Foot controller 5 Zigzag foot "J" (on machine) XC3021-051 26 Operation manual 6 Blind stitch foot "R" X56409-051 27 Quick reference guide 7 Button fitting foot "M" 130489-001 28 Embroidery foot "Q" 8 Stitch guide foot...
Users Manual - English
Page 12
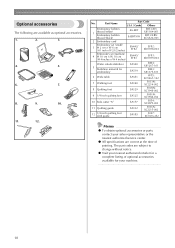
...-002 12 1/4 inch quilting foot with guide SA185 F057: XC7416-252 Memo z To obtain optional accessories or parts, contact your nearest authorized retailer for your machine. 10 Optional accessories The following are subject to change without notice.
...-002 12 1/4 inch quilting foot with guide SA185 F057: XC7416-252 Memo z To obtain optional accessories or parts, contact your nearest authorized retailer for your machine. 10 Optional accessories The following are subject to change without notice.
Users Manual - English
Page 13
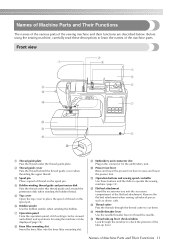
...the thread behind the thread guide cover when threading the upper thread. i Embroidery unit connector slot Plug in the connector for using the sewing machine, carefully read these buttons and the slide to thread the needle. j Presser foot lever Raise and lower the presser foot lever to learn... the names of the sewing machine and their functions are described below. Before using the machine can be displayed (page 14). l Flat bed attachment Insert the accessories tray into the knee lifter mounting slot....
...the thread behind the thread guide cover when threading the upper thread. i Embroidery unit connector slot Plug in the connector for using the sewing machine, carefully read these buttons and the slide to thread the needle. j Presser foot lever Raise and lower the presser foot lever to learn... the names of the sewing machine and their functions are described below. Before using the machine can be displayed (page 14). l Flat bed attachment Insert the accessories tray into the knee lifter mounting slot....


