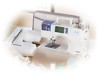

Accessory Catalog
Page 13
...on lightweight fabric. Move fabric about 1" (2.5 cm) past the needle to slide the fabric from left into gathers or tucks. Sew slowly for details.) Brother Embellishment Feet Pin Tuck Foot 24 Ruffler Foot Pin Tuck Foot This presser foot has 7 grooves and produces perfect pin tucks and... corded pin tucks using a twin needle on the lower portion of stitch length, tuck setting and depth setting. 2. Install and manually thread a twin...
...on lightweight fabric. Move fabric about 1" (2.5 cm) past the needle to slide the fabric from left into gathers or tucks. Sew slowly for details.) Brother Embellishment Feet Pin Tuck Foot 24 Ruffler Foot Pin Tuck Foot This presser foot has 7 grooves and produces perfect pin tucks and... corded pin tucks using a twin needle on the lower portion of stitch length, tuck setting and depth setting. 2. Install and manually thread a twin...

Accessory Catalog
Page 34
...(White): SA-EBT B (Black): SAEBT999 C (White only): EBT-PE Christmas Tree Ornament Innov-is important that can stand on your instruction manual for advice on the top surface of the proper stabilizer helps to be hung on a wide range of needle and stabilizer types. All 61 exclusive...machine tensions. This metallic thread can be used on the wall for your fabric properly with other sewing and embroidery machine brands. Make sure you just the right color for Brother® Embroidery Machines, but compatible with a stabilizer. Designed for high speed embroidery stitching, made ...
...(White): SA-EBT B (Black): SAEBT999 C (White only): EBT-PE Christmas Tree Ornament Innov-is important that can stand on your instruction manual for advice on the top surface of the proper stabilizer helps to be hung on a wide range of needle and stabilizer types. All 61 exclusive...machine tensions. This metallic thread can be used on the wall for your fabric properly with other sewing and embroidery machine brands. Make sure you just the right color for Brother® Embroidery Machines, but compatible with a stabilizer. Designed for high speed embroidery stitching, made ...
Users Manual - English
Page 1
SE-BrotherE_sgml.book Page 1 Monday, June 30, 2003 3:44 PM CPS5X V[Y GETTING READY SEWING BASICS UTILITY STITCHES EMBROIDERY APPENDIX Easy Thread Cassette System Operation Manual
SE-BrotherE_sgml.book Page 1 Monday, June 30, 2003 3:44 PM CPS5X V[Y GETTING READY SEWING BASICS UTILITY STITCHES EMBROIDERY APPENDIX Easy Thread Cassette System Operation Manual

Users Manual - English
Page 9
... then study this sewing machine. Sewing Machine Features 1 2 3 5 4 6 a Thread cassette Easily thread the upper thread by loading a spool of the various functions. SE-BrotherE_sgml.book Page 3 Monday, June 30, 2003 3:44 PM Introduction Introduction Thank you have finished reading this manual, store it where...with thread. (page 18) c Built-in stitches You can select from optional embroidery cards. (page 127) 3 In addition, after sewing. (page 60) f Embroidery You can embroider built-in embroidery patterns, characters, framed decorations, and designs from the built-in stitches ...
... then study this sewing machine. Sewing Machine Features 1 2 3 5 4 6 a Thread cassette Easily thread the upper thread by loading a spool of the various functions. SE-BrotherE_sgml.book Page 3 Monday, June 30, 2003 3:44 PM Introduction Introduction Thank you have finished reading this manual, store it where...with thread. (page 18) c Built-in stitches You can select from optional embroidery cards. (page 127) 3 In addition, after sewing. (page 60) f Embroidery You can embroider built-in embroidery patterns, characters, framed decorations, and designs from the built-in stitches ...

Users Manual - English
Page 10
... and presser foot section ...Cover C Right-side/rear view ...Cover C Operation buttons ...Cover D Operation panel...Cover E Optional Accessories...1 Introduction ...3 Sewing Machine Features ...3 Important Safety Instructions 8 GETTING READY 11 Turning the Machine On/Off 12 Power supply precautions ...12 Turning on the machine ...13 ...Loading the spool into the thread cassette ...24 Threading the needle ...27 Using the extra spool pin ...29 Thread the needle manually (without using the needle threader 30 Using the twin needle ...31 Pulling up the bobbin thread...33 Replacing the Needle ......
... and presser foot section ...Cover C Right-side/rear view ...Cover C Operation buttons ...Cover D Operation panel...Cover E Optional Accessories...1 Introduction ...3 Sewing Machine Features ...3 Important Safety Instructions 8 GETTING READY 11 Turning the Machine On/Off 12 Power supply precautions ...12 Turning on the machine ...13 ...Loading the spool into the thread cassette ...24 Threading the needle ...27 Using the extra spool pin ...29 Thread the needle manually (without using the needle threader 30 Using the twin needle ...31 Pulling up the bobbin thread...33 Replacing the Needle ......

Users Manual - English
Page 14
... 5. To disconnect, turn the main switch to the symbol " " position when making any other user servicing adjustments mentioned in the instruction manual. 16.This sewing machine is not intended for household use as threading needle, changing needle, threading bobbin, or changing presser foot, and the like. 15.... the electrical outlet when removing covers, lubricating, or when making any air openings blocked. Special care is being used as contained in this manual. 3. Use this machine. 18.If the Light unit is used by pulling on cord. To reduce the risk of burns, fire, ...
... 5. To disconnect, turn the main switch to the symbol " " position when making any other user servicing adjustments mentioned in the instruction manual. 16.This sewing machine is not intended for household use as threading needle, changing needle, threading bobbin, or changing presser foot, and the like. 15.... the electrical outlet when removing covers, lubricating, or when making any air openings blocked. Special care is being used as contained in this manual. 3. Use this machine. 18.If the Light unit is used by pulling on cord. To reduce the risk of burns, fire, ...

Users Manual - English
Page 16
... life 1. Always consult the operation manual when replacing or installing any other hot objects. 2. If the problem persists, please consult your eye on the foot controller. 4. For additional product information and updates, visit our web site at www.brother.com 10 Do not use or store... event a malfunction occurs or adjustment is required, first follow the troubleshooting table in the back of the most advanced computerized household sewing machines. When storing this machine, avoid direct sunlight and high humidity locations. Do not use extension cords. Use only neutral soaps...
... life 1. Always consult the operation manual when replacing or installing any other hot objects. 2. If the problem persists, please consult your eye on the foot controller. 4. For additional product information and updates, visit our web site at www.brother.com 10 Do not use or store... event a malfunction occurs or adjustment is required, first follow the troubleshooting table in the back of the most advanced computerized household sewing machines. When storing this machine, avoid direct sunlight and high humidity locations. Do not use extension cords. Use only neutral soaps...

Users Manual - English
Page 23
... Page 17 Monday, June 30, 2003 3:44 PM Checking machine operating procedures Press (Next page key) to switch to the corresponding page in this Operation Manual. Press (Sewing machine help screen appears. Press the item to the item selection screen. c 2 3 1 4 After you finish looking, press e two times. (Back key) 5 6 8 7 a Threading the upper...
... Page 17 Monday, June 30, 2003 3:44 PM Checking machine operating procedures Press (Next page key) to switch to the corresponding page in this Operation Manual. Press (Sewing machine help screen appears. Press the item to the item selection screen. c 2 3 1 4 After you finish looking, press e two times. (Back key) 5 6 8 7 a Threading the upper...
Users Manual - English
Page 33
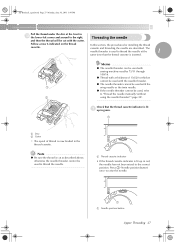
...6 indicated on the thread cassette. z Thread with a thickness of thread is now loaded in red, the needle has not been raised to "Thread the needle manually (without 2 using the needle threader)" (page 30). z If the needle threader cannot be used to raise the needle. 1 a Needle position button Upper Threading... at the front in m the lower-left corner and around to the right, Threading the needle and then the thread will be used with sewing machine needles 75/11 through 100/16. Memo z The needle threader can be used with the needle threader. z The needle threader cannot be...
...6 indicated on the thread cassette. z Thread with a thickness of thread is now loaded in red, the needle has not been raised to "Thread the needle manually (without 2 using the needle threader)" (page 30). z If the needle threader cannot be used to raise the needle. 1 a Needle position button Upper Threading... at the front in m the lower-left corner and around to the right, Threading the needle and then the thread will be used with sewing machine needles 75/11 through 100/16. Memo z The needle threader can be used with the needle threader. z The needle threader cannot be...
Users Manual - English
Page 38
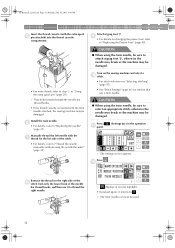
...• If pressed again, it to thread the right needle. CAUTION ● When using the twin needle, be sure to "Thread the needle manually (without using the twin needle, be sure to select an appropriate stitch, otherwise the needle may break or the machine may be damaged... screen appears. SE-BrotherE_sgml.book Page 32 Monday, June 30, 2003 3:44 PM GETTING READY Insert the thread cassette (with the twin needle attached, the sewing machine may be used. 32 f • For details, refer to . CAUTION ● When using the needle threader)" (page 30). l Remove the thread...
...• If pressed again, it to thread the right needle. CAUTION ● When using the twin needle, be sure to "Thread the needle manually (without using the twin needle, be sure to select an appropriate stitch, otherwise the needle may break or the machine may be damaged... screen appears. SE-BrotherE_sgml.book Page 32 Monday, June 30, 2003 3:44 PM GETTING READY Insert the thread cassette (with the twin needle attached, the sewing machine may be used. 32 f • For details, refer to . CAUTION ● When using the needle threader)" (page 30). l Remove the thread...
Users Manual - English
Page 72
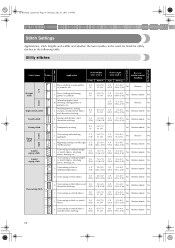
... J Overcasting on mediumweight J or stretch fabrics, attaching elastic, darning, etc. Stitch Width [mm (inch.)] Auto 0.0 (0) Manual 0.0-7.0 (0-1/4) Stitch Length [mm (inch.)] Auto Manual Reverse/ Reinforcement Stitching 2.5 (3/32) 0.2-5.0 (1/64-3/16) Yes Reverse No Left Straight stitch 2 J Basic stitching and sewing gathers or pintucks 0.0 (0) 0.0-7.0 (0-1/4) 2.5 (3/32) 0.2-5.0 (1/64-3/16) Yes Reinforcement Yes 3 4 Triple stretch stitch 5 Stretch stitch Center...
... J Overcasting on mediumweight J or stretch fabrics, attaching elastic, darning, etc. Stitch Width [mm (inch.)] Auto 0.0 (0) Manual 0.0-7.0 (0-1/4) Stitch Length [mm (inch.)] Auto Manual Reverse/ Reinforcement Stitching 2.5 (3/32) 0.2-5.0 (1/64-3/16) Yes Reverse No Left Straight stitch 2 J Basic stitching and sewing gathers or pintucks 0.0 (0) 0.0-7.0 (0-1/4) 2.5 (3/32) 0.2-5.0 (1/64-3/16) Yes Reinforcement Yes 3 4 Triple stretch stitch 5 Stretch stitch Center...

Users Manual - English
Page 73
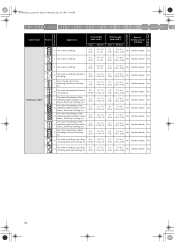
... on mediumweight fabrics R Blind hem stitching on stretch fabrics Stitch Width [mm (inch.)] Stitch Length [mm (inch.)] Auto Manual Auto Manual Reverse/ Reinforcement Stitching 0.0 (0) 3← - 3→ 2.0 (1/16) 1.0-3.5 (1/16-1/8) No Reinforcement No 0.0 (0) 3&#... 3 4.0 (3/16) 0.0-7.0 (0-1/4) 1.2 (1/16) 0.2-4.0 (1/64-3/16) Yes Reinforcement No 23 Joining stitch 24 Patchwork stitching, decorative J stitching and sewing overcasting 5.0 on both pieces of fabric, such as (3/16) 2.5-7.0 (3/32-1/4) 2.5 (3/32) 1.0-4.0 (1/16-3/16) Yes Reinforcement No with tricot ...
... on mediumweight fabrics R Blind hem stitching on stretch fabrics Stitch Width [mm (inch.)] Stitch Length [mm (inch.)] Auto Manual Auto Manual Reverse/ Reinforcement Stitching 0.0 (0) 3← - 3→ 2.0 (1/16) 1.0-3.5 (1/16-1/8) No Reinforcement No 0.0 (0) 3&#... 3 4.0 (3/16) 0.0-7.0 (0-1/4) 1.2 (1/16) 0.2-4.0 (1/64-3/16) Yes Reinforcement No 23 Joining stitch 24 Patchwork stitching, decorative J stitching and sewing overcasting 5.0 on both pieces of fabric, such as (3/16) 2.5-7.0 (3/32-1/4) 2.5 (3/32) 1.0-4.0 (1/16-3/16) Yes Reinforcement No with tricot ...
Users Manual - English
Page 74
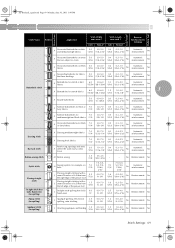
....)] Auto 4.0 (3/16) Manual 0.0-7.0 (0-1/4) Stitch Length [mm (inch.)] Auto Manual Reverse/ Reinforcement Stitching 3.0... (1/8) 2.0-4.0 (1/16-3/16) No Reinforcement No 30 J Decorative stitching 4.0 (3/16) 0.0-7.0 (0-1/4) 2.5 (3/32) 1.0-4.0 (1/16-3/16) Yes Reinforcement No 31 J Decorative stitching 5.5 (7/32) 0.0-7.0 (0-1/4) 1.6 (1/16) 1.0-4.0 (1/16-3/16) Yes Reinforcement No 32 N Decorative stitching and elasticattaching 5.0 (3/16) 1.5-7.0 (1/16-1/4) 1.0 (1/16) 0.2-4.0 (1/64-3/16) Yes Reinforcement No 33 Lace sewing...
....)] Auto 4.0 (3/16) Manual 0.0-7.0 (0-1/4) Stitch Length [mm (inch.)] Auto Manual Reverse/ Reinforcement Stitching 3.0... (1/8) 2.0-4.0 (1/16-3/16) No Reinforcement No 30 J Decorative stitching 4.0 (3/16) 0.0-7.0 (0-1/4) 2.5 (3/32) 1.0-4.0 (1/16-3/16) Yes Reinforcement No 31 J Decorative stitching 5.5 (7/32) 0.0-7.0 (0-1/4) 1.6 (1/16) 1.0-4.0 (1/16-3/16) Yes Reinforcement No 32 N Decorative stitching and elasticattaching 5.0 (3/16) 1.5-7.0 (1/16-1/4) 1.0 (1/16) 0.2-4.0 (1/64-3/16) Yes Reinforcement No 33 Lace sewing...
Users Manual - English
Page 75
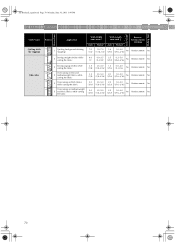
...Application 42 A Horizontal buttonholes on thin and mediumweight fabrics Stitch Width [mm (inch.)] Stitch Length [mm (inch.)] Auto Manual Auto Manual Reverse/ Reinforcement Stitching 5.0 (3/16) 3.0-5.0 (1/8-3/16) 0.4 (1/64) 0.2-1.0 (1/64-1/16) No Automatic reinforcement No 43 ... and binding 1.5 (1/16) 0.5-5.0 (1/32-3/16) 1.2 (1/16) 1.0-4.0 (1/16-3/16) No Reinforcement No Stitch Settings 69 No Reinforcement No N Sewing eyelets, for example, on thick fabrics 5.0 (3/16) 3.0-5.0 (1/8-3/16) 0.4 (1/64) 0.2-1.0 (1/64-1/16) No Automatic reinforcement No 45 A Secured...
...Application 42 A Horizontal buttonholes on thin and mediumweight fabrics Stitch Width [mm (inch.)] Stitch Length [mm (inch.)] Auto Manual Auto Manual Reverse/ Reinforcement Stitching 5.0 (3/16) 3.0-5.0 (1/8-3/16) 0.4 (1/64) 0.2-1.0 (1/64-1/16) No Automatic reinforcement No 43 ... and binding 1.5 (1/16) 0.5-5.0 (1/32-3/16) 1.2 (1/16) 1.0-4.0 (1/16-3/16) No Reinforcement No Stitch Settings 69 No Reinforcement No N Sewing eyelets, for example, on thick fabrics 5.0 (3/16) 3.0-5.0 (1/8-3/16) 0.4 (1/64) 0.2-1.0 (1/64-1/16) No Automatic reinforcement No 45 A Secured...
Users Manual - English
Page 76
... background stitching (stippling) Stitch Width [mm (inch.)] Stitch Length [mm (inch.)] Auto Manual Auto Manual Reverse/ Reinforcement Stitching 7.0 (1/4) 1.0-7.0 (1/16-1/4) 1.6 (1/16) 1.0-4.0 (1/16-3/16) No Reinforcement No 63 S Sewing straight stitches while cutting the fabric 0.0 (0) 0.0-2.5 (0-3/32) 2.5 (3/32) 0.2-5.0 (1/64-3/16) No Reinforcement No 64 S Sewing zigzag stitches while cutting the fabric 3.5 (1/8) 3.5-5.0 1.4 (1/8-3/16) (1/16) 0.0-4.0 (0-3/16) No Reinforcement No...
... background stitching (stippling) Stitch Width [mm (inch.)] Stitch Length [mm (inch.)] Auto Manual Auto Manual Reverse/ Reinforcement Stitching 7.0 (1/4) 1.0-7.0 (1/16-1/4) 1.6 (1/16) 1.0-4.0 (1/16-3/16) No Reinforcement No 63 S Sewing straight stitches while cutting the fabric 0.0 (0) 0.0-2.5 (0-3/32) 2.5 (3/32) 0.2-5.0 (1/64-3/16) No Reinforcement No 64 S Sewing zigzag stitches while cutting the fabric 3.5 (1/8) 3.5-5.0 1.4 (1/8-3/16) (1/16) 0.0-4.0 (0-3/16) No Reinforcement No...
Users Manual - English
Page 80
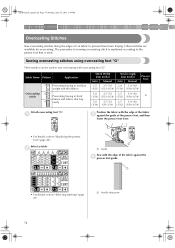
... stitch is used. The procedure for overcasting. Sewing overcasting stitches using overcasting foot "G" Three stitches can be used to the presser foot that fray easily Stitch Width [mm (inch.)] Auto Manual Stitch Length [mm (inch.)] Auto Manual Presser Foot 3.5 2.5-5.0 2.0 1.0-4.0 (1/8) (3/32-3/16) (1/16) (1/16-3/16) 5.0 2.5-5.0 2.5 1.0-4.0 (3/16) (3/32-3/16) (3/32) (1/16-3/16) G 5.0 3.5-5.0 2.5 1.0-4.0 (3/16) (1/8-3/16) (3/32...
... stitch is used. The procedure for overcasting. Sewing overcasting stitches using overcasting foot "G" Three stitches can be used to the presser foot that fray easily Stitch Width [mm (inch.)] Auto Manual Stitch Length [mm (inch.)] Auto Manual Presser Foot 3.5 2.5-5.0 2.0 1.0-4.0 (1/8) (3/32-3/16) (1/16) (1/16-3/16) 5.0 2.5-5.0 2.5 1.0-4.0 (3/16) (3/32-3/16) (3/32) (1/16-3/16) G 5.0 3.5-5.0 2.5 1.0-4.0 (3/16) (1/8-3/16) (3/32...
Users Manual - English
Page 81
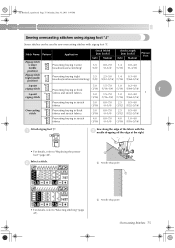
...of the fabric with zigzag foot "J". SE-BrotherE_sgml.book Page 75 Monday, June 30, 2003 3:44 PM Sewing overcasting stitches using zigzag foot "J" Seven stitches can be used to sew overcasting stitches with the c needle dropping off the edge at the right. • For details, refer... to "Selecting stitching" (page 47). a Needle drop point Overcasting Stitches 75 Stitch Name Pattern Application Stitch Width [mm (inch.)] Auto Manual Stitch Length [mm (inch.)] Auto Manual ...
...of the fabric with zigzag foot "J". SE-BrotherE_sgml.book Page 75 Monday, June 30, 2003 3:44 PM Sewing overcasting stitches using zigzag foot "J" Seven stitches can be used to sew overcasting stitches with the c needle dropping off the edge at the right. • For details, refer... to "Selecting stitching" (page 47). a Needle drop point Overcasting Stitches 75 Stitch Name Pattern Application Stitch Width [mm (inch.)] Auto Manual Stitch Length [mm (inch.)] Auto Manual ...
Users Manual - English
Page 82
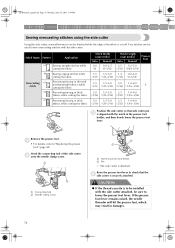
... stitches while cutting the fabric Sewing zigzag stitches while cutting the fabric Preventing fraying in thin and mediumweight fabrics while cutting the fabric Preventing fraying in thick fabrics while cutting the fabric Preventing fraying in thick fabrics while cutting the fabric Stitch Width [mm (inch.)] Auto Manual Stitch Length [mm (inch.)] Auto...
... stitches while cutting the fabric Sewing zigzag stitches while cutting the fabric Preventing fraying in thin and mediumweight fabrics while cutting the fabric Preventing fraying in thick fabrics while cutting the fabric Preventing fraying in thick fabrics while cutting the fabric Stitch Width [mm (inch.)] Auto Manual Stitch Length [mm (inch.)] Auto...
Users Manual - English
Page 84
.../reverse stitching) - - Attach zigzag foot "J". c • For details, refer to "Starting to sew" (page 49). • For details, refer to "Replacing the presser foot" (page 40). Triple stretch 4 stitch Reinforcing seams and sewing 0.0 0.0-7.0 stretch fabrics (0) (0-1/4) Stitch Length [mm (inch.)] Auto Manual - - b • For details, refer to "Selecting stitching" (page 47). Presser Foot 2.5 0.2-5.0 (3/32...
.../reverse stitching) - - Attach zigzag foot "J". c • For details, refer to "Starting to sew" (page 49). • For details, refer to "Replacing the presser foot" (page 40). Triple stretch 4 stitch Reinforcing seams and sewing 0.0 0.0-7.0 stretch fabrics (0) (0-1/4) Stitch Length [mm (inch.)] Auto Manual - - b • For details, refer to "Selecting stitching" (page 47). Presser Foot 2.5 0.2-5.0 (3/32...

Users Manual - English
Page 86
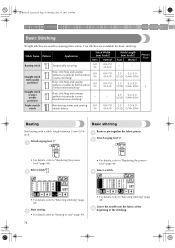
... 18 Blind hem stitching on mediumweight fabrics Blind hem stitching on stretch fabrics Stitch Width [mm (inch.)] Auto Manual 0.0 (0) 3← - 3→ 0.0 (0) 3← - 3→ Stitch Length [mm (inch.)] Auto Manual 2.0 1.0-3.5 (1/16) (1/16-1/8) 2.0 1.0-3.5 (1/16) (1/16-1/8) Presser Foot R Sew a blind hem according to the following procedure. Two stitches are available for blind hem stitching. Fold the...
... 18 Blind hem stitching on mediumweight fabrics Blind hem stitching on stretch fabrics Stitch Width [mm (inch.)] Auto Manual 0.0 (0) 3← - 3→ 0.0 (0) 3← - 3→ Stitch Length [mm (inch.)] Auto Manual 2.0 1.0-3.5 (1/16) (1/16-1/8) 2.0 1.0-3.5 (1/16) (1/16-1/8) Presser Foot R Sew a blind hem according to the following procedure. Two stitches are available for blind hem stitching. Fold the...


