
Accessory Catalog
Page 4
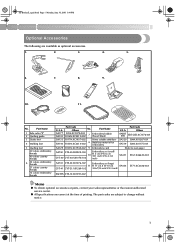
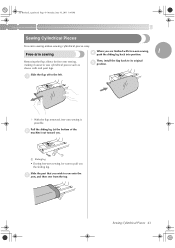
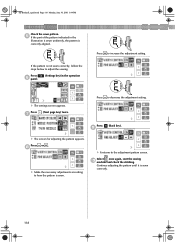
...adjusted exactly on the edge of zipper/piping, avoiding the non-flat parts of the presser foot and slide the presser foot so that the ...Shank Adapter for ULT series, PC-6500, PC-8200 and PC-8500 sewing machines. SA161 All Brother home-use sewing machines www.brother.com Screw on either left ). 2. Use these utility presser feet and accessories to add a ...professional finish to your sewing projects. Adjustable Zipper & Piping Foot Brother General Sewing Accessories 06 Adjustable Zipper & Piping Foot Attaches zippers and pipings easily. Sew. Position the...
...adjusted exactly on the edge of zipper/piping, avoiding the non-flat parts of the presser foot and slide the presser foot so that the ...Shank Adapter for ULT series, PC-6500, PC-8200 and PC-8500 sewing machines. SA161 All Brother home-use sewing machines www.brother.com Screw on either left ). 2. Use these utility presser feet and accessories to add a ...professional finish to your sewing projects. Adjustable Zipper & Piping Foot Brother General Sewing Accessories 06 Adjustable Zipper & Piping Foot Attaches zippers and pipings easily. Sew. Position the...

Accessory Catalog
Page 6
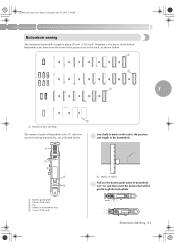
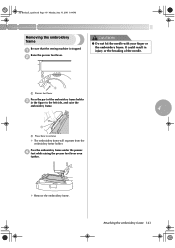
... Sewing Accessories 09 Narrow Hemmer Foot Non Stick Foot Overlock Foot Picot Foot Brother General Sewing Accessories 10 SA126 ABCDEFJKMN SA127 GHILOP Skirt Innov-is rolling around the curled part of the foot. 7. Select an overlock stitch. 2. Raise the needle and the presser foot. 5. Hold the fabric ...on sheer and very lightweight fabrics. 1. Slowly sew 2-3 stitches, making sure the fabric is Project Book (See page 50 for details.) www.brother.com Position the edge of the fabric. 4. Lower the presser foot so that the foot guide is exactly against the edge of the fabric behind...
... Sewing Accessories 09 Narrow Hemmer Foot Non Stick Foot Overlock Foot Picot Foot Brother General Sewing Accessories 10 SA126 ABCDEFJKMN SA127 GHILOP Skirt Innov-is rolling around the curled part of the foot. 7. Select an overlock stitch. 2. Raise the needle and the presser foot. 5. Hold the fabric ...on sheer and very lightweight fabrics. 1. Slowly sew 2-3 stitches, making sure the fabric is Project Book (See page 50 for details.) www.brother.com Position the edge of the fabric. 4. Lower the presser foot so that the foot guide is exactly against the edge of the fabric behind...

Users Manual - English
Page 2
...Extra spool pin 130013-154 XC3834-021 31 Accessory case 18 Spool net XA5523-050 Part Code U.S.A. Others No. z The screw of the presser foot holder is missing or damaged, contact your authorized dealer.... 29. 30. 31. *75/11 2 needles 90/14 2 needles 90/14 2 needles: Ball point needle (gold colored) No. Part Name Part Code U.S.A. If any item is available through your retailer. Included Accessories After opening the box, check that the following accessories are included. Others...set : on machine 1set: in carton) 5 Zigzag foot "J" (on this machine model 500D/500, HE-120.
...Extra spool pin 130013-154 XC3834-021 31 Accessory case 18 Spool net XA5523-050 Part Code U.S.A. Others No. z The screw of the presser foot holder is missing or damaged, contact your authorized dealer.... 29. 30. 31. *75/11 2 needles 90/14 2 needles 90/14 2 needles: Ball point needle (gold colored) No. Part Name Part Code U.S.A. If any item is available through your retailer. Included Accessories After opening the box, check that the following accessories are included. Others...set : on machine 1set: in carton) 5 Zigzag foot "J" (on this machine model 500D/500, HE-120.

Users Manual - English
Page 3
.... Remove the flap to create a table. SE-BrotherE_sgml.book Page B Monday, June 30, 2003 3:44 PM Names of Machine Parts and Their Functions The names of the various parts of the machine parts. d Thread tension dial Use the thread tension dial to start the sewing machine and raise and lower the needle. (page...
.... Remove the flap to create a table. SE-BrotherE_sgml.book Page B Monday, June 30, 2003 3:44 PM Names of Machine Parts and Their Functions The names of the various parts of the machine parts. d Thread tension dial Use the thread tension dial to start the sewing machine and raise and lower the needle. (page...
Users Manual - English
Page 7
... EF61:XA6630-002 SA741 ETS-22:X81276-102 Embroidery set (small) H 2 cm X W 6 cm (H 1 inch X W 2-1/2 inch) Part Code U.S.A. Others SAEBT 999 EBT-CEB:XC1376-001 SA520 BM4:X81267-001 SA519 BM3:X81175-001 (Refer to change without notice. 1 Others No. The...Quilting foot 40 colors embroidery threads 40 colors country threads 6 22 colors embroidery threads 21 colors country threads 12 colors embroidery threads Part Code U.S.A. Part Name SA177 F054:XC3879-002 SA132 F016N:XC2215-002 7 Embroidery bobbin thread (black) SA133 F017N:XC1957-002 Water soluble stabilizer ...
... EF61:XA6630-002 SA741 ETS-22:X81276-102 Embroidery set (small) H 2 cm X W 6 cm (H 1 inch X W 2-1/2 inch) Part Code U.S.A. Others SAEBT 999 EBT-CEB:XC1376-001 SA520 BM4:X81267-001 SA519 BM3:X81175-001 (Refer to change without notice. 1 Others No. The...Quilting foot 40 colors embroidery threads 40 colors country threads 6 22 colors embroidery threads 21 colors country threads 12 colors embroidery threads Part Code U.S.A. Part Name SA177 F054:XC3879-002 SA132 F016N:XC2215-002 7 Embroidery bobbin thread (black) SA133 F017N:XC1957-002 Water soluble stabilizer ...

Users Manual - English
Page 8
... SA300 SA303 SA304 SA305 SA306 SA307 SA311 SA312 SA313 SA314 SA315 SA316 SA319 SA320 SA321 SA325 SA327 SA328 SA329 SA330 SA331 SA332 SA333 SA335 SA336 Part Code Others X58317-001 X58321-001 X58362-001 X58497-001 X59322-001 X59357-001 X59511-001 X59567-001 XA0257-001 XA0275-001 XA0517-001 XA1223... XA2869-001 XA2873-001 XA3791-001 XA4289-001 XA4502-001 XA4664-001 XA4771-001 XA5037-001 XA5386-001 XA5567-001 XA5629-001 XA5659-001 No. Part Name 37 Appliqué Alphabet 38 Angel 39 Doll Face 40 Sports 3 41 Renaissance Alphabet 42 Farm 43 Victorian 44 Lace2 45 Fancy Work 46...
... SA300 SA303 SA304 SA305 SA306 SA307 SA311 SA312 SA313 SA314 SA315 SA316 SA319 SA320 SA321 SA325 SA327 SA328 SA329 SA330 SA331 SA332 SA333 SA335 SA336 Part Code Others X58317-001 X58321-001 X58362-001 X58497-001 X59322-001 X59357-001 X59511-001 X59567-001 XA0257-001 XA0275-001 XA0517-001 XA1223... XA2869-001 XA2873-001 XA3791-001 XA4289-001 XA4502-001 XA4664-001 XA4771-001 XA5037-001 XA5386-001 XA5567-001 XA5629-001 XA5659-001 No. Part Name 37 Appliqué Alphabet 38 Angel 39 Doll Face 40 Sports 3 41 Renaissance Alphabet 42 Farm 43 Victorian 44 Lace2 45 Fancy Work 46...

Users Manual - English
Page 10
SE-BrotherE_sgml.book Page 4 Monday, June 30, 2003 3:44 PM Contents Included Accessories Cover A Accessories ...Cover A Names of Machine Parts and Their Functions Cover B Front view ...Cover B Needle and presser foot section ...Cover C Right-side/rear view ...Cover C Operation buttons ...Cover D Operation panel...Cover E Optional ...
SE-BrotherE_sgml.book Page 4 Monday, June 30, 2003 3:44 PM Contents Included Accessories Cover A Accessories ...Cover A Names of Machine Parts and Their Functions Cover B Front view ...Cover B Needle and presser foot section ...Cover C Right-side/rear view ...Cover C Operation buttons ...Cover D Operation panel...Cover E Optional ...

Users Manual - English
Page 14
... from the electrical outlet immediately after using and before using this machine, basic safety precautions should always be taken, including the following: Read all moving parts. Do not allow this machine to ensure that they do not play with any air openings blocked. It may deflect the needle causing it to...
... from the electrical outlet immediately after using and before using this machine, basic safety precautions should always be taken, including the following: Read all moving parts. Do not allow this machine to ensure that they do not play with any air openings blocked. It may deflect the needle causing it to...

Users Manual - English
Page 16
...and adjust the machine yourself. Always consult the operation manual when replacing or installing any other moving parts. 2. For additional product information and updates, visit our web site at www.brother.com 10 When storing this machine, avoid direct sunlight and high humidity locations. For repair or .... 4. To fully enjoy all the features, we suggest that you study the manual before using the machine. Remember to keep your local authorized Brother dealer. Benzene, thinner, and scouring powders can damage the case and machine, and should never be used. 3. Be sure to turn off...
...and adjust the machine yourself. Always consult the operation manual when replacing or installing any other moving parts. 2. For additional product information and updates, visit our web site at www.brother.com 10 When storing this machine, avoid direct sunlight and high humidity locations. For repair or .... 4. To fully enjoy all the features, we suggest that you study the manual before using the machine. Remember to keep your local authorized Brother dealer. Benzene, thinner, and scouring powders can damage the case and machine, and should never be used. 3. Be sure to turn off...

Users Manual - English
Page 24
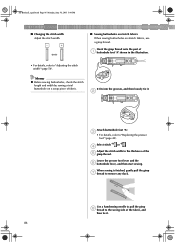
.... Use of any other bobbin may result in injuries or damage to prepare the bobbin thread. Turn on b the right side of the same type (part code: SA156, SFB:XA5539-151). 11.5 mm (7/16 inch) Actual size This model Older model Wind the thread around the bobbin to the machine. ... spool pin up the bobbin thread spool pin. Use only the included bobbin or bobbins of the sewing machine. CAUTION ● Only use the Bobbin (part code: SA156, SFB:XA5539-151) designed specifically for this sewing machine. SE-BrotherE_sgml.book Page 18 Monday, June 30, 2003 3:44 PM GETTING READY ...
.... Use of any other bobbin may result in injuries or damage to prepare the bobbin thread. Turn on b the right side of the same type (part code: SA156, SFB:XA5539-151). 11.5 mm (7/16 inch) Actual size This model Older model Wind the thread around the bobbin to the machine. ... spool pin up the bobbin thread spool pin. Use only the included bobbin or bobbins of the sewing machine. CAUTION ● Only use the Bobbin (part code: SA156, SFB:XA5539-151) designed specifically for this sewing machine. SE-BrotherE_sgml.book Page 18 Monday, June 30, 2003 3:44 PM GETTING READY ...

Users Manual - English
Page 27
spinning or spins freely. Use scissors to cut the end of the same type (part code: SA156, SFB:XA5539151). 11.5 mm (7/16 inch) Actual size This model Older model Slide the bobbin cover latch to the right. o Remove the bobbin ...
spinning or spins freely. Use scissors to cut the end of the same type (part code: SA156, SFB:XA5539151). 11.5 mm (7/16 inch) Actual size This model Older model Slide the bobbin cover latch to the right. o Remove the bobbin ...
Users Manual - English
Page 37
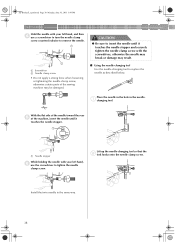
... the same stitch with the twin needle, refer to the machine may bend the needle or damage the machine. ● Never use the twin needle (Part code : X59296-051). Using the twin needle, you can easily break, possibly resulting in "Using the extra spool pin" (page 29). Bent needles can sew...
... the same stitch with the twin needle, refer to the machine may bend the needle or damage the machine. ● Never use the twin needle (Part code : X59296-051). Using the twin needle, you can easily break, possibly resulting in "Using the extra spool pin" (page 29). Bent needles can sew...
Users Manual - English
Page 44
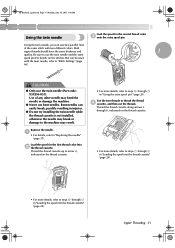
... counterclockwise to remove the needle. 1 2 a Screwdriver b Needle clamp screw • Do not apply a strong force when loosening or tightening the needle clamp screw, otherwise certain parts of the machine, insert the needle until it touches the needle stopper and securely tighten the needle clamp screw with the screwdriver, otherwise the needle...
... counterclockwise to remove the needle. 1 2 a Screwdriver b Needle clamp screw • Do not apply a strong force when loosening or tightening the needle clamp screw, otherwise certain parts of the machine, insert the needle until it touches the needle stopper and securely tighten the needle clamp screw with the screwdriver, otherwise the needle...
Users Manual - English
Page 49
... sure to pull out the sliding leg. Then, install the flap back to sew onto the c arm, and then sew from the top. Slide the part that you wish to its original e position.
... sure to pull out the sliding leg. Then, install the flap back to sew onto the c arm, and then sew from the top. Slide the part that you wish to its original e position.
Users Manual - English
Page 52
... on replacing the presser foot, refer to "Selecting stitching" (page 47). ↓ 3 Attach the presser foot. In addition, keep your hands away from all moving parts such as the needle and balance wheel, otherwise injuries may occur. ● Do not pull or push the fabric too hard while sewing, otherwise injuries...
... on replacing the presser foot, refer to "Selecting stitching" (page 47). ↓ 3 Attach the presser foot. In addition, keep your hands away from all moving parts such as the needle and balance wheel, otherwise injuries may occur. ● Do not pull or push the fabric too hard while sewing, otherwise injuries...
Users Manual - English
Page 89
... guide plate of the button). Use chalk to the back, as shown below . A Buttonhole Stitching 83 Buttonholes are indicated below . 1 1 1 3 1 a Reinforcement stitching The names of parts of buttonhole foot "A", which is about 28 mm (1-1/8 inch) (diameter + thickness of buttonhole b foot "A", and then insert the button that will be put through the...
... guide plate of the button). Use chalk to the back, as shown below . A Buttonhole Stitching 83 Buttonholes are indicated below . 1 1 1 3 1 a Reinforcement stitching The names of parts of buttonhole foot "A", which is about 28 mm (1-1/8 inch) (diameter + thickness of buttonhole b foot "A", and then insert the button that will be put through the...
Users Manual - English
Page 92
... the wrong side of a buttonhole foot "A" shown in the illustration. • For details, refer to the thickness of fabric. Hook the gimp thread onto the part of the fabric, and then tie it . d Adjust the stitch width to "Adjusting the stitch width" (page 56). Select stitch 46 or 47 . b Attach buttonhole...
... the wrong side of a buttonhole foot "A" shown in the illustration. • For details, refer to the thickness of fabric. Hook the gimp thread onto the part of the fabric, and then tie it . d Adjust the stitch width to "Adjusting the stitch width" (page 56). Select stitch 46 or 47 . b Attach buttonhole...
Users Manual - English
Page 124
... to increase the adjustment setting. Press or . X The screen for adjusting the pattern appears. Continue adjusting the pattern until it is correctly aligned. e If the part of the pattern indicated in the operation X The settings screen appears. If the pattern is sewn. h X Make the necessary adjustments according to how the pattern...
... to increase the adjustment setting. Press or . X The screen for adjusting the pattern appears. Continue adjusting the pattern until it is correctly aligned. e If the part of the pattern indicated in the operation X The settings screen appears. If the pattern is sewn. h X Make the necessary adjustments according to how the pattern...
Users Manual - English
Page 149
It could result in injury or the breaking of the needle. 1 a Presser foot lever Press the part of the embroidery frame holder c in the figure to the left side, and raise the embroidery frame. 4 1 a Press here to remove X The embroidery frame will ...
It could result in injury or the breaking of the needle. 1 a Presser foot lever Press the part of the embroidery frame holder c in the figure to the left side, and raise the embroidery frame. 4 1 a Press here to remove X The embroidery frame will ...
Users Manual - English
Page 156
... be displayed on the LCD. 3 1 2 4 5 a Embroidery foot "Q" (recommended presser foot) b Current color step/Number of colors in design c Current name of color d Current color part e Next color part • Typical color names, embroidery thread/ country thread color number, needle count , and time to change it gently in the thread b cassette, and thread...
... be displayed on the LCD. 3 1 2 4 5 a Embroidery foot "Q" (recommended presser foot) b Current color step/Number of colors in design c Current name of color d Current color part e Next color part • Typical color names, embroidery thread/ country thread color number, needle count , and time to change it gently in the thread b cassette, and thread...

