
Users Manual - English
Page 5
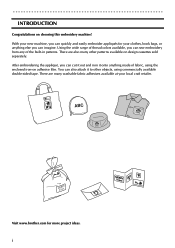
...;, you can quickly and easily embroider appliqués for more project ideas. i With your new machine, you can also attach it onto anything else you can imagine. G G G G G G G G G G G G G G G G G G G G G G G G G G G G G G G G G G G G G G G G G G G G G G G G G G G G G G G G G INTRODUCTION Congratulations on adhesive film. Visit www.brother.com for your local craft retailer. There are many other objects, using the enclosed iron-on choosing this...
...;, you can quickly and easily embroider appliqués for more project ideas. i With your new machine, you can also attach it onto anything else you can imagine. G G G G G G G G G G G G G G G G G G G G G G G G G G G G G G G G G G G G G G G G G G G G G G G G G G G G G G G G G INTRODUCTION Congratulations on adhesive film. Visit www.brother.com for your local craft retailer. There are many other objects, using the enclosed iron-on choosing this...
Users Manual - English
Page 6
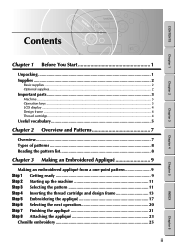
... vocabulary 5 Chapter 2 Overview and Patterns 7 Overview 7 Types of patterns 8 Reading the pattern list 8 Chapter 3 Making an Embroidered Appliqu 9 Making an embroidered appliqué from a one-point pattern 9 Step 1 Getting ready 9 Step 2 Starting up the machine 11 Step 3 Selecting the pattern 11 Step 4 Inserting the thread cartridge and design frame 13 Step 5 Embroidering the...
... vocabulary 5 Chapter 2 Overview and Patterns 7 Overview 7 Types of patterns 8 Reading the pattern list 8 Chapter 3 Making an Embroidered Appliqu 9 Making an embroidered appliqué from a one-point pattern 9 Step 1 Getting ready 9 Step 2 Starting up the machine 11 Step 3 Selecting the pattern 11 Step 4 Inserting the thread cartridge and design frame 13 Step 5 Embroidering the...
Users Manual - English
Page 9
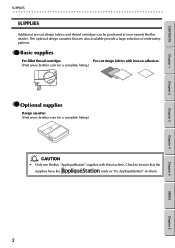
...machine. Chapter 3 Chapter 4 Chapter 5 INDEX Chapter 6 2 GG Basic supplies Pre-filled thread cartridges Pre-cut design fabrics and thread cartridges can be sure that are also available provide a large selection of embroidery patterns. The optional design cassettes that the supplies have the mark or "for a complete listing.) CAUTION • Only use Brother "Appliqu...éStation" supplies with iron-on adhesives (Visit www.brother.com for a complete listing.) GG Optional supplies Design cassettes (Visit www...
...machine. Chapter 3 Chapter 4 Chapter 5 INDEX Chapter 6 2 GG Basic supplies Pre-filled thread cartridges Pre-cut design fabrics and thread cartridges can be sure that are also available provide a large selection of embroidery patterns. The optional design cassettes that the supplies have the mark or "for a complete listing.) CAUTION • Only use Brother "Appliqu...éStation" supplies with iron-on adhesives (Visit www.brother.com for a complete listing.) GG Optional supplies Design cassettes (Visit www...
Users Manual - English
Page 14
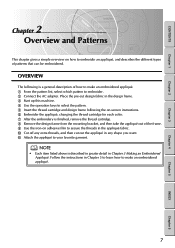
... embroidery is described in greater detail in the design frame. 3 Start up this machine. 4 Use the operation keys to make an embroidered appliqué. 7 Chapter 4 Chapter 5 INDEX Chapter 6 Place the pre-cut design fabric in Chapter 3 Making an Embroidered Appliqué. CONTENTS Chapter 1 Chapter 2 Chapter 3 2 Chapter 2Overview and Patterns This chapter gives a simple...
... embroidery is described in greater detail in the design frame. 3 Start up this machine. 4 Use the operation keys to make an embroidered appliqué. 7 Chapter 4 Chapter 5 INDEX Chapter 6 Place the pre-cut design fabric in Chapter 3 Making an Embroidered Appliqué. CONTENTS Chapter 1 Chapter 2 Chapter 3 2 Chapter 2Overview and Patterns This chapter gives a simple...
Users Manual - English
Page 16
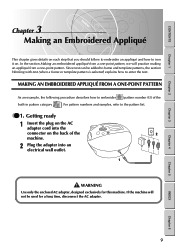
... For pattern numbers and samples, refer to embroider (pattern number 03) of the 2 machine. 2 Plug the adapter into the connector on . Chapter 4 Chapter 5 INDEX Chapter 6 9 In the section Making an embroidered appliqué from a one-point pattern, we will not be added to frame and template...how to enter the text. CONTENTS Chapter 1 Chapter 2 Chapter 3 3 Chapter 3Making an Embroidered Appliqué This chapter gives details on each step that you should follow to embroider an appliqué and how to iron it on the back of the built-in pattern category . Getting...
... For pattern numbers and samples, refer to embroider (pattern number 03) of the 2 machine. 2 Plug the adapter into the connector on . Chapter 4 Chapter 5 INDEX Chapter 6 9 In the section Making an embroidered appliqué from a one-point pattern, we will not be added to frame and template...how to enter the text. CONTENTS Chapter 1 Chapter 2 Chapter 3 3 Chapter 3Making an Embroidered Appliqué This chapter gives details on each step that you should follow to embroider an appliqué and how to iron it on the back of the built-in pattern category . Getting...
Users Manual - English
Page 17
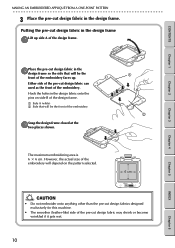
... embroidering area is 6 ן6 cm. Putting the pre-cut design fabric in the design frame 1Lift up . CONTENTS Chapter 1 Chapter 2 MAKING AN EMBROIDERED APPLIQUÉ FROM A ONE-POINT PATTERN G G G G G G G G G G G G G G G G G G G G G G G G G G G G G G G G G G G G G G G G G G G G G G G G G G G G G G G G G 3 Place the pre-... INDEX Chapter 6 CAUTION • Do not embroider onto anything other than the pre-cut design fabrics designed exclusively for this machine. • The smoother (leather-like) side of the pre-cut design fabric can used as the front of the embroidery...
... embroidering area is 6 ן6 cm. Putting the pre-cut design fabric in the design frame 1Lift up . CONTENTS Chapter 1 Chapter 2 MAKING AN EMBROIDERED APPLIQUÉ FROM A ONE-POINT PATTERN G G G G G G G G G G G G G G G G G G G G G G G G G G G G G G G G G G G G G G G G G G G G G G G G G G G G G G G G G 3 Place the pre-... INDEX Chapter 6 CAUTION • Do not embroider onto anything other than the pre-cut design fabrics designed exclusively for this machine. • The smoother (leather-like) side of the pre-cut design fabric can used as the front of the embroidery...
Users Manual - English
Page 18
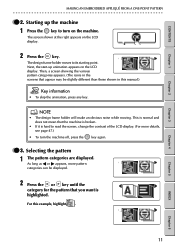
...APPLIQUÉ FROM A ONE-POINT PATTERN G G G G G G G G G G G G G G G G G G G G G G G G G G G G G G G G G G G G G G G G G G G G G G G G G G G G G G G G G GG 2. Starting up animation appears on the LCD display. Then, a screen showing the various pattern categories appears. (The icons in the screens that appear may be displayed. 2 Press the or key until the category for the pattern that the machine... is broken. • If it is highlighted. The design frame holder moves to turn the machine off, press the key again. This is normal...
...APPLIQUÉ FROM A ONE-POINT PATTERN G G G G G G G G G G G G G G G G G G G G G G G G G G G G G G G G G G G G G G G G G G G G G G G G G G G G G G G G G GG 2. Starting up animation appears on the LCD display. Then, a screen showing the various pattern categories appears. (The icons in the screens that appear may be displayed. 2 Press the or key until the category for the pattern that the machine... is broken. • If it is highlighted. The design frame holder moves to turn the machine off, press the key again. This is normal...
Users Manual - English
Page 23
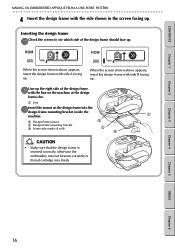
...design frame slot. 1 Line 3Insert the mount on the design frame into the design frame mounting bracket inside the 1 machine. 2 Design frame mount 3 Design frame mounting bracket 4 Frame side marks (A or B) 3 2 4 CAUTION •... up. 2Line up the right side of the design frame should face up. Chapter 3 Chapter 4 Chapter 5 INDEX Chapter 6 16 CONTENTS Chapter 1 Chapter 2 MAKING AN EMBROIDERED APPLIQUÉ FROM A ONE-POINT PATTERN G G G G G G G G G G G G G G G G G G G G G G G G G G G G G G G G G G G G G G G G G G G G G G G G G G G G G G G G G 4 Insert the design frame with the ...
...design frame slot. 1 Line 3Insert the mount on the design frame into the design frame mounting bracket inside the 1 machine. 2 Design frame mount 3 Design frame mounting bracket 4 Frame side marks (A or B) 3 2 4 CAUTION •... up. 2Line up the right side of the design frame should face up. Chapter 3 Chapter 4 Chapter 5 INDEX Chapter 6 16 CONTENTS Chapter 1 Chapter 2 MAKING AN EMBROIDERED APPLIQUÉ FROM A ONE-POINT PATTERN G G G G G G G G G G G G G G G G G G G G G G G G G G G G G G G G G G G G G G G G G G G G G G G G G G G G G G G G G 4 Insert the design frame with the ...
Users Manual - English
Page 24
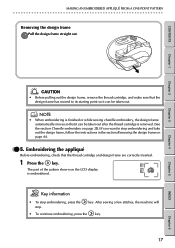
... the LCD display is removed. (See the section Chenille embroidery on page 44. After sewing a few stitches, the machine will • To continue embroidering, press the key. 17 INDEX Chapter 6 MAKING AN EMBROIDERED APPLIQUÉ FROM A ONE-POINT PATTERN G G G G G G G G G G G G G G G G G G G G G G G G G G G G G G G G G G G G G G G G G G G G G G G G G G G G G G G G G Removing the design frame 1Pull ...its starting point so it can be taken out after the thread cartridge is embroidered. Embroidering the appliqué Before embroidering, check that the design frame has moved to stop .
... the LCD display is removed. (See the section Chenille embroidery on page 44. After sewing a few stitches, the machine will • To continue embroidering, press the key. 17 INDEX Chapter 6 MAKING AN EMBROIDERED APPLIQUÉ FROM A ONE-POINT PATTERN G G G G G G G G G G G G G G G G G G G G G G G G G G G G G G G G G G G G G G G G G G G G G G G G G G G G G G G G G Removing the design frame 1Pull ...its starting point so it can be taken out after the thread cartridge is embroidered. Embroidering the appliqué Before embroidering, check that the design frame has moved to stop .
Users Manual - English
Page 25
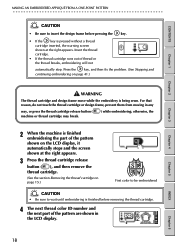
... APPLIQUÉ FROM A ONE-POINT PATTERN G G G G G G G G G G G G G G G G G G G G G G G G G G G G G G G G G G G G G G G G G G G G G G G G G G G G G G G G G CAUTION • Be sure to insert the design frame before removing the thread cartridge. 4 The next thread color ID number and the next part of thread or the thread breaks, embroidering will not automatically stop. otherwise, the 2 When the machine ... the thread cartridge runs out of the pattern are shown in any way, or press the thread cartridge release button ( machine or thread cartridge may break. ) while embroidering;
... APPLIQUÉ FROM A ONE-POINT PATTERN G G G G G G G G G G G G G G G G G G G G G G G G G G G G G G G G G G G G G G G G G G G G G G G G G G G G G G G G G CAUTION • Be sure to insert the design frame before removing the thread cartridge. 4 The next thread color ID number and the next part of thread or the thread breaks, embroidering will not automatically stop. otherwise, the 2 When the machine ... the thread cartridge runs out of the pattern are shown in any way, or press the thread cartridge release button ( machine or thread cartridge may break. ) while embroidering;
Users Manual - English
Page 27
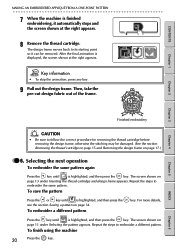
... on page 11 under Inserting the thread cartridge and design frame appears. INDEX Chapter 6 To finish using the machine 20 Press the key. CONTENTS MAKING AN EMBROIDERED APPLIQUÉ FROM A ONE-POINT PATTERN G G G G G G G G G G G G G G G G G G G G G G G G G G G G G G G G G G G G G G G G G G G G G G G G G G G G G G G G G 7 When the machine is finished embroidering, it can be damaged. (See the section Removing the thread cartridge on page 15...
... on page 11 under Inserting the thread cartridge and design frame appears. INDEX Chapter 6 To finish using the machine 20 Press the key. CONTENTS MAKING AN EMBROIDERED APPLIQUÉ FROM A ONE-POINT PATTERN G G G G G G G G G G G G G G G G G G G G G G G G G G G G G G G G G G G G G G G G G G G G G G G G G G G G G G G G G 7 When the machine is finished embroidering, it can be damaged. (See the section Removing the thread cartridge on page 15...
Users Manual - English
Page 30
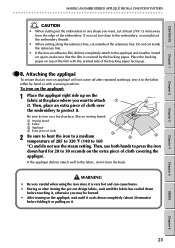
... the appliqué...on appliqué...Ironing board 2 Fabric 3 Appliqué 4 Extra piece... of cloth over the embroidery to iron on the extra piece of the backing paper facing up on it . CONTENTS Chapter 1 Chapter 2 MAKING AN EMBROIDERED APPLIQUÉ FROM A ONE-POINT PATTERN G G G G G G G G G G G G G G G G G G G G G G G G G G G...appliqué: 1 Place the appliqué right side up . If the appliqué did not completely attach to the appliqué and must be burned. • After ironing on the appliqu...appliqué. Place the backing paper on top of the film with a sewing...
... the appliqué...on appliqué...Ironing board 2 Fabric 3 Appliqué 4 Extra piece... of cloth over the embroidery to iron on the extra piece of the backing paper facing up on it . CONTENTS Chapter 1 Chapter 2 MAKING AN EMBROIDERED APPLIQUÉ FROM A ONE-POINT PATTERN G G G G G G G G G G G G G G G G G G G G G G G G G G G...appliqué: 1 Place the appliqué right side up . If the appliqué did not completely attach to the appliqué and must be burned. • After ironing on the appliqu...appliqué. Place the backing paper on top of the film with a sewing...
Users Manual - English
Page 33
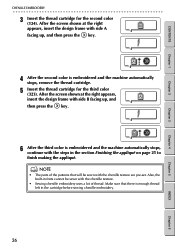
... • Sewing chenille embroidery uses a lot of the patterns that there is enough thread left in the section Finishing the appliqué on page 21 to finish making the appliqué. After the screen shown at the right appears, insert the design frame with side B facing up , and then ...press the key. 4 After the second color is embroidered and the machine automatically stops, continue with side A facing up , and then press the key...
... • Sewing chenille embroidery uses a lot of the patterns that there is enough thread left in the section Finishing the appliqué on page 21 to finish making the appliqué. After the screen shown at the right appears, insert the design frame with side B facing up , and then ...press the key. 4 After the second color is embroidered and the machine automatically stops, continue with side A facing up , and then press the key...


