BR-Receipts Users Guide Windows
Page 6
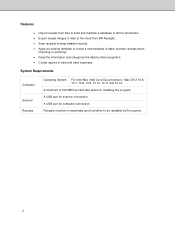
...create a new template to batch process receipts when importing or scanning. • Read the information and categorize the data by the scanner. 2 A USB port for installing the program. Receipts must meet the minimum requirements to run the operating system. Display SVGA (1024...x 768) or better. CD-ROM Drive. For more information, visit the relevant Microsoft website. A USB port for computer connection. System Requirements Computer Scanner Receipts Operating System Microsoft Windows XP, Windows Vista (32/64-bit), Windows 7 (32/64-bit), Windows 8 (32/64-bit) , Windows 8.1...
...create a new template to batch process receipts when importing or scanning. • Read the information and categorize the data by the scanner. 2 A USB port for installing the program. Receipts must meet the minimum requirements to run the operating system. Display SVGA (1024...x 768) or better. CD-ROM Drive. For more information, visit the relevant Microsoft website. A USB port for computer connection. System Requirements Computer Scanner Receipts Operating System Microsoft Windows XP, Windows Vista (32/64-bit), Windows 7 (32/64-bit), Windows 8 (32/64-bit) , Windows 8.1...
BR-Receipts Users Guide Windows
Page 7
..., Sales Tax, Vendor, or Payment Type (or drag the selected section directly to the desired field) to have common information such as a file in the scanner and begin scanning. c. Create a Receipt Box Create a receipt box to set up the export style.
..., Sales Tax, Vendor, or Payment Type (or drag the selected section directly to the desired field) to have common information such as a file in the scanner and begin scanning. c. Create a Receipt Box Create a receipt box to set up the export style.
BR-Receipts Users Guide Windows
Page 18
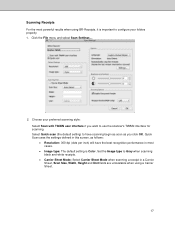
Collecting Receipts Use your scanner to configure your folders properly. 1. Scanning Receipts For the most powerful results when using BR-Receipts, it is recognized during field categorizing. To import a CSV ...
Collecting Receipts Use your scanner to configure your folders properly. 1. Scanning Receipts For the most powerful results when using BR-Receipts, it is recognized during field categorizing. To import a CSV ...
BR-Receipts Users Guide Windows
Page 19
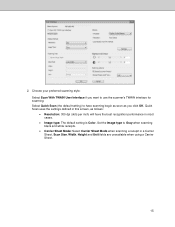
Set the Image type to use the scanner's TWAIN interface for scanning. Choose your preferred scanning style: Select Scan With TWAIN User Interface if you click OK. Select Quick Scan (the default setting) ...
Set the Image type to use the scanner's TWAIN interface for scanning. Choose your preferred scanning style: Select Scan With TWAIN User Interface if you click OK. Select Quick Scan (the default setting) ...
BR-Receipts Users Guide Windows
Page 20
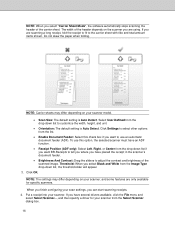
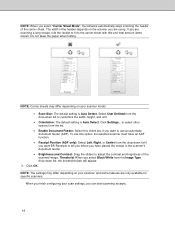
... drop-down list if you want to the carrier sheet with title and total amount items shown. When you have placed the receipt in the scanner's document feeder. • Brightness And Contrast: Drag the sliders to customize the width, height, and unit. • Orientation: The default ...setting is Auto Detect. NOTE: Carrier sheets may differ depending on the scanner you have an ADF function. • Receipt Position (ADF only): Select Left, Right, or Center from the list. • Enable Document Feeder:...
... drop-down list if you want to the carrier sheet with title and total amount items shown. When you have placed the receipt in the scanner's document feeder. • Brightness And Contrast: Drag the sliders to customize the width, height, and unit. • Orientation: The default ...setting is Auto Detect. NOTE: Carrier sheets may differ depending on the scanner you have an ADF function. • Receipt Position (ADF only): Select Left, Right, or Center from the list. • Enable Document Feeder:...

BR-Receipts Users Guide Windows
Page 21
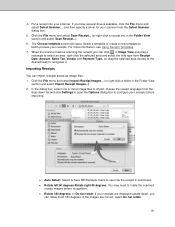
... Options dialog box to configure your receipts before importing. • Auto Detect: Select to have BR-Receipts check to see Using Receipt Templates. 7. When the scanner finishes scanning the receipt, you can click in the Orientation drop-down , you can import receipts saved as image files. 1. Click the File menu and...
... Options dialog box to configure your receipts before importing. • Auto Detect: Select to have BR-Receipts check to see Using Receipt Templates. 7. When the scanner finishes scanning the receipt, you can click in the Orientation drop-down , you can import receipts saved as image files. 1. Click the File menu and...
BR-Receipts Users Guide Windows
Page 22
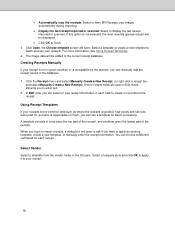
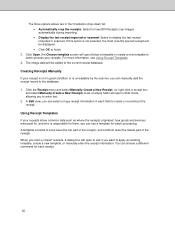
... receipt. 18 For more information, see Using Receipt Templates. 4. Creating Receipts Manually If your receipt is not in good condition or is unreadable by the scanner, you can manually add the receipt record to enter text. 2. In Edit view, you can select or type receipt information in each receipt. A template consists...
... receipt. 18 For more information, see Using Receipt Templates. 4. Creating Receipts Manually If your receipt is not in good condition or is unreadable by the scanner, you can manually add the receipt record to enter text. 2. In Edit view, you can select or type receipt information in each receipt. A template consists...
BR-Receipts Users Guide Windows
Page 30
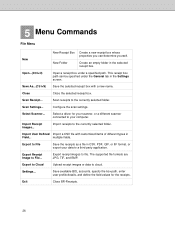
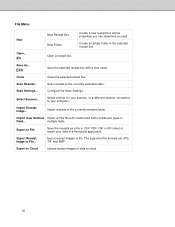
... are JPG, TIF, and BMP. Export to Cloud Upload receipt images or data to a third party application. Scan receipts to your scanner, or a different scanner connected to the currently selected folder. Select Scanner... Import Receipt Images... Exit Close BR-Receipts. 26 Select a driver for the receipts. New Folder Create an empty folder in...
... are JPG, TIF, and BMP. Export to Cloud Upload receipt images or data to a third party application. Scan receipts to your scanner, or a different scanner connected to the currently selected folder. Select Scanner... Import Receipt Images... Exit Close BR-Receipts. 26 Select a driver for the receipts. New Folder Create an empty folder in...
BR-Receipts Users Guide Macintosh
Page 6
...; Scan receipts to keep detailed records. Apply an existing template or create a new template to view and track expenses. A USB port for scanner connection. System Requirements Computer Scanner Receipts Operating System For Intel-Mac (Intel Core Duo processor), Mac OS X 10.6, 10.7, 10.8, 10.9, 10.10, 10.11 and 10.12... readable by field recognition. Create reports to batch process receipts when importing or scanning. Read the information and categorize the data by the scanner. 2
...; Scan receipts to keep detailed records. Apply an existing template or create a new template to view and track expenses. A USB port for scanner connection. System Requirements Computer Scanner Receipts Operating System For Intel-Mac (Intel Core Duo processor), Mac OS X 10.6, 10.7, 10.8, 10.9, 10.10, 10.11 and 10.12... readable by field recognition. Create reports to batch process receipts when importing or scanning. Read the information and categorize the data by the scanner. 2
BR-Receipts Users Guide Macintosh
Page 7
... highlight a section of your receipts. The scanning progress bar displays the scanning status. 3. b. Click Settings to discard the results and try again. 5. Click in the scanner and begin scanning. Use the file format best suited to specify a file encoding format. Delimited by , select Comma, Tab, or Space to choose the...
... highlight a section of your receipts. The scanning progress bar displays the scanning status. 3. b. Click Settings to discard the results and try again. 5. Click in the scanner and begin scanning. Use the file format best suited to specify a file encoding format. Delimited by , select Comma, Tab, or Space to choose the...

BR-Receipts Users Guide Macintosh
Page 20
Collecting Receipts Use your receipts. You can also be placed under the Display name of Payment Type field. Appearance: Select a location for your scanner to the Display name of the receipts in a database. When you create a receipt box, the currency type and date format of Payment Type list, so ...
Collecting Receipts Use your receipts. You can also be placed under the Display name of Payment Type field. Appearance: Select a location for your scanner to the Display name of the receipts in a database. When you create a receipt box, the currency type and date format of Payment Type list, so ...
BR-Receipts Users Guide Macintosh
Page 21
... defined in this screen, as follows: Resolution: 300 dpi (dots per inch) will have scanning begin as soon as you want to use the scanner's TWAIN interface for scanning. Select Quick scan (the default setting) to have the best recognition performance in a Carrier Sheet, Scan Size, Width, Height and Unit...
... defined in this screen, as follows: Resolution: 300 dpi (dots per inch) will have scanning begin as soon as you want to use the scanner's TWAIN interface for scanning. Select Quick scan (the default setting) to have the best recognition performance in a Carrier Sheet, Scan Size, Width, Height and Unit...
BR-Receipts Users Guide Macintosh
Page 22
...amount items shown. to select other options from the list. Enable Document Feeder: Select this option, the selected scanner must have placed the receipt in the scanner's document feeder. Brightness and Contrast: Drag the sliders to tell you where you have an ADF function. ...to customize the width, height, and unit. Orientation: The default setting is Auto Detect. If you are only available for specific scanners. To use an automatic document feeder (ADF). Click Settings... NOTE: When you select "Carrier Sheet Mode", the software automatically skips scanning ...
...amount items shown. to select other options from the list. Enable Document Feeder: Select this option, the selected scanner must have placed the receipt in the scanner's document feeder. Brightness and Contrast: Drag the sliders to tell you where you have an ADF function. ...to customize the width, height, and unit. Orientation: The default setting is Auto Detect. If you are only available for specific scanners. To use an automatic document feeder (ADF). Click Settings... NOTE: When you select "Carrier Sheet Mode", the software automatically skips scanning ...
BR-Receipts Users Guide Macintosh
Page 23
...Click the File menu and select Import Receipt Images... (or right-click a folder in the Folder View section and select Scan Receipt...). 6. 4. When the scanner finishes scanning the receipt, you can import receipts saved as image files. 1. If the images are displayed upside down, you can click in Image View... Receipt Date, Amount, Sales Tax, Vendor and Payment Type, (or drag the selected area directly to the desired field) to batch-process your scanner from the drop-down list and click Settings to open . Click the File menu and select Scan Receipt... (or right-click a receipt box ...
...Click the File menu and select Import Receipt Images... (or right-click a folder in the Folder View section and select Scan Receipt...). 6. 4. When the scanner finishes scanning the receipt, you can import receipts saved as image files. 1. If the images are displayed upside down, you can click in Image View... Receipt Date, Amount, Sales Tax, Vendor and Payment Type, (or drag the selected area directly to the desired field) to batch-process your scanner from the drop-down list and click Settings to open . Click the File menu and select Scan Receipt... (or right-click a receipt box ...
BR-Receipts Users Guide Macintosh
Page 24
... receipt). If this option is responsible for batch processing. Creating Receipts Manually If your receipt is not in good condition or is unreadable by the scanner, you can select or type receipt information in the Orientation drop-down list. Automatically crop the receipts: Select to have BR-Receipts crop images...
... receipt). If this option is responsible for batch processing. Creating Receipts Manually If your receipt is not in good condition or is unreadable by the scanner, you can select or type receipt information in the Orientation drop-down list. Automatically crop the receipts: Select to have BR-Receipts crop images...
BR-Receipts Users Guide Macintosh
Page 34
Open... Scan Receipt... Select Scanner... Export to cloud. 30 QIF or IIF format or export your computer. Export to Cloud Upload receipt images or data to File Save the receipts ... name. Import receipts to file. Export Receipt Image to the currently selected folder. O Open a receipt box. Scan receipts to File... Select a driver for your scanner, or a different scanner connected to your data to a third party application. Import Receipt Image... PDF. multiple fields. Save As... Create an empty folder in Field... File Menu...
Open... Scan Receipt... Select Scanner... Export to cloud. 30 QIF or IIF format or export your computer. Export to Cloud Upload receipt images or data to File Save the receipts ... name. Import receipts to file. Export Receipt Image to the currently selected folder. O Open a receipt box. Scan receipts to File... Select a driver for your scanner, or a different scanner connected to your data to a third party application. Import Receipt Image... PDF. multiple fields. Save As... Create an empty folder in Field... File Menu...
Users Guide
Page 4
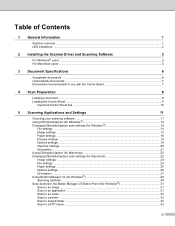
Table of Contents 1 General Information 1 Scanner overview ...1 LED indications ...2 2 Installing the Scanner Driver and Scanning Software 3 For Windows ® users ...3 For Macintosh users ...5 3 Document Specifications 6 Acceptable documents ...6 Unacceptable documents ...7 Documents recommended for use with the Carrier Sheet 7 4 ...
Table of Contents 1 General Information 1 Scanner overview ...1 LED indications ...2 2 Installing the Scanner Driver and Scanning Software 3 For Windows ® users ...3 For Macintosh users ...5 3 Document Specifications 6 Acceptable documents ...6 Unacceptable documents ...7 Documents recommended for use with the Carrier Sheet 7 4 ...
Users Guide
Page 5
... Calibration using software (for Macintosh 37 7 Scanner Maintenance 39 Cleaning the outside of your scanner ...39 Cleaning the inside of your scanner ...39 8 Troubleshooting 41 Error and maintenance messages ...41 Troubleshooting ...42 A Appendix A 47 Specifications ...47 General ...47 Scanner ...48 Interfaces ...49 Computer requirements ...49 B Appendix B 51 Contacting Brother ...51 Register your product ...51 Frequently...
... Calibration using software (for Macintosh 37 7 Scanner Maintenance 39 Cleaning the outside of your scanner ...39 Cleaning the inside of your scanner ...39 8 Troubleshooting 41 Error and maintenance messages ...41 Troubleshooting ...42 A Appendix A 47 Specifications ...47 General ...47 Scanner ...48 Interfaces ...49 Computer requirements ...49 B Appendix B 51 Contacting Brother ...51 Register your product ...51 Frequently...
Users Guide
Page 6
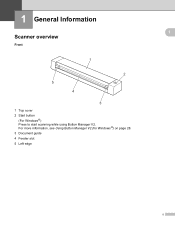
1 General Information 1 1 Scanner overview Front 1 2 5 4 3 1 Top cover 2 Start button (For Windows ®) Press to start scanning while using Button Manager V2. For more information, see Using Button Manager V2 (for Windows®) on page 28. 3 Document guide 4 Feeder slot 5 Left edge 1
1 General Information 1 1 Scanner overview Front 1 2 5 4 3 1 Top cover 2 Start button (For Windows ®) Press to start scanning while using Button Manager V2. For more information, see Using Button Manager V2 (for Windows®) on page 28. 3 Document guide 4 Feeder slot 5 Left edge 1
Users Guide
Page 8
... Windows®) on page 12. 3 b When the Setup screen appears, click Install Scanner Driver and follow the on using DSmobileCapture, see Using DSmobileCapture (for your operating system, or you install the scanner driver, DSmobileCapture (a scanning application) will be installed at support.brother.com a Insert the DVD-ROM. For more information on -screen instructions.
... Windows®) on page 12. 3 b When the Setup screen appears, click Install Scanner Driver and follow the on using DSmobileCapture, see Using DSmobileCapture (for your operating system, or you install the scanner driver, DSmobileCapture (a scanning application) will be installed at support.brother.com a Insert the DVD-ROM. For more information on -screen instructions.


