

Service Manual
Page 2
... 2. Presser foot mechanism 21 4. Pressure on materials 3 3. Programming 7 12. Needle feed mechanism 11 3. Thread trimmer mechanism 15 6. Rotary hook mechanism 21 5. Machine head 2 2. Needle bar mechanism 20 3. CONTENTS SPECIFICATIONS 1 INSTALLATION 2 1. Sewing speed setting 6 8. Stitch length 5 6. Sensor sensitivity setting 6 9. Correction stitching setting 6 11. Feed regulation mechanism 12 4. Lubrication mechanism 13 5. Tension release 18...
... 2. Presser foot mechanism 21 4. Pressure on materials 3 3. Programming 7 12. Needle feed mechanism 11 3. Thread trimmer mechanism 15 6. Rotary hook mechanism 21 5. Machine head 2 2. Needle bar mechanism 20 3. CONTENTS SPECIFICATIONS 1 INSTALLATION 2 1. Sewing speed setting 6 8. Stitch length 5 6. Sensor sensitivity setting 6 9. Correction stitching setting 6 11. Feed regulation mechanism 12 4. Lubrication mechanism 13 5. Tension release 18...

Service Manual
Page 6
X Loosen the nut 0 before adjustment. -3- X Use the oil specified by BROTHER: Hi White 70. (4) After removing the face plate, adjust oil absorption by turning the oil regulating valve ©. (5) After tilting the machine head until it stops, adjust oil absorption by removing the oil cover screw 0.... (3) Wipe off any contamination from the magnet @ and the oil pan. To adjust the pressure, turn the presser adjustment screw @. Pressure on a material during sewing must be as weak...
X Loosen the nut 0 before adjustment. -3- X Use the oil specified by BROTHER: Hi White 70. (4) After removing the face plate, adjust oil absorption by turning the oil regulating valve ©. (5) After tilting the machine head until it stops, adjust oil absorption by removing the oil cover screw 0.... (3) Wipe off any contamination from the magnet @ and the oil pan. To adjust the pressure, turn the presser adjustment screw @. Pressure on a material during sewing must be as weak...

Service Manual
Page 9
... needle (release the treadle) above the needle plate when sewing, set ON, the machine sews a material in the correction stitching mode (215 spm) if the actuator is pressed while the machine is pressed during operation, the machine enters the reverse stitching mode. 0 -6- The indicator @... goes on. it decreases when the control @ is turned clockwise (HIGH); If the actuator e is stopped. Sewing speed setting CON 0 El EXEDRA* brother 01 0 2 0 07 ...
... needle (release the treadle) above the needle plate when sewing, set ON, the machine sews a material in the correction stitching mode (215 spm) if the actuator is pressed while the machine is pressed during operation, the machine enters the reverse stitching mode. 0 -6- The indicator @... goes on. it decreases when the control @ is turned clockwise (HIGH); If the actuator e is stopped. Sewing speed setting CON 0 El EXEDRA* brother 01 0 2 0 07 ...

Service Manual
Page 11
...d Body Reflection sensor (1) Press the SET START key 0. Its indicator blinks, then goes off , set the margin-to-seam width. (Seam A to D through B and C) (6) Sew to the edge of the name tag, and press the INPUT key G. (7) When the margin-to-seam width is the same at A, B, C and D, continue... sewing and press the INPUT key 0 at each stop of the machine at position B). (9) Press the MARGIN key O. (10) Set the margin-to-seam width. (11) After sewing to d) • When the PLY SENSOR indicator is turned off . (4) Press one...
...d Body Reflection sensor (1) Press the SET START key 0. Its indicator blinks, then goes off , set the margin-to-seam width. (Seam A to D through B and C) (6) Sew to the edge of the name tag, and press the INPUT key G. (7) When the margin-to-seam width is the same at A, B, C and D, continue... sewing and press the INPUT key 0 at each stop of the machine at position B). (9) Press the MARGIN key O. (10) Set the margin-to-seam width. (11) After sewing to d) • When the PLY SENSOR indicator is turned off . (4) Press one...
Service Manual
Page 29
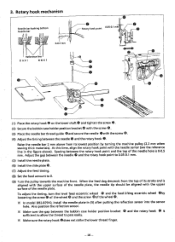
... secure the needle 0 with the upper surface of the needle hole is sufficient to allow the thread to 0. (9) Turn the pulley towards the machine front. Adjust the gap between the rotary hook point and the top of the needle plate. When the feed dog descends from its stroke and...timing, turn the level feed eccentric wheel m and the feed lifting eccentric wheel ®by turning the machine pulley (2.2 mm when sewing thick materials). Raise the needle bar 2 mm above ). X In model DB2-B7910, install the needle plate in the figure above from the top of its lowest position by loosening ...
... secure the needle 0 with the upper surface of the needle hole is sufficient to allow the thread to 0. (9) Turn the pulley towards the machine front. Adjust the gap between the rotary hook point and the top of the needle plate. When the feed dog descends from its stroke and...timing, turn the level feed eccentric wheel m and the feed lifting eccentric wheel ®by turning the machine pulley (2.2 mm when sewing thick materials). Raise the needle bar 2 mm above ). X In model DB2-B7910, install the needle plate in the figure above from the top of its lowest position by loosening ...

Service Manual
Page 43
... indication 2.0mm 25 mm 2.0 mm =. CLEAR +0.5 } II SELECT (1) The distance is indicated when PROGRAMME key No.1 is pressed, while indicators No.1, 2, 6 and 7 are off (normal sewing mode). (2) At this adjustment. The distance is measured when the feed amount is 0. 0 2 0 Lk_ 0 7 INPUL SET Pl. O 4O MARGIN X NO. START SENSOR ft MO"DE...
... indication 2.0mm 25 mm 2.0 mm =. CLEAR +0.5 } II SELECT (1) The distance is indicated when PROGRAMME key No.1 is pressed, while indicators No.1, 2, 6 and 7 are off (normal sewing mode). (2) At this adjustment. The distance is measured when the feed amount is 0. 0 2 0 Lk_ 0 7 INPUL SET Pl. O 4O MARGIN X NO. START SENSOR ft MO"DE...


