
Owners Manual - English
Page 1
Before using your Brother vacuum cleaner, please read this operation manual carefully to obtain the best use from your vacuum cleaner. MODELS OPERATION MANUAL VACUUM CLEANER CONTENTS PAGE • IMPORTANT SAFETY INSTRUCTIONS .... 2 • PARTS IDENTIFICATION 4 • SPECIFICATIONS 4 • OPERATING INSTRUCTIONS 6 • MAINTENANCE INSTRUCTIONS 11 • REPLACEMENT INSTRUCTIONS 13 • BEFORE REQUESTING SERVICE 19 • DESCRIPTION OF ACCESSORIES .......... 20 • SPANISH DIGEST 21 Thank you very much for buying another quality by Brother.
Before using your Brother vacuum cleaner, please read this operation manual carefully to obtain the best use from your vacuum cleaner. MODELS OPERATION MANUAL VACUUM CLEANER CONTENTS PAGE • IMPORTANT SAFETY INSTRUCTIONS .... 2 • PARTS IDENTIFICATION 4 • SPECIFICATIONS 4 • OPERATING INSTRUCTIONS 6 • MAINTENANCE INSTRUCTIONS 11 • REPLACEMENT INSTRUCTIONS 13 • BEFORE REQUESTING SERVICE 19 • DESCRIPTION OF ACCESSORIES .......... 20 • SPANISH DIGEST 21 Thank you very much for buying another quality by Brother.
Owners Manual - English
Page 2
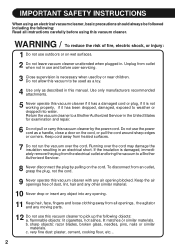
... injury: 1 Do not use outdoors or on wet surfaces. 2 Do not leave vacuum cleaner unattended when plugged in an electrical short. Return the vacuum cleaner to a Brother Authorized Servicer in the United States for examination and repair. 6 Do not pull or carry this vacuum cleaner to pick up the following objects: a. very fine dust: plaster, cement, cooking...
... injury: 1 Do not use outdoors or on wet surfaces. 2 Do not leave vacuum cleaner unattended when plugged in an electrical short. Return the vacuum cleaner to a Brother Authorized Servicer in the United States for examination and repair. 6 Do not pull or carry this vacuum cleaner to pick up the following objects: a. very fine dust: plaster, cement, cooking...
Owners Manual - English
Page 3
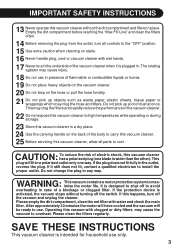
...the outlet, reverse the plug. If the protection device is plugged in. SAVE THESE INSTRUCTIONS This vacuum cleaner is intended for household use in presence of the vacuum cleaner when it still does not fit, contact a qualified electrician to install the proper outlet. This plug... wrappings which may cause the vacuum to use. Operating this vacuum cleaner, allow all controls to high temperatures while operating or during storage. 23 Store this vacuum cleaner without turning off the vacuum and unplug the cleaner. If it is activated, the vacuum stops without the dirt compartment and...
...the outlet, reverse the plug. If the protection device is plugged in. SAVE THESE INSTRUCTIONS This vacuum cleaner is intended for household use in presence of the vacuum cleaner when it still does not fit, contact a qualified electrician to install the proper outlet. This plug... wrappings which may cause the vacuum to use. Operating this vacuum cleaner, allow all controls to high temperatures while operating or during storage. 23 Store this vacuum cleaner without turning off the vacuum and unplug the cleaner. If it is activated, the vacuum stops without the dirt compartment and...
Owners Manual - English
Page 5
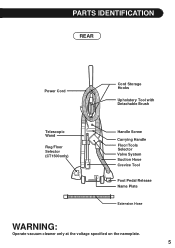
PARTS IDENTIFICATION REAR Power Cord Cord Storage Hooks Upholstery Tool with Detachable Brush Telescopic Wand Rug/Floor Selector (CT1500only) Handle Screw Carrying Handle Floor/Tools Selector Valve System Suction Hose Crevice Tool Foot Pedal Release Name Plate Extension Hose WARNING: Operate vacuum cleaner only at the voltage specified on the nameplate. 5
PARTS IDENTIFICATION REAR Power Cord Cord Storage Hooks Upholstery Tool with Detachable Brush Telescopic Wand Rug/Floor Selector (CT1500only) Handle Screw Carrying Handle Floor/Tools Selector Valve System Suction Hose Crevice Tool Foot Pedal Release Name Plate Extension Hose WARNING: Operate vacuum cleaner only at the voltage specified on the nameplate. 5
Owners Manual - English
Page 6
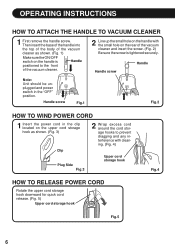
...quick cord release. (Fig. 5) Upper cord storage hook Fig.5 6 Then insert the base of the handle into the top of the body of the vacuum cleaner as shown. (Fig. 3) Clip Plug Side Fig.3 2 Wrap excess cord around the cord storage hooks to prevent dragging and any interference with the ...small hole on the rear of the vacuum cleaner. 2 Line up the small hole on the handle is Handle positioned to the front of the vacuum cleaner and insert the screw. (Fig. 2) Be sure the screw is tightened securely. OPERATING INSTRUCTIONS...
...quick cord release. (Fig. 5) Upper cord storage hook Fig.5 6 Then insert the base of the handle into the top of the body of the vacuum cleaner as shown. (Fig. 3) Clip Plug Side Fig.3 2 Wrap excess cord around the cord storage hooks to prevent dragging and any interference with the ...small hole on the rear of the vacuum cleaner. 2 Line up the small hole on the handle is Handle positioned to the front of the vacuum cleaner and insert the screw. (Fig. 2) Be sure the screw is tightened securely. OPERATING INSTRUCTIONS...
Owners Manual - English
Page 7
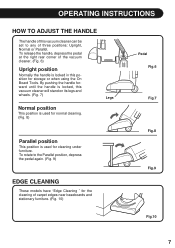
OPERATING INSTRUCTIONS HOW TO ADJUST THE HANDLE The handle of this vacuum cleaner can be set to the Parallel position, depress the pedal again. (Fig. 9) EDGE CLEANING These models have "Edge Cleaning " for the cleaning of three positions: ..., this position for cleaning under furniture. To release the handle, depress the pedal at the right rear corner of the vacuum cleaner. (Fig. 6) Upright position Normally the handle is locked in this vacuum cleaner will stand on its legs and wheels. (Fig. 7) Normal position This position is used for storage or when using the...
OPERATING INSTRUCTIONS HOW TO ADJUST THE HANDLE The handle of this vacuum cleaner can be set to the Parallel position, depress the pedal again. (Fig. 9) EDGE CLEANING These models have "Edge Cleaning " for the cleaning of three positions: ..., this position for cleaning under furniture. To release the handle, depress the pedal at the right rear corner of the vacuum cleaner. (Fig. 6) Upright position Normally the handle is locked in this vacuum cleaner will stand on its legs and wheels. (Fig. 7) Normal position This position is used for storage or when using the...
Owners Manual - English
Page 8
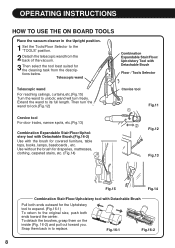
OPERATING INSTRUCTIONS HOW TO USE THE ON BOARD TOOLS Place the vacuum cleaner in to replace. Use without the brush for draperies, mattresses, clothing, carpeted stairs, etc. (Fig.14) Crevice tool Fig.11 1 2 Fig.12 Fig.13 Fig.....13) Combination Expandable Stair/Floor/Upholstery tool with Detachable Brush.(Fig.16-2) Use with the brush for the cleaning task from the back of the vacuum. 3 Then select the tool best suited for covered furniture, table tops, books, lamps, baseboards , etc. wand will turn the wand to its full length...
OPERATING INSTRUCTIONS HOW TO USE THE ON BOARD TOOLS Place the vacuum cleaner in to replace. Use without the brush for draperies, mattresses, clothing, carpeted stairs, etc. (Fig.14) Crevice tool Fig.11 1 2 Fig.12 Fig.13 Fig.....13) Combination Expandable Stair/Floor/Upholstery tool with Detachable Brush.(Fig.16-2) Use with the brush for the cleaning task from the back of the vacuum. 3 Then select the tool best suited for covered furniture, table tops, books, lamps, baseboards , etc. wand will turn the wand to its full length...
Owners Manual - English
Page 10
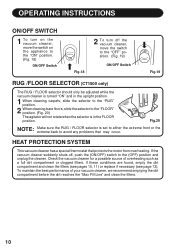
... is set to either the extreme front or the extreme back to avoid any problems that protects the motor from overheating. If the vacuum cleaner suddenly shuts off the vacuum cleaner, move the switch to the "OFF" position. (Fig. 19) ON/OFF Switch OFF Fig.19 RUG /FLOOR SELECTOR (CT1500 only) ...The RUG / FLOOR selector should only be adjusted while the vacuum cleaner is turned "ON" and in the upright position. 1 When cleaning carpets, slide the selector to the "RUG" position. 2 When cleaning bare floors, slide ...
... is set to either the extreme front or the extreme back to avoid any problems that protects the motor from overheating. If the vacuum cleaner suddenly shuts off the vacuum cleaner, move the switch to the "OFF" position. (Fig. 19) ON/OFF Switch OFF Fig.19 RUG /FLOOR SELECTOR (CT1500 only) ...The RUG / FLOOR selector should only be adjusted while the vacuum cleaner is turned "ON" and in the upright position. 1 When cleaning carpets, slide the selector to the "RUG" position. 2 When cleaning bare floors, slide ...
Owners Manual - English
Page 11
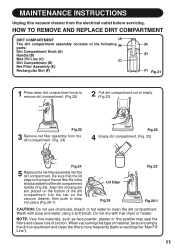
... powder may seal the filters and cause loss of the net filter fits in the slot placed behind the dirt compartment handle (Fig.26). When vacuuming this vacuum cleaner from the dirt compartment. (Fig. 24) Fig.23 4 Empty dirt compartment. (Fig. 25) Fig.24 5 Replace the net filter assembly into place (... with soap and water using a soft brush. Be sure that the lid edge on the top of suction. Align the rectangular slot placed on the vacuum cleaner, then push to empty. (Fig.23) Fig.22 3 Remove net filter assembly from the electrical outlet before reaching the "Max Fill Line"). 11 ...
... powder may seal the filters and cause loss of the net filter fits in the slot placed behind the dirt compartment handle (Fig.26). When vacuuming this vacuum cleaner from the dirt compartment. (Fig. 24) Fig.23 4 Empty dirt compartment. (Fig. 25) Fig.24 5 Replace the net filter assembly into place (... with soap and water using a soft brush. Be sure that the lid edge on the top of suction. Align the rectangular slot placed on the vacuum cleaner, then push to empty. (Fig.23) Fig.22 3 Remove net filter assembly from the electrical outlet before reaching the "Max Fill Line"). 11 ...
Owners Manual - English
Page 12
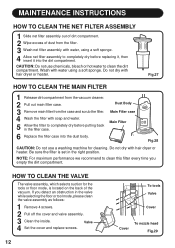
... HOW TO CLEAN THE NET FILTER ASSEMBLY 1 Slide net filter assembly out of dirt compartment. 2 Wipe excess of the vacuum. Fig.27 HOW TO CLEAN THE MAIN FILTER 1 Release dirt compartment from the vacuum cleaner. 2 Pull out main filter case. 3 Remove main filter from the filter. 3 Wash net filter assembly with water, using...
... HOW TO CLEAN THE NET FILTER ASSEMBLY 1 Slide net filter assembly out of dirt compartment. 2 Wipe excess of the vacuum. Fig.27 HOW TO CLEAN THE MAIN FILTER 1 Release dirt compartment from the vacuum cleaner. 2 Pull out main filter case. 3 Remove main filter from the filter. 3 Wash net filter assembly with water, using...

Owners Manual - English
Page 13
...by sliding the latch as shown. (Fig. 30) Grooves Tabs Bottom plate Fig.31 HOW TO REPLACE THE HEADLIGHT LAMP Unplug the vacuum cleaner from the electrical outlet. Latch Bottom plate Latch Mounting screw REMOVE FASTEN Fig.30 RESET Make sure that all the parts are properly ...13 REPLACEMENT INSTRUCTIONS HOW TO REMOVE / AND RESET THE BOTTOM PLATE Before replacing any standard bayonet base vacuum cleaner lamp rated 125V, 20W. 4 Replace the lens cover and secure with the screw. Place the vacuum cleaner in the parallel position. 1 Remove the lens cover by unscrewing the screw. (Fig. 32) ...
...by sliding the latch as shown. (Fig. 30) Grooves Tabs Bottom plate Fig.31 HOW TO REPLACE THE HEADLIGHT LAMP Unplug the vacuum cleaner from the electrical outlet. Latch Bottom plate Latch Mounting screw REMOVE FASTEN Fig.30 RESET Make sure that all the parts are properly ...13 REPLACEMENT INSTRUCTIONS HOW TO REMOVE / AND RESET THE BOTTOM PLATE Before replacing any standard bayonet base vacuum cleaner lamp rated 125V, 20W. 4 Replace the lens cover and secure with the screw. Place the vacuum cleaner in the parallel position. 1 Remove the lens cover by unscrewing the screw. (Fig. 32) ...
Owners Manual - English
Page 14
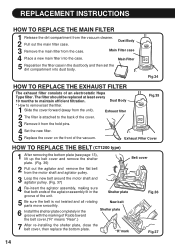
... and agitator pulley. (Fig. 37) 4 Re-insert the agitator assembly, making sure that both ends of the agitator assembly fit in the groove of the vacuum. Fig.34 HOW TO REPLACE THE EXHAUST FILTER The exhaust filter consists of R side toward Shelter plate the belt cover.("R" means "Rear".) R 7 After re-installing... from the hold pins. 4 Set the new filter. 5 Replace the cover on the front of the unit. Dust Body 3 Remove the main filter from the vacuum cleaner. 2 Pull out the main filter case. Main Filter case 4 Place a new main filter into dust body.
... and agitator pulley. (Fig. 37) 4 Re-insert the agitator assembly, making sure that both ends of the agitator assembly fit in the groove of the vacuum. Fig.34 HOW TO REPLACE THE EXHAUST FILTER The exhaust filter consists of R side toward Shelter plate the belt cover.("R" means "Rear".) R 7 After re-installing... from the hold pins. 4 Set the new filter. 5 Replace the cover on the front of the unit. Dust Body 3 Remove the main filter from the vacuum cleaner. 2 Pull out the main filter case. Main Filter case 4 Place a new main filter into dust body.
Owners Manual - English
Page 19
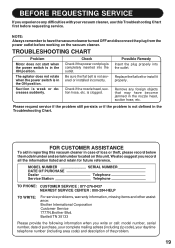
... items and other assistance: Brother International Corporation Customer Service 7777N.Brother Blvd. The agitator does not rotate when the power switch is not defined in case of loss or theft, please record below the model number and serial number located on this Troubleshooting Chart first before working on the vacuum cleaner. Replace the flat belt...
... items and other assistance: Brother International Corporation Customer Service 7777N.Brother Blvd. The agitator does not rotate when the power switch is not defined in case of loss or theft, please record below the model number and serial number located on this Troubleshooting Chart first before working on the vacuum cleaner. Replace the flat belt...