
Owners Manual - English
Page 3
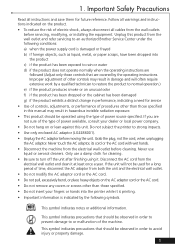
...the electrical wall outlet before servicing, modifying, or installing the equipment. If you are covered by the following conditions: a) when the power supply cord is indicated by the operating instructions. Disconnect the AC cord from the wall outlets before cleaning. bc a This symbol indicates ...such as liquid, metal, or paper scraps, have been dropped into the product c) if the product has been exposed to an authorized Brother Service Center under the following symbols. + This symbol indicates notes or additional information. Grab the plug, not the cord, when unplugging the...
...the electrical wall outlet before servicing, modifying, or installing the equipment. If you are covered by the following conditions: a) when the power supply cord is indicated by the operating instructions. Disconnect the AC cord from the wall outlets before cleaning. bc a This symbol indicates ...such as liquid, metal, or paper scraps, have been dropped into the product c) if the product has been exposed to an authorized Brother Service Center under the following symbols. + This symbol indicates notes or additional information. Grab the plug, not the cord, when unplugging the...

Owners Manual - English
Page 18
... the writing surface with sharp or hard objects. 16 Do not allow the seam of paper. 8 POWER indicator: This indicator is lit when the printer is printing. Operation Printer description 12 3 4 5 678 B A : 9 1 DC jack 2 Power supply switch 3 COPY ALL button: Press this button to print out both writing surfaces at the same time...
... the writing surface with sharp or hard objects. 16 Do not allow the seam of paper. 8 POWER indicator: This indicator is lit when the printer is printing. Operation Printer description 12 3 4 5 678 B A : 9 1 DC jack 2 Power supply switch 3 COPY ALL button: Press this button to print out both writing surfaces at the same time...
Owners Manual - English
Page 20
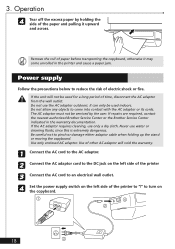
Power supply Follow the precautions below to reduce the risk of time, disconnect the AC adaptor from the wall outlet. If repairs are required, contact the nearest authorized Brother Service Center or the Brother Service Center indicated in the printer and cause a paper jam. Be careful not to come... 18 3 Use only enclosed AC adaptor. bc Remove the roll of the printer to "|" to an electrical wall outlet. 4 Set the power supply switch on the left side of paper before transporting the copyboard, otherwise it upward and across. The AC adaptor must not be serviced by ...
Power supply Follow the precautions below to reduce the risk of time, disconnect the AC adaptor from the wall outlet. If repairs are required, contact the nearest authorized Brother Service Center or the Brother Service Center indicated in the printer and cause a paper jam. Be careful not to come... 18 3 Use only enclosed AC adaptor. bc Remove the roll of the printer to "|" to an electrical wall outlet. 4 Set the power supply switch on the left side of paper before transporting the copyboard, otherwise it upward and across. The AC adaptor must not be serviced by ...

Owners Manual - English
Page 21
Writing & printing 1 Make sure that the power supply switch on the left side of the printer is moving. bc Only use the other writing surface area, press f to "|". 2 Write within the scannable area ...
Writing & printing 1 Make sure that the power supply switch on the left side of the printer is moving. bc Only use the other writing surface area, press f to "|". 2 Write within the scannable area ...

Owners Manual - English
Page 23
...compartment. ¶ Loading the paper (page 17) • Check that the paper compartment cover is lit. Use a soft damp cloth to call for Brother numbers to out clearly. wipe off the writing surface. If it is lit, replace the roll of the printer and that the AC cord is... not light up. • Check that the AC adaptor cord is correctly plugged into both the AC adaptor and the electrical wall outlet. ¶ Power supply (page 18) • Check that only the specified Dry Erase markers are correctly connected. Carefully wipe the writing surface with a soft cloth dampened with...
...compartment. ¶ Loading the paper (page 17) • Check that the paper compartment cover is lit. Use a soft damp cloth to call for Brother numbers to out clearly. wipe off the writing surface. If it is lit, replace the roll of the printer and that the AC cord is... not light up. • Check that the AC adaptor cord is correctly plugged into both the AC adaptor and the electrical wall outlet. ¶ Power supply (page 18) • Check that only the specified Dry Erase markers are correctly connected. Carefully wipe the writing surface with a soft cloth dampened with...

Owners Manual - English
Page 28
Specifications Dimensions: Weight: Operating environment: Power source: Power consumption: Copyboard writing surface area: Scanning method: Scannable area: Printing area: Printer type: Printing speed: Paper roll size: With stand: 28.5 × 27.0 × 75.9 ...: 32 lb (14.5 kg) Without stand: 26 lb (11.8 kg) Temperature: 50 to 95 ºF (10 to 35 ºC) Humidity: 45% to 80% (no condensation) Supplied AC adaptor: 120 V AC, 50/60 Hz Standby: Copy: 5 W 30 W 23.6 × 35.4 in. (600 × 900 mm) Contact image sensing 23.4 × 34.6 in...
Specifications Dimensions: Weight: Operating environment: Power source: Power consumption: Copyboard writing surface area: Scanning method: Scannable area: Printing area: Printer type: Printing speed: Paper roll size: With stand: 28.5 × 27.0 × 75.9 ...: 32 lb (14.5 kg) Without stand: 26 lb (11.8 kg) Temperature: 50 to 95 ºF (10 to 35 ºC) Humidity: 45% to 80% (no condensation) Supplied AC adaptor: 120 V AC, 50/60 Hz Standby: Copy: 5 W 30 W 23.6 × 35.4 in. (600 × 900 mm) Contact image sensing 23.4 × 34.6 in...
Owners Manual - English
Page 30
...in materials or workmanship in the materials, workmanship or Year 2000 compliance of the limited warranty period remaining on the conditions described below. This warranty is , this Product has no warranty - For consumable items supplied with this Product, or (6) damage caused by improper ...been modified, defaced or removed from this Product, (4) this Product has been abused or damaged, (5) non Brother®-brand or non Brother approved parts, supplies, power supplies or other rights that the replacement products or parts conform to the manufacturer's specifications for 90 days after ...
...in materials or workmanship in the materials, workmanship or Year 2000 compliance of the limited warranty period remaining on the conditions described below. This warranty is , this Product has no warranty - For consumable items supplied with this Product, or (6) damage caused by improper ...been modified, defaced or removed from this Product, (4) this Product has been abused or damaged, (5) non Brother®-brand or non Brother approved parts, supplies, power supplies or other rights that the replacement products or parts conform to the manufacturer's specifications for 90 days after ...