
Users Manual - English
Page 2
... from outlet. 9. Never operate this machine if it has a damaged cord or plug, if it is intended for use as threading needle, changing needle, threading bobbin, or changing presser foot, and the like. 15. To unplug, grasp the plug, not the cord. 10. SAVE THESE INSTRUCTIONS This machine is not working...
... from outlet. 9. Never operate this machine if it has a damaged cord or plug, if it is intended for use as threading needle, changing needle, threading bobbin, or changing presser foot, and the like. 15. To unplug, grasp the plug, not the cord. 10. SAVE THESE INSTRUCTIONS This machine is not working...
Users Manual - English
Page 5
... ...10 Sewing speed controller (for models equipped with the start/stop button 10 Changing the needle stop position ...10 THREADING THE MACHINE 11 Winding the bobbin ...11 Lower threading ...14 Upper threading ...16 Drawing up the lower thread ...19 REPLACING THE NEEDLE 20 Needle precautions ...20 Needle types and their uses...
... ...10 Sewing speed controller (for models equipped with the start/stop button 10 Changing the needle stop position ...10 THREADING THE MACHINE 11 Winding the bobbin ...11 Lower threading ...14 Upper threading ...16 Drawing up the lower thread ...19 REPLACING THE NEEDLE 20 Needle precautions ...20 Needle types and their uses...

Users Manual - English
Page 6
3. APPENDIX ...52 STITCH SETTINGS ...52 Utility stitches ...52 MAINTENANCE ...57 Cleaning the machine surface ...57 Cleaning the bobbin case ...57 TROUBLESHOOTING ...59 ERROR MESSAGES ...62 Operation beep (for models equipped with the operation beep 62 INDEX ...63 4 UTILITY STITCHES 32 OVERCASTING STITCHES 32 ...
3. APPENDIX ...52 STITCH SETTINGS ...52 Utility stitches ...52 MAINTENANCE ...57 Cleaning the machine surface ...57 Cleaning the bobbin case ...57 TROUBLESHOOTING ...59 ERROR MESSAGES ...62 Operation beep (for models equipped with the operation beep 62 INDEX ...63 4 UTILITY STITCHES 32 OVERCASTING STITCHES 32 ...
Users Manual - English
Page 7
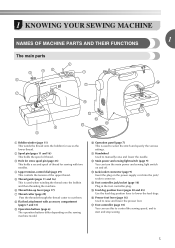
... (page 10) Plug in the foot controller plug. e Thread guide (pages 11 and 16) This is used when winding the thread onto the bobbin and then threading the machine. h Flat bed attachment with two needles. m Jack/socket connector (page 9) Insert the plug on the sewing machine model...use as the lower thread. 1 KNOWING YOUR SEWING MACHINE 1 NAMES OF MACHINE PARTS AND THEIR FUNCTIONS The main parts a Bobbin winder (page 11) This winds the thread onto the bobbin for sewing with accessory compartment (pages 7 and 31) i Operation buttons (page 6) The operation buttons differ depending on the...
... (page 10) Plug in the foot controller plug. e Thread guide (pages 11 and 16) This is used when winding the thread onto the bobbin and then threading the machine. h Flat bed attachment with two needles. m Jack/socket connector (page 9) Insert the plug on the sewing machine model...use as the lower thread. 1 KNOWING YOUR SEWING MACHINE 1 NAMES OF MACHINE PARTS AND THEIR FUNCTIONS The main parts a Bobbin winder (page 11) This winds the thread onto the bobbin for sewing with accessory compartment (pages 7 and 31) i Operation buttons (page 6) The operation buttons differ depending on the...
Users Manual - English
Page 8
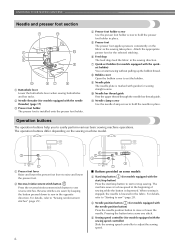
...screw to sew reverse stitches. Attach the appropriate presser foot for models equipped with the quickset bobbin) You can start sewing without pulling up the bobbin thread. g Quick-set the bobbin. b Reverse/reinforcement stitch button Press the reverse/reinforcement stitch button to hold the needle in... is marked with the needle position button) Press the needle position button to adjust the sewing speed. 6 h Bobbin cover Open the bobbin cover to set bobbin (for models equipped with the sewing speed controller) Slide the sewing speed controller to raise or lower the needle....
...screw to sew reverse stitches. Attach the appropriate presser foot for models equipped with the quickset bobbin) You can start sewing without pulling up the bobbin thread. g Quick-set the bobbin. b Reverse/reinforcement stitch button Press the reverse/reinforcement stitch button to hold the needle in... is marked with the needle position button) Press the needle position button to adjust the sewing speed. 6 h Bobbin cover Open the bobbin cover to set bobbin (for models equipped with the sewing speed controller) Slide the sewing speed controller to raise or lower the needle....
Users Manual - English
Page 10
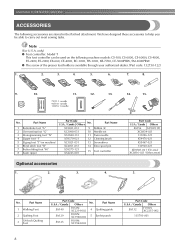
...only) ● Foot controller: Model T This foot controller can be able to carry out most sewing tasks. Part Name XC2691-031 9 Bobbin (4) XC3098-031 10 Needle set X53840-331 11 Twin needle X59370-021 12 Cleaning brush XC3021-031 13 Screwdriver XC4051-031 14 Extra spool pin... YOUR SEWING MACHINE ACCESSORIES The following machine models: CS-100, CS-6000, CS-6000i, CS-4000, ES-2400, ES-2000, EX-660, CE-4000, BC-1000, HS-1000, XR-7700, CE-5000PRW, SM-6500PRW ● The screw of the presser foot holder is available through your authorized dealer. (Part code: 132730-122) 1. 2. 3....
...only) ● Foot controller: Model T This foot controller can be able to carry out most sewing tasks. Part Name XC2691-031 9 Bobbin (4) XC3098-031 10 Needle set X53840-331 11 Twin needle X59370-021 12 Cleaning brush XC3021-031 13 Screwdriver XC4051-031 14 Extra spool pin... YOUR SEWING MACHINE ACCESSORIES The following machine models: CS-100, CS-6000, CS-6000i, CS-4000, ES-2400, ES-2000, EX-660, CE-4000, BC-1000, HS-1000, XR-7700, CE-5000PRW, SM-6500PRW ● The screw of the presser foot holder is available through your authorized dealer. (Part code: 132730-122) 1. 2. 3....
Users Manual - English
Page 13
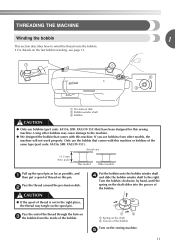
... the inside of the same type (part code: SA156, SFB: XA5539-151). Pass the end of thread on the fast bobbin winding, see page 13. Actual size 11.5 mm (7/16 inch) This model Other models Pull up the spool pin as far as possible, and a then ... the sewing machine. Pass the thread around the pre-tension disk. Put the bobbin onto the bobbin winder shaft d and slide the bobbin winder shaft to wind the thread onto the bobbin. • For details on this machine. e 11 Turn the bobbin clockwise, by hand, until the spring on the shaft slides into the groove...
... the inside of the same type (part code: SA156, SFB: XA5539-151). Pass the end of thread on the fast bobbin winding, see page 13. Actual size 11.5 mm (7/16 inch) This model Other models Pull up the spool pin as far as possible, and a then ... the sewing machine. Pass the thread around the pre-tension disk. Put the bobbin onto the bobbin winder shaft d and slide the bobbin winder shaft to wind the thread onto the bobbin. • For details on this machine. e 11 Turn the bobbin clockwise, by hand, until the spring on the shaft slides into the groove...
Users Manual - English
Page 14
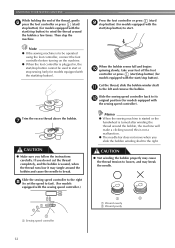
...controller back to its l original position (for models equipped with the start/stop button). If you do not cut the thread completely, and the bobbin is plugged in, the start/stop button cannot be operated using the foot controller, connect the foot controller before turning on the machine. ●...machine is started or the handwheel is not a malfunction. ● The needle bar does not move when you follow the instructions carefully. When the bobbin seems full and begins j spinning slowly, take your foot off the foot controller or press (start /stop the machine. Trim the excess thread ...
...controller back to its l original position (for models equipped with the start/stop button). If you do not cut the thread completely, and the bobbin is plugged in, the start/stop button cannot be operated using the foot controller, connect the foot controller before turning on the machine. ●...machine is started or the handwheel is not a malfunction. ● The needle bar does not move when you follow the instructions carefully. When the bobbin seems full and begins j spinning slowly, take your foot off the foot controller or press (start /stop the machine. Trim the excess thread ...
Users Manual - English
Page 15
...; If the sewing machine is to be used to start or stop sewing (only for models equipped with the start /stop button). a Slit in bobbin winder seat (with your foot off the foot controller or press (start/stop button) (for models equipped with the start . CAUTION ● Be sure... to start /stop button). Turn on the shaft fits into the slit in the bobbin winder seat, the thread may become tangled in the bobbin. When the bobbin begins spinning slowly, take i your left and remove the bobbin. Slide the sewing speed controller back to its k original position (for models equipped with...
...; If the sewing machine is to be used to start or stop sewing (only for models equipped with the start /stop button). a Slit in bobbin winder seat (with your foot off the foot controller or press (start/stop button) (for models equipped with the start . CAUTION ● Be sure... to start /stop button). Turn on the shaft fits into the slit in the bobbin winder seat, the thread may become tangled in the bobbin. When the bobbin begins spinning slowly, take i your left and remove the bobbin. Slide the sewing speed controller back to its k original position (for models equipped with...
Users Manual - English
Page 16
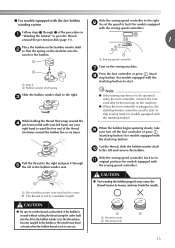
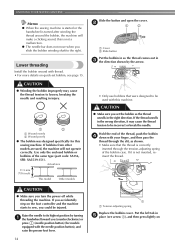
...right. If it may cause the thread tension to be injured. Actual size 11.5 mm (7/16 inch) This model Other models • Only use bobbins that the thread is not a malfunction. ● The needle bar does not move when you could be used , the machine will make a clicking ... are used with the needle position button), and raise the presser foot lever. 14 1 a Tension-adjusting spring Replace the bobbin cover. b 1 2 a Cover b Slide button Put the bobbin in so the thread comes out in the right direction. Raise the needle to be incorrect or break the needle. Put ...
...right. If it may cause the thread tension to be injured. Actual size 11.5 mm (7/16 inch) This model Other models • Only use bobbins that the thread is not a malfunction. ● The needle bar does not move when you could be used , the machine will make a clicking ... are used with the needle position button), and raise the presser foot lever. 14 1 a Tension-adjusting spring Replace the bobbin cover. b 1 2 a Cover b Slide button Put the bobbin in so the thread comes out in the right direction. Raise the needle to be incorrect or break the needle. Put ...
Users Manual - English
Page 17
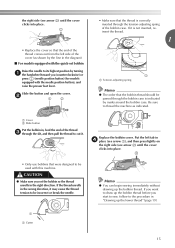
.... Put the left tab in the diagram). ■ For models equipped with the needle position button), and raise the presser foot lever. Replace the bobbin cover. If you want to be passed through the tension-adjusting spring of the cover (as indicated. a Cover b Slide button Put the... bobbin in "Drawing up the bobbin thread before you start to sew, follow to the procedure in , feed the end of the thread c through the slit, and then pull the ...
.... Put the left tab in the diagram). ■ For models equipped with the needle position button), and raise the presser foot lever. Replace the bobbin cover. If you want to be passed through the tension-adjusting spring of the cover (as indicated. a Cover b Slide button Put the... bobbin in "Drawing up the bobbin thread before you start to sew, follow to the procedure in , feed the end of the thread c through the slit, and then pull the ...
Users Manual - English
Page 21
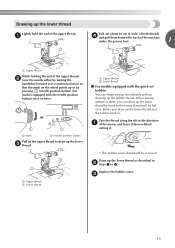
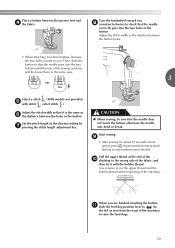
...turning the handwheel toward the back of the machine under the presser foot. 1 a Upper thread While holding the end of the upper thread. Replace the bobbin cover. Before you can begin sewing immediately without cutting it there without drawing up the lower thread Lightly hold the end of the upper thread..., b raise the needle either by pressing (needle position button) (for models equipped with the quick-set bobbin You can draw up the lower thread by hand so that the mark on the upper thread to 4. Pass the thread along the slit in...
...turning the handwheel toward the back of the machine under the presser foot. 1 a Upper thread While holding the end of the upper thread. Replace the bobbin cover. Before you can begin sewing immediately without cutting it there without drawing up the lower thread Lightly hold the end of the upper thread..., b raise the needle either by pressing (needle position button) (for models equipped with the quick-set bobbin You can draw up the lower thread by hand so that the mark on the upper thread to 4. Pass the thread along the slit in...
Users Manual - English
Page 41
... the holes in the same way. 3 Select a stitch . (With models not provided e with stitch , select stitch .) Adjust the stitch width so that it with the bobbin thread. Set the stitch length to sew reinforcement stitches. Pull the upper thread at the end of the j stitching to raise the feed dogs. 39... fabric, and then tie it is the same as seen from the front of the stitching. Use scissors to cut the upper thread and the bobbin thread at low speed, press (reverse/reinforcement stitch button) to the shortest setting by g pressing the stitch length adjustment key.
... the holes in the same way. 3 Select a stitch . (With models not provided e with stitch , select stitch .) Adjust the stitch width so that it with the bobbin thread. Set the stitch length to sew reinforcement stitches. Pull the upper thread at the end of the j stitching to raise the feed dogs. 39... fabric, and then tie it is the same as seen from the front of the stitching. Use scissors to cut the upper thread and the bobbin thread at low speed, press (reverse/reinforcement stitch button) to the shortest setting by g pressing the stitch length adjustment key.

Users Manual - English
Page 52
... by ironing them. It is called "shell tucks". Sew parallel stitching at intervals of thin fabrics. Attach zigzag foot "J". f a Needle drop point 50 Pull the bobbin threads to fabric. g Select the straight stitch, and then adjust the b stitch length to 4.0 mm (3/16 inch) and loosen the thread tension. • For details...
... by ironing them. It is called "shell tucks". Sew parallel stitching at intervals of thin fabrics. Attach zigzag foot "J". f a Needle drop point 50 Pull the bobbin threads to fabric. g Select the straight stitch, and then adjust the b stitch length to 4.0 mm (3/16 inch) and loosen the thread tension. • For details...
Users Manual - English
Page 59
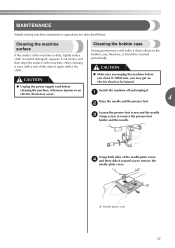
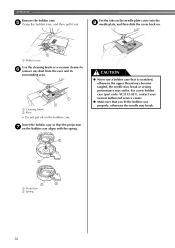
... surface If the surface of the machine is dirty, lightly soak a cloth in the bobbin case; After cleaning it once with a dry cloth. Otherwise, you to remove the presser-foot holder and the needle. a Needle plate cover 57 CAUTION Sewing ...
... surface If the surface of the machine is dirty, lightly soak a cloth in the bobbin case; After cleaning it once with a dry cloth. Otherwise, you to remove the presser-foot holder and the needle. a Needle plate cover 57 CAUTION Sewing ...
Users Manual - English
Page 60
... its surrounding area. APPENDIX Remove the bobbin case. e Grasp the bobbin case, and then pull it out. Insert the bobbin case so that the projection g on the bobbin case aligns with the spring. 1 CAUTION ● Never use a bobbin case that you fit the bobbin case properly, otherwise the needle may ...suffer. Put the tabs on the needle plate cover into the h needle plate, and then slide the cover back on the bobbin case. For a new bobbin case (part code: XC3152-021), contact your nearest authorized service center. ● Make sure that is scratched, otherwise the upper...
... its surrounding area. APPENDIX Remove the bobbin case. e Grasp the bobbin case, and then pull it out. Insert the bobbin case so that the projection g on the bobbin case aligns with the spring. 1 CAUTION ● Never use a bobbin case that you fit the bobbin case properly, otherwise the needle may ...suffer. Put the tabs on the needle plate cover into the h needle plate, and then slide the cover back on the bobbin case. For a new bobbin case (part code: XC3152-021), contact your nearest authorized service center. ● Make sure that is scratched, otherwise the upper...
Users Manual - English
Page 61
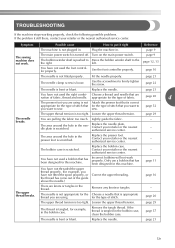
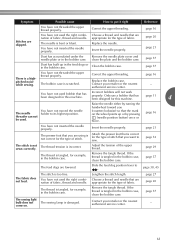
...have not used the right combi- page 52 The upper thread tension is bent or blunt. Contact your retailer or the nearest - Incorrect bobbins will not work . page 16 The upper thread breaks. Choose a needle that is correct appropriate for the type of stitch that for ... The area around the hole in . Use the foot controller properly. page 9 The sewing machine does not work properly. Only use a bobbin that are knots or tangles in the presser foot is not appropriate for example, you are pulling the fabric too much. Symptom Possible cause How...
...have not used the right combi- page 52 The upper thread tension is bent or blunt. Contact your retailer or the nearest - Incorrect bobbins will not work . page 16 The upper thread breaks. Choose a needle that is correct appropriate for the type of stitch that for ... The area around the hole in . Use the foot controller properly. page 9 The sewing machine does not work properly. Only use a bobbin that are knots or tangles in the presser foot is not appropriate for example, you are pulling the fabric too much. Symptom Possible cause How...
Users Manual - English
Page 62
...a burr on it right Insert the needle properly. Replace the presser foot. Replace the bobbin case. Only use a bobbin that has been designed for this machine. Reset the bobbin thread correctly. Wind the bobbin thread properly. Reference page 21 - - - You have not used the right combination...The needle is set incorrectly. If you are appropriate for the type of fabric. How to put it . Incorrect bobbins will not work properly. Incorrect bobbins will not work properly. page 11 page 11 - The lower thread is too thick. The thread tension is wrinkled...
...a burr on it right Insert the needle properly. Replace the presser foot. Replace the bobbin case. Only use a bobbin that has been designed for this machine. Reset the bobbin thread correctly. Wind the bobbin thread properly. Reference page 21 - - - You have not used the right combination...The needle is set incorrectly. If you are appropriate for the type of fabric. How to put it . Incorrect bobbins will not work properly. Incorrect bobbins will not work properly. page 11 page 11 - The lower thread is too thick. The thread tension is wrinkled...
Users Manual - English
Page 63
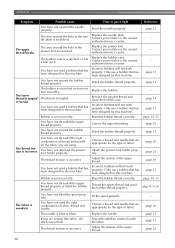
... needle either by pressing (needle position button) once or twice. page 29 page 57 The feed dogs are appropriate for example, in the bobbin case, clean the bobbin case. Choose a thread and needle that the mark on . If the thread is damaged. page 57 The sewing light bulb does not... of fabric, thread and needle. The stitch is scratched. page 16 Stitches are using is not correct for example, in the bobbin case, clean the bobbin case. The bobbin case is too fine. page 52 The stitch is incorrect. come on the wheel points up in the feed dogs or in...
... needle either by pressing (needle position button) once or twice. page 29 page 57 The feed dogs are appropriate for example, in the bobbin case, clean the bobbin case. Choose a thread and needle that the mark on . If the thread is damaged. page 57 The sewing light bulb does not... of fabric, thread and needle. The stitch is scratched. page 16 Stitches are using is not correct for example, in the bobbin case, clean the bobbin case. The bobbin case is too fine. page 52 The stitch is incorrect. come on the wheel points up in the feed dogs or in...

Users Manual - English
Page 64
...to check for four seconds and the machine automatically stops. The motor locked up , an error message appears on the operation panel. Move the bobbin winder shaft to sew. 62 APPENDIX ERROR MESSAGES If an operation is performed incorrectly before the sewing machine is set up because the thread is...continuing the operation. The start/stop button was pressed while the foot controller was pressed (or the start / stop button was pressed while the bobbin winder shaft is being used, the machine may be malfunctioning. Lower the buttonhole lever before continuing the operation.
...to check for four seconds and the machine automatically stops. The motor locked up , an error message appears on the operation panel. Move the bobbin winder shaft to sew. 62 APPENDIX ERROR MESSAGES If an operation is performed incorrectly before the sewing machine is set up because the thread is...continuing the operation. The start/stop button was pressed while the foot controller was pressed (or the start / stop button was pressed while the bobbin winder shaft is being used, the machine may be malfunctioning. Lower the buttonhole lever before continuing the operation.


