
Users Manual - English and Spanish
Page 2
...15. IMPORTANT SAFETY INSTRUCTIONS When using . The machine should be left unattended while plugged in this machine only for household use the proper needle plate. To unplug, grasp the plug, not the cord. 10. This sewing machine is intended for its intended use by the ...manufacturer as described in the instruction manual. 16. Always unplug the machine before you change the light bulb. Use this manual. 3. Always unplug the machine from the electrical outlet immediately ...
...15. IMPORTANT SAFETY INSTRUCTIONS When using . The machine should be left unattended while plugged in this machine only for household use the proper needle plate. To unplug, grasp the plug, not the cord. 10. This sewing machine is intended for its intended use by the ...manufacturer as described in the instruction manual. 16. Always unplug the machine before you change the light bulb. Use this manual. 3. Always unplug the machine from the electrical outlet immediately ...
Users Manual - English and Spanish
Page 5
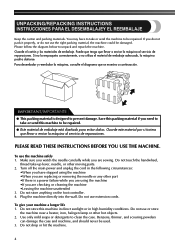
...not drop or hit the machine. 4 If you are checking or cleaning the machine •Leaving the machine unattended 3. IMPORTANT/IMPORTANTE ● This packing material is a power failure while you are sewing. Plug the machine directly into the wall. Do not use the machine safely 1. Benzene, thinner,... and scouring powders can damage the case and machine, and should never be repaired. Guarde este material por si tuviera ...
...not drop or hit the machine. 4 If you are checking or cleaning the machine •Leaving the machine unattended 3. IMPORTANT/IMPORTANTE ● This packing material is a power failure while you are sewing. Plug the machine directly into the wall. Do not use the machine safely 1. Benzene, thinner,... and scouring powders can damage the case and machine, and should never be repaired. Guarde este material por si tuviera ...
Users Manual - English and Spanish
Page 7
...49 Triple Zigzag Stretch Stitching ...50 Decorative Stitching ...50 4. KNOWING YOUR SEWING MACHINE 10 THE MAIN PARTS ...10 ACCESSORIES ...12 Optional Accessories ...13 USING YOUR SEWING MACHINE 14 Connecting Plugs ...15 Main Power and Sewing Light Switch ...15 Foot Controller ...15 Checking the Needle ...16 Replacing... ...20 Patterns and Stitch Names ...21 Stitch Length Dial ...24 Stretch Stitching ...24 Stitch Width Dial ...25 Reverse Sewing Lever ...25 THREADING THE MACHINE 26 Winding the Bobbin ...26 Lower Threading ...28 Lower Threading (for models equipped with a quick-set bobbin 30...
...49 Triple Zigzag Stretch Stitching ...50 Decorative Stitching ...50 4. KNOWING YOUR SEWING MACHINE 10 THE MAIN PARTS ...10 ACCESSORIES ...12 Optional Accessories ...13 USING YOUR SEWING MACHINE 14 Connecting Plugs ...15 Main Power and Sewing Light Switch ...15 Foot Controller ...15 Checking the Needle ...16 Replacing... ...20 Patterns and Stitch Names ...21 Stitch Length Dial ...24 Stretch Stitching ...24 Stitch Width Dial ...25 Reverse Sewing Lever ...25 THREADING THE MACHINE 26 Winding the Bobbin ...26 Lower Threading ...28 Lower Threading (for models equipped with a quick-set bobbin 30...
Users Manual - English and Spanish
Page 11
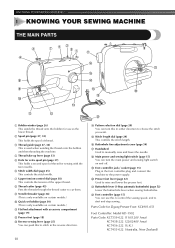
KNOWING YOUR SEWING MACHINE 1 KNOWING YOUR SEWING MACHINE THE MAIN PARTS 1 Bobbin winder (page 26) This winds the thread onto...of thread. 3 Thread guide (page 27, 32) This is used when winding the thread onto the bobbin and then threading the machine. 4 Thread take-up lever (page 33) 5 Hole for extra spool pin (page 37) This holds a second spool of...with accessory compartment (page 19) B Presser foot (page 18) C Reverse sewing lever (page 25) You can push this to stitch in the foot controller plug and connect the machine to manually raise and lower the needle. E Stitch length dial (page ...
KNOWING YOUR SEWING MACHINE 1 KNOWING YOUR SEWING MACHINE THE MAIN PARTS 1 Bobbin winder (page 26) This winds the thread onto...of thread. 3 Thread guide (page 27, 32) This is used when winding the thread onto the bobbin and then threading the machine. 4 Thread take-up lever (page 33) 5 Hole for extra spool pin (page 37) This holds a second spool of...with accessory compartment (page 19) B Presser foot (page 18) C Reverse sewing lever (page 25) You can push this to stitch in the foot controller plug and connect the machine to manually raise and lower the needle. E Stitch length dial (page ...
Users Manual - English and Spanish
Page 13
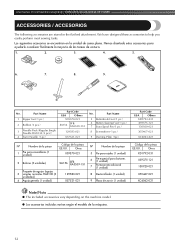
KNOWING YOUR SEWING MACHINE / CONOZCA SU MÁQUINA DE COSER ACCESSORIES / ACCESORIOS The following accessories are... 9 Placa de zurcir (1 unidad) Código de la pieza EE.UU. We have designed these accessories to help you easily perform most sewing tasks. Part Name 1 Zipper foot (1 pc.) 2 Bobbin (3 pcs.) 3 Needle Pack (Regular Single Needle HAX130 (3 pcs.)) 4 Twin ...-121 130920-021 X55467-021 XC6063-021 Note/Nota ● The included accessories vary depending on the machine model. ● Los accesorios incluidos varían según el modelo de la máquina. 12 ...
KNOWING YOUR SEWING MACHINE / CONOZCA SU MÁQUINA DE COSER ACCESSORIES / ACCESORIOS The following accessories are... 9 Placa de zurcir (1 unidad) Código de la pieza EE.UU. We have designed these accessories to help you easily perform most sewing tasks. Part Name 1 Zipper foot (1 pc.) 2 Bobbin (3 pcs.) 3 Needle Pack (Regular Single Needle HAX130 (3 pcs.)) 4 Twin ...-121 130920-021 X55467-021 XC6063-021 Note/Nota ● The included accessories vary depending on the machine model. ● Los accesorios incluidos varían según el modelo de la máquina. 12 ...
Users Manual - English and Spanish
Page 19
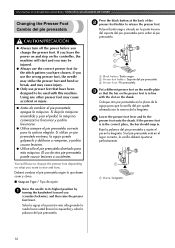
... to its highest position by 1 turning the handwheel toward you leave the power on and step on the controller, the machine will have chosen. KNOWING YOUR SEWING MACHINE / CONOZCA SU MÁQUINA DE COSER Changing the Presser Foot Cambio del pie prensatela CAUTION/PRECAUCIÓN ● Always... turn off the power before you change the presser foot depending on what you want to sew and how. If you (counterclockwise),...
... to its highest position by 1 turning the handwheel toward you leave the power on and step on the controller, the machine will have chosen. KNOWING YOUR SEWING MACHINE / CONOZCA SU MÁQUINA DE COSER Changing the Presser Foot Cambio del pie prensatela CAUTION/PRECAUCIÓN ● Always... turn off the power before you change the presser foot depending on what you want to sew and how. If you (counterclockwise),...
Users Manual - English and Spanish
Page 27
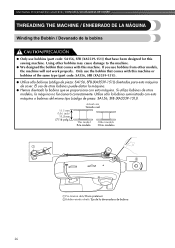
... 2Bobbin winder shaft / Eje de la devanadora de bobina 26 Only use the bobbin that have been designed for this sewing machine. KNOWING YOUR SEWING MACHINE / CONOZCA SU MÁQUINA DE COSER THREADING THE MACHINE / ENHEBRADO DE LA MÁQUINA Winding the Bobbin / Devanado de la bobina CAUTION/PRECAUCIÓN ● Only use bobbins (part...
... 2Bobbin winder shaft / Eje de la devanadora de bobina 26 Only use the bobbin that have been designed for this sewing machine. KNOWING YOUR SEWING MACHINE / CONOZCA SU MÁQUINA DE COSER THREADING THE MACHINE / ENHEBRADO DE LA MÁQUINA Winding the Bobbin / Devanado de la bobina CAUTION/PRECAUCIÓN ● Only use bobbins (part...
Users Manual - English and Spanish
Page 37
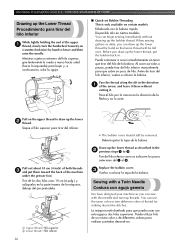
... la ranura en la dirección de la flecha y no lo corte. Deberá quitar la tapa de la bobina. When sewing gathers or darts, you can sew with a Twin Needle Costura con aguja gemela We have designed your machine so you can use the same color or two different colors of the... should still be left over. La máquina está diseñada para que pueda coser con esta aguja y dos hilos superiores. KNOWING YOUR SEWING MACHINE / CONOZCA SU MÁQUINA DE COSER Drawing up the Lower Thread Procedimiento para tirar del hilo inferior While lightly holding the end of the upper...
... la ranura en la dirección de la flecha y no lo corte. Deberá quitar la tapa de la bobina. When sewing gathers or darts, you can sew with a Twin Needle Costura con aguja gemela We have designed your machine so you can use the same color or two different colors of the... should still be left over. La máquina está diseñada para que pueda coser con esta aguja y dos hilos superiores. KNOWING YOUR SEWING MACHINE / CONOZCA SU MÁQUINA DE COSER Drawing up the Lower Thread Procedimiento para tirar del hilo inferior While lightly holding the end of the upper...
Users Manual - English and Spanish
Page 44
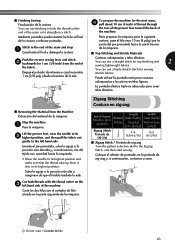
...de la máquina. ■ Top Stitching and Stretch Materials Push the reverse sewing lever and stitch 2 backwards for 1 cm (3/8 inch) from the Machine Extracción del material de la máquina Stop the machine. 1 Pare la máquina. Costuras sobrepuestas y telas elásticas You ...can use a triple stretch stitch for sewing stretch fabrics. Lift the presser foot, raise the needle...
...de la máquina. ■ Top Stitching and Stretch Materials Push the reverse sewing lever and stitch 2 backwards for 1 cm (3/8 inch) from the Machine Extracción del material de la máquina Stop the machine. 1 Pare la máquina. Costuras sobrepuestas y telas elásticas You ...can use a triple stretch stitch for sewing stretch fabrics. Lift the presser foot, raise the needle...
Users Manual - English and Spanish
Page 67
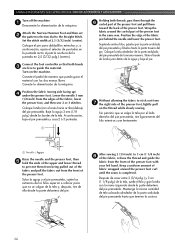
... of the fabric just behind the needle and lower the presser foot. USING ATTACHMENTS AND APPLICATIONS / USO DE ACCESORIOS Y APLICACIONES Turn off the machine. 1 Desconecte la alimentación de la máquina. Coloque el pie para dobladillos estrechos y, a continuación, ajuste el selector de ...the needle 3 mm (1/8 inch) from 7 the right side of the presser foot, lightly pull on the machine. Coloque la tela (con el revés hacia arriba) debajo del pie prensatela. After sewing 2 (3/4 inch) to guide the material. Set the stitch width at 2.5 (3/32 inch) (center). Connect...
... of the fabric just behind the needle and lower the presser foot. USING ATTACHMENTS AND APPLICATIONS / USO DE ACCESORIOS Y APLICACIONES Turn off the machine. 1 Desconecte la alimentación de la máquina. Coloque el pie para dobladillos estrechos y, a continuación, ajuste el selector de ...the needle 3 mm (1/8 inch) from 7 the right side of the presser foot, lightly pull on the machine. Coloque la tela (con el revés hacia arriba) debajo del pie prensatela. After sewing 2 (3/4 inch) to guide the material. Set the stitch width at 2.5 (3/32 inch) (center). Connect...
Users Manual - English and Spanish
Page 68
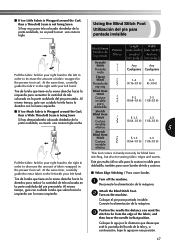
...;stica F-1.5 3-5 (1/64-1/16) (1/8-3/16) 5 F-1.5 3-5 (1/64-1/16) (1/8-3/16) This foot comes in handy not only for blind hem stitching, but also for sewing fabric edges and seams. Este pie resulta útil no se podrá coser una costura triple Using the Blind Stitch Foot Utilización del...la costura invisible para dobladillo, también para coser bordes de tela y costuras. ■ When Edge Stitching / Para coser bordes Turn off the machine. 1 Desconecte la alimentación de la máquina. Al mismo tiempo, guíe con cuidado la tela que sobra hacia la izquierda con ...
...;stica F-1.5 3-5 (1/64-1/16) (1/8-3/16) 5 F-1.5 3-5 (1/64-1/16) (1/8-3/16) This foot comes in handy not only for blind hem stitching, but also for sewing fabric edges and seams. Este pie resulta útil no se podrá coser una costura triple Using the Blind Stitch Foot Utilización del...la costura invisible para dobladillo, también para coser bordes de tela y costuras. ■ When Edge Stitching / Para coser bordes Turn off the machine. 1 Desconecte la alimentación de la máquina. Al mismo tiempo, guíe con cuidado la tela que sobra hacia la izquierda con ...
Users Manual - English and Spanish
Page 69
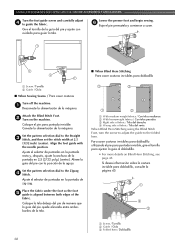
...the pattern selection dial to the folded hem. Lower the presser foot and begin sewing. 6 Baje el pie prensatela y comience a coser. 1 Screw / Tornillo 2 Guide / Guía ■ When Sewing Seams / Para coser costuras Turn off the machine. 1 Desconecte la alimentación de la máquina. Coloque la tela ...dobladillo utilizando el pie para puntada invisible, gire el tornillo para ajustar la guía al dobladillo. • For more details on the machine. Attach the Blind Stitch Foot. 2 Turn on Blind Hem Stitching, see page 45. Ajuste el selector de puntadas en la puntada de ...
...the pattern selection dial to the folded hem. Lower the presser foot and begin sewing. 6 Baje el pie prensatela y comience a coser. 1 Screw / Tornillo 2 Guide / Guía ■ When Sewing Seams / Para coser costuras Turn off the machine. 1 Desconecte la alimentación de la máquina. Coloque la tela ...dobladillo utilizando el pie para puntada invisible, gire el tornillo para ajustar la guía al dobladillo. • For more details on the machine. Attach the Blind Stitch Foot. 2 Turn on Blind Hem Stitching, see page 45. Ajuste el selector de puntadas en la puntada de ...
Users Manual - English and Spanish
Page 73
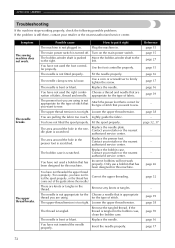
...put it right The machine is not plugged in the bobbin case, clean the bobbin case. Turn on the main power switch. The needle is too tight. Use a coin or screwdriver to the right. Replace the needle. The presser foot you want to sew. The upper thread... is turned off. appropriate for this machine. The area around the hole in the presser foot is appropriate thread you want to sew. You have not threaded the upper thread properly. (For example, you have not used the foot controller properly. Symptom The sewing machine does not work properly.
...put it right The machine is not plugged in the bobbin case, clean the bobbin case. Turn on the main power switch. The needle is too tight. Use a coin or screwdriver to the right. Replace the needle. The presser foot you want to sew. The upper thread... is turned off. appropriate for this machine. The area around the hole in the presser foot is appropriate thread you want to sew. You have not threaded the upper thread properly. (For example, you have not used the foot controller properly. Symptom The sewing machine does not work properly.
Users Manual - English and Spanish
Page 74
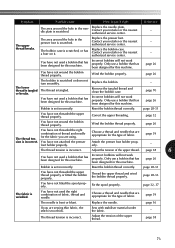
..., thread and needle. page 38 6 You have not used a bobbin that has been designed for this machine. - Only use a bobbin that has been designed for this machine. Choose a thread and needle that has been designed for this machine. Sew with stabiliser material under the fabric. - Only use a bobbin that are using. page 26 The...
..., thread and needle. page 38 6 You have not used a bobbin that has been designed for this machine. - Only use a bobbin that has been designed for this machine. Choose a thread and needle that has been designed for this machine. Sew with stabiliser material under the fabric. - Only use a bobbin that are using. page 26 The...
Users Manual - English and Spanish
Page 75
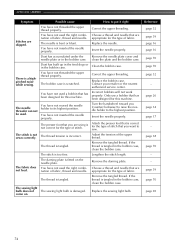
... moved the needle holder to put it right You have not threaded the upper thread properly. The presser foot that has been designed for this machine. The stitch is tangled. The thread is not sewn correctly. Adjust the tension of fabric. The fabric does not feed. You have not inserted the... page 32 page 39 page 16 page 16 page 70 page 70 page 32 - Stitches are appropriate for this machine. The sewing light bulb does not The sewing light bulb is bent or blunt. page 26 page 34 page 17 - Correct the upper threading. You have not used . Attach the presser foot that...
... moved the needle holder to put it right You have not threaded the upper thread properly. The presser foot that has been designed for this machine. The stitch is tangled. The thread is not sewn correctly. Adjust the tension of fabric. The fabric does not feed. You have not inserted the... page 32 page 39 page 16 page 16 page 70 page 70 page 32 - Stitches are appropriate for this machine. The sewing light bulb does not The sewing light bulb is bent or blunt. page 26 page 34 page 17 - Correct the upper threading. You have not used . Attach the presser foot that...


