
Parts Manual - English
Page 8
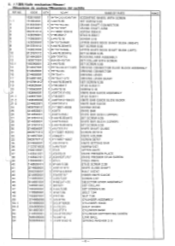
... KNIFE BAR GUIDE SLIDE BLOCK KNIFE BAR GUIDE SCREW 357X8 KNIFE BAR KNIFE BAR BUSH (UPPER) SET SCREW 6.35 KNIFE BAR BUSH (LOWER) SET SCREW 6.35 KNIFE SHAFT GUIDE SCREW 357X10 KNIFE HOLDER SCREW 357X7 KNIFE SETTING BAR SCREW 3.57 UPPER KNIFE KNIFE PRESSER PLATE KNIFE PRESSER STUD SCREW FIXED KNIFE STUD SCREW 2.38 KNIFE GUIDE SHAFT BOLT 3.57X7 INNER KNIFE GUIDE SCREW 3.57 SELECTOR LEVER ASSEMBLY SET COLLAR SET SCREW 5.95 BOLT 7.94 NUT 7.94 CYLINDER ASSEMBLY CYLINDER 16X20 HALF UNION CYLINDER BASE CYLINDER SUPPORTING SCREW LINK BALL SPRING...
... KNIFE BAR GUIDE SLIDE BLOCK KNIFE BAR GUIDE SCREW 357X8 KNIFE BAR KNIFE BAR BUSH (UPPER) SET SCREW 6.35 KNIFE BAR BUSH (LOWER) SET SCREW 6.35 KNIFE SHAFT GUIDE SCREW 357X10 KNIFE HOLDER SCREW 357X7 KNIFE SETTING BAR SCREW 3.57 UPPER KNIFE KNIFE PRESSER PLATE KNIFE PRESSER STUD SCREW FIXED KNIFE STUD SCREW 2.38 KNIFE GUIDE SHAFT BOLT 3.57X7 INNER KNIFE GUIDE SCREW 3.57 SELECTOR LEVER ASSEMBLY SET COLLAR SET SCREW 5.95 BOLT 7.94 NUT 7.94 CYLINDER ASSEMBLY CYLINDER 16X20 HALF UNION CYLINDER BASE CYLINDER SUPPORTING SCREW LINK BALL SPRING...

Instruction Manual - English
Page 3
... a Cycle Sewing Program) 20 21 PROGRAMMING (Inputting an Angled Sewing Program) 22 PROGRAM CHECKING 24 SEWING 25 26 26 26 27 CENTER KNIFE POSITION ADJUSTMENT 28 CORNER KNIFE POSITION ADJUSTMENT 29 _4•P SENSOR SENSITIVITY ADJUSTMENT (BAS-611,BAS-612) 30 - _ -g the flap sensor sensitivity> 30 ustments> 31 Fitting the spool stand 6 4. Connecting the treadle 6 3. Setting-up the table 6 2. Fitting the material holder 6 5. CONTENTS SPECIFICATIONS 1 CONTROL PANEL 2 INSTALLATION 6 1.
... a Cycle Sewing Program) 20 21 PROGRAMMING (Inputting an Angled Sewing Program) 22 PROGRAM CHECKING 24 SEWING 25 26 26 26 27 CENTER KNIFE POSITION ADJUSTMENT 28 CORNER KNIFE POSITION ADJUSTMENT 29 _4•P SENSOR SENSITIVITY ADJUSTMENT (BAS-611,BAS-612) 30 - _ -g the flap sensor sensitivity> 30 ustments> 31 Fitting the spool stand 6 4. Connecting the treadle 6 3. Setting-up the table 6 2. Fitting the material holder 6 5. CONTENTS SPECIFICATIONS 1 CONTROL PANEL 2 INSTALLATION 6 1.
Instruction Manual - English
Page 4
... and needle bar height] 36 [Clearance between the rotary hook and bobbin case opener] 36 CARRIAGE FEED ADJUSTMENTS 37 37 37 38 38 39 KNIFE REPLACEMENT 40 40 42 43 44 44 PARTS REPLACEMENT FOR SINGLE WELTING 45 45 MAIN CIRCUIT BOARD DIP SWITCHES 46 WHEN CHANGING THE TREADLE OPERATION TO TIMER SWITCH CONTROL 48 PROGRAMING THE CARRIAGE FEED RESET TIMER 50 MEMORY INITIALIZATION 51 ERROR CODES 52 TROUBLE...
... and needle bar height] 36 [Clearance between the rotary hook and bobbin case opener] 36 CARRIAGE FEED ADJUSTMENTS 37 37 37 38 38 39 KNIFE REPLACEMENT 40 40 42 43 44 44 PARTS REPLACEMENT FOR SINGLE WELTING 45 45 MAIN CIRCUIT BOARD DIP SWITCHES 46 WHEN CHANGING THE TREADLE OPERATION TO TIMER SWITCH CONTROL 48 PROGRAMING THE CARRIAGE FEED RESET TIMER 50 MEMORY INITIALIZATION 51 ERROR CODES 52 TROUBLE...
Instruction Manual - English
Page 6
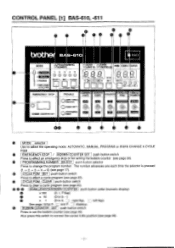
... for F- [I TROUBLE CORNER KNIFE CENTER KNIFE STACKER CARRIAGE FEED THREAD TRIMMER O UPPER THREAD BREAKAGE ON ON Ea FORWARD UPPER O BOBBIN EMPTY BOBBIN COUNTER SET O ERRORAMMING OFF OFF OFF BACKWARD LOWER 12 13 O RODE selector Use to select the operating mode: AUTOMATIC, MANUAL, PROGRAM or KNIFE CHANGE 6 CYCLE PGM O EMERGENCY STOP / BOBBIN COUNTER SET push-button switch Press to correct the corner knife position (see page 20). CONTROL PANEL [1] BAS-610, -611 •...
... for F- [I TROUBLE CORNER KNIFE CENTER KNIFE STACKER CARRIAGE FEED THREAD TRIMMER O UPPER THREAD BREAKAGE ON ON Ea FORWARD UPPER O BOBBIN EMPTY BOBBIN COUNTER SET O ERRORAMMING OFF OFF OFF BACKWARD LOWER 12 13 O RODE selector Use to select the operating mode: AUTOMATIC, MANUAL, PROGRAM or KNIFE CHANGE 6 CYCLE PGM O EMERGENCY STOP / BOBBIN COUNTER SET push-button switch Press to correct the corner knife position (see page 20). CONTROL PANEL [1] BAS-610, -611 •...
Instruction Manual - English
Page 7
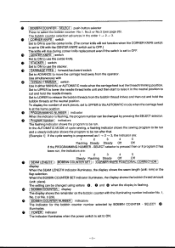
... to release the bobbin threads from the operator. SELECT illuminates. Use simultaneously with THREAD TRIMMER switch Use in either MANUAL or AUTOMATIC mode when the carriage feed is pressed then or if program 2 has been run . To display the number of cycle sewing, a flashing indicator shows the sewing program to be changed by BOBBIN COUNTER - Set to UPPER to lower the needle thread knife unit and then start to raise...
... to release the bobbin threads from the operator. SELECT illuminates. Use simultaneously with THREAD TRIMMER switch Use in either MANUAL or AUTOMATIC mode when the carriage feed is pressed then or if program 2 has been run . To display the number of cycle sewing, a flashing indicator shows the sewing program to be changed by BOBBIN COUNTER - Set to UPPER to lower the needle thread knife unit and then start to raise...
Instruction Manual - English
Page 8
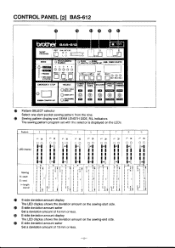
...; II II 1 I 1101 NO.2 NO.3 EMERGENCY STOP BOBBIN COUNTER SET TROUBLE O UPPER THREAD BREAKAGE O BOBBIN EMPTY O PROGRAMMING ERROR CORNER KNIFE O CENTER KNIFE STACKER CARRIAGE FEED THREAD TRIMMER 1:3 Im e Pattern SELECT selector Select one slant pocket sewing pattern from the nine. €1) Sewing pattern display and SEAM LENGTH SIDE, R/L indicators The sewing pattern program set with the selector is displayed on the sewing-start E = end 1-length overall 1 rm 00 iVlI II II II...
...; II II 1 I 1101 NO.2 NO.3 EMERGENCY STOP BOBBIN COUNTER SET TROUBLE O UPPER THREAD BREAKAGE O BOBBIN EMPTY O PROGRAMMING ERROR CORNER KNIFE O CENTER KNIFE STACKER CARRIAGE FEED THREAD TRIMMER 1:3 Im e Pattern SELECT selector Select one slant pocket sewing pattern from the nine. €1) Sewing pattern display and SEAM LENGTH SIDE, R/L indicators The sewing pattern program set with the selector is displayed on the sewing-start E = end 1-length overall 1 rm 00 iVlI II II II...
Instruction Manual - English
Page 9
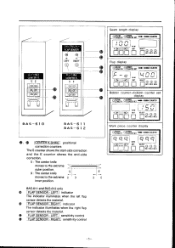
... S moves to the extreme 0 9 inner position. 9 0 BAS-611 and BAS-612 only (IP FLAP SENSOR - LEFT sensitivity control FLAP SENSOR - RIGHT sensitivity control Seam length display OiNeiCATH BOBBIN SET li. n I I SELECT 0 0 0 NO.1 NO.2 i40.3 Flap display ClisgiCrfni i COUNTER SET r.. I n 1 1111 M/M S 5. -CE SET I LI SELECT 0 0 0) NO.1 NO.2 NO.3 Work piece counter display -SEAM ©COMIER SET IFS BOBBIN COUNTER /- bobbin counter set display CtEitimi -BOBBIN SET me BOBBIN COUNTER S >-< E L17 - i - / rI r/ I I7...
... S moves to the extreme 0 9 inner position. 9 0 BAS-611 and BAS-612 only (IP FLAP SENSOR - LEFT sensitivity control FLAP SENSOR - RIGHT sensitivity control Seam length display OiNeiCATH BOBBIN SET li. n I I SELECT 0 0 0 NO.1 NO.2 i40.3 Flap display ClisgiCrfni i COUNTER SET r.. I n 1 1111 M/M S 5. -CE SET I LI SELECT 0 0 0) NO.1 NO.2 NO.3 Work piece counter display -SEAM ©COMIER SET IFS BOBBIN COUNTER /- bobbin counter set display CtEitimi -BOBBIN SET me BOBBIN COUNTER S >-< E L17 - i - / rI r/ I I7...
Instruction Manual - English
Page 13
Place empty bobbin 0 onto bobbin winder shaft 0 . 3. To wind another bobbin, take the thread end from thread holder 0 and wind it around the new one. -9- 0 Move lever in the arrowed direction. CORRECT OPERATION [1] 6 (.6 e e 1. Remove bobbin 0 from the spool stand as illustrated and wind the thread end around bobbin 0 for bobbin 0, loosen screw Q and move lever 0 to six turns. 4. Set power switch 0 to wind the thread on the bobbin. 5. The winder will start automatically and bobbin winder shaft 0 will stop revolving. 6 To adjust the maximum...
Place empty bobbin 0 onto bobbin winder shaft 0 . 3. To wind another bobbin, take the thread end from thread holder 0 and wind it around the new one. -9- 0 Move lever in the arrowed direction. CORRECT OPERATION [1] 6 (.6 e e 1. Remove bobbin 0 from the spool stand as illustrated and wind the thread end around bobbin 0 for bobbin 0, loosen screw Q and move lever 0 to six turns. 4. Set power switch 0 to wind the thread on the bobbin. 5. The winder will start automatically and bobbin winder shaft 0 will stop revolving. 6 To adjust the maximum...
Instruction Manual - English
Page 17
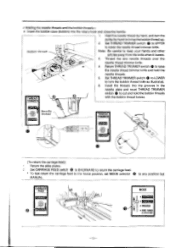
... bobbin threads> • Insert the bobbin case (bobbin) into the grooves in the needle plate and reset THREAD TRIMMER THREAD TRIMMER switch 0 to cut and hold the needle threads. 5. Hold the needle thread by hand, and turn the bobbin thread knife as illustrated. 6. Return THREAD TRIMMER switch 0 to bring the bobbin thread up. 2. Thread the two needle threads over the needle thread trimmer knife. 4. Insert the threads into the rotary hook and close the handle. 1. Set THREAD TRIMMER switch 0 to LOWER...
... bobbin threads> • Insert the bobbin case (bobbin) into the grooves in the needle plate and reset THREAD TRIMMER THREAD TRIMMER switch 0 to cut and hold the needle threads. 5. Hold the needle thread by hand, and turn the bobbin thread knife as illustrated. 6. Return THREAD TRIMMER switch 0 to bring the bobbin thread up. 2. Thread the two needle threads over the needle thread trimmer knife. 4. Insert the threads into the rotary hook and close the handle. 1. Set THREAD TRIMMER switch 0 to LOWER...
Instruction Manual - English
Page 26
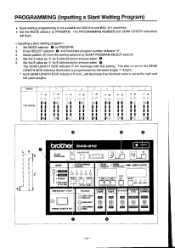
... 0 to PROGRAM. The side on which the SEAM LENGTH SIDE indicator illuminates is programmed for BAS-610 and BAS- 611 machines. • Set the MODE selector to PROGRAM. 2. Pattern LEDdlsplay r- 70 OO VI il II II II I M/M MODE 0 PROGRAMMING NUMBER 0 SEAM LENGTH CBOOBUBNITNER SET BOBBIN COUNTER UTOMA IC MANUAL • PROGRAM • KNEE CHANGE CYCLE PGIA. 1 2 3 4 5 Or O O SELECT SET - XI OO Di II II II II...
... 0 to PROGRAM. The side on which the SEAM LENGTH SIDE indicator illuminates is programmed for BAS-610 and BAS- 611 machines. • Set the MODE selector to PROGRAM. 2. Pattern LEDdlsplay r- 70 OO VI il II II II I M/M MODE 0 PROGRAMMING NUMBER 0 SEAM LENGTH CBOOBUBNITNER SET BOBBIN COUNTER UTOMA IC MANUAL • PROGRAM • KNEE CHANGE CYCLE PGIA. 1 2 3 4 5 Or O O SELECT SET - XI OO Di II II II II...
Instruction Manual - English
Page 28
... II, NUMBER • AUTOMATIC • MANUAL • PROGRAM 12 34 5 0 0 0 © ©I EMERGENCY STOP STACKER ON BOBBIN COUNTER SET OFF IL> -24- The carriage feed will return to the home position. * The carriage feed will not operate if STACKER switch () is pressed for the fifth time in the case of condensed stitch sewing or for the seventh time in the case of the condensed seam (stitch length is...
... II, NUMBER • AUTOMATIC • MANUAL • PROGRAM 12 34 5 0 0 0 © ©I EMERGENCY STOP STACKER ON BOBBIN COUNTER SET OFF IL> -24- The carriage feed will return to the home position. * The carriage feed will not operate if STACKER switch () is pressed for the fifth time in the case of condensed stitch sewing or for the seventh time in the case of the condensed seam (stitch length is...

Instruction Manual - English
Page 30
... AUTOMATIC. 2. The BOBBIN COUNTER SET display will show the previous set to AUTOMATIC. 2. C / ..--- n i - Set MODE selector 0 to AUTOMATIC. 2. n( SEAM \--!LENGTH BOBBIN COUNTER SET M/M S i C E SET BOBBIN COUNTER SELECT O it c O O NO.1 NO.2 NO.3 EMERGENCY STOP 91 BOBBIN COUNTER SET THREAD TRIMMER UPPER it LOWER -26- Press BOBBIN COUNTER - To change the value, use setters 0 . 5. CLEAR1 __ - CYCLE PGM. nI n• ni O cp O SELECT NO.1 NO.2 NO.3 THREAD TRIMMER UPPER LOWER < Setting the piece counter> 1. CYCLE PGM. -4. (n)SEAM _•...
... AUTOMATIC. 2. The BOBBIN COUNTER SET display will show the previous set to AUTOMATIC. 2. C / ..--- n i - Set MODE selector 0 to AUTOMATIC. 2. n( SEAM \--!LENGTH BOBBIN COUNTER SET M/M S i C E SET BOBBIN COUNTER SELECT O it c O O NO.1 NO.2 NO.3 EMERGENCY STOP 91 BOBBIN COUNTER SET THREAD TRIMMER UPPER it LOWER -26- Press BOBBIN COUNTER - To change the value, use setters 0 . 5. CLEAR1 __ - CYCLE PGM. nI n• ni O cp O SELECT NO.1 NO.2 NO.3 THREAD TRIMMER UPPER LOWER < Setting the piece counter> 1. CYCLE PGM. -4. (n)SEAM _•...
Instruction Manual - English
Page 34
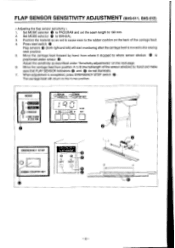
... and make sure that FLAP SENSOR indicators 0 and 0 do not illuminate. 7. MODE AUTOMATIC MANUAL • PROGRAM • KNIFE CHANGE & CYCLE PGM. Adjust the sensitivity as not to cause wear to the sewing start position. 5. rt - SEAM BOBBIN `,--"•LENGTH COUNTER SET I I a l Li M/M ›. The carriage feed will start switch 0 . Set MODE selector 0 to 190 mm. 2. Set MODE selector 0 to PROGRAM and set the seam length to MANUAL. 3. Move the carriage feed...
... and make sure that FLAP SENSOR indicators 0 and 0 do not illuminate. 7. MODE AUTOMATIC MANUAL • PROGRAM • KNIFE CHANGE & CYCLE PGM. Adjust the sensitivity as not to cause wear to the sewing start position. 5. rt - SEAM BOBBIN `,--"•LENGTH COUNTER SET I I a l Li M/M ›. The carriage feed will start switch 0 . Set MODE selector 0 to 190 mm. 2. Set MODE selector 0 to PROGRAM and set the seam length to MANUAL. 3. Move the carriage feed...
Instruction Manual - English
Page 36
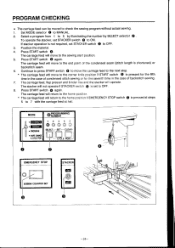
... carriage feed. 2. SEAM ,, BOBBIN t eLENGTH AtitOUNTER SET "MO. BOBBIN COUNTER 5 1 M/M E SET lL SELECT O O O 1- 7 NO.1 NO.2 NO.3 EMERGENCY STOP O BOBBIN COUNTER SET TROUBLE OUBPPERKATGHEREAD O BOBBIN EMPTY OGRAMMING O rROH CARRIAGE FEED FORWARD BACKWARD -32- EMERGENCY STOP * BOBS N COUNTER SET TROUBLE UPPER THREAD BREAKAGE O BOBBIN EMPTY (v",.-.r-.-mji PROGRAMMING ERROR 1. Press EMERGENCY STOP switch 0 to AUTOMATIC and input the number of work pieces for resetting the bobbin counter MODE AUTOMATIC MANUAL • PROGRAM • KNIFE CHANGE CYCLE PGM. Set CARRIAGE FEED...
... carriage feed. 2. SEAM ,, BOBBIN t eLENGTH AtitOUNTER SET "MO. BOBBIN COUNTER 5 1 M/M E SET lL SELECT O O O 1- 7 NO.1 NO.2 NO.3 EMERGENCY STOP O BOBBIN COUNTER SET TROUBLE OUBPPERKATGHEREAD O BOBBIN EMPTY OGRAMMING O rROH CARRIAGE FEED FORWARD BACKWARD -32- EMERGENCY STOP * BOBS N COUNTER SET TROUBLE UPPER THREAD BREAKAGE O BOBBIN EMPTY (v",.-.r-.-mji PROGRAMMING ERROR 1. Press EMERGENCY STOP switch 0 to AUTOMATIC and input the number of work pieces for resetting the bobbin counter MODE AUTOMATIC MANUAL • PROGRAM • KNIFE CHANGE CYCLE PGM. Set CARRIAGE FEED...
Instruction Manual - English
Page 37
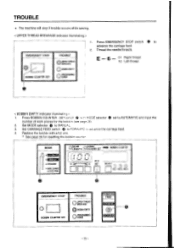
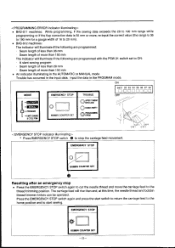
... to cut the needle thread and move the carriage feed to start switch to return the carriage feed to the home position and to the thread trimming position. Press the EMERGENCY STOP switch again and press the start sewing. EMERGENCY STOP BOBBIN COUNTER SET Resetting after an emergency stop the carriage feed movement. < PROGRAMMING ERROR indicator illuminating> • BAS-611 machines: While programming, if the sewing data exceeds the...
... to cut the needle thread and move the carriage feed to start switch to return the carriage feed to the home position and to the thread trimming position. Press the EMERGENCY STOP switch again and press the start sewing. EMERGENCY STOP BOBBIN COUNTER SET Resetting after an emergency stop the carriage feed movement. < PROGRAMMING ERROR indicator illuminating> • BAS-611 machines: While programming, if the sewing data exceeds the...
Instruction Manual - English
Page 42
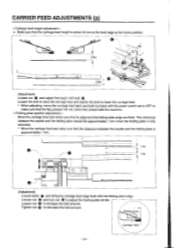
... to lower the carriage feed. * When adjusting, move the carriage feed back and forth by hand with the power switch set to OFF to make sure that the flap presser will not come into contact with the folding plate edge. 0 Loosen nut 0 and turn nut 0 to adjust the folding plate stroke. Move the carriage feed and make sure that the clearance between the needle and...
... to lower the carriage feed. * When adjusting, move the carriage feed back and forth by hand with the power switch set to OFF to make sure that the flap presser will not come into contact with the folding plate edge. 0 Loosen nut 0 and turn nut 0 to adjust the folding plate stroke. Move the carriage feed and make sure that the clearance between the needle and...
Instruction Manual - English
Page 44
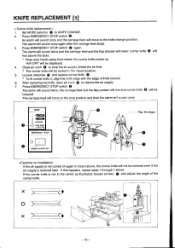
..., loosen screws and adjust the angle of knife bracket 6. The alarm will sound twice; Press EMERGENCY STOP switch . EWE CHANGE r CYCLE PGM. If this happens, repeat steps 1 through 7 above the table. * Keep your hands away from where the corner knife comes up....0 X > "AIR OFF" will lower; The alarm will sound twice and the carriage feed and the flap presser will be locked in step 6 above, the corner knife will sound once. Set MODE selector 0 to restore the air supply. 7. After replacing the knife, open air cock Q to KNIFE CHANGE. 2. MODE AUTOMATIC MANUAL .
..., loosen screws and adjust the angle of knife bracket 6. The alarm will sound twice; Press EMERGENCY STOP switch . EWE CHANGE r CYCLE PGM. If this happens, repeat steps 1 through 7 above the table. * Keep your hands away from where the corner knife comes up....0 X > "AIR OFF" will lower; The alarm will sound twice and the carriage feed and the flap presser will be locked in step 6 above, the corner knife will sound once. Set MODE selector 0 to restore the air supply. 7. After replacing the knife, open air cock Q to KNIFE CHANGE. 2. MODE AUTOMATIC MANUAL .
Instruction Manual - English
Page 54
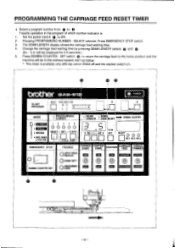
... SET TROUBLE CORNER KNIFE CENTER KNIFE STACKER CARRIAGE FEED THREAD TRIMMER O UPPER THREAD BREAKAGE O BOBBIN EMPTY PROGRAMMING \O-z.2 ERROR ON 0 OFF ON 0 OFF ON FORWARD UPPER O OFF BACKWARD O LOWER cj ------------ Press BOBBIN COUNTER - Treadle operation in the ordinary system start-up status. * This timer is 1. PROGRAMMING THE CARRIAGE FEED RESET TIMER • Select a program number from 0 to ON. 2. bother BAS -61 SLANT PROGRAM SELECT SEAM LENGTH SIDE R 0 oo Cno= L 0 ooED 0 S L M/' 0 POWER...
... SET TROUBLE CORNER KNIFE CENTER KNIFE STACKER CARRIAGE FEED THREAD TRIMMER O UPPER THREAD BREAKAGE O BOBBIN EMPTY PROGRAMMING \O-z.2 ERROR ON 0 OFF ON 0 OFF ON FORWARD UPPER O OFF BACKWARD O LOWER cj ------------ Press BOBBIN COUNTER - Treadle operation in the ordinary system start-up status. * This timer is 1. PROGRAMMING THE CARRIAGE FEED RESET TIMER • Select a program number from 0 to ON. 2. bother BAS -61 SLANT PROGRAM SELECT SEAM LENGTH SIDE R 0 oo Cno= L 0 ooED 0 S L M/' 0 POWER...
Instruction Manual - English
Page 57
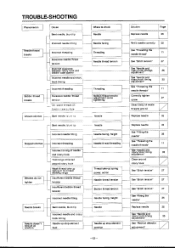
... timing adjustment" Clean around rotary hook H Weak thread take -up spring power, action Needle thread tension Bobbin thread tension Needle facing, height Needle Needle up stop at up spring or its limited working range Insufficient needle thread tension _ .1 Insufficient bobbin thread tension Incorrect needle fitting Needle breaks Needle doesn't stop element position -53- TROUBLE-SHOOTING Phenomenon Cause Bent needle, blunt tip Needle thread breaks H Incorrect needle fitting Incorrect threading Excessive needle thread tension Incorrect clearance between rotary hook and bobbin case...
... timing adjustment" Clean around rotary hook H Weak thread take -up spring power, action Needle thread tension Bobbin thread tension Needle facing, height Needle Needle up stop at up spring or its limited working range Insufficient needle thread tension _ .1 Insufficient bobbin thread tension Incorrect needle fitting Needle breaks Needle doesn't stop element position -53- TROUBLE-SHOOTING Phenomenon Cause Bent needle, blunt tip Needle thread breaks H Incorrect needle fitting Incorrect threading Excessive needle thread tension Incorrect clearance between rotary hook and bobbin case...

Parts Manual - English
Page 8
... KNIFE BAR GUIDE SLIDE BLOCK KNIFE BAR GUIDE SCREW 357X8 KNIFE BAR KNIFE BAR BUSH (UPPER) SET SCREW 6.35 KNIFE BAR BUSH (LOWER) SET SCREW 6.35 KNIFE SHAFT GUIDE SCREW 357X10 KNIFE HOLDER SCREW 357X7 KNIFE SETTING BAR SCREW 3.57 UPPER KNIFE KNIFE PRESSER PLATE KNIFE PRESSER STUD SCREW FIXED KNIFE STUD SCREW 2.38 KNIFE GUIDE SHAFT BOLT 3.57X7 INNER KNIFE GUIDE SCREW 3.57 SELECTOR LEVER ASSEMBLY SET COLLAR SET SCREW 5.95 BOLT 7.94 NUT 7.94 CYLINDER ASSEMBLY CYLINDER 16X20 HALF UNION CYLINDER BASE CYLINDER SUPPORTING SCREW LINK BALL SPRING...
... KNIFE BAR GUIDE SLIDE BLOCK KNIFE BAR GUIDE SCREW 357X8 KNIFE BAR KNIFE BAR BUSH (UPPER) SET SCREW 6.35 KNIFE BAR BUSH (LOWER) SET SCREW 6.35 KNIFE SHAFT GUIDE SCREW 357X10 KNIFE HOLDER SCREW 357X7 KNIFE SETTING BAR SCREW 3.57 UPPER KNIFE KNIFE PRESSER PLATE KNIFE PRESSER STUD SCREW FIXED KNIFE STUD SCREW 2.38 KNIFE GUIDE SHAFT BOLT 3.57X7 INNER KNIFE GUIDE SCREW 3.57 SELECTOR LEVER ASSEMBLY SET COLLAR SET SCREW 5.95 BOLT 7.94 NUT 7.94 CYLINDER ASSEMBLY CYLINDER 16X20 HALF UNION CYLINDER BASE CYLINDER SUPPORTING SCREW LINK BALL SPRING...


