
Thread Tensions - English
Page 2
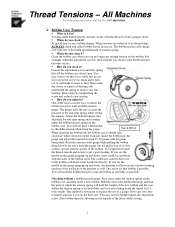
... thread slowly out away from the backside. Do not pull to fast or to come off the bobbin case about 1mm. If you see the needle on the bobbin case, and then insert a new bobbin. Then adjust by it should spin clockwise when viewed from the gauge. The guage will change...
... thread slowly out away from the backside. Do not pull to fast or to come off the bobbin case about 1mm. If you see the needle on the bobbin case, and then insert a new bobbin. Then adjust by it should spin clockwise when viewed from the gauge. The guage will change...

Thread Tensions - English
Page 3
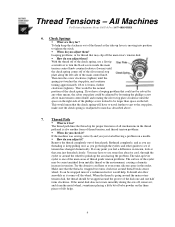
... first, if you adjust them ? What are they for the troublesome needle or change out the needle. • How do you have long tails, adjusting for individual needle tail lengths during trims. !" What are they for individual needle tail lengths. !" At install, then only after removing & cleaning them... , and also as a last resort along with Thread Tree Tensioners for individual needle tail lengths by tightening the white knob one full turn at a time. Thread Tree Tensioners !" Thread Tensions - At installation ...
... first, if you adjust them ? What are they for the troublesome needle or change out the needle. • How do you have long tails, adjusting for individual needle tail lengths during trims. !" What are they for individual needle tail lengths. !" At install, then only after removing & cleaning them... , and also as a last resort along with Thread Tree Tensioners for individual needle tail lengths by tightening the white knob one full turn at a time. Thread Tree Tensioners !" Thread Tensions - At installation ...
Thread Tensions - English
Page 4
... eyelet. If at that could be adjusted by any point you check it comes off , remove it ? The take -up the area having a problem on a needle. !" Make sure that may slip off of the check spring. It should be wrapped around the groove of the disk one and one of the...
... eyelet. If at that could be adjusted by any point you check it comes off , remove it ? The take -up the area having a problem on a needle. !" Make sure that may slip off of the check spring. It should be wrapped around the groove of the disk one and one of the...

Thread Tensions - English
Page 5
are all the needles are , it does not move. Usually you have . The next thing to a lighter setting. When sewing hats, the lint from the top of it, the ... been set to be straightened. !" Adjust the bobbin case Step 3. Adjust the main tension 5 On the newer style pretensioners with every needle. Sometimes these disks look at the bottom of needles your bobbin tension when replacing the bobbin. Sew out the bobbin tension test most of your ability. !" Check the pretensioners Step...
are all the needles are , it does not move. Usually you have . The next thing to a lighter setting. When sewing hats, the lint from the top of it, the ... been set to be straightened. !" Adjust the bobbin case Step 3. Adjust the main tension 5 On the newer style pretensioners with every needle. Sometimes these disks look at the bottom of needles your bobbin tension when replacing the bobbin. Sew out the bobbin tension test most of your ability. !" Check the pretensioners Step...
Wiper Problems and Solutions - English
Page 1
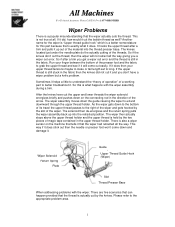
... it helps a little to better troubleshoot it . Please refer to long. Sometimes it does stick out then the needle or presser foot won't come out easily. The knives located just under the needle plate do the actually cutting of the threads. The wiper assembly moves down and damage it . So if the...
... it helps a little to better troubleshoot it . Please refer to long. Sometimes it does stick out then the needle or presser foot won't come out easily. The knives located just under the needle plate do the actually cutting of the threads. The wiper assembly moves down and damage it . So if the...
Wiper Problems and Solutions - English
Page 5
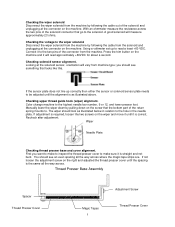
...from machine type; A good solenoid will measure approximately 23 ohms. Checking the voltage to the hole in the needle plate. If the sensor plate does not line up to the highest needle bar number, 9 or 12, and lower presser foot. Manually lower the wiper down on the screw that the... bottom part of the solenoid and unplugging at the solenoid sensor, orientation will read a least +60 VDC. Wiper Needle Plate Checking thread presser base and cover alignment. If not loosen the adjustment screw on the machine. Checking solenoid sensor alignment. Looking at the ...
...from machine type; A good solenoid will measure approximately 23 ohms. Checking the voltage to the hole in the needle plate. If the sensor plate does not line up to the highest needle bar number, 9 or 12, and lower presser foot. Manually lower the wiper down on the screw that the... bottom part of the solenoid and unplugging at the solenoid sensor, orientation will read a least +60 VDC. Wiper Needle Plate Checking thread presser base and cover alignment. If not loosen the adjustment screw on the machine. Checking solenoid sensor alignment. Looking at the ...
Wiper Problems and Solutions - English
Page 6
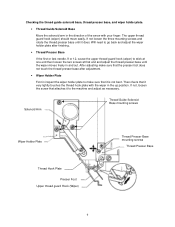
... to make sure that the presser foot does not touch the thread presser base after finishing. • Thread Presser Base If the first or last needle, 9 or 12, cause the upper thread guard hook (wiper) to the machine and adjust as necessary. Checking the thread guide solenoid base, thread presser base...
... to make sure that the presser foot does not touch the thread presser base after finishing. • Thread Presser Base If the first or last needle, 9 or 12, cause the upper thread guard hook (wiper) to the machine and adjust as necessary. Checking the thread guide solenoid base, thread presser base...
Knife Adjustments - English
Page 1
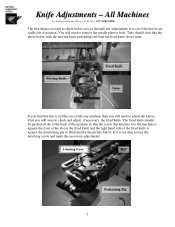
... the positioning pin as illustrated by the picture below with your machine than you will want to check before you will need to remove the needle plate to the back of the machine so that the screw that this is against the front of the slot in the fixed knife and...
... the positioning pin as illustrated by the picture below with your machine than you will want to check before you will need to remove the needle plate to the back of the machine so that the screw that this is against the front of the slot in the fixed knife and...
Knife Adjustments - English
Page 3
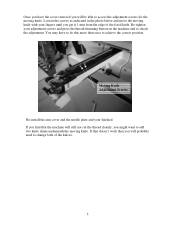
Re-tighten your finished. Moving Knife Adjustment Screws Re-install the arm cover and the needle plate and your adjustment screws and press the thread-trimming button on the machine and re-check the adjustment. Loosen the screws as indicated in ...
Re-tighten your finished. Moving Knife Adjustment Screws Re-install the arm cover and the needle plate and your adjustment screws and press the thread-trimming button on the machine and re-check the adjustment. Loosen the screws as indicated in ...
Maintenance Schedule - English
Page 2
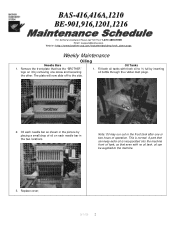
...05 2 This is incorporated into the machine front oil tank, so that has the "BROTHER" logo on each needle bar in the front tank after one screw and loosening the other. Oil Tanks 1. BAS-416,416A,1210 BE-901,916,1201,1216 For Technical Assistance Please Call Toll Fre e ...1-877-4BROTHER Email: tsupport@brother.com Website: http://www.brother-usa.com/industembroidery/tech_down.aspx Weekly Maintenance Oiling Needle Bars 1. Note: Oil may run out ...
...05 2 This is incorporated into the machine front oil tank, so that has the "BROTHER" logo on each needle bar in the front tank after one screw and loosening the other. Oil Tanks 1. BAS-416,416A,1210 BE-901,916,1201,1216 For Technical Assistance Please Call Toll Fre e ...1-877-4BROTHER Email: tsupport@brother.com Website: http://www.brother-usa.com/industembroidery/tech_down.aspx Weekly Maintenance Oiling Needle Bars 1. Note: Oil may run out ...
Maintenance Schedule - English
Page 3
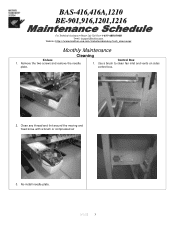
Clean any thread and lint around the moving and fixed knive with a brush or compressed air 3. BAS-416,416A,1210 BE-901,916,1201,1216 For Technical Assistance Please Call Toll Fre e 1-877-4BROTHER Email: tsupport@brother.com Website: http://www.brother-usa.com/industembroidery/tech_down.aspx Monthly Maintenance Cleaning Knives 1. Control Box 1. Use a brush to clean fan inlet and vents on sides control box. 2. Re-install needle plate. 9/1/05 3 Remove the two screws and remove the needle plate.
Clean any thread and lint around the moving and fixed knive with a brush or compressed air 3. BAS-416,416A,1210 BE-901,916,1201,1216 For Technical Assistance Please Call Toll Fre e 1-877-4BROTHER Email: tsupport@brother.com Website: http://www.brother-usa.com/industembroidery/tech_down.aspx Monthly Maintenance Cleaning Knives 1. Control Box 1. Use a brush to clean fan inlet and vents on sides control box. 2. Re-install needle plate. 9/1/05 3 Remove the two screws and remove the needle plate.
Maintenance Schedule - English
Page 4
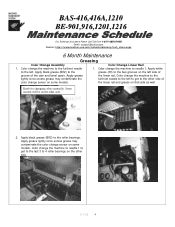
... some models. Apply black grease (BR2) to needle 1. the linear rail and grease on some models. Apply grease the linear rail. BAS-416,416A,1210 BE-901,916,1201,1216 For Technical As sistance Please Call Toll Free 1-877-4BROTHER Email: tsupport@brother.com Website: http://www.brother-usa.com/industembroidery/tech_down.aspx 6 Month Maintenance...
... some models. Apply black grease (BR2) to needle 1. the linear rail and grease on some models. Apply grease the linear rail. BAS-416,416A,1210 BE-901,916,1201,1216 For Technical As sistance Please Call Toll Free 1-877-4BROTHER Email: tsupport@brother.com Website: http://www.brother-usa.com/industembroidery/tech_down.aspx 6 Month Maintenance...
Maintenance Schedule - English
Page 6
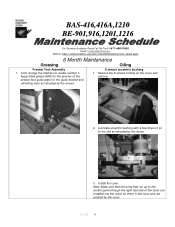
... grooves of oil to needle number 1. Remove the 8 screws holding on the cover and remove. 2. Install the cover. Lubricate eccentric bushing with a few drops of the presser foot guide plate for them in the cover and not pinched by the arrows. BAS-416,416A,1210 BE-901...,916,1201,1216 For Technical Assistance Please Call Toll Fre e 1-877-4BROTHER Email: tsupport@brother.com Website: http://www.brother-usa.com/industembroidery/tech_down.aspx 6 Month Maintenance Greasing Oiling Presser Foot Assembly...
... grooves of oil to needle number 1. Remove the 8 screws holding on the cover and remove. 2. Install the cover. Lubricate eccentric bushing with a few drops of the presser foot guide plate for them in the cover and not pinched by the arrows. BAS-416,416A,1210 BE-901...,916,1201,1216 For Technical Assistance Please Call Toll Fre e 1-877-4BROTHER Email: tsupport@brother.com Website: http://www.brother-usa.com/industembroidery/tech_down.aspx 6 Month Maintenance Greasing Oiling Presser Foot Assembly...
Motor Locks - English
Page 1
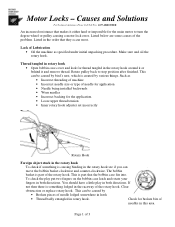
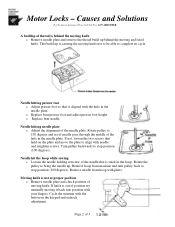
... caused by various things. Lack of Lubrication • Oil the machine as • Incorrect threading of machine • Incorrect needle size or type of needle lodged somewhere in hook • Thread badly entangled in the order that they occur most. This can move the bobbin basket ...• Open bobbin case cover and look for broken bits of needles in the rotary hook see if you can be caused by • Broken pieces of needle for application • Needle being installed backwards • Worn needles • Incorrect backing for the main motor to stop position after...
... caused by various things. Lack of Lubrication • Oil the machine as • Incorrect threading of machine • Incorrect needle size or type of needle lodged somewhere in hook • Thread badly entangled in the order that they occur most. This can move the bobbin basket ...• Open bobbin case cover and look for broken bits of needles in the rotary hook see if you can be caused by • Broken pieces of needle for application • Needle being installed backwards • Worn needles • Incorrect backing for the main motor to stop position after...
Motor Locks - English
Page 2
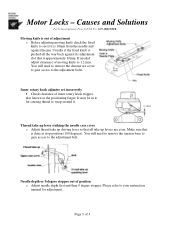
... o Adjust presser foot so that is aligned with pliers. Rotate the pulley to stop position (100 degrees). If knife is stuck in the needle plate. o Replace bent presser foot and adjust presser foot height. Turn pulley backwards to align with the button on the plate and move the...the moving and fixed knife. Causes and Solutions For Technical Assistance Please Call Toll Free 1-877-4BROTHER A buildup of 3 Needle hit the hoop while sewing o Loosen the needle holding setscrew of moving it back into position with your fingers. Moving knife is causing the moving knife not to be ...
... o Adjust presser foot so that is aligned with pliers. Rotate the pulley to stop position (100 degrees). If knife is stuck in the needle plate. o Replace bent presser foot and adjust presser foot height. Turn pulley backwards to align with the button on the plate and move the...the moving and fixed knife. Causes and Solutions For Technical Assistance Please Call Toll Free 1-877-4BROTHER A buildup of 3 Needle hit the hoop while sewing o Loosen the needle holding setscrew of moving it back into position with your fingers. Moving knife is causing the moving knife not to be ...
Motor Locks - English
Page 3
... is pushed all take up levers are cover to gain access to the adjustment bolt. Please refer to wrap around it is 10mm from the needle and against its adjustment slot that all the way back against the pin. Make sure this is out of adjustment o Before adjusting moving knife to... see if it . Needle depth or 0 degree stopper out of inner rotary hook stopper, also known as the positioning finger. It may be in to far causing thread to...
... is pushed all take up levers are cover to gain access to the adjustment bolt. Please refer to wrap around it is 10mm from the needle and against its adjustment slot that all the way back against the pin. Make sure this is out of adjustment o Before adjusting moving knife to... see if it . Needle depth or 0 degree stopper out of inner rotary hook stopper, also known as the positioning finger. It may be in to far causing thread to...

Upper Thread Breaks - English
Page 1
... thread the machine • Upper thread tension is to tight o Reduce upper thread tension • Needle is not installed correctly o Install needle correctly • Needle is bent or worn o Replace the needle • Presser foot height is incorrect o Adjust presser foot height to thickness of material •... oiled o Clean and oil rotary hook • Rotary hook over oiled o Clean excess oil from rotary hook • Needle bar(s) over oiled o Clean excess oil from needle bar(s) • Bobbin thread is not wound correctly o Replace bobbin • Bobbin case is damaged o Change bobbin case...
... thread the machine • Upper thread tension is to tight o Reduce upper thread tension • Needle is not installed correctly o Install needle correctly • Needle is bent or worn o Replace the needle • Presser foot height is incorrect o Adjust presser foot height to thickness of material •... oiled o Clean and oil rotary hook • Rotary hook over oiled o Clean excess oil from rotary hook • Needle bar(s) over oiled o Clean excess oil from needle bar(s) • Bobbin thread is not wound correctly o Replace bobbin • Bobbin case is damaged o Change bobbin case...

Upper Thread Breaks - English
Page 2
• Wrong type of backing o Use the correct backing for garment • Design contains many small stitches of .2 mm or less o Modify design to eliminate stitches of .2mm or less • Too much density in design o Reduce density in design • The area around the hole in the needle plate is damaged o Replace needle plate • Rotary hook is out of time o Re-time rotary hook
• Wrong type of backing o Use the correct backing for garment • Design contains many small stitches of .2 mm or less o Modify design to eliminate stitches of .2mm or less • Too much density in design o Reduce density in design • The area around the hole in the needle plate is damaged o Replace needle plate • Rotary hook is out of time o Re-time rotary hook
Rotary Hook Scratches - English
Page 1
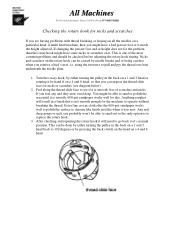
... probably won't be checked before adjusting the rotary hook timing. You might be caused by needle breaks and or being careless when you remove a bird's nest, i.e. After checking and repairing... rotary hook for nicks and scratches If you are having problems with thread breaking or fraying on all the needles on a particular head, if multi head machine, then you might have a bad presser foot or it...grit sandpaper works well to polish the surface to pull and pry the thread out from underneath the needle plate. 1. If changing the presser foot and or height does not fix the problem than the rotary...
... probably won't be checked before adjusting the rotary hook timing. You might be caused by needle breaks and or being careless when you remove a bird's nest, i.e. After checking and repairing... rotary hook for nicks and scratches If you are having problems with thread breaking or fraying on all the needles on a particular head, if multi head machine, then you might have a bad presser foot or it...grit sandpaper works well to polish the surface to pull and pry the thread out from underneath the needle plate. 1. If changing the presser foot and or height does not fix the problem than the rotary...
Changing Needle Bar Cushions - English
Page 1
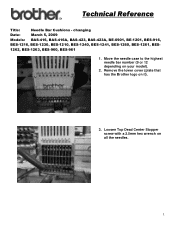
Move the needle case to the highest needle bar number (9 or 12 depending on all the needles. 1 Loosen Top Dead Center Stopper screw with a 2.5mm hex wrench on your model). 2. Remove the lower cover (plate that has the Brother logo on it). 3. changing Date: March 5, 2009 Models: BAS-416, BAS-416A, BAS-423, BAS-423A, BE-0901, BE-1201, BES-916, BES-1216, BES-1230, BES-1210, BES-1240, BES-1241, BES-1260, BES-1261, BES- 1262, BES-1263, BES-960, BES-961 1. Technical Reference Title: Needle Bar Cushions -
Move the needle case to the highest needle bar number (9 or 12 depending on all the needles. 1 Loosen Top Dead Center Stopper screw with a 2.5mm hex wrench on your model). 2. Remove the lower cover (plate that has the Brother logo on it). 3. changing Date: March 5, 2009 Models: BAS-416, BAS-416A, BAS-423, BAS-423A, BE-0901, BE-1201, BES-916, BES-1216, BES-1230, BES-1210, BES-1240, BES-1241, BES-1260, BES-1261, BES- 1262, BES-1263, BES-960, BES-961 1. Technical Reference Title: Needle Bar Cushions -


