
Upper Thread Breaks - English
Page 1
... sliding surface of the rotary hook o Smooth scratches or replace rotary hook • Poor quality thread o Replace thread • Fabric is not taut in the hoop o Re-hoop garment
... sliding surface of the rotary hook o Smooth scratches or replace rotary hook • Poor quality thread o Replace thread • Fabric is not taut in the hoop o Re-hoop garment

Quick Reference Guide - English
Page 2
... To move BACK only to delete the design from memory. Press END to return to "FileNo" screen SETTING HOOP FEED POSITION HOOP FEED Press HOOP FEED to move the frame to the current HOOP FEED position If you choose END START To EXIT the edit mode To return to the above display with..."#" again to display a "T" in # the grey box To move through a design after you have started sewing you wish to toggle between sewing position and hoop feed position MOVING THE NEEDLE CASE NEEDLE SELECT To enter the NEEDLE SELECT mode To move the frame in effect. Co. # # N_No EDIT EDIT To...
... To move BACK only to delete the design from memory. Press END to return to "FileNo" screen SETTING HOOP FEED POSITION HOOP FEED Press HOOP FEED to move the frame to the current HOOP FEED position If you choose END START To EXIT the edit mode To return to the above display with..."#" again to display a "T" in # the grey box To move through a design after you have started sewing you wish to toggle between sewing position and hoop feed position MOVING THE NEEDLE CASE NEEDLE SELECT To enter the NEEDLE SELECT mode To move the frame in effect. Co. # # N_No EDIT EDIT To...

Instruction Manual - English
Page 2
...procedures 13 Flow chart 13 I PREPARATION 14 1 Attaching embroidery hoop to holder base 14 2 Inserting floppy disk 16 3 Names and functions of operation panel 17 4 Dip switch functions 24 5 Preparation of machine 26 6 Data available in BAS-415 32 I] MAIN MENU 33 Summary of main menu 33 ...1 Setting hoop feed point 34 2 Needle bar setting 36 3 Selecting needle bar 38 4 Setting bobbin thread counter and ...
...procedures 13 Flow chart 13 I PREPARATION 14 1 Attaching embroidery hoop to holder base 14 2 Inserting floppy disk 16 3 Names and functions of operation panel 17 4 Dip switch functions 24 5 Preparation of machine 26 6 Data available in BAS-415 32 I] MAIN MENU 33 Summary of main menu 33 ...1 Setting hoop feed point 34 2 Needle bar setting 36 3 Selecting needle bar 38 4 Setting bobbin thread counter and ...

Instruction Manual - English
Page 3
... Connecting cable with editing system 71 ERROR MESSAGES when receiving data from editing system 72 What is needed" 73 Error messages 74 Troubleshooting 77 Embroidery hoop types 81 Options 85 II!
... Connecting cable with editing system 71 ERROR MESSAGES when receiving data from editing system 72 What is needed" 73 Error messages 74 Troubleshooting 77 Embroidery hoop types 81 Options 85 II!

Instruction Manual - English
Page 4
... Single phase 240V, 220V, 200V, 120V maximum 500VA 165kg W 1050 mm x L 940 mm x H 1380 mm Paper tape reader, embroidery hoop in each size, ML 651 lamp set, bobbin winder, accessory case, cap frame device, boring attachment, plate for tubular materials can be done ... n z- •., 1- ,, 0 1 .41 • Rix x s f : , € ; Up to fully embroider the back of Tajima, and the receive data from Brother's editing system can be used. [NOTE) Brother format data cannot be used_ 5) By removing the table and using the cylinder bed, embroidery for shelf, marking light, memory expansion board...
... Single phase 240V, 220V, 200V, 120V maximum 500VA 165kg W 1050 mm x L 940 mm x H 1380 mm Paper tape reader, embroidery hoop in each size, ML 651 lamp set, bobbin winder, accessory case, cap frame device, boring attachment, plate for tubular materials can be done ... n z- •., 1- ,, 0 1 .41 • Rix x s f : , € ; Up to fully embroider the back of Tajima, and the receive data from Brother's editing system can be used. [NOTE) Brother format data cannot be used_ 5) By removing the table and using the cylinder bed, embroidery for shelf, marking light, memory expansion board...

Instruction Manual - English
Page 5
... (9) key board eat operation panel contrast dial of liquid crystal display speed dial carriages X and Y guard bar disk drive *Standard hoop and holder base *Optional accessories (sold separately) Embroidery hoop . . plastic square hoop (45 x 32) • Paper tape reader, accessory case, bobbin winder, cap frame device, boring attachment, plate for shelf, marking light...
... (9) key board eat operation panel contrast dial of liquid crystal display speed dial carriages X and Y guard bar disk drive *Standard hoop and holder base *Optional accessories (sold separately) Embroidery hoop . . plastic square hoop (45 x 32) • Paper tape reader, accessory case, bobbin winder, cap frame device, boring attachment, plate for shelf, marking light...

Instruction Manual - English
Page 16
...mark is to holder base 2. Preparation of keys on operation panel 4. Sewing (function selection) mode 2 Sewing 3. Attaching embroidery hoop to be done by changing dip switch. 1. Rotation 2 Mirror image 3. Needle bar setting mode 5. Names and functions of machine... Floppy data entry Paper tape data entry Brother editing system data entry 1. CHAPTER 2 Sewing procedures I Preparation II Entry III Editing IV Sewing 1. Hoop feed mode 7. Suspension 4. Needle bar selecting mode 6. B.T. counter and thread breakage sensor...
...mark is to holder base 2. Preparation of keys on operation panel 4. Sewing (function selection) mode 2 Sewing 3. Attaching embroidery hoop to be done by changing dip switch. 1. Rotation 2 Mirror image 3. Needle bar setting mode 5. Names and functions of machine... Floppy data entry Paper tape data entry Brother editing system data entry 1. CHAPTER 2 Sewing procedures I Preparation II Entry III Editing IV Sewing 1. Hoop feed mode 7. Suspension 4. Needle bar selecting mode 6. B.T. counter and thread breakage sensor...
Instruction Manual - English
Page 17
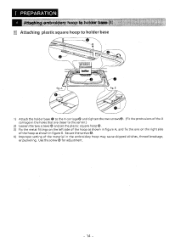
Secure the screws 0. 4) Improper setting of the material in the embroidery hoop may cause skipped stitches, thread breakage, or puckering. A fig. B 1) Attach the holder base 0 to the X carriage@ and tighten the two screws©. (Fit the protrusions ... base [ uuuuuuuuu bother fig. Use the screw @ for adjustment. - 14 - I PREPARATION [1] Attaching plastic square hoop to the center.) 2) Loosen the two screws 0 and set the plastic square hoop 0. 3) Fix the metal fittings on the left side of the hoop as shown in figure A, and fix the one on the right side of the...
Secure the screws 0. 4) Improper setting of the material in the embroidery hoop may cause skipped stitches, thread breakage, or puckering. A fig. B 1) Attach the holder base 0 to the X carriage@ and tighten the two screws©. (Fit the protrusions ... base [ uuuuuuuuu bother fig. Use the screw @ for adjustment. - 14 - I PREPARATION [1] Attaching plastic square hoop to the center.) 2) Loosen the two screws 0 and set the plastic square hoop 0. 3) Fix the metal fittings on the left side of the hoop as shown in figure A, and fix the one on the right side of the...

Instruction Manual - English
Page 18
...of the embroidery machine. 11111101111A a5 fig. Use the screw 0 for adjustment. - 15 - ❑2 Attaching tubular square hoop to the center.) 2) Attach the metal fittings of the tubular square hoop O as shown in figure A. (Fit the protrusions (5 of the X carriage in the holes that are closer to ...holder base [NOTE] Before using the tubular square hoop and the holder base, remove table (C) of the material in figures B and C. C 1) Attach the tubular square frame eeto the X carriage Owith ...
...of the embroidery machine. 11111101111A a5 fig. Use the screw 0 for adjustment. - 15 - ❑2 Attaching tubular square hoop to the center.) 2) Attach the metal fittings of the tubular square hoop O as shown in figure A. (Fit the protrusions (5 of the X carriage in the holes that are closer to ...holder base [NOTE] Before using the tubular square hoop and the holder base, remove table (C) of the material in figures B and C. C 1) Attach the tubular square frame eeto the X carriage Owith ...

Instruction Manual - English
Page 20
EMERGENCY OFR E POWER ;WI!) THREAD THREAD SENSOR TRIMMING HOOP FEED [WW1' itiFFNFi NEEDLE SET NSEEELEDCLTE) V!. 7 END f °EDI: brother BAB-4415 '7UP CLEAR it Ai lit BACK FORWARD V O4 40 - 17 -
EMERGENCY OFR E POWER ;WI!) THREAD THREAD SENSOR TRIMMING HOOP FEED [WW1' itiFFNFi NEEDLE SET NSEEELEDCLTE) V!. 7 END f °EDI: brother BAB-4415 '7UP CLEAR it Ai lit BACK FORWARD V O4 40 - 17 -

Instruction Manual - English
Page 21
... the data stored in just the state it was in last embroidered. • Restart in selecting number.) • Enter current needle location as hoop feed point and to start point. Functions of keys on operation panel START Use this key to; • Enter data entry mode (from floppy...entry, paper tape data entry or END editing system data entry. • Exit from the editing menu (after the carriage moved to set value in hoop feed mode. • Change current counter number to sewing start automatic sewing. r7 " • Decide automatic stop in setting needle bar or not....
... the data stored in just the state it was in last embroidered. • Restart in selecting number.) • Enter current needle location as hoop feed point and to start point. Functions of keys on operation panel START Use this key to; • Enter data entry mode (from floppy...entry, paper tape data entry or END editing system data entry. • Exit from the editing menu (after the carriage moved to set value in hoop feed mode. • Change current counter number to sewing start automatic sewing. r7 " • Decide automatic stop in setting needle bar or not....

Instruction Manual - English
Page 22
... mode. (The numbers 1 to 9 are scrolled.) • Move needle location to the desired hoop feed point. • Feed hoop just after entering sewing mode. (This is invalid in sewing mode during suspension.) • Inch hoop to ; • Scroll file names registered in inching mode. . V Use this key to;... • Change the cursor position on the number in setting bobbin thread counter. • Move needle location to the desired hoop feed point. • Select the needle bar shift direction toward no.1 or no.9 in selecting needle bar. • Select color order in selecting ...
... mode. (The numbers 1 to 9 are scrolled.) • Move needle location to the desired hoop feed point. • Feed hoop just after entering sewing mode. (This is invalid in sewing mode during suspension.) • Inch hoop to ; • Scroll file names registered in inching mode. . V Use this key to;... • Change the cursor position on the number in setting bobbin thread counter. • Move needle location to the desired hoop feed point. • Select the needle bar shift direction toward no.1 or no.9 in selecting needle bar. • Select color order in selecting ...

Instruction Manual - English
Page 23
... mode. main menu mode, floppy data entry mode, paper tape data entry mode, editing system data entry mode, sewing mode after returning from hoop feed point in each mode (main menu mode, floppy disk data entry mode, paper tape data entry mode, editing system data entry mode) and entering ... key to set needle order after data input from floppy disk or editing system. • Check set values of sewing. - 20 - HOOP FEED Use this key to: • Enter hoop feed mode from each mode (main menu mode, floppy disk data entry mode, paper tape data entry mode, editing system data entry...
... mode. main menu mode, floppy data entry mode, paper tape data entry mode, editing system data entry mode, sewing mode after returning from hoop feed point in each mode (main menu mode, floppy disk data entry mode, paper tape data entry mode, editing system data entry mode) and entering ... key to set needle order after data input from floppy disk or editing system. • Check set values of sewing. - 20 - HOOP FEED Use this key to: • Enter hoop feed mode from each mode (main menu mode, floppy disk data entry mode, paper tape data entry mode, editing system data entry...

Instruction Manual - English
Page 24
EMERGENCY Use this key to; • Select registered data number and to switch hoop feed mode. * Mode changing can be done repeatedly. • Enter paper tape data reading mode in setting floppy data entry. • Enter editing system data ... tape data, this key to; • Clear the back-up memory when the power is displayed alternately. Use this key is invalid. • Decide automatic hoop feed after entering sewing mode. • Enter inching mode or jump mode in setting repeat sewing. * "V" (vertical direction) and "H" (horizontal direction) are alternately displayed. •...
EMERGENCY Use this key to; • Select registered data number and to switch hoop feed mode. * Mode changing can be done repeatedly. • Enter paper tape data reading mode in setting floppy data entry. • Enter editing system data ... tape data, this key to; • Clear the back-up memory when the power is displayed alternately. Use this key is invalid. • Decide automatic hoop feed after entering sewing mode. • Enter inching mode or jump mode in setting repeat sewing. * "V" (vertical direction) and "H" (horizontal direction) are alternately displayed. •...

Instruction Manual - English
Page 25
POWER THREAD THREAD SENSOR TRIMMING HOOP FEED START It4IONZ StOON/R NEEDLE NEEDLE SET SELECT YJ.: END 111 EDIT ')UP CLEAR A hj ENTER &A MS BACK FORWARD - 22 - Power lamp THREAD SENSOR ON/OFF indicator X itg Rartt://- ~'rile~ yeti = rpiOnfirtir:PAVITtilAP k. 144,4 re, LED lamp 1) Power lamp (green) This indicator is lit when the power is turned on. 2) THREAD SENSOR ON/OFF (red) This indicator is lit when the thread sensor operates.
POWER THREAD THREAD SENSOR TRIMMING HOOP FEED START It4IONZ StOON/R NEEDLE NEEDLE SET SELECT YJ.: END 111 EDIT ')UP CLEAR A hj ENTER &A MS BACK FORWARD - 22 - Power lamp THREAD SENSOR ON/OFF indicator X itg Rartt://- ~'rile~ yeti = rpiOnfirtir:PAVITtilAP k. 144,4 re, LED lamp 1) Power lamp (green) This indicator is lit when the power is turned on. 2) THREAD SENSOR ON/OFF (red) This indicator is lit when the thread sensor operates.
Instruction Manual - English
Page 28
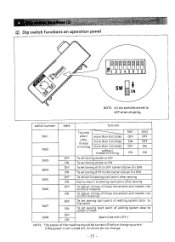
... OFF ON OFF ON OFF ON OFF ON OFF ON function To jump stitch after sewing To adjust timing of hoop movement and needle rise for thick material To adjust timing of hoop movement and needle rise for thin material To set sewing start point of editing system data to first stitch...
... OFF ON OFF ON OFF ON OFF ON OFF ON function To jump stitch after sewing To adjust timing of hoop movement and needle rise for thick material To adjust timing of hoop movement and needle rise for thin material To set sewing start point of editing system data to first stitch...
Instruction Manual - English
Page 29
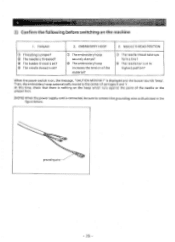
...; Threading is at its highest position? THREAD r 2. Q The bobbin thread is set ? 0 The embroidery hoop securely clamps? ® The embroidery hoop increases the tension of carriages X and Y. Then, the embroidery hoop automatically moves to connect the grounding wire as illustrated in the figure below. 4E> grounding wire - 26 -... The needle thread take-ups form a line? ® The needle bar is proper? At this time, check that there is nothing on the hoop which runs against the point of the needle or the presser foot. [NOTE] When the power supply cord is set ? ® The needle thread...
...; Threading is at its highest position? THREAD r 2. Q The bobbin thread is set ? 0 The embroidery hoop securely clamps? ® The embroidery hoop increases the tension of carriages X and Y. Then, the embroidery hoop automatically moves to connect the grounding wire as illustrated in the figure below. 4E> grounding wire - 26 -... The needle thread take-ups form a line? ® The needle bar is proper? At this time, check that there is nothing on the hoop which runs against the point of the needle or the presser foot. [NOTE] When the power supply cord is set ? ® The needle thread...
Instruction Manual - English
Page 33
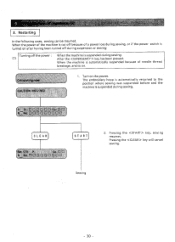
... key will cancel sewing. When the power of the machine is cut off because of needle thread breakage, and so on the power. The embroidery hoop is automatically returned to the position where sewing was suspended before and the machine is suspended during sewing. CLEAR START 2. s. Sewing - 30 - After the key...
... key will cancel sewing. When the power of the machine is cut off because of needle thread breakage, and so on the power. The embroidery hoop is automatically returned to the position where sewing was suspended before and the machine is suspended during sewing. CLEAR START 2. s. Sewing - 30 - After the key...

Instruction Manual - English
Page 36
...system data reading and sewing modes. modes. il MAIN MENU The main menu "i" is invalid in selecting registered data number (2) To move hoop To enter data entry mode from floppy disk, paper tape or editing system To enter sewing mode To enter editing mode To enter needle... bar selecting mode To enter thread sensor and bobbin ee, thread counter setting mode To switch following alternately (1) To select registered data number (2) To enter hoop feed mode . ' . ' b "e''`' To trim thread e•' • 'eq. "*" is displayed if registered. (max.16 "*"s) "J" is displayed in floppy ...
...system data reading and sewing modes. modes. il MAIN MENU The main menu "i" is invalid in selecting registered data number (2) To move hoop To enter data entry mode from floppy disk, paper tape or editing system To enter sewing mode To enter editing mode To enter needle... bar selecting mode To enter thread sensor and bobbin ee, thread counter setting mode To switch following alternately (1) To select registered data number (2) To enter hoop feed mode . ' . ' b "e''`' To trim thread e•' • 'eq. "*" is displayed if registered. (max.16 "*"s) "J" is displayed in floppy ...
Instruction Manual - English
Page 37
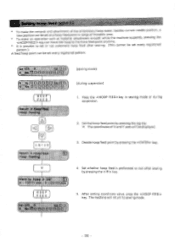
...8226; To make an operation such as a hoop feed point in sewing mode or during suspension) 1. After setting coordinate value, press the key. HOOP I FEED ) (sewing mode) (during suspension. (N) ENTER 2. f Hoop k FEED) 4. Set the hoop feed point by pressing the key. •... To make the removal and attachment of the embroidery hoop easier, besides current needle position, a new ...
...8226; To make an operation such as a hoop feed point in sewing mode or during suspension) 1. After setting coordinate value, press the key. HOOP I FEED ) (sewing mode) (during suspension. (N) ENTER 2. f Hoop k FEED) 4. Set the hoop feed point by pressing the key. •... To make the removal and attachment of the embroidery hoop easier, besides current needle position, a new ...


