

Programmer Instruction Manual - English
Page 2
Please follow the operational and safety instructions by the experts/instructors and use this "Programmer Instruction Manual" and the separate volume "Programmable Electronic Pattern Sewer Instruction Manual" carefully before using the machine. These parts may cause personal injuries. Programmer 1 Please read this machine correctly. Operation of this industrial sewing machine is usually carried out in front of moving parts such as the needle and the needle thread take-up. Thank you very much for purchasing the Brother Industrial Sewing Machine.
Please follow the operational and safety instructions by the experts/instructors and use this "Programmer Instruction Manual" and the separate volume "Programmable Electronic Pattern Sewer Instruction Manual" carefully before using the machine. These parts may cause personal injuries. Programmer 1 Please read this machine correctly. Operation of this industrial sewing machine is usually carried out in front of moving parts such as the needle and the needle thread take-up. Thank you very much for purchasing the Brother Industrial Sewing Machine.
Extended Option Output Instruction Manual - English
Page 6
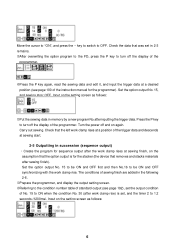
... sewing stop: OFF. The conditions of the instruction manual for sequence output after the work clamp rises at a desired position (see page 192), set in the following 2-6. •Prepare the programmer, and display the output setting screen. ,Referring to the condition number table of standard output (see page 100 of sewing ... key to ON when the condition No. 30 (after sewing finish). Carry out sewing. Turn the power off the display of No. 15 to turn off and on again. Press the P key to OFF. Check the data that removes and stacks materials after work clamp rise.
... sewing stop: OFF. The conditions of the instruction manual for sequence output after the work clamp rises at a desired position (see page 192), set in the following 2-6. •Prepare the programmer, and display the output setting screen. ,Referring to the condition number table of standard output (see page 100 of sewing ... key to ON when the condition No. 30 (after sewing finish). Carry out sewing. Turn the power off the display of No. 15 to turn off and on again. Press the P key to OFF. Check the data that removes and stacks materials after work clamp rise.
Instruction Manual - English
Page 2
... in front of moving parts such as the needle and thread take-up lever, and consequently there is always a danger of . Before using the machine or physical damage to carry out work while positioned directly in the instruction manual. CAUTION The instructions which follow this term indicate situations where failure to follow the instructions could cause injury when using your new machine, please read the safety...
... in front of moving parts such as the needle and thread take-up lever, and consequently there is always a danger of . Before using the machine or physical damage to carry out work while positioned directly in the instruction manual. CAUTION The instructions which follow this term indicate situations where failure to follow the instructions could cause injury when using your new machine, please read the safety...
Instruction Manual - English
Page 3
...;C during use . Use the arm motor cover with correct operation. Furthermore, do not excessively bend the cords or secure them too firmly with correct operation. Any fluctuations in any electrical work table which is free from sources of strong electrical noise may cause problems with correct operation. Avoid exposure to direct sunlight may cause problems with correct operation. The installation should be done. BAS-364E, 366E, 370E, 375E ii...
...;C during use . Use the arm motor cover with correct operation. Furthermore, do not excessively bend the cords or secure them too firmly with correct operation. Any fluctuations in any electrical work table which is free from sources of strong electrical noise may cause problems with correct operation. Avoid exposure to direct sunlight may cause problems with correct operation. The installation should be done. BAS-364E, 366E, 370E, 375E ii...
Instruction Manual - English
Page 4
... Brother dealer or a qualified electrician to carry out any applications other than sewing. Ask your skin, otherwise inflammation can cause vomiting and diarrhoea. Use only the proper replacement parts as they can result. Any problems in machine operation which could result in injury. Cleaning Set the needle to the needle up stop position before carrying out cleaning, otherwise the machine may operate if the foot switch is used...
... Brother dealer or a qualified electrician to carry out any applications other than sewing. Ask your skin, otherwise inflammation can cause vomiting and diarrhoea. Use only the proper replacement parts as they can result. Any problems in machine operation which could result in injury. Cleaning Set the needle to the needle up stop position before carrying out cleaning, otherwise the machine may operate if the foot switch is used...
Instruction Manual - English
Page 6
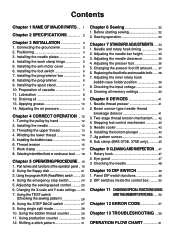
... needle plates 4 4. Installing the foot switch 6 7. Installing the programmer 6 9. Applying grease 10 14. Shifting a stitch pattern 31 Chapter 6 Sewing 32 1. Adjusting the needle clearance 35 4. Changing the presser foot lift amount ...... 37 6. Clearing all memory settings 40 Chapter 8 DEVICES 41 1. Two-stage thread tension mechanism ..... 42 4. Sub clamp (BAS-370E, 375E only 45 Chapter 9 CLEANING AND INSPECTION ... 47 1. Draining oil 9 13. Installing the needle 12 3. Using the program R/W (Read/Write) switch ........ 23 4. Adjusting the sewing speed control...
... needle plates 4 4. Installing the foot switch 6 7. Installing the programmer 6 9. Applying grease 10 14. Shifting a stitch pattern 31 Chapter 6 Sewing 32 1. Adjusting the needle clearance 35 4. Changing the presser foot lift amount ...... 37 6. Clearing all memory settings 40 Chapter 8 DEVICES 41 1. Two-stage thread tension mechanism ..... 42 4. Sub clamp (BAS-370E, 375E only 45 Chapter 9 CLEANING AND INSPECTION ... 47 1. Draining oil 9 13. Installing the needle 12 3. Using the program R/W (Read/Write) switch ........ 23 4. Adjusting the sewing speed control...
Instruction Manual - English
Page 8
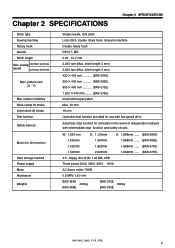
... mm BAS-370E) 1,200 ✕ 400 mm ........ (BAS-375E) 20,000 stitches per pattern Max. 50 mm 16 mm Operation test function provided for use with low speed drive Automatic stop function for activation in the event of stitches Work clamp lift stroke Intermittent lift stroke Test function Safety devices Machine dimensions Data storage method Power supply Motor Air pressure Weights Single needle, lock stitch Lock stitch, double rotary hook, long arm machine Double rotary hook DP...
... mm BAS-370E) 1,200 ✕ 400 mm ........ (BAS-375E) 20,000 stitches per pattern Max. 50 mm 16 mm Operation test function provided for use with low speed drive Automatic stop function for activation in the event of stitches Work clamp lift stroke Intermittent lift stroke Test function Safety devices Machine dimensions Data storage method Power supply Motor Air pressure Weights Single needle, lock stitch Lock stitch, double rotary hook, long arm machine Double rotary hook DP...
Instruction Manual - English
Page 18
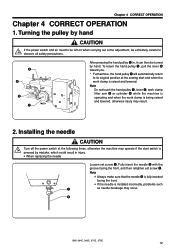
... pulley q, lever w, work clamp lifter arm e or cylinder r while the machine is operating and when the work clamp is installed incorrectly, problems such q as needle breakage may occur. G If the needle is raised and lowered. Fully insert the needle w with the groove facing the front, and then retighten set screw q. w BAS-364E, 366E, 370E, 375E 12 G When replacing the needle Loosen set screw q. Chapter 4 CORRECT OPERATION Chapter 4 CORRECT OPERATION 1. Installing the needle CAUTION Turn off the power switch...
... pulley q, lever w, work clamp lifter arm e or cylinder r while the machine is operating and when the work clamp is installed incorrectly, problems such q as needle breakage may occur. G If the needle is raised and lowered. Fully insert the needle w with the groove facing the front, and then retighten set screw q. w BAS-364E, 366E, 370E, 375E 12 G When replacing the needle Loosen set screw q. Chapter 4 CORRECT OPERATION Chapter 4 CORRECT OPERATION 1. Installing the needle CAUTION Turn off the power switch...

Instruction Manual - English
Page 20
... sewing machine starts. 5. The bobbin holder q will light. 4. Release the start the sewing machine. Remove the bobbin, and pull the bobbin in the direction of the BAS-364E and 366E, there is no lower thread guide u), wind the thread around the bobbin several time in personal injury or damage to capacity (approximately 80 - 90 % of the bobbin diameter). 6. 4. Press and hold the STEP BACK switch e on the operation panel will automatically return when the bobbin...
... sewing machine starts. 5. The bobbin holder q will light. 4. Release the start the sewing machine. Remove the bobbin, and pull the bobbin in the direction of the BAS-364E and 366E, there is no lower thread guide u), wind the thread around the bobbin several time in personal injury or damage to capacity (approximately 80 - 90 % of the bobbin diameter). 6. 4. Press and hold the STEP BACK switch e on the operation panel will automatically return when the bobbin...
Instruction Manual - English
Page 21
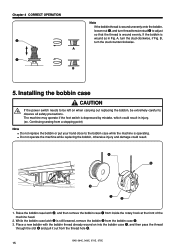
..., 375E 15 If the bobbin is wound as in injury. (ex. B, turn thread tension stud w to adjust so that the thread is wound evenly. Raise the bobbin case latch w, and then remove the bobbin case q from the bobbin case q. 3. Place a new bobbin with the bobbin thread already wound on when carrying out replacing the bobbin, be extremely careful to the bobbin case while the machine is operating. Installing the bobbin case CAUTION If the power switch needs to...
..., 375E 15 If the bobbin is wound as in injury. (ex. B, turn thread tension stud w to adjust so that the thread is wound evenly. Raise the bobbin case latch w, and then remove the bobbin case q from the bobbin case q. 3. Place a new bobbin with the bobbin thread already wound on when carrying out replacing the bobbin, be extremely careful to the bobbin case while the machine is operating. Installing the bobbin case CAUTION If the power switch needs to...
Instruction Manual - English
Page 26
Using the bobbin thread counter".) !5 TEST switch Used to move the feed mechanism only in the bobbin thread counter to floppy disk. !4 Bobbin Thread CHANGE Used to a broken needle thread. BAS-364E, 366E, 370E, 375E 20 indicator Illuminates when split No. Used to store the number of work pieces displayed in order to confirm a programmed stitch pattern. !6 TEST indicator Lights when the TEST switch is not possible when the counter reads .) (Refer...
Using the bobbin thread counter".) !5 TEST switch Used to move the feed mechanism only in the bobbin thread counter to floppy disk. !4 Bobbin Thread CHANGE Used to a broken needle thread. BAS-364E, 366E, 370E, 375E 20 indicator Illuminates when split No. Used to store the number of work pieces displayed in order to confirm a programmed stitch pattern. !6 TEST indicator Lights when the TEST switch is not possible when the counter reads .) (Refer...
Instruction Manual - English
Page 47
... 12345678 BAS-364E, 366E, 370E, 375E 41 G When A-8 is lowered for the first stitch at the sewing start, and releases the needle thread when the needle comes out of the specifications include optional devices as standard equipment. 1. Note Always be set to turn off the power when changing the DIP switch settings. G The needle thread presser presses the needle thread when the needle is ON, the thread breakage detection mechanism operates. Chapter 8 DEVICES...
... 12345678 BAS-364E, 366E, 370E, 375E 41 G When A-8 is lowered for the first stitch at the sewing start, and releases the needle thread when the needle comes out of the specifications include optional devices as standard equipment. 1. Note Always be set to turn off the power when changing the DIP switch settings. G The needle thread presser presses the needle thread when the needle is ON, the thread breakage detection mechanism operates. Chapter 8 DEVICES...

Instruction Manual - English
Page 48
... pattern due to operate or not operate by means of the material being sewn changes when sewing one pattern, an intermittent presser foot height can be selected without interrupting sewing. Two-stage thread tension mechanism G Use the programmer to program the intermittent presser foot height. G The height of the thread tension in the material. Stepping foot control mechanism BAS-364E, 366E, 370E, 375E 42 G Use the programmer to program the different needle thread tensions...
... pattern due to operate or not operate by means of the material being sewn changes when sewing one pattern, an intermittent presser foot height can be selected without interrupting sewing. Two-stage thread tension mechanism G Use the programmer to program the intermittent presser foot height. G The height of the thread tension in the material. Stepping foot control mechanism BAS-364E, 366E, 370E, 375E 42 G Use the programmer to program the different needle thread tensions...
Instruction Manual - English
Page 49
... switch B-4 is removed. Remove screws q, and remove optional needle plate w. 2. Turn the pulley to lower the needle to turn the power off before changing the DIP switch setting. Secure the provided needle plate t with screws r. 3. BAS-364E, 366E, 370E, 375E 43 Temporarily install bottom plunger e with screws q. Hold up the bottom plunger e manually and adjust its position at the same time that sewing starts, and stops when sewing stops. A The needle cooler operation is controlled by means the...
... switch B-4 is removed. Remove screws q, and remove optional needle plate w. 2. Turn the pulley to lower the needle to turn the power off before changing the DIP switch setting. Secure the provided needle plate t with screws r. 3. BAS-364E, 366E, 370E, 375E 43 Temporarily install bottom plunger e with screws q. Hold up the bottom plunger e manually and adjust its position at the same time that sewing starts, and stops when sewing stops. A The needle cooler operation is controlled by means the...
Instruction Manual - English
Page 63
... the power and check. ratio. No end code in severe injury. Input an end code, or change the program number. inside the operation panel. Floppy disk is possible. Replace the floppy disk and repeat the operation. Upper thread has broken. Jig pattern sensor error. Press the emergency stop position error. Z motor or Z servo amp trouble. Check the synchronizer connection. Check the enlargement or reduction ratio setting. Can...
... the power and check. ratio. No end code in severe injury. Input an end code, or change the program number. inside the operation panel. Floppy disk is possible. Replace the floppy disk and repeat the operation. Upper thread has broken. Jig pattern sensor error. Press the emergency stop position error. Z motor or Z servo amp trouble. Check the synchronizer connection. Check the enlargement or reduction ratio setting. Can...
Instruction Manual - English
Page 65
... "Threading the upper thread". G Are the tension and stroke of the thread take -up spring correct? / Adjust the tension and height of adjustments Problem Check and remedy Presser foot does not rise. G Are the rotary hook, needle plate hole or needle damaged or burred? / Grind the parts to make them smooth or replace them . G Is the needle installed incorrectly? / Install the needle correctly, while re- Chapter 13 TROUBLESHOOTING Chapter 13 TROUBLESHOOTING List of the thread take -up spring while...
... "Threading the upper thread". G Are the tension and stroke of the thread take -up spring correct? / Adjust the tension and height of adjustments Problem Check and remedy Presser foot does not rise. G Are the rotary hook, needle plate hole or needle damaged or burred? / Grind the parts to make them smooth or replace them . G Is the needle installed incorrectly? / Install the needle correctly, while re- Chapter 13 TROUBLESHOOTING Chapter 13 TROUBLESHOOTING List of the thread take -up spring while...
Instruction Manual - English
Page 66
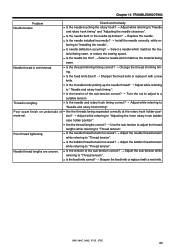
... fixed knife or replace it with a new knife. Needle thread lengths are uneven. BAS-364E, 366E, 370E, 375E 60 G Is the needle too thin? / Select a needle which matches the ma- material. lengths while referring to "Thread tension". G Is needle deflection occurring? / Select a needle which matches the material being sewn. Needle thread is tangling. G Is the tension of G Are the threads being sewn, or reduce the sewing speed. Chapter 13 TROUBLESHOOTING Problem Needle breaks. G Is the needle installed...
... fixed knife or replace it with a new knife. Needle thread lengths are uneven. BAS-364E, 366E, 370E, 375E 60 G Is the needle too thin? / Select a needle which matches the ma- material. lengths while referring to "Thread tension". G Is needle deflection occurring? / Select a needle which matches the material being sewn. Needle thread is tangling. G Is the tension of G Are the threads being sewn, or reduce the sewing speed. Chapter 13 TROUBLESHOOTING Problem Needle breaks. G Is the needle installed...
Instruction Manual - English
Page 67
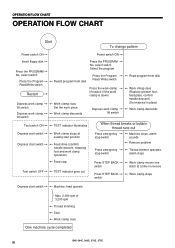
... (Replace presser foot, feed plate, confirm needle descent) (Set material in place) Work clamp descends TEST indicator illuminates Work clamp stops at sewing start position Feed drive (confirm needle descent, stepping foot and work clamp lift switch Test switch ON Depress start switch Depress start switch Machine, feed operate Max. 2,000 rpm or 3,200 rpm Thread trimming Stop Work clamp rises One machine cycle completed BAS-364E, 366E, 370E, 375E 61 OPERATION FLOW CHART OPERATION FLOW CHART Start To change pattern Power switch ON Power switch ON Insert...
... (Replace presser foot, feed plate, confirm needle descent) (Set material in place) Work clamp descends TEST indicator illuminates Work clamp stops at sewing start position Feed drive (confirm needle descent, stepping foot and work clamp lift switch Test switch ON Depress start switch Depress start switch Machine, feed operate Max. 2,000 rpm or 3,200 rpm Thread trimming Stop Work clamp rises One machine cycle completed BAS-364E, 366E, 370E, 375E 61 OPERATION FLOW CHART OPERATION FLOW CHART Start To change pattern Power switch ON Power switch ON Insert...
Parts Manual - English
Page 13
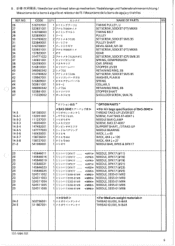
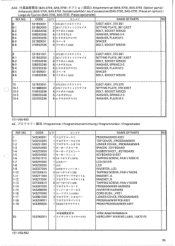
... 524593001 1 / *- * Ai V 7 CAP, SPRING 39 516810001 1 i, VIC- [..I - 7'%U--f THREAD GUIDE, N-BAR 24-3 511867001 1 i\litr)-1 1-7.›.)- -f THREAD GUIDE, N-BAR 151-V64-101 6 I- /4 * 55.95 SET SCREW, SOCKET SM5.95 42 159947001 1 7 PY 7 l l •-•1')1* WASHER, PLAIN 8 43 516809001 1 tit=.-77 /7=t./ /. 1 / -' L 1 / Z (✓ T•4X4 1 / Z L .I.4x4 1 /\ U :V r') " OPTION PARTS " THREAD TAKE-UP LEVER SET SCREW, FLAT SM3.57-40X7 L NEEDLE BAR CLAMP SCREW, SM3.57-40X7 SUPPORT SHAFT, ;T/TAKE-UP NEEDLE BEARING WICK, L = 40 WICK...
... 524593001 1 / *- * Ai V 7 CAP, SPRING 39 516810001 1 i, VIC- [..I - 7'%U--f THREAD GUIDE, N-BAR 24-3 511867001 1 i\litr)-1 1-7.›.)- -f THREAD GUIDE, N-BAR 151-V64-101 6 I- /4 * 55.95 SET SCREW, SOCKET SM5.95 42 159947001 1 7 PY 7 l l •-•1')1* WASHER, PLAIN 8 43 516809001 1 tit=.-77 /7=t./ /. 1 / -' L 1 / Z (✓ T•4X4 1 / Z L .I.4x4 1 /\ U :V r') " OPTION PARTS " THREAD TAKE-UP LEVER SET SCREW, FLAT SM3.57-40X7 L NEEDLE BAR CLAMP SCREW, SM3.57-40X7 SUPPORT SHAFT, ;T/TAKE-UP NEEDLE BEARING WICK, L = 40 WICK...
Parts Manual - English
Page 93
...if t *2-5 WASHER, SPRING 2-5 9-4 025050236 8 L -5if t ..ts. ..2- 0)5 WASHER, PLAIN M 5 9-5 531909001 8 Ai\ - -y- CODE Q'TY E ›.) 4 -f NAME OF PARTS RM 8 531950001 1 370-361-f ':;.1/ F/ Z.. EJECT ASSY, 375-370 10-1 S31886000 2 370-f :7I/ F F V V ir -f / SETTING PLATE, 370 EJECT 10-2 ...SETTING PLATE, 361 EJECT 9-2 018502036 8 77 )- AD2 .11M (BAS-370E, BAS-375E : a >AaEl) /Attachment set (BAS-370E, BAS-375E :Option parts) / Anbausatz (BAS-370E, BAS-375E :Sonderzubehor) / Jeu d'accessoires (BAS-370E, BAS-375E :Pieces en option) / Jue o de fi aci6n (BAS-370E, BAS-375E...
...if t *2-5 WASHER, SPRING 2-5 9-4 025050236 8 L -5if t ..ts. ..2- 0)5 WASHER, PLAIN M 5 9-5 531909001 8 Ai\ - -y- CODE Q'TY E ›.) 4 -f NAME OF PARTS RM 8 531950001 1 370-361-f ':;.1/ F/ Z.. EJECT ASSY, 375-370 10-1 S31886000 2 370-f :7I/ F F V V ir -f / SETTING PLATE, 370 EJECT 10-2 ...SETTING PLATE, 361 EJECT 9-2 018502036 8 77 )- AD2 .11M (BAS-370E, BAS-375E : a >AaEl) /Attachment set (BAS-370E, BAS-375E :Option parts) / Anbausatz (BAS-370E, BAS-375E :Sonderzubehor) / Jeu d'accessoires (BAS-370E, BAS-375E :Pieces en option) / Jue o de fi aci6n (BAS-370E, BAS-375E...


