

Instruction Manual - English
Page 2
... to carry out work while positioned directly in the instruction manual. With industrial sewing machines, it correctly. BAS-300G, BAS-311G, BAS-326G Before using your new machine, please read the safety instructions below and the explanations given in front of ...moving parts such as the needle and thread take-up lever, and consequently there is normal to use it is always a danger of injury that you very much for buying a BROTHER sewing machine...
... to carry out work while positioned directly in the instruction manual. With industrial sewing machines, it correctly. BAS-300G, BAS-311G, BAS-326G Before using your new machine, please read the safety instructions below and the explanations given in front of ...moving parts such as the needle and thread take-up lever, and consequently there is normal to use it is always a danger of injury that you very much for buying a BROTHER sewing machine...

Instruction Manual - English
Page 4
...using a work that they cannot move. If the oil and grease get into your eyes or onto your Brother dealer or a qualified electrician for the sewing machine's total air consumption. They may become unbalanced and fall down, and serious injury or damage to its original... cord until installation is depressed by mistake, the sewing machine might start operating and injury could occur. Touching areas where high voltages are lower or higher than the requirements for the machine. ii BAS-300G, BAS-311G, BAS-326G Voltage fluctuations which are present can result. Install the...
...using a work that they cannot move. If the oil and grease get into your eyes or onto your Brother dealer or a qualified electrician for the sewing machine's total air consumption. They may become unbalanced and fall down, and serious injury or damage to its original... cord until installation is depressed by mistake, the sewing machine might start operating and injury could occur. Touching areas where high voltages are lower or higher than the requirements for the machine. ii BAS-300G, BAS-311G, BAS-326G Voltage fluctuations which are present can result. Install the...

Instruction Manual - English
Page 5
...removed, be absolutely sure to re-install them to the machine. If the machine develops a problem, contact your nearest Brother dealer or a qualified technician. The sewing machine should only be used by mistake, the sewing machine might start operating and injury could result. • Inspection... If the foot switch is the danger that they cannot move. BAS-300G, BAS-311G, BAS-326G iii Furthermore, do not modify the machine yourself. They may result. CAUTION Sewing This sewing machine should not be used for any safety devices have received the necessary...
...removed, be absolutely sure to re-install them to the machine. If the machine develops a problem, contact your nearest Brother dealer or a qualified technician. The sewing machine should only be used by mistake, the sewing machine might start operating and injury could result. • Inspection... If the foot switch is the danger that they cannot move. BAS-300G, BAS-311G, BAS-326G iii Furthermore, do not modify the machine yourself. They may result. CAUTION Sewing This sewing machine should not be used for any safety devices have received the necessary...

Instruction Manual - English
Page 6
Please follow the instructions on the sewing machine. [3] Warning labels The following warning labels appear on the labels at all times when using the machine. If the labels have been removed or are difficult to read, please contact your nearest Brother dealer. 1 2 . *Safety devices ...machine head and returning it to its original position. 4 Be sure to connect the ground. If the ground connection is not secure, you run a high risk of receiving a serious electric shock, and problems with correct operation may also occur. 5 Direction of operation iv BAS-300G, BAS-311G, BAS-326G...
Please follow the instructions on the sewing machine. [3] Warning labels The following warning labels appear on the labels at all times when using the machine. If the labels have been removed or are difficult to read, please contact your nearest Brother dealer. 1 2 . *Safety devices ...machine head and returning it to its original position. 4 Be sure to connect the ground. If the ground connection is not secure, you run a high risk of receiving a serious electric shock, and problems with correct operation may also occur. 5 Direction of operation iv BAS-300G, BAS-311G, BAS-326G...

Instruction Manual - English
Page 8
... of advanced functions 33 6-2. Using the production counter 37 6-6. USING CF CARDS 47 7-1. Writing all sewing data from the CF card at once 50 BAS-300G, BAS-311G, BAS-326G CONTENTS 1. Table processing diagram 4 3-2. Installing the oil pan 5 3-4. Installing the machine head 6 3-5. Threading the upper thread 20 4-3. List of memory switch settings 35 6-4. Using cycle programs...
... of advanced functions 33 6-2. Using the production counter 37 6-6. USING CF CARDS 47 7-1. Writing all sewing data from the CF card at once 50 BAS-300G, BAS-311G, BAS-326G CONTENTS 1. Table processing diagram 4 3-2. Installing the oil pan 5 3-4. Installing the machine head 6 3-5. Threading the upper thread 20 4-3. List of memory switch settings 35 6-4. Using cycle programs...
Instruction Manual - English
Page 11
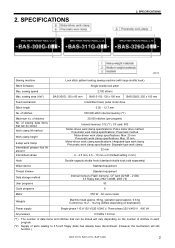
.... of stitches 500,000-stitch internal memory (*1) Maximum no. SPECIFICATIONS 2. sewing area (XxY) BAS-300G: 130 x 60 mm BAS-311G: 130 x 100 mm BAS-326G: 220 x 100 mm Feed mechanism Intermittent feed, pulse motor drive Stitch length 0.05 − 12.7 mm No. of stitches No. 2. SPECIFICATIONS 2997B Sewing machine Lock stitch pattern tacking sewing machine (with large shuttle hook) Stitch...
.... of stitches 500,000-stitch internal memory (*1) Maximum no. SPECIFICATIONS 2. sewing area (XxY) BAS-300G: 130 x 60 mm BAS-311G: 130 x 100 mm BAS-326G: 220 x 100 mm Feed mechanism Intermittent feed, pulse motor drive Stitch length 0.05 − 12.7 mm No. of stitches No. 2. SPECIFICATIONS 2997B Sewing machine Lock stitch pattern tacking sewing machine (with large shuttle hook) Stitch...

Instruction Manual - English
Page 12
... occur. Contact your Brother dealer or a qualified electrician for any moving parts. Furthermore, do not apply excessive force when tilting back the machine head. Install the safety covers to connect the ground. The sewing machine head weighs approximately 88kg. Be sure to the machine head and motor. 3 BAS-300G, BAS-311G, BAS-326G INSTALLATION CAUTION Machine installation should be done...
... occur. Contact your Brother dealer or a qualified electrician for any moving parts. Furthermore, do not apply excessive force when tilting back the machine head. Install the safety covers to connect the ground. The sewing machine head weighs approximately 88kg. Be sure to the machine head and motor. 3 BAS-300G, BAS-311G, BAS-326G INSTALLATION CAUTION Machine installation should be done...

Instruction Manual - English
Page 13
...box. 3000B (Reference position) 3003B BAS-300G, BAS-311G, BAS-326G 4 Refer to the diagram above diagram. INSTALLATION 3-1. If the control box and the leg are too close together, it should be moved to the left (B = 261mm). • Check that the control box is in incorrect sewing machine operation. 3. Table processing diagram ...• The thickness of the table should be strong enough to bear the weight and vibration of the sewing machine. • If the distance A between the insides of the legs is less than 740 mm, move the control box installation ...
...box. 3000B (Reference position) 3003B BAS-300G, BAS-311G, BAS-326G 4 Refer to the diagram above diagram. INSTALLATION 3-1. If the control box and the leg are too close together, it should be moved to the left (B = 261mm). • Check that the control box is in incorrect sewing machine operation. 3. Table processing diagram ...• The thickness of the table should be strong enough to bear the weight and vibration of the sewing machine. • If the distance A between the insides of the legs is less than 740 mm, move the control box installation ...
Instruction Manual - English
Page 16
... plate. 3. NOTE: Install the auxiliary plate (10) so that it should tilt back the machine head, and it is lower than the needle plate, the feed plate may get caught on ...BAS-300G, BAS-311G, BAS-326G INSTALLATION Needle plate 2698B (10) Auxiliary plate (11) Bolts with washer [4 pcs.] Loosen the four bolts with washer (12), and adjust so that the auxiliary plate (10) is 0 to the right when looking from the front of the sewing machine... (the direction of the arrow in the illustration), and then gently tilt back the machine head.
... plate. 3. NOTE: Install the auxiliary plate (10) so that it should tilt back the machine head, and it is lower than the needle plate, the feed plate may get caught on ...BAS-300G, BAS-311G, BAS-326G INSTALLATION Needle plate 2698B (10) Auxiliary plate (11) Bolts with washer [4 pcs.] Loosen the four bolts with washer (12), and adjust so that the auxiliary plate (10) is 0 to the right when looking from the front of the sewing machine... (the direction of the arrow in the illustration), and then gently tilt back the machine head.

Instruction Manual - English
Page 18
... (31) and the accessory M3x16 screw (33). • Check that the machine head switch (32) is turned on , errors "E050", "E051" and "E055" will go in the direction of the arrow in figure 1. Tilting the sewing machine head CAUTION 2970B 4919Q 1. Move the work clamp arm (1) as far as...work clamp arm (1) is not turned on as it may damage the outer cover L (2). 9 BAS-300G, BAS-311G, BAS-326G 3. INSTALLATION Figure 1 Oil pan 2365B • Gently return the machine head to tilt back the machine head while the work clamp arm (1) all the way to the right when looking from the ...
... (31) and the accessory M3x16 screw (33). • Check that the machine head switch (32) is turned on , errors "E050", "E051" and "E055" will go in the direction of the arrow in figure 1. Tilting the sewing machine head CAUTION 2970B 4919Q 1. Move the work clamp arm (1) as far as...work clamp arm (1) is not turned on as it may damage the outer cover L (2). 9 BAS-300G, BAS-311G, BAS-326G 3. INSTALLATION Figure 1 Oil pan 2365B • Gently return the machine head to tilt back the machine head while the work clamp arm (1) all the way to the right when looking from the ...
Instruction Manual - English
Page 20
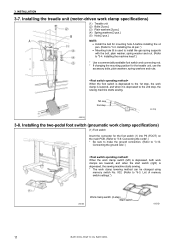
...ground wire".) When the work clamp switch (left) is depressed, both work clamps are lowered, and when the start switch (right) is depressed, the sewing machine starts sewing. * The work clamp specifications) (1) Treadle unit (2) Bolts [3 pcs.] (3) Plain washers [3 pcs.] (4) Spring washers [3 pcs.] (5) Nuts [3 ... hole B is depressed to "3-3. 3. List of memory switch settings.") 2972B Work clamp switch (2-step) Start switch 4923Q 11 BAS-300G, BAS-311G, BAS-326G When the foot switch is depressed to the 1st step, the work clamp specifications) (1) Foot switch Insert the connector for the...
...ground wire".) When the work clamp switch (left) is depressed, both work clamps are lowered, and when the start switch (right) is depressed, the sewing machine starts sewing. * The work clamp specifications) (1) Treadle unit (2) Bolts [3 pcs.] (3) Plain washers [3 pcs.] (4) Spring washers [3 pcs.] (5) Nuts [3 ... hole B is depressed to "3-3. 3. List of memory switch settings.") 2972B Work clamp switch (2-step) Start switch 4923Q 11 BAS-300G, BAS-311G, BAS-326G When the foot switch is depressed to the 1st step, the work clamp specifications) (1) Foot switch Insert the connector for the...
Instruction Manual - English
Page 26
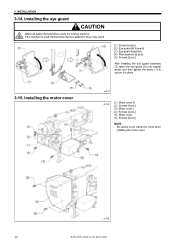
... pcs.] (3) Motor cover L (4) Screws [4 pcs.] (5) Motor cover (6) Screws [4 pcs.] NOTE: Be careful not to secure it in place 3-15. INSTALLATION 3-14. If the machine is used without these devices attached, injury may result. (1) Screw (loosen) (2) Eye guard (tilt forward) (3) Eye guard assembly (4) Plain washers [2 pcs.] (5) Screws [2 pcs.]...(2) to its original angle, and then tighten the screw (1) to clamp the cords when installing the motor cover. 2976B 17 BAS-300G, BAS-311G, BAS-326G 3. Installing the eye guard CAUTION Attach all safety devices before using the sewing machine.
... pcs.] (3) Motor cover L (4) Screws [4 pcs.] (5) Motor cover (6) Screws [4 pcs.] NOTE: Be careful not to secure it in place 3-15. INSTALLATION 3-14. If the machine is used without these devices attached, injury may result. (1) Screw (loosen) (2) Eye guard (tilt forward) (3) Eye guard assembly (4) Plain washers [2 pcs.] (5) Screws [2 pcs.]...(2) to its original angle, and then tighten the screw (1) to clamp the cords when installing the motor cover. 2976B 17 BAS-300G, BAS-311G, BAS-326G 3. Installing the eye guard CAUTION Attach all safety devices before using the sewing machine.
Instruction Manual - English
Page 27
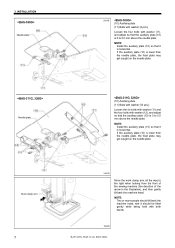
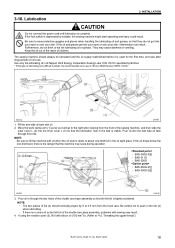
... sewing may cause diarrhea or vomiting. INSTALLATION 3-16. Threading the upper thread".) BAS-300G, BAS-311G, BAS-326G 18 3. Furthermore, do not get into the inner cover L (3) so that the machine may seize during operation. ・ BAS-300G-03[] ・ BAS-311G ・ BAS-326G ・ BAS-300G-01[] ・ BAS-300G-02[] 1845B 4940Q 3. Use only the lubricating oil specified by Brother...
... sewing may cause diarrhea or vomiting. INSTALLATION 3-16. Threading the upper thread".) BAS-300G, BAS-311G, BAS-326G 18 3. Furthermore, do not get into the inner cover L (3) so that the machine may seize during operation. ・ BAS-300G-03[] ・ BAS-311G ・ BAS-326G ・ BAS-300G-01[] ・ BAS-300G-02[] 1845B 4940Q 3. Use only the lubricating oil specified by Brother...
Instruction Manual - English
Page 28
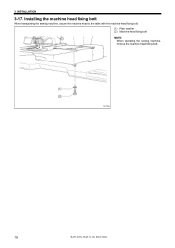
INSTALLATION 3-17. Installing the machine head fixing bolt When transporting the sewing machine, secure the machine head to the table with the machine head fixing bolt. (1) Plain washer (2) Machine head fixing bolt NOTE: When operating the sewing machine, remove the machine head fixing bolt. 5021Q 19 BAS-300G, BAS-311G, BAS-326G 3.
INSTALLATION 3-17. Installing the machine head fixing bolt When transporting the sewing machine, secure the machine head to the table with the machine head fixing bolt. (1) Plain washer (2) Machine head fixing bolt NOTE: When operating the sewing machine, remove the machine head fixing bolt. 5021Q 19 BAS-300G, BAS-311G, BAS-326G 3.

Instruction Manual - English
Page 29
...SEWING 4-1. 4. BAS-300G, BAS-311G, BAS-326G 20 If the foot switch is at the sewing start operating and injury could result. 1. Insert the needle (2) in the illustration below. * When using synthetic thread] BAS-300G-03[], BAS-311G, BAS-326G BAS-300G-01[], 02[] Thread the upper thread 2370B Needle cooler 2978B • Turn the machine..., the tension discs (1) will open so that the long groove on the needle is depressed by mistake, the sewing machine might start .) • When threading the thread through the needle, allow a distance of approximately 40 mm between...
...SEWING 4-1. 4. BAS-300G, BAS-311G, BAS-326G 20 If the foot switch is at the sewing start operating and injury could result. 1. Insert the needle (2) in the illustration below. * When using synthetic thread] BAS-300G-03[], BAS-311G, BAS-326G BAS-300G-01[], 02[] Thread the upper thread 2370B Needle cooler 2978B • Turn the machine..., the tension discs (1) will open so that the long groove on the needle is depressed by mistake, the sewing machine might start .) • When threading the thread through the needle, allow a distance of approximately 40 mm between...

Instruction Manual - English
Page 30
... mode is safe because the sewing machine will not start even when the foot switch is depressed. 1 Turn on the power switch. 2 All indicators switch off Press the THREAD/CLAMP key. • ... THREAD/CLAMP key. • The work clamp will drop. • The tension discs will open. 4421Q THREAD/CLAMP indicator illuminates MENU indicator switches off 21 BAS-300G, BAS-311G, BAS-326G 4.
... mode is safe because the sewing machine will not start even when the foot switch is depressed. 1 Turn on the power switch. 2 All indicators switch off Press the THREAD/CLAMP key. • ... THREAD/CLAMP key. • The work clamp will drop. • The tension discs will open. 4421Q THREAD/CLAMP indicator illuminates MENU indicator switches off 21 BAS-300G, BAS-311G, BAS-326G 4.

Instruction Manual - English
Page 31
... CAUTION 4. Place the bobbin onto the bobbin winder shaft (1). 2. For case B BAS-300G, BAS-311G, BAS-326G 22 Check that the needle does not touch the work clamp, and then while pressing the TENSION/WIND key (3), depress the foot switch to the sewing machine may result. 4429Q 1. Turn on the power switch. 4. Remove the bobbin, hook...
... CAUTION 4. Place the bobbin onto the bobbin winder shaft (1). 2. For case B BAS-300G, BAS-311G, BAS-326G 22 Check that the needle does not touch the work clamp, and then while pressing the TENSION/WIND key (3), depress the foot switch to the sewing machine may result. 4429Q 1. Turn on the power switch. 4. Remove the bobbin, hook...

Instruction Manual - English
Page 32
... 23 BAS-300G, BAS-311G, BAS-326G If the foot switch is pulled. 5. Installing the bobbin case CAUTION Turn off the power switch before installing the bobbin case. Pass the thread through the lever thread hole (4), and then pull out approximately 30 mm of the arrow when the thread is depressed by mistake, the sewing machine... bobbin turns in the direction of thread. 6. Hold the latch on the bobbin case and insert the bobbin case into the bobbin case. 3. PREPARATION BEFORE SEWING 4-4. 4.
... 23 BAS-300G, BAS-311G, BAS-326G If the foot switch is pulled. 5. Installing the bobbin case CAUTION Turn off the power switch before installing the bobbin case. Pass the thread through the lever thread hole (4), and then pull out approximately 30 mm of the arrow when the thread is depressed by mistake, the sewing machine... bobbin turns in the direction of thread. 6. Hold the latch on the bobbin case and insert the bobbin case into the bobbin case. 3. PREPARATION BEFORE SEWING 4-4. 4.

Instruction Manual - English
Page 34
...the ridge at its highest position. Turn on the arm. 5223Q 4421Q Aligned 1. display (4). 2nd step 4441Q 4953Q 25 4952Q 2. BAS-300G, BAS-311G, BAS-326G PREPARATION BEFORE SEWING 4-6. Turn the pulley (1) in the PROGRAM No. Depress the foot switch to the 2nd step. (If using a two-pedal... For programs with a large number of the thread take-up (2) is detected, and then the feed mechanism will move to the sewing start switch (6).) The sewing machine will move to clear the error. The power indicator (3) will illuminate, and the model number will flash in the menu display ...
...the ridge at its highest position. Turn on the arm. 5223Q 4421Q Aligned 1. display (4). 2nd step 4441Q 4953Q 25 4952Q 2. BAS-300G, BAS-311G, BAS-326G PREPARATION BEFORE SEWING 4-6. Turn the pulley (1) in the PROGRAM No. Depress the foot switch to the 2nd step. (If using a two-pedal... For programs with a large number of the thread take-up (2) is detected, and then the feed mechanism will move to the sewing start switch (6).) The sewing machine will move to clear the error. The power indicator (3) will illuminate, and the model number will flash in the menu display ...

Instruction Manual - English
Page 37
... Setting the program number 2nd step 1. NOTE: After completing the setting, be loaded from the CF card and copied into the sewing machine's internal memory. Loading sewing data Refer to check the feed home position. Notes on handling CF cards (sold separately)" for details on the power switch. ... Press the R/W key. • The buzzer will sound and the selected sewing data will appear at the time of the CF slot. 5-3. NOTE: • Make sure the CF card is correct. 4954Q BAS-300G, BAS-311G, BAS-326G 28 Depress the foot switch to the 2nd step. (If using CF cards...
... Setting the program number 2nd step 1. NOTE: After completing the setting, be loaded from the CF card and copied into the sewing machine's internal memory. Loading sewing data Refer to check the feed home position. Notes on handling CF cards (sold separately)" for details on the power switch. ... Press the R/W key. • The buzzer will sound and the selected sewing data will appear at the time of the CF slot. 5-3. NOTE: • Make sure the CF card is correct. 4954Q BAS-300G, BAS-311G, BAS-326G 28 Depress the foot switch to the 2nd step. (If using CF cards...


