BR-Receipts Users Guide Macintosh
Page 4
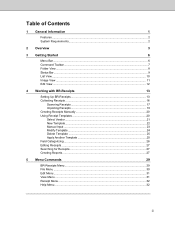
... 1 Features ...2 System Requirements...2 2 Overview 3 3 Getting Started 6 Menu Bar...6 Command Toolbar ...7 Folder View ...8 Status Bar...9 List View...10 Image View ...11 Edit View ...12 4 Working with BR-Receipts 13 Setting Up BR-Receipts 13 Collecting Receipts ...16 Scanning Receipts 17 Importing Receipts 19 Creating Receipts Manually 20 Using Receipt Templates 20 Select Vendor...21 New Template...22 Manual Input ...23 Modify Template...24...
... 1 Features ...2 System Requirements...2 2 Overview 3 3 Getting Started 6 Menu Bar...6 Command Toolbar ...7 Folder View ...8 Status Bar...9 List View...10 Image View ...11 Edit View ...12 4 Working with BR-Receipts 13 Setting Up BR-Receipts 13 Collecting Receipts ...16 Scanning Receipts 17 Importing Receipts 19 Creating Receipts Manually 20 Using Receipt Templates 20 Select Vendor...21 New Template...22 Manual Input ...23 Modify Template...24...
BR-Receipts Users Guide Macintosh
Page 6
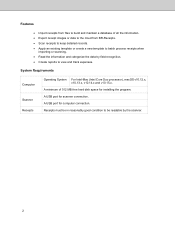
A USB port for scanner connection. Receipts must be in reasonably good condition to be readable by field recognition. • Create reports to view and track expenses. A minimum of all the information. • Export receipt images or data to the cloud from files to build and maintain a database of 512 MB free hard disk space for installing the program. Features • Import...
A USB port for scanner connection. Receipts must be in reasonably good condition to be readable by field recognition. • Create reports to view and track expenses. A minimum of all the information. • Export receipt images or data to the cloud from files to build and maintain a database of 512 MB free hard disk space for installing the program. Features • Import...

BR-Receipts Users Guide Macintosh
Page 7
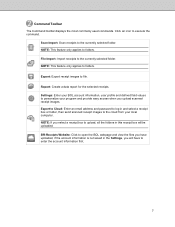
... a QIF file using field recognition. A dialog box will open the Export to finish. Export To You can import available Quicken accounts, or you get started: 1. b. Under Delimited by - The scanning progress bar displays the scanning status. 3. Click in the exported file. • Select with the OCR results. a. Click on the toolbar, or select Export to File from the File menu, to open to set up...
... a QIF file using field recognition. A dialog box will open the Export to finish. Export To You can import available Quicken accounts, or you get started: 1. b. Under Delimited by - The scanning progress bar displays the scanning status. 3. Click in the exported file. • Select with the OCR results. a. Click on the toolbar, or select Export to File from the File menu, to open to set up...
BR-Receipts Users Guide Macintosh
Page 8
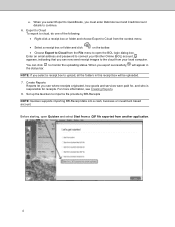
... can click to continue. 6. Set up the Quicken to open Quicken and select Start from a .QIF file exported from your Brother Online (BOL) account, appears, indicating that you select a receipt box to connect your local computer. Before starting, open the BOL login dialog box. Enter an email address and password to upload, all the folders in this receipt box will appear in the status...
... can click to continue. 6. Set up the Quicken to open Quicken and select Start from a .QIF file exported from your Brother Online (BOL) account, appears, indicating that you select a receipt box to connect your local computer. Before starting, open the BOL login dialog box. Enter an email address and password to upload, all the folders in this receipt box will appear in the status...
BR-Receipts Users Guide Macintosh
Page 10
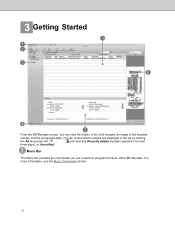
Menu Bar The Menu bar provides the commands you can control which receipts are displayed in the list by clicking the All drop-down list and selecting Recently Added (receipts updated in the last three days), or Unverified. For more information, see the Menu Commands section. 6 3 Getting Started From the BR-Receipts screen, you use to perform program functions within BR-Receipts. You can view file folders, a list of all receipts, an image of the selected receipt, and the recognized data.
Menu Bar The Menu bar provides the commands you can control which receipts are displayed in the list by clicking the All drop-down list and selecting Recently Added (receipts updated in the last three days), or Unverified. For more information, see the Menu Commands section. 6 3 Getting Started From the BR-Receipts screen, you use to perform program functions within BR-Receipts. You can view file folders, a list of all receipts, an image of the selected receipt, and the recognized data.
BR-Receipts Users Guide Macintosh
Page 11
...: Enter an email address and password to the cloud from your local computer. BR-Receipts Website: Click to open the BOL webpage and view the files you have uploaded, if the account information is not saved in the Settings, you select a receipt box to upload, all the folders in and select a receipt box or folder, then send scanned receipt images to log...
...: Enter an email address and password to the cloud from your local computer. BR-Receipts Website: Click to open the BOL webpage and view the files you have uploaded, if the account information is not saved in the Settings, you select a receipt box to upload, all the folders in and select a receipt box or folder, then send scanned receipt images to log...

BR-Receipts Users Guide Macintosh
Page 12
... a folder. Change the name of the receipt box. Choose a receipt box location from your local computer. 8 Open a receipt box that already exists. NOTE: The receipt box name can create a receipt box, open a file, and create a new folder. Click the Folder tab to view these commands: New Receipt Box... Save As... Right-click the blank area to the cloud from the menu. Create a receipt box. Enter an email address and password...
... a folder. Change the name of the receipt box. Choose a receipt box location from your local computer. 8 Open a receipt box that already exists. NOTE: The receipt box name can create a receipt box, open a file, and create a new folder. Click the Folder tab to view these commands: New Receipt Box... Save As... Right-click the blank area to the cloud from the menu. Create a receipt box. Enter an email address and password...
BR-Receipts Users Guide Macintosh
Page 21
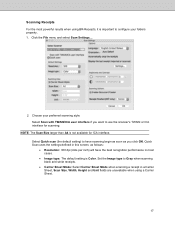
Select Quick scan (the default setting) to use the scanner's TWAIN or ICA interface for ICA interface. Choose your folders properly. 1. Quick Scan uses the settings defined in this screen, as you click OK. Click the File menu and select Scan Settings.... 2. Set the Image type to configure your preferred scanning style: Select Scan with TWAIN/ICA user interface if you want to have scanning begin as soon as follows: • Resolution: 300 dpi (dots per...
Select Quick scan (the default setting) to use the scanner's TWAIN or ICA interface for ICA interface. Choose your folders properly. 1. Quick Scan uses the settings defined in this screen, as you click OK. Click the File menu and select Scan Settings.... 2. Set the Image type to configure your preferred scanning style: Select Scan with TWAIN/ICA user interface if you want to have scanning begin as soon as follows: • Resolution: 300 dpi (dots per...

BR-Receipts Users Guide Macintosh
Page 22
... to use this check box if you want BR-Receipts to tell you where you want to the carrier sheet with title and total amount items shown. Do not skew the paper when folding. NOTE: The settings may differ depending on the scanner you select "Carrier Sheet Mode", the software automatically skips scanning the header of the scanned image. Click OK. If you can start scanning...
... to use this check box if you want BR-Receipts to tell you where you want to the carrier sheet with title and total amount items shown. Do not skew the paper when folding. NOTE: The settings may differ depending on the scanner you select "Carrier Sheet Mode", the software automatically skips scanning the header of the scanned image. Click OK. If you can start scanning...
BR-Receipts Users Guide Macintosh
Page 23
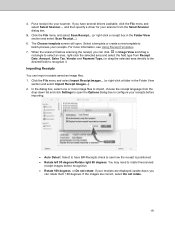
... template screen will open the Options dialog box to configure your receipts before recognition. • Rotate 180 degrees, or Do not rotate: If your scanner from the Select Scanner dialog box. 5. If you have BR-Receipts check to see Using Receipt Templates. 7. Click the File menu and select Scan Receipt... (or right-click a receipt box in the Folder View section and select Import Receipt Images...
... template screen will open the Options dialog box to configure your receipts before recognition. • Rotate 180 degrees, or Do not rotate: If your scanner from the Select Scanner dialog box. 5. If you have BR-Receipts check to see Using Receipt Templates. 7. Click the File menu and select Scan Receipt... (or right-click a receipt box in the Folder View section and select Import Receipt Images...
BR-Receipts Users Guide Macintosh
Page 24
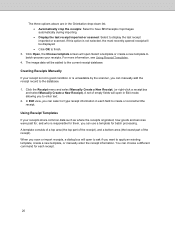
... drop-down list. • Automatically crop the receipts: Select to have BR-Receipts crop images automatically during importing. • Display the last receipt imported or scanned: Select to create or reconstruct the receipt. If this option is not selected, the most recently opened receipt will be added to apply an existing template, create a new template, or manually enter...
... drop-down list. • Automatically crop the receipts: Select to have BR-Receipts crop images automatically during importing. • Display the last receipt imported or scanned: Select to create or reconstruct the receipt. If this option is not selected, the most recently opened receipt will be added to apply an existing template, create a new template, or manually enter...

BR-Receipts Users Guide Macintosh
Page 34
... file. Save As... Configure the Scan Settings. Export receipt images to the currently selected folder. The supported file formats are JPG, TIF, and BMP. Close Close the selected receipt box. Select a driver for your scanner, or a different scanner connected to your data to a third party application. PDF. QIF, IIF, or TXF format or export your computer. Scan receipts to File... Create an empty folder in CSV. Scan Receipt... Open... Import Receipt Image...
... file. Save As... Configure the Scan Settings. Export receipt images to the currently selected folder. The supported file formats are JPG, TIF, and BMP. Close Close the selected receipt box. Select a driver for your scanner, or a different scanner connected to your data to a third party application. PDF. QIF, IIF, or TXF format or export your computer. Scan receipts to File... Create an empty folder in CSV. Scan Receipt... Open... Import Receipt Image...

Quick Setup Guide
Page 1
... a toy. • Use only the AC Adapter supplied with this document before loading it into the Automatic Document Feeder (ADF). 3 Select your language and configure the date and time (ADS-2700W only) • Select language Press (Settings) > Initial Setup > Local Language > Select your country. Extend the trays. Remove the protective tape and film covering the machine. Do not use network tools/utilities securely. 2 Connect the power cord Attach the Automatic Document Feeder (ADF). ADS-2200/ADS-2700W Quick Setup Guide The latest manuals are available...
... a toy. • Use only the AC Adapter supplied with this document before loading it into the Automatic Document Feeder (ADF). 3 Select your language and configure the date and time (ADS-2700W only) • Select language Press (Settings) > Initial Setup > Local Language > Select your country. Extend the trays. Remove the protective tape and film covering the machine. Do not use network tools/utilities securely. 2 Connect the power cord Attach the Automatic Document Feeder (ADF). ADS-2200/ADS-2700W Quick Setup Guide The latest manuals are available...

Quick Setup Guide
Page 2
... Network D A Using your scanner with your mobile device (LAN cable to Network) Connect your machine to network (ADS-2700W only)) 1. > Setup Wizard > Yes. 2. Finish NOTE: When finished, restart your Network using Brother iPrint&Scan, go to support.brother.com/manuals Finish D Using your scanner as a standalone device Wi-Fi® connection to Network • If you have a PC that is connected to the network B LAN cable to install the driver and software package. Enter the Network key (Password). 3. For instructions on -screen instructions to a network...
... Network D A Using your scanner with your mobile device (LAN cable to Network) Connect your machine to network (ADS-2700W only)) 1. > Setup Wizard > Yes. 2. Finish NOTE: When finished, restart your Network using Brother iPrint&Scan, go to support.brother.com/manuals Finish D Using your scanner as a standalone device Wi-Fi® connection to Network • If you have a PC that is connected to the network B LAN cable to install the driver and software package. Enter the Network key (Password). 3. For instructions on -screen instructions to a network...
Quick Setup Guide
Page 3
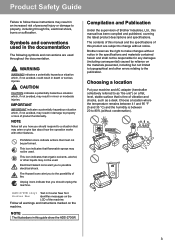
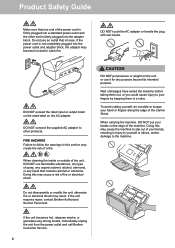
... and other errors relating to a situation that you to property, including through fire, electrical shock, burns or suffocation. Electrical Hazard icons alert you should respond to the publication. Unplug icons indicate that may arise or give tips about how the operation works with other liquids may not be used in this guide show the ADS-2700W. CAUTION...
... and other errors relating to a situation that you to property, including through fire, electrical shock, burns or suffocation. Electrical Hazard icons alert you should respond to the publication. Unplug icons indicate that may arise or give tips about how the operation works with other liquids may not be used in this guide show the ADS-2700W. CAUTION...
Quick Setup Guide
Page 4
... speakers or the base units of non-Brother cordless telephones. If you or others and serious damage to the unit. This product must place it in a high-traffic area, ensure that the unit is located on Specifications in the User's Guide. Otherwise, it . Make sure that may interfere with the operation of power source you must be installed near heaters, air conditioners...
... speakers or the base units of non-Brother cordless telephones. If you or others and serious damage to the unit. This product must place it in a high-traffic area, ensure that the unit is located on Specifications in the User's Guide. Otherwise, it . Make sure that may interfere with the operation of power source you must be installed near heaters, air conditioners...
Quick Setup Guide
Page 5
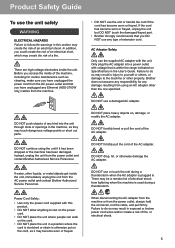
... contact Brother Authorized Service Personnel. Power Cord Safety: • Use only the power cord supplied with voltage that is used during a thunderstorm when the AC adapter is otherwise put on , damage, or modify the AC adapter. When disconnecting the AC adapter from the machine or from the power outlet and contact Brother Authorized Service Personnel. DO NOT push objects of any Ethernet (ADS-2700W only) cables from using the unit...
... contact Brother Authorized Service Personnel. Power Cord Safety: • Use only the power cord supplied with voltage that is used during a thunderstorm when the AC adapter is otherwise put on , damage, or modify the AC adapter. When disconnecting the AC adapter from the machine or from the power outlet and contact Brother Authorized Service Personnel. DO NOT push objects of any Ethernet (ADS-2700W only) cables from using the unit...
Quick Setup Guide
Page 6
...Guide Make sure that one end of a fire. FIRE HAZARDS Failure to follow the warnings in this section may create the risk of the power cord is loose. When carrying the machine, DO NOT put pressure or weight on the AC adapter. When cleaning the inside or outside of the unit, DO NOT use...catch fire. Do not disassemble or modify the unit, otherwise fire or electrical shock may cause the machine to your hands, resulting in a roller. If the unit requires repair, contact Brother Authorized Service Personnel. To avoid cutting yourself, do not slide or scrape your hand or fingers along the ...
...Guide Make sure that one end of a fire. FIRE HAZARDS Failure to follow the warnings in this section may create the risk of the power cord is loose. When carrying the machine, DO NOT put pressure or weight on the AC adapter. When cleaning the inside or outside of the unit, DO NOT use...catch fire. Do not disassemble or modify the unit, otherwise fire or electrical shock may cause the machine to your hands, resulting in a roller. If the unit requires repair, contact Brother Authorized Service Personnel. To avoid cutting yourself, do not slide or scrape your hand or fingers along the ...
Quick Setup Guide
Page 7
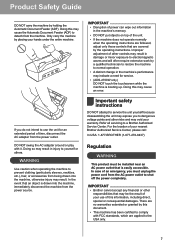
... risks and may cause the Automatic Document Feeder (ADF) to detach from the power outlet. Important safety instructions DO NOT attempt to service the unit yourself because disassembling the unit may indicate a need for an extended period of your use the unit for service. • (ADS-2700W only) DO NOT touch the touchscreen while the machine is booting up. IMPORTANT • Brother cannot accept any financial...
... risks and may cause the Automatic Document Feeder (ADF) to detach from the power outlet. Important safety instructions DO NOT attempt to service the unit yourself because disassembling the unit may indicate a need for an extended period of your use the unit for service. • (ADS-2700W only) DO NOT touch the touchscreen while the machine is booting up. IMPORTANT • Brother cannot accept any financial...

Quick Setup Guide
Page 8
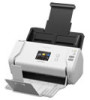
..., if not installed and used to ensure compliance with the power available in a particular installation. Product Safety Guide Federal Communications Commission (FCC) Declaration of Conformity (USA only) Responsible Party: Brother International Corporation 200 Crossing Boulevard Bridgewater, NJ 08807-0911 USA TEL: (908) 704-1700 declares, that the products Product Name: ADS-2200 and ADS-2700W comply with the instructions, may cause...
..., if not installed and used to ensure compliance with the power available in a particular installation. Product Safety Guide Federal Communications Commission (FCC) Declaration of Conformity (USA only) Responsible Party: Brother International Corporation 200 Crossing Boulevard Bridgewater, NJ 08807-0911 USA TEL: (908) 704-1700 declares, that the products Product Name: ADS-2200 and ADS-2700W comply with the instructions, may cause...


