
Users Guide
Page 7
...page 114 For installing drivers: Install Drivers Used for scanning business cards. PageManager Apple Image Capture WS Scan (Windows ® users only) (ADS-2500We only) Windows ® Fax and Scan Windows ® Photo Gallery Use the Presto! After installing the Brother MFL-Pro software suite, you can also use the Apple Image Capture application for scanning. For scanning using the Web Services protocol. Scan to scan over the network using your document by using the TWAIN driver: Scan Using Presto! BizCard 6 (Windows ®) on page 119 Scan Using the Applications TWAIN...
...page 114 For installing drivers: Install Drivers Used for scanning business cards. PageManager Apple Image Capture WS Scan (Windows ® users only) (ADS-2500We only) Windows ® Fax and Scan Windows ® Photo Gallery Use the Presto! After installing the Brother MFL-Pro software suite, you can also use the Apple Image Capture application for scanning. For scanning using the Web Services protocol. Scan to scan over the network using your document by using the TWAIN driver: Scan Using Presto! BizCard 6 (Windows ®) on page 119 Scan Using the Applications TWAIN...
Users Guide
Page 12
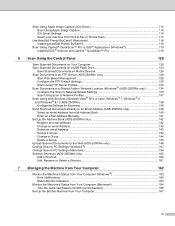
... Scan Using Apple Image Capture 114 ICA Driver Settings ...116 Select your machine from Your Computer 167 xi BizCard 6 118 Scan Using Captiva ® QuickScan™ Pro or ISIS ® Applications (Windows 119 Installing ISIS ® Scanner and Captiva ® QuickScan™ Pro 119 6 Scan Using the Control Panel 120 Save Scanned Documents on Your Computer 120 Save Scanned Documents on a USB Flash Drive 123 Save Scanned Documents on Mobile Devices 126 Scan Documents to an FTP Server (ADS-2500We only 128 Start Web Based Management ...128 Configure...
... Scan Using Apple Image Capture 114 ICA Driver Settings ...116 Select your machine from Your Computer 167 xi BizCard 6 118 Scan Using Captiva ® QuickScan™ Pro or ISIS ® Applications (Windows 119 Installing ISIS ® Scanner and Captiva ® QuickScan™ Pro 119 6 Scan Using the Control Panel 120 Save Scanned Documents on Your Computer 120 Save Scanned Documents on a USB Flash Drive 123 Save Scanned Documents on Mobile Devices 126 Scan Documents to an FTP Server (ADS-2500We only 128 Start Web Based Management ...128 Configure...
Users Guide
Page 13
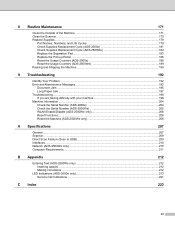
... of the Machine ...171 Clean the Scanner ...173 Replace Supplies...179 Part Names, Numbers, and Life Cycles 179 Check Supplies Replacement Cycle (ADS-2000e 181 Check Supplies Replacement Cycle (ADS-2500We 182 Replace the Separation Pad...183 Replace the Pick-up Roller ...185 Reset the Usage Counters (ADS-2000e 188 Reset the Usage Counters (ADS-2500We 189 Packing and Shipping the Machine ...190 9 Troubleshooting 192 Identify Your Problem ...192 Error and Maintenance Messages...192 Document Jam ...195 Long Paper Jam ...197 Troubleshooting ...198 If you are...
... of the Machine ...171 Clean the Scanner ...173 Replace Supplies...179 Part Names, Numbers, and Life Cycles 179 Check Supplies Replacement Cycle (ADS-2000e 181 Check Supplies Replacement Cycle (ADS-2500We 182 Replace the Separation Pad...183 Replace the Pick-up Roller ...185 Reset the Usage Counters (ADS-2000e 188 Reset the Usage Counters (ADS-2500We 189 Packing and Shipping the Machine ...190 9 Troubleshooting 192 Identify Your Problem ...192 Error and Maintenance Messages...192 Document Jam ...195 Long Paper Jam ...197 Troubleshooting ...198 If you are...
Users Guide
Page 32
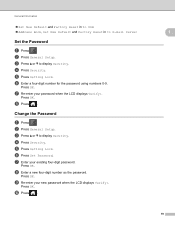
... USB Address Book, Set New Default and Factory Reset in to E-mail Server Set the Password 1 Press . 2 Press General Setup. 3 Press a or b to display Security. 4 Press Security. 5 Press Setting Lock. 6 Press Set Password. 7 Enter your new password when the LCD displays Verify:. Press OK. 0 Press . 1 1 1 19 Change the Password 1 Press . 2 Press General Setup. 3 Press a or b to display Security. 4 Press Security. 5 Press Setting Lock. 6 Enter a four-digit number for the password using numbers...
... USB Address Book, Set New Default and Factory Reset in to E-mail Server Set the Password 1 Press . 2 Press General Setup. 3 Press a or b to display Security. 4 Press Security. 5 Press Setting Lock. 6 Press Set Password. 7 Enter your new password when the LCD displays Verify:. Press OK. 0 Press . 1 1 1 19 Change the Password 1 Press . 2 Press General Setup. 3 Press a or b to display Security. 4 Press Security. 5 Press Setting Lock. 6 Enter a four-digit number for the password using numbers...

Users Guide
Page 38
... documents, use the Carrier Sheet. Document Specifications Long Paper Length 14 to 34.0 in. (355.6 to 863 mm) Width Weight Thickness 2.0 to 8.5 in. (51 to 215.9 mm) 14 to 29 lb (52 to 110 g/m2) 3 to 5 mil (0.08 to your computer as an image file. Select the Plastic Card Mode check box in the setting dialog box. 25 The Carrier Sheet cannot be used when scanning to a USB flash...
... documents, use the Carrier Sheet. Document Specifications Long Paper Length 14 to 34.0 in. (355.6 to 863 mm) Width Weight Thickness 2.0 to 8.5 in. (51 to 215.9 mm) 14 to 29 lb (52 to 110 g/m2) 3 to 5 mil (0.08 to your computer as an image file. Select the Plastic Card Mode check box in the setting dialog box. 25 The Carrier Sheet cannot be used when scanning to a USB flash...

Users Guide
Page 65
... machine starts scanning, and then the Scanning Completed dialog box appears and display the number of the following: Click the (Save) button to print the scanned data. See Basic Scan on page 50. Click the (Print) button to save the scanned data. See Basic Scan on page 67). 7 Select a scan size other settings if needed (see Change Scan Settings (ControlCenter4) (Windows ®) on page 50. 52 See Basic Scan on page 50. Click the (OCR) button to scan to an email. Scan Using...
... machine starts scanning, and then the Scanning Completed dialog box appears and display the number of the following: Click the (Save) button to print the scanned data. See Basic Scan on page 50. Click the (Print) button to save the scanned data. See Basic Scan on page 67). 7 Select a scan size other settings if needed (see Change Scan Settings (ControlCenter4) (Windows ®) on page 50. 52 See Basic Scan on page 50. Click the (OCR) button to scan to an email. Scan Using...

Users Guide
Page 81
... gray. 24bit Color Uses up to 16.8 million colors to scan the image. Check Show Folder to automatically display the destination folder after scanning. • SharePoint 5 Write the URL address you would like to save your scanned document to . File size Adjust the File size by moving the slider to confirm the destination. Scan Using Your Computer Setting Description Applicable Feature Image OCR E-mail File Print Destination Click the Change button and then the folder icon to...
... gray. 24bit Color Uses up to 16.8 million colors to scan the image. Check Show Folder to automatically display the destination folder after scanning. • SharePoint 5 Write the URL address you would like to save your scanned document to . File size Adjust the File size by moving the slider to confirm the destination. Scan Using Your Computer Setting Description Applicable Feature Image OCR E-mail File Print Destination Click the Change button and then the folder icon to...

Users Guide
Page 85
... Multifeed Detection Uses a ultrasonic sensor to make the scanned data more settings in the Advanced Settings dialog box. Click the Advanced Settings button. Setting Description Applicable Feature Image OCR E-mail File Print Auto Deskew Corrects the skew (within 5 degrees) of the scanned Yes Yes Yes Yes Yes data. 1 Auto Image Changes the direction of the document based on the Yes Yes Yes Yes Yes Rotation text orientation. 1 Bleed Prevents bleedthrough on your computer screen.
... Multifeed Detection Uses a ultrasonic sensor to make the scanned data more settings in the Advanced Settings dialog box. Click the Advanced Settings button. Setting Description Applicable Feature Image OCR E-mail File Print Auto Deskew Corrects the skew (within 5 degrees) of the scanned Yes Yes Yes Yes Yes data. 1 Auto Image Changes the direction of the document based on the Yes Yes Yes Yes Yes Rotation text orientation. 1 Bleed Prevents bleedthrough on your computer screen.

Users Guide
Page 90
... a supported file format. The Scan to File dialog box appears. 5 3 Configure the scan settings, if needed. To scan a 2-sided document, select the 2-sided Scanning check box and choose Long-edge binding or Short-edge binding. To change the file name, enter the file name you entered plus the current date and a sequential number. Choose the file type for the saved image from the File Type pop-up to use for the document (up menu.
... a supported file format. The Scan to File dialog box appears. 5 3 Configure the scan settings, if needed. To scan a 2-sided document, select the 2-sided Scanning check box and choose Long-edge binding or Short-edge binding. To change the file name, enter the file name you entered plus the current date and a sequential number. Choose the file type for the saved image from the File Type pop-up to use for the document (up menu.

Users Guide
Page 98
... buttons which you scan a page directly into editable text files. You can choose any image viewer/editor software. To customize a button, click the button while holding down the Control key, and the configuration window appears. For installation information see Scan Using Presto! You can choose the destination application for the editable text. Scan Using Your Computer Register Your Favorite Scan Settings Using ControlCenter2 (Macintosh) 5 There are four scan functions: Scan to Image, Scan to OCR, Scan...
... buttons which you scan a page directly into editable text files. You can choose any image viewer/editor software. To customize a button, click the button while holding down the Control key, and the configuration window appears. For installation information see Scan Using Presto! You can choose the destination application for the editable text. Scan Using Your Computer Register Your Favorite Scan Settings Using ControlCenter2 (Macintosh) 5 There are four scan functions: Scan to Image, Scan to OCR, Scan...

Users Guide
Page 105
... Paper when you configure the settings as following: • Auto Deskew: Off • 2-sided Scanning: Off 2-sided Scanning If you check this function may not work properly. 92 After the first batch of documents and put them Yes Yes Yes Yes together into one data file. Yes Yes Yes Yes Continuous Scanning Scan multiple batches of documents is set to Legal size. Scan Using Your Computer Setting Document Size Description Applicable Feature Image OCR E-mail File Document size is scanned...
... Paper when you configure the settings as following: • Auto Deskew: Off • 2-sided Scanning: Off 2-sided Scanning If you check this function may not work properly. 92 After the first batch of documents and put them Yes Yes Yes Yes together into one data file. Yes Yes Yes Yes Continuous Scanning Scan multiple batches of documents is set to Legal size. Scan Using Your Computer Setting Document Size Description Applicable Feature Image OCR E-mail File Document size is scanned...

Users Guide
Page 111
The Scanner Setup dialog box appears. 98 Scan Using Your Computer 3 Click Scan Settings from the Desktop tab on the left side of the window. 5 4 Click the Select button. 5 From the Available Scanners list, select TWAIN: TW-Brother ADS-XXXXX or TWAIN: TW-Brother ADS-XXXXX LAN (where ADS-XXXXX is the model name of your machine). Click OK. 6 Select the Display scanner dialog box check box in the Scan or Get Photo panel. 7 Click the Scan button. The Scan or Get Photo panel appears on the ribbon. If you want to use the WIA driver, select the Brother driver that has "WIA" as the prefix.
The Scanner Setup dialog box appears. 98 Scan Using Your Computer 3 Click Scan Settings from the Desktop tab on the left side of the window. 5 4 Click the Select button. 5 From the Available Scanners list, select TWAIN: TW-Brother ADS-XXXXX or TWAIN: TW-Brother ADS-XXXXX LAN (where ADS-XXXXX is the model name of your machine). Click OK. 6 Select the Display scanner dialog box check box in the Scan or Get Photo panel. 7 Click the Scan button. The Scan or Get Photo panel appears on the ribbon. If you want to use the WIA driver, select the Brother driver that has "WIA" as the prefix.
Users Guide
Page 132
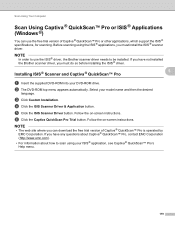
...™ Pro is operated by EMC Corporation. Select your DVD-ROM drive. 2 The DVD-ROM top menu appears automatically. Follow the on -screen instructions. 6 Click the Captiva QuickScan Pro Trial button. Before scanning using the ISIS® applications, you have not installed the Brother scanner driver, you can use the ISIS ® driver, the Brother scanner driver needs to be installed. Scan Using Your Computer Scan Using Captiva ® QuickScan™ Pro or ISIS® Applications (Windows ®) 5 You can download the free trial...
...™ Pro is operated by EMC Corporation. Select your DVD-ROM drive. 2 The DVD-ROM top menu appears automatically. Follow the on -screen instructions. 6 Click the Captiva QuickScan Pro Trial button. Before scanning using the ISIS® applications, you have not installed the Brother scanner driver, you can use the ISIS ® driver, the Brother scanner driver needs to be installed. Scan Using Your Computer Scan Using Captiva ® QuickScan™ Pro or ISIS® Applications (Windows ®) 5 You can download the free trial...

Users Guide
Page 162
... Multi-Page. Destination File Click the Change button and then the folder icon to adjust the file size for the file name if needed . Yes - Yes Yes - - OCR Language Set to automatically display the destination folder after scanning. Check Show Folder to match the language of the scanned document's - Yes Yes Yes Yes NOTE • To save the document as TIFF, TIFF Multi-Page, PDF, Secure PDF and JPEG support file size compression. For PDF, Secure PDF and JPEG, use for Scan...
... Multi-Page. Destination File Click the Change button and then the folder icon to adjust the file size for the file name if needed . Yes - Yes Yes - - OCR Language Set to automatically display the destination folder after scanning. Check Show Folder to match the language of the scanned document's - Yes Yes Yes Yes NOTE • To save the document as TIFF, TIFF Multi-Page, PDF, Secure PDF and JPEG support file size compression. For PDF, Secure PDF and JPEG, use for Scan...
Users Guide
Page 205
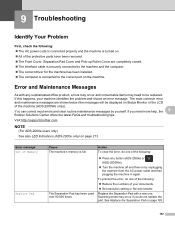
... parts have been removed. The Front Cover, Separation Pad Cover and Pick-up Roller Cover are shown below (the messages will be replaced. Scanning errors may need more help, the 9 Brother Solutions Center offers the latest FAQs and troubleshooting tips. Visit http://support.brother.com NOTE (For ADS-2000e users only) See also LED Indications (ADS-2000e only) on page 183. 192 Replace the Separation Pad with any button (ADS-2000e) or (ADS-2500We). Turn...
... parts have been removed. The Front Cover, Separation Pad Cover and Pick-up Roller Cover are shown below (the messages will be replaced. Scanning errors may need more help, the 9 Brother Solutions Center offers the latest FAQs and troubleshooting tips. Visit http://support.brother.com NOTE (For ADS-2000e users only) See also LED Indications (ADS-2000e only) on page 183. 192 Replace the Separation Pad with any button (ADS-2000e) or (ADS-2500We). Turn...
Users Guide
Page 211
... the scanned image. PageManager on page 173. 198 In Presto! See Installing Presto! If you need additional help , you have installed Presto! Most problems can also scan documents using the ICA Scanner Driver. OCR does not work. The scanner resolution is a problem with your scanning to scan. (Windows ®) scanning application. Make sure the Brother TWAIN driver is appear when starting to select the Brother TWAIN/WIA driver. Visit us at http://support.brother.com Using non-Brother supplies may affect the scan quality...
... the scanned image. PageManager on page 173. 198 In Presto! See Installing Presto! If you need additional help , you have installed Presto! Most problems can also scan documents using the ICA Scanner Driver. OCR does not work. The scanner resolution is a problem with your scanning to scan. (Windows ®) scanning application. Make sure the Brother TWAIN driver is appear when starting to select the Brother TWAIN/WIA driver. Visit us at http://support.brother.com Using non-Brother supplies may affect the scan quality...

Users Guide
Page 212
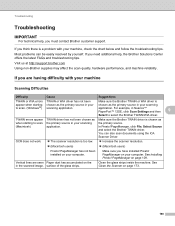
... as document size. Adjust the Document Guides to Off. Make sure the document size settings are suitable for your document is acceptable for your document. slow. To clean the Pick-up Roller, see Replace the Separation Pad. suitable for your document. See Acceptable Documents on page 24. Remove any foreign objects or ripped paper from the machine, clean the rubber side of the document. fed. Troubleshooting Difficulty Cause Suggestions The scanned image is...
... as document size. Adjust the Document Guides to Off. Make sure the document size settings are suitable for your document is acceptable for your document. slow. To clean the Pick-up Roller, see Replace the Separation Pad. suitable for your document. See Acceptable Documents on page 24. Remove any foreign objects or ripped paper from the machine, clean the rubber side of the document. fed. Troubleshooting Difficulty Cause Suggestions The scanned image is...

Users Guide
Page 214
... Software Difficulties 9 Difficulty Cannot install software. Long Paper is not loaded properly. The document is not selected for the document size. Nuance serial number to check your secure function lock settings. If you can select Long Paper for the document size. A multifeed occurs. This program will repair and reinstall the software. (Windows ® users only) Enter the Nuance serial number that is not a The document is set both Auto Deskew and 2-sided Scanning to Auto. Troubleshooting...
... Software Difficulties 9 Difficulty Cannot install software. Long Paper is not loaded properly. The document is not selected for the document size. Nuance serial number to check your secure function lock settings. If you can select Long Paper for the document size. A multifeed occurs. This program will repair and reinstall the software. (Windows ® users only) Enter the Nuance serial number that is not a The document is set both Auto Deskew and 2-sided Scanning to Auto. Troubleshooting...
Users Guide
Page 223
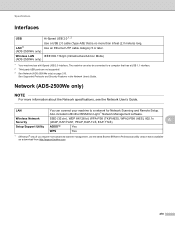
... bit, WPA-PSK (TKIP/AES), WPA2-PSK (AES), 802.1x A Security (LEAP, EAP-FAST, PEAP, EAP-TLS, EAP-TTLS) Setup Support Utility AOSS™ Yes WPS Yes 1 (Windows® only) If you require more information about the Network specifications, see the Network User's Guide. Network (ADS-2500We only) A NOTE For more advanced scanner management, use the latest Brother BRAdmin Professional utility version that is available as a download from http://support.brother...
... bit, WPA-PSK (TKIP/AES), WPA2-PSK (AES), 802.1x A Security (LEAP, EAP-FAST, PEAP, EAP-TLS, EAP-TTLS) Setup Support Utility AOSS™ Yes WPS Yes 1 (Windows® only) If you require more information about the Network specifications, see the Network User's Guide. Network (ADS-2500We only) A NOTE For more advanced scanner management, use the latest Brother BRAdmin Professional utility version that is available as a download from http://support.brother...
Quick Setup Guide
Page 16
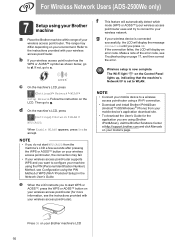
... to connect to g. Make a note of the error code, see Troubleshooting on the LCD. Wireless setup is set to a wireless access point/router using a Wi-Fi connection. • Download and install Brother iPrint&Scan (Android™/iOS/Windows® Phone) from the machine's LCD a few seconds after pressing the WPS or AOSS™ button on your machine using the PIN (Personal Identification Number) Method, see the instructions provided...
... to connect to g. Make a note of the error code, see Troubleshooting on the LCD. Wireless setup is set to a wireless access point/router using a Wi-Fi connection. • Download and install Brother iPrint&Scan (Android™/iOS/Windows® Phone) from the machine's LCD a few seconds after pressing the WPS or AOSS™ button on your machine using the PIN (Personal Identification Number) Method, see the instructions provided...


