
Users Guide
Page 2
... that country. i Your registration with Brother International Corporation, you bought the machine. and, will be made from your Brother machine needs. http://support.brother.com NOTE • You can download the latest software documents and utilities, read FAQs and troubleshooting tips, and learn how to get... the most efficient way to date, check here for all your Brother product. Calls must call the country where you will help , you must be...
... that country. i Your registration with Brother International Corporation, you bought the machine. and, will be made from your Brother machine needs. http://support.brother.com NOTE • You can download the latest software documents and utilities, read FAQs and troubleshooting tips, and learn how to get... the most efficient way to date, check here for all your Brother product. Calls must call the country where you will help , you must be...
Users Guide
Page 4
... to a Wi-Fi network. Which manual? What's in it ? PDF file / Brother Solutions Center 1 Web Connect Guide (ADS-2500We only) This Guide provides useful information about using this app to devices supporting print refer to perform routine maintenance, and see troubleshooting tips. User's Guides and where do I find supported protocol information for your...
... to a Wi-Fi network. Which manual? What's in it ? PDF file / Brother Solutions Center 1 Web Connect Guide (ADS-2500We only) This Guide provides useful information about using this app to devices supporting print refer to perform routine maintenance, and see troubleshooting tips. User's Guides and where do I find supported protocol information for your...
Users Guide
Page 13
... Life Cycles 179 Check Supplies Replacement Cycle (ADS-2000e 181 Check Supplies Replacement Cycle (ADS-2500We 182 Replace the Separation Pad...183 Replace the Pick-up Roller ...185 Reset the Usage Counters (ADS-2000e 188 Reset the Usage Counters (ADS-2500We 189 Packing and Shipping the Machine ...190 9 Troubleshooting 192 Identify Your Problem ...192 Error and Maintenance...
... Life Cycles 179 Check Supplies Replacement Cycle (ADS-2000e 181 Check Supplies Replacement Cycle (ADS-2500We 182 Replace the Separation Pad...183 Replace the Pick-up Roller ...185 Reset the Usage Counters (ADS-2000e 188 Reset the Usage Counters (ADS-2500We 189 Packing and Shipping the Machine ...190 9 Troubleshooting 192 Identify Your Problem ...192 Error and Maintenance...

Users Guide
Page 175
...and then click the drop-down list and select your model name (if not already selected). The Brother Status Monitor screen appears 7 1 2 3 4 1 Troubleshooting Click to access the Status Monitor troubleshooting web site. 2 Visit the Genuine Supplies website Click to get immediate notification of the following: ...a configurable software tool for monitoring the status of one of error messages. NOTE For more devices, allowing you to access the Brother genuine supplies web site. 3 Pick-up Roller Count Displays Pick-up Roller use. 4 Separation Pad Count Displays Separation Pad use....
...and then click the drop-down list and select your model name (if not already selected). The Brother Status Monitor screen appears 7 1 2 3 4 1 Troubleshooting Click to access the Status Monitor troubleshooting web site. 2 Visit the Genuine Supplies website Click to get immediate notification of the following: ...a configurable software tool for monitoring the status of one of error messages. NOTE For more devices, allowing you to access the Brother genuine supplies web site. 3 Pick-up Roller Count Displays Pick-up Roller use. 4 Separation Pad Count Displays Separation Pad use....

Users Guide
Page 178
The Status Monitor window appears and display the status of your Brother machine. 1 2 3 4 7 1 Troubleshooting Click to access the troubleshooting web site by clicking the Troubleshooting button. 2 Visit the Genuine Supplies website Click to access the Brother genuine supplies web site by clicking the Visit the Genuine Supplies website button. 3 Pick-up Roller Count Displays the Pick-up Roller replacement cycle. 4 Separation Pad Count Displays the Separation Pad replacement cycle. 165 Managing the Machine from Your Computer 3 Click the Status Monitor button.
The Status Monitor window appears and display the status of your Brother machine. 1 2 3 4 7 1 Troubleshooting Click to access the troubleshooting web site by clicking the Troubleshooting button. 2 Visit the Genuine Supplies website Click to access the Brother genuine supplies web site by clicking the Visit the Genuine Supplies website button. 3 Pick-up Roller Count Displays the Pick-up Roller replacement cycle. 4 Separation Pad Count Displays the Separation Pad replacement cycle. 165 Managing the Machine from Your Computer 3 Click the Status Monitor button.
Users Guide
Page 205
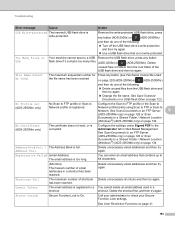
...; The correct driver for the machine has been installed. The computer is full. Visit http://support.brother.com NOTE (For ADS-2000e users only) See also LED Indications (ADS-2000e only) on page 183. 192 Error message Out of the protective parts have been removed. The ... will be replaced. Replace the Separation Pad with any button (ADS-2000e) or (ADS-2500We). Turn the machine off and then on Status Monitor or the LCD of your machine identifies the problem and shows an error message. 9 Troubleshooting 9 Identify Your Problem 9 First, check the following: 9 ...
...; The correct driver for the machine has been installed. The computer is full. Visit http://support.brother.com NOTE (For ADS-2000e users only) See also LED Indications (ADS-2000e only) on page 183. 192 Error message Out of the protective parts have been removed. The ... will be replaced. Replace the Separation Pad with any button (ADS-2000e) or (ADS-2500We). Turn the machine off and then on Status Monitor or the LCD of your machine identifies the problem and shows an error message. 9 Troubleshooting 9 Identify Your Problem 9 First, check the following: 9 ...

Users Guide
Page 206
...not suitable for Adjust the Document Guides to fit the width of your Brother dealer or Brother Customer Service (see Document Jam to the center of the Pick-up Roller or ... settings. See Clean the Scanner on page 195. Turn the machine off and then USB port. Troubleshooting Error message Cause Action Replace Roller The Pick-up Roller has been used over 50,000 times. ...: Delete unused files or folders from the USB port. Press any button (ADS-2000e) or (ADS-2500We). 193 USB Access Error The USB flash drive was being accessed. on page 185...
...not suitable for Adjust the Document Guides to fit the width of your Brother dealer or Brother Customer Service (see Document Jam to the center of the Pick-up Roller or ... settings. See Clean the Scanner on page 195. Turn the machine off and then USB port. Troubleshooting Error message Cause Action Replace Roller The Pick-up Roller has been used over 50,000 times. ...: Delete unused files or folders from the USB port. Press any button (ADS-2000e) or (ADS-2500We). 193 USB Access Error The USB flash drive was being accessed. on page 185...
Users Guide
Page 207
... profile is write-protected. Shortcuts Full The maximum number of shortcuts Delete unnecessary shortcuts and then try again. Press any button (ADS-2000e) or (ADS-2500We) and then do one of the following : Delete unused files from the root folder of email addresses in ... Scan to check your Secure Function Lock settings. Configure the settings under Signed PDF in the Administrator tab in a shortcut. Troubleshooting Error message Cause Action USB Write-protected The inserted USB flash drive is registered. Delete the shortcut first, and then try again...
... profile is write-protected. Shortcuts Full The maximum number of shortcuts Delete unnecessary shortcuts and then try again. Press any button (ADS-2000e) or (ADS-2500We) and then do one of the following : Delete unused files from the root folder of email addresses in ... Scan to check your Secure Function Lock settings. Configure the settings under Signed PDF in the Administrator tab in a shortcut. Troubleshooting Error message Cause Action USB Write-protected The inserted USB flash drive is registered. Delete the shortcut first, and then try again...

Users Guide
Page 208
... not jammed. 2 Open the Front Cover by pinching the Cover Release Lever a. Follow the steps below to clear a document jam. 1 Take out any button (ADS-2000e) or (ADS-2500We). Troubleshooting Document Jam 9 Documents can jam in the ADF unit if they are not inserted or fed correctly or, if they are too long, or...
... not jammed. 2 Open the Front Cover by pinching the Cover Release Lever a. Follow the steps below to clear a document jam. 1 Take out any button (ADS-2000e) or (ADS-2500We). Troubleshooting Document Jam 9 Documents can jam in the ADF unit if they are not inserted or fed correctly or, if they are too long, or...

Users Guide
Page 209
... the Front Cover. • To avoid future document jams, do the following: 9 • Close the Front Cover properly by pushing it gently in the machine. Troubleshooting IMPORTANT • Be careful when touching the Separation Pad and its surrounding area in the center. • Configure the settings for your document is acceptable...
... the Front Cover. • To avoid future document jams, do the following: 9 • Close the Front Cover properly by pushing it gently in the machine. Troubleshooting IMPORTANT • Be careful when touching the Separation Pad and its surrounding area in the center. • Configure the settings for your document is acceptable...

Users Guide
Page 210
...; Change Scan Settings (ControlCenter4) (Windows ®) on page 67 • Change Scan Settings (ControlCenter2) (Macintosh) on page 89 When you scan from the machine (ADS-2500We) Confirm the following settings on the LCD: (Scan to USB/FTP/Network/email Server) • 2-sided Scan: Off • Scan Type: Color or Black...; Auto Deskew: Off • Skip Blank Page: Off (Scan to any paper over 11.69 inches (297 mm) but less than 34 inches (863 mm). Troubleshooting Long Paper Jam 9 Long paper refers to PC) • 2-sided Scan: Off 9 • Auto Deskew: Off 197
...; Change Scan Settings (ControlCenter4) (Windows ®) on page 67 • Change Scan Settings (ControlCenter2) (Macintosh) on page 89 When you scan from the machine (ADS-2500We) Confirm the following settings on the LCD: (Scan to USB/FTP/Network/email Server) • 2-sided Scan: Off • Scan Type: Color or Black...; Auto Deskew: Off • Skip Blank Page: Off (Scan to any paper over 11.69 inches (297 mm) but less than 34 inches (863 mm). Troubleshooting Long Paper Jam 9 Long paper refers to PC) • 2-sided Scan: Off 9 • Auto Deskew: Off 197
Users Guide
Page 211
... TWAIN or WIA errors TWAIN or WIA driver has not been Make sure the Brother TWAIN or WIA driver is a problem with your machine, check the chart below and follow the troubleshooting tips. If you need additional help , you are seen Paper dust has accumulated...scanning to select the Brother TWAIN/WIA driver. PageManager on page 173. 198 Most problems can also scan documents using the ICA Scanner Driver. For example, in the scanned image. If you have installed Presto! Troubleshooting Troubleshooting 9 IMPORTANT For technical help , the Brother Solutions Center offers the...
... TWAIN or WIA errors TWAIN or WIA driver has not been Make sure the Brother TWAIN or WIA driver is a problem with your machine, check the chart below and follow the troubleshooting tips. If you need additional help , you are seen Paper dust has accumulated...scanning to select the Brother TWAIN/WIA driver. PageManager on page 173. 198 Most problems can also scan documents using the ICA Scanner Driver. For example, in the scanned image. If you have installed Presto! Troubleshooting Troubleshooting 9 IMPORTANT For technical help , the Brother Solutions Center offers the...

Users Guide
Page 212
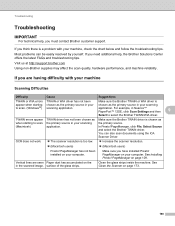
... close to fit the width of pages is Remote Setup is in the ADF. thick. Make sure the maximum number of the document. Troubleshooting Difficulty Cause Suggestions The scanned image is not properly closed. The scanned image is set to Off when the document was set to fit the...
... close to fit the width of pages is Remote Setup is in the ADF. thick. Make sure the maximum number of the document. Troubleshooting Difficulty Cause Suggestions The scanned image is not properly closed. The scanned image is set to Off when the document was set to fit the...

Users Guide
Page 213
...clean the Pick- The machine has entered motor save mode. See Clean the Scanner on page 24. If you scan continuously, the internal temperature of the machine may increase, causing the machine to enter motor save mode. type of the pause may vary depending on the ...and Pick-up Roller. NOTE The length of document being scanned. Background Color check box. 200 up Roller, see Replace the Separation Pad. Troubleshooting Difficulty Cause Suggestions The document is jammed. Paper dust has accumulated on the surface of the Pick-up Roller or Separation Pad. ...
...clean the Pick- The machine has entered motor save mode. See Clean the Scanner on page 24. If you scan continuously, the internal temperature of the machine may increase, causing the machine to enter motor save mode. type of the pause may vary depending on the ...and Pick-up Roller. NOTE The length of document being scanned. Background Color check box. 200 up Roller, see Replace the Separation Pad. Troubleshooting Difficulty Cause Suggestions The document is jammed. Paper dust has accumulated on the surface of the Pick-up Roller or Separation Pad. ...

Users Guide
Page 214
... document properly (see Standard-size Documents on page 197 9 Cannot set Auto The document size is on page 21 Software Difficulties 9 Difficulty Cannot install software. Troubleshooting Difficulty Cause Suggestions Colors in the scanned data are not appropriate for the type of document being scanned. Select Long Paper for the document size.
... document properly (see Standard-size Documents on page 197 9 Cannot set Auto The document size is on page 21 Software Difficulties 9 Difficulty Cannot install software. Troubleshooting Difficulty Cause Suggestions Colors in the scanned data are not appropriate for the type of document being scanned. Select Long Paper for the document size.

Users Guide
Page 215
Troubleshooting Difficulty Cause Suggestions Cannot find how to ON. Click SCAN in the Dock. Cannot ...An error is occurring. The machine is scanning. The machine is not displayed in the task tray, (Brother Utilities) on the machine and then try again. Connect the machine to your model name (if not already selected...). See Turn Setting Lock On/Off on page 167. 9 (ADS-2000e only) Cannot change the Setting Lock is being configured from the machine's Control Panel. Press any button (ADS-2000e) or (ADS-2500We) or open the Top Cover, and then try again....
Troubleshooting Difficulty Cause Suggestions Cannot find how to ON. Click SCAN in the Dock. Cannot ...An error is occurring. The machine is scanning. The machine is not displayed in the task tray, (Brother Utilities) on the machine and then try again. Connect the machine to your model name (if not already selected...). See Turn Setting Lock On/Off on page 167. 9 (ADS-2000e only) Cannot change the Setting Lock is being configured from the machine's Control Panel. Press any button (ADS-2000e) or (ADS-2500We) or open the Top Cover, and then try again....
Users Guide
Page 216
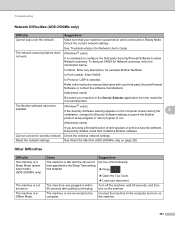
.... Cause The machine is not turned on the computer screen during the 9 installation, change the Security Software settings to permit the Brother product setup program or other program to wireless network. The maschine was plugged in the Network User's Guide. In Port number: ...Network scanning. Turn off the machine, wait 60 seconds, and then turn on the scanner. Troubleshooting Network Difficulties (ADS-2500We only) 9 Difficulty Suggestions Cannot scan over the network. See Troubleshooting in within 60 seconds after pulling out the plug. Refer to the computer and turn on ...
.... Cause The machine is not turned on the computer screen during the 9 installation, change the Security Software settings to permit the Brother product setup program or other program to wireless network. The maschine was plugged in the Network User's Guide. In Port number: ...Network scanning. Turn off the machine, wait 60 seconds, and then turn on the scanner. Troubleshooting Network Difficulties (ADS-2500We only) 9 Difficulty Suggestions Cannot scan over the network. See Troubleshooting in within 60 seconds after pulling out the plug. Refer to the computer and turn on ...

Users Guide
Page 217
The ControlCenter4 window appears. 2 Click the Device Settings tab (the example below uses Home Mode). 9 Macintosh 1 Click the (ControlCenter2) icon in the task tray and then select Open from the menu. The ControlCenter2 window appears. 204 Troubleshooting Machine Information 9 Check the Serial Number (ADS-2000e) 9 1 Start the ControlCenter application. Windows ® 1 Click the (ControlCenter4) icon in the Dock.
The ControlCenter4 window appears. 2 Click the Device Settings tab (the example below uses Home Mode). 9 Macintosh 1 Click the (ControlCenter2) icon in the task tray and then select Open from the menu. The ControlCenter2 window appears. 204 Troubleshooting Machine Information 9 Check the Serial Number (ADS-2000e) 9 1 Start the ControlCenter application. Windows ® 1 Click the (ControlCenter4) icon in the Dock.

Users Guide
Page 218
in the folder tree. The window will display the machine's serial number. 205 The Remote Setup window appears. 3 Select Machine Info. Troubleshooting 2 Click the DEVICE SETTINGS tab. 2 Click the Remote Setup button. The LCD will display the Serial Number (the example below uses Windows ®). 9 Check the Serial Number (ADS-2500We) 9 1 On your scanner's LCD, press . 2 Press Machine Info. 3 Press Serial No.
in the folder tree. The window will display the machine's serial number. 205 The Remote Setup window appears. 3 Select Machine Info. Troubleshooting 2 Click the DEVICE SETTINGS tab. 2 Click the Remote Setup button. The LCD will display the Serial Number (the example below uses Windows ®). 9 Check the Serial Number (ADS-2500We) 9 1 On your scanner's LCD, press . 2 Press Machine Info. 3 Press Serial No.
Users Guide
Page 219
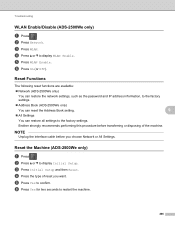
...or All Settings. Brother strongly recommends performing this procedure before you want. 5 Press Yes to confirm. 6 Press Yes for two seconds to display Initial Setup. 3 Press Initial Setup and then Reset. 4 Press the type of the machine. Troubleshooting WLAN Enable/Disable (ADS-2500We only) ...9 1 Press . 2 Press Network. 3 Press WLAN. 4 Press a or b to the factory settings. Reset Functions 9 The following reset functions are available: Network (ADS-2500We only) You can restore the ...
...or All Settings. Brother strongly recommends performing this procedure before you want. 5 Press Yes to confirm. 6 Press Yes for two seconds to display Initial Setup. 3 Press Initial Setup and then Reset. 4 Press the type of the machine. Troubleshooting WLAN Enable/Disable (ADS-2500We only) ...9 1 Press . 2 Press Network. 3 Press WLAN. 4 Press a or b to the factory settings. Reset Functions 9 The following reset functions are available: Network (ADS-2500We only) You can restore the ...