Brother International 3234DT Support and Manuals
Get Help and Manuals for this Brother International item
View All Support Options Below
Free Brother International 3234DT manuals!
Problems with Brother International 3234DT?
Ask a Question
Free Brother International 3234DT manuals!
Problems with Brother International 3234DT?
Ask a Question
Brother International 3234DT Videos

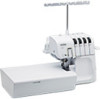
Brother Sewing 3234DT
Duration: 2:16
Total Views: 2,216
Duration: 2:16
Total Views: 2,216
Brother 3234DT 2, 3, or 4 Thread Serger with Differential Feed
Duration: :34
Total Views: 212
Duration: :34
Total Views: 212
Brother 3234DT Serger Overview
Duration: 2:07
Total Views: 8,402
Duration: 2:07
Total Views: 8,402
Popular Brother International 3234DT Manual Pages
Users Guide - Page 1
...;n de problemas así como la lista de preguntas y respuestas más frecuentes. English
Español
HANDBOOK FOR COMPACT OVERLOCK MACHINE MANUAL DE INSTRUCCIONES DE LA MAQUINA COMPACTA OVERLOCK
Product Code: 884-B01
Please visit us at http://solutions.brother.com
where you can get product support and answers to frequently asked questions (FAQs).
Users Guide - Page 2
... install the...unplug the cord in the instruction manual. 16. To disconnect, turn the main switch to the nearest authorized dealer or service center for use bent needles.... examination, repair, electrical or mechanical adjustment. 4. When you are replacing or removing the needle or any openings. 6. Fully plug the machine directly into any other moving parts.
I
Always...
Users Guide - Page 3
.... 2. When servicing the sewing machine, or when removing covers, the machine or the electrical set must be used . 3. Do not bend the cord, or pull on the soft cover. 13.
English
7. Place the machine near a heater, iron, halogen lamp or other parts to ensure that they have been given supervision or instruction concerning use...
Users Guide - Page 5
...INSTRUCTIONS I WARNING LABELS ...III Contents ...1 Chapter 1: Names of parts... ...11 Removing/Installing the needle 11...Troubleshooting ...27 Chapter 7: Maintenance ...28 Cleaning ...28 Oiling ...28 Chapter 8: Introduction of optional feet 29 Blind stitch foot ...29 Taping foot ...31 Pearl sequence foot ...32 Piping foot ...33 Gathering foot ...34 Specifications ...35 Specifications ...35 Setting...
Users Guide - Page 6
...set, Hexagonal driver
2 Bed extension compartment
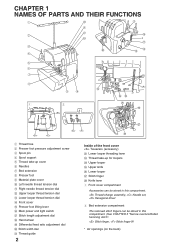
The removed stitch fingers can be stored in this compartment. (See CHAPTER 5 "Narrow overlock/Rolled hemming stitch". CHAPTER 1 NAMES OF PARTS AND THEIR FUNCTIONS
1
2
1 Thread tree 2 Presser foot pressure adjustment screw 3 Spool pin 4 Spool support... dial J Stitch width dial K Thread guide
2
Inside of the front cover Tweezers ...
Users Guide - Page 7
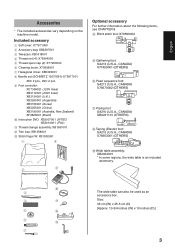
...X75906001 7 Hexagonal driver: XB0393001
8 Needle set (SCHMETZ 130/...Instruction DVD: XB2007001 (NTSC) XB2014001 (PAL)
A Thread change assembly: XB1991001
B Trim trap: XB1958001
C Stitch finger W: XB1902001
1
8
2
9
LG
Optional accessory
For further information about the following items, see CHAPTER 8. English
Accessories
* The included accessories vary depending on the machine model...
Users Guide - Page 10

...right side of 5 mm (3/16 inch). Selection mark
Stitch width
The normal stitch width setting for regular overlock stitch is at its lowest point.
Bring down the knife.
3. Move...
To sew without cutting the fabric edge, you need to the right. Stitch length
The normal stitch length setting is 3 mm. Selection mark
6
To change the stitch length, turn the stitch width adjustment dial.
1...
Users Guide - Page 11
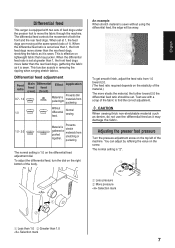
...An example When stretch material is sewn without using the differential feed, the edge will be set at less than 1, the front feed dogs move the fabric through the machine. CAUTION ...normal setting is gathered or pushed together. Adjusting the presser foot pressure
Turn the pressure adjustment screw on lightweight fabric that may damage the fabric. English
Differential feed
This serger is...
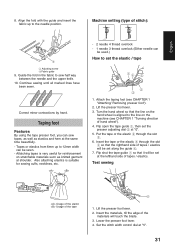
Users Guide - Page 25
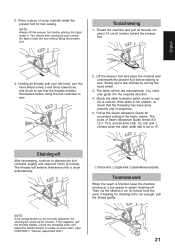
... to depress the foot controller slightly and chain-off
After test-sewing, continue to sew. You need only guide it . Then cut the stitches 5 cm (2 inches) from the work
When the seam is set to sew.
2. You cannot start sewing
1. Slowly sew a few times toward you, and check to see if it...
Users Guide - Page 28
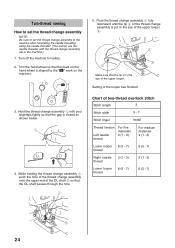
Setting of two-thread overlock stitch
Stitch length
3
Stitch width
5 - 7
Stitch finger
Install
Thread tension
Left needle thread
For fine materials 2 (1 - 3)
For medium materials 2 (1 - 3)
Lower looper thread
6 (5 - 7)
6 (5 - ... end of the thread change assembly 1 with the thread change assembly set the thread change assembly to the machine after completing the needle threading...
Users Guide - Page 29
Instructions for narrow overlock stitch: R to complete the edge of the bed extension.
Remove the ...three thread overlock, using the 3-thread overlock stitch. Set the stitch length adjustment dial to "R to 2" position (for both narrow overlock/ Rolled hemming stitches
CAUTION Turn off the main power and light switch before removing/ installing a needle. 1. NOTE: For the recommended thread ...
Users Guide - Page 31
... of the thread change assembly is designed for trouble-free operation. Thread tensions are not adjusted properly
Thread correctly. (See pages 13-18.) Turn the pressure adjustment screw clockwise to increase the presser foot pressure. (See page 7.)
Replace with new needle. (See page 11.)
Install needle correctly. (See page 11.)
Use correct needle...
Users Guide - Page 33
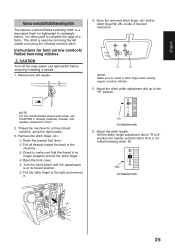
... once and then back to the left position.
Lower the presser foot lever, adjust the fabric guide toward you) the fabric guide will be removed. 3. Recommended settings - While folding the fabric by hand, sew so that the needle is pulled flat. Needle ... (2-4) Procedure 1. English
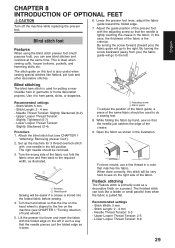
CHAPTER 8 INTRODUCTION OF OPTIONAL FEET
CAUTION Turn off the machine while replacing the presser foot.
Users Guide - Page 34
...an accent to any sewing project. Lower the presser foot lever, adjust the fabric guide toward the folded edge.
7. Set up the machine for pin tuck placement. Lift the presser foot lever and insert...lines on the right side of the fabric. By turning the screw forward the stitch guide will go to the left . Set up the machine for thin fabrics. Attach the blind stitch foot (see CHAPTER 1 "...
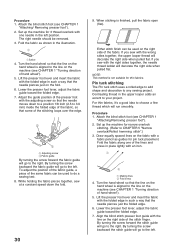
Users Guide - Page 35
... tape presser foot, you can sew tapes, as well as knitted garment at "5".
31 Flip open the tape guide 1, then set along the guide 4. 7. Insert the materials, till the edge of hand wheel"). 4. "
3 Adjusting screw 4 Fabric guide
9. Attach the taping foot (see CHAPTER 1 "Turning direction of the
materials will be sewn. - Put the tape...
Brother International 3234DT Reviews
We have not received any reviews for Brother International yet.