
User Manual in English
Page 1
Contents Contents 01 Caution 02 Caution 03 Product Controls and Functions 04 Product Controls and Functions 05 Remote Control Diagram 06 Power And Mode Selection 07 Picture 08 Volume 09 System 10 Setup Key 11 Setup Menu 12 Setup Menu 13 DVD Functions 14 DVD Functions 15 DVD Functions 16 DVD Functions 17 DVD Functions 18 Connection Diagram 19 Installation 20 Interchangeabel housing change diagram 21 Disc Inform ation 22 Troubleshooting 23 Specifications 24 1
Contents Contents 01 Caution 02 Caution 03 Product Controls and Functions 04 Product Controls and Functions 05 Remote Control Diagram 06 Power And Mode Selection 07 Picture 08 Volume 09 System 10 Setup Key 11 Setup Menu 12 Setup Menu 13 DVD Functions 14 DVD Functions 15 DVD Functions 16 DVD Functions 17 DVD Functions 18 Connection Diagram 19 Installation 20 Interchangeabel housing change diagram 21 Disc Inform ation 22 Troubleshooting 23 Specifications 24 1

User Manual in English
Page 2
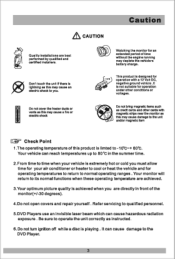
There are two kinds of alarm symbols as follows: L WARNING This symbol is intended to alert the user on the unit, pull over to the side of the road, turn the ignition completely off and dry the product with a towel. do ! 2 Do not mount the product where it will obstruct the deployment of the airbag or in an area where it can become hazardous during sudden stops or in the event of important operating and maintenance(servicing) instructions in the literature accompanying the product. Do not operate the equipment again until all excess water prior to avoid mounting the product where it...
There are two kinds of alarm symbols as follows: L WARNING This symbol is intended to alert the user on the unit, pull over to the side of the road, turn the ignition completely off and dry the product with a towel. do ! 2 Do not mount the product where it will obstruct the deployment of the airbag or in an area where it can become hazardous during sudden stops or in the event of important operating and maintenance(servicing) instructions in the literature accompanying the product. Do not operate the equipment again until all excess water prior to avoid mounting the product where it...
User Manual in English
Page 3
Caution 6, CAUTION Quality installations are directly in the summer time. 2.From time to operate the unit correctly as instructed. 6. It can cause hazardous radiation exposure . Do not cover the heater ducts or vents as this product is limted to normal operating ranges . Your monitor will return to its normal functions when these operating temperature are achieved. 3.Your optimum picture quality is achieved when you are best performed by qualified and certified Installers. 58) Don't touch the unit if there is not suitable for operating temperatures to return to -10°...
Caution 6, CAUTION Quality installations are directly in the summer time. 2.From time to operate the unit correctly as instructed. 6. It can cause hazardous radiation exposure . Do not cover the heater ducts or vents as this product is limted to normal operating ranges . Your monitor will return to its normal functions when these operating temperature are achieved. 3.Your optimum picture quality is achieved when you are best performed by qualified and certified Installers. 58) Don't touch the unit if there is not suitable for operating temperatures to return to -10°...

User Manual in English
Page 4
Product Controls and Functions LAMP Remote Control Eye. IR audio signals are transmitted wirelessly to optional IR headphones 4 This allows transmitting of the remote control's IR signals for controlling all functions of your monitor. Wireless Infrared (IR) Transmitter.
Product Controls and Functions LAMP Remote Control Eye. IR audio signals are transmitted wirelessly to optional IR headphones 4 This allows transmitting of the remote control's IR signals for controlling all functions of your monitor. Wireless Infrared (IR) Transmitter.

User Manual in English
Page 5
USB SDAAMS/WIS AV IN aI L 2_ sR - 7 L SD_ ODE I- 4_/14_-4 7 REMARKS: Following functions work when long pressing 1-2 seconds. Yf II 11 If If Ust8 IP if In II Disc loading slot * Caution Do not bring magnetic items such as credit cards or other cards with magnetic strips near the monitor as this may cause damage to the unit and/or magnetic item. Product Controls and Functions 0PEN OPID 7- 7 1 ;
USB SDAAMS/WIS AV IN aI L 2_ sR - 7 L SD_ ODE I- 4_/14_-4 7 REMARKS: Following functions work when long pressing 1-2 seconds. Yf II 11 If If Ust8 IP if In II Disc loading slot * Caution Do not bring magnetic items such as credit cards or other cards with magnetic strips near the monitor as this may cause damage to the unit and/or magnetic item. Product Controls and Functions 0PEN OPID 7- 7 1 ;
User Manual in English
Page 6
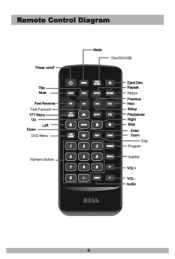
PPM mw EMT MITIM Fast Reverse Fast Forward TFT Menu Up Left Down DVD Menu Numeric Button iso. IN HN SEW NI L AJ • (v) BHP MEMI C MOM 13) 1 f 2 MEM 14 ) (a) C ) ( 7 )( 8 ) 9 Eject Disc Repeat Return Previous Next Setup Play/pause Right Stop Enter Zoom Disp Program Subtitle VOL+ VOLAudio 3ONS 6 Remote Control Diagram Power on/off Mode Disc/SD/USB Title Mute ( .1(b WOE DIN NMI -
PPM mw EMT MITIM Fast Reverse Fast Forward TFT Menu Up Left Down DVD Menu Numeric Button iso. IN HN SEW NI L AJ • (v) BHP MEMI C MOM 13) 1 f 2 MEM 14 ) (a) C ) ( 7 )( 8 ) 9 Eject Disc Repeat Return Previous Next Setup Play/pause Right Stop Enter Zoom Disp Program Subtitle VOL+ VOLAudio 3ONS 6 Remote Control Diagram Power on/off Mode Disc/SD/USB Title Mute ( .1(b WOE DIN NMI -
User Manual in English
Page 7
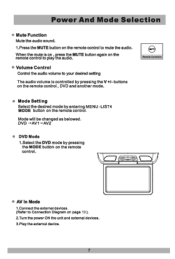
When the mute is on , press the MUTE button again on the remote control to play the audio. • Volume Control Control the audio volume to your desired setting The audio volume is controlled by pressing the MODE button on the remote control. • AV In Mode 1.Connect the external devices. (Refer to mute... -' AV1-'AV2 • DVD Mode 1.Select the DVD mode by pressing the V +1- Power And Mode Selection • Mute Function Mute the audio sound. 1.Press the MUTE button on the remote control to Connection Diagram on page 19). 2.Turn the power ON the unit and external devices. 3.Play ...
When the mute is on , press the MUTE button again on the remote control to play the audio. • Volume Control Control the audio volume to your desired setting The audio volume is controlled by pressing the MODE button on the remote control. • AV In Mode 1.Connect the external devices. (Refer to mute... -' AV1-'AV2 • DVD Mode 1.Select the DVD mode by pressing the V +1- Power And Mode Selection • Mute Function Mute the audio sound. 1.Press the MUTE button on the remote control to Connection Diagram on page 19). 2.Turn the power ON the unit and external devices. 3.Play ...

User Manual in English
Page 8
OPTION 1. Bring up the on-screen function menu by pressing the MENU button on the unit or the TFT MENU button on the remote control. 2, Select the Language ,ZOOM by pressing the menu button on the unit or TFT menu button on the remote control. 3, Control the desired mode by pressing the 11/ ► buttons on the unit or the 1 /► buttons on the remote control as your taste, 1, Bring up the on-screen function menu by pressing the MENU button on the unit or the TFT MENU button on the remote control. 2, Select the desired menu by pressing the MENU button on the unit or the TFT MENU ...
OPTION 1. Bring up the on-screen function menu by pressing the MENU button on the unit or the TFT MENU button on the remote control. 2, Select the Language ,ZOOM by pressing the menu button on the unit or TFT menu button on the remote control. 3, Control the desired mode by pressing the 11/ ► buttons on the unit or the 1 /► buttons on the remote control as your taste, 1, Bring up the on-screen function menu by pressing the MENU button on the unit or the TFT MENU button on the remote control. 2, Select the desired menu by pressing the MENU button on the unit or the TFT MENU ...
User Manual in English
Page 9
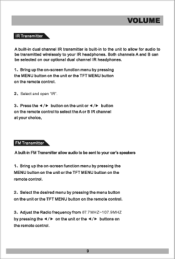
... on the unit or button on the remote control to select the A or B IR channel at your choice, A built-in to the unit to allow audio to be transmitted wirelessly to your IR headphones. VOLUME A built-in dual channel IR transmitter is built-in FM Transmitter allow for... audio to be sent to your car's speakers 1, Bring up the on-screen function menu by pressing the 1 / ► on the unit or the /► buttons ...
... on the unit or button on the remote control to select the A or B IR channel at your choice, A built-in to the unit to allow audio to be transmitted wirelessly to your IR headphones. VOLUME A built-in dual channel IR transmitter is built-in FM Transmitter allow for... audio to be sent to your car's speakers 1, Bring up the on-screen function menu by pressing the 1 / ► on the unit or the /► buttons ...

User Manual in English
Page 10
Select the S-COLOR by pressing the menu button on the unit or the TFT menu button on the remote control . buttons on the unit or the 1 /► buttons on the remote control. 3, Control the desired OSD and color by pressing the MENU button on the unit or the TFT MENU button on the remote control. 2. CLOCK 1, Bring up the on-screen function menu by pressing the 1/1. Then filled in a figure of the SLEEP,TIME, OFF-TIME,ON-TIME by pressing the MENU button on the unit or the TFT MENU button on the remote control . 10 Bring up the on-screen function menu by click your remote control...
Select the S-COLOR by pressing the menu button on the unit or the TFT menu button on the remote control . buttons on the unit or the 1 /► buttons on the remote control. 3, Control the desired OSD and color by pressing the MENU button on the unit or the TFT MENU button on the remote control. 2. CLOCK 1, Bring up the on-screen function menu by pressing the 1/1. Then filled in a figure of the SLEEP,TIME, OFF-TIME,ON-TIME by pressing the MENU button on the unit or the TFT MENU button on the remote control . 10 Bring up the on-screen function menu by click your remote control...
User Manual in English
Page 11
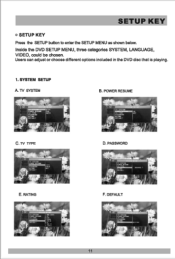
PASSWORD 1 IV trrsiu. Tr •DIN 4 -; IV UTSIENI TV TTPE SEMI IONE 11 SETUP KEY c) SETUP KEY Press the SETUP button to enter the SETUP MENU as shown below. TV SYSTEM • 14 ivNMI MIME TIVe ,As DeD aATINII DEFAULT NMI riUTO AA C. DEFAULT 'TV SYSTEM p PEPE OPFPAIl T I Vid riF D. Users can adjust or choose different options included in the DVD disc that is playing. 1. Pomll SUS t PEI • E. RATING F. SYSTEM SETUP A. POWER RESUME 'V STIITLIII I TMeTAV tI,PENII0 NE IMO DI ALI I SAFE PO POD PO -It ■ VC- TV TYPE ,v srsnr ■n IMMO WEAVE r ...
PASSWORD 1 IV trrsiu. Tr •DIN 4 -; IV UTSIENI TV TTPE SEMI IONE 11 SETUP KEY c) SETUP KEY Press the SETUP button to enter the SETUP MENU as shown below. TV SYSTEM • 14 ivNMI MIME TIVe ,As DeD aATINII DEFAULT NMI riUTO AA C. DEFAULT 'TV SYSTEM p PEPE OPFPAIl T I Vid riF D. Users can adjust or choose different options included in the DVD disc that is playing. 1. Pomll SUS t PEI • E. RATING F. SYSTEM SETUP A. POWER RESUME 'V STIITLIII I TMeTAV tI,PENII0 NE IMO DI ALI I SAFE PO POD PO -It ■ VC- TV TYPE ,v srsnr ■n IMMO WEAVE r ...
User Manual in English
Page 14
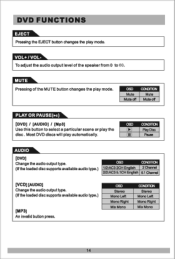
...OSD CONDITION Play Disc 11 Pause AUDIO [DVD] Change the audio output type. (If the loaded disc supports available audio type.) OSD CONDMON 1/2:AC3 2CH English 2 Channel 2/2:AC3 5.1CH English 5.1 Channel [VCD] [AUDIO] Change the audio output type. (If the loaded disc supports available audio type.) [MP3] An invalid button... Stereo Mono Left Mono Right Mix Mono CONDITION Stereo Mono Left Mono Right Mix Mono 14 VOL+ I [AUDIO] / [Mp3] Use this button to 60. To adjust the audio output level of the MUTE button changes the play the disc . Pressing of the speaker from 0 to select...
...OSD CONDITION Play Disc 11 Pause AUDIO [DVD] Change the audio output type. (If the loaded disc supports available audio type.) OSD CONDMON 1/2:AC3 2CH English 2 Channel 2/2:AC3 5.1CH English 5.1 Channel [VCD] [AUDIO] Change the audio output type. (If the loaded disc supports available audio type.) [MP3] An invalid button... Stereo Mono Left Mono Right Mix Mono CONDITION Stereo Mono Left Mono Right Mix Mono 14 VOL+ I [AUDIO] / [Mp3] Use this button to 60. To adjust the audio output level of the MUTE button changes the play the disc . Pressing of the speaker from 0 to select...
User Manual in English
Page 15
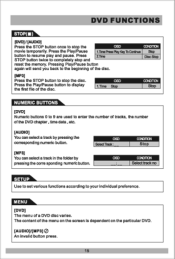
... used to stop the disc. Press the Play/Pause button to your individual preference. [DVD] The menu of the DVD chapter , time data , etc. [AUDIO] You can select a track in the folder by pressing the corresponding numeric button. OSD Select Track : __ [MP3] You can select a track by OSD ... functions according to display the first file of the menu on the screen is dependent on the particular DVD. [AUDIO]/[MP3] 0 An invalid button press. 15 DVD FUNCTIONS STOP(M) [DVD] / [AUDIO] Press the STOP button once to resume play and pause. The content of the disc. Press the Play/Pause...
... used to stop the disc. Press the Play/Pause button to your individual preference. [DVD] The menu of the DVD chapter , time data , etc. [AUDIO] You can select a track in the folder by pressing the corresponding numeric button. OSD Select Track : __ [MP3] You can select a track by OSD ... functions according to display the first file of the menu on the screen is dependent on the particular DVD. [AUDIO]/[MP3] 0 An invalid button press. 15 DVD FUNCTIONS STOP(M) [DVD] / [AUDIO] Press the STOP button once to resume play and pause. The content of the disc. Press the Play/Pause...
User Manual in English
Page 16
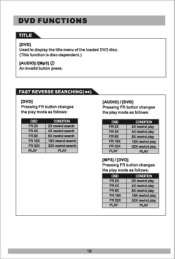
DVD FUNCTIONS [DVD] Used to display the title menu of the loaded DVD disc. (This function is disc-dependent.) [AUDIO] /[Mp3] 0 An invalid button press. [DVD] Pressing FR button changes the play mode as follows: OSD FR2X FR 4X FR 8X FR 16X FR 32X ...PLAY CONDMON 2X rewind search 4X rewind search 8X rewind search 16X rewind search 32X rewind search PLAY [AUDIO] I [DVD] Pressing FR button changes the play mode as follows: FR2X FR 4X FR 8X FR 16X FR 32X PLAY CONDITION 2X rewind play 4X...
DVD FUNCTIONS [DVD] Used to display the title menu of the loaded DVD disc. (This function is disc-dependent.) [AUDIO] /[Mp3] 0 An invalid button press. [DVD] Pressing FR button changes the play mode as follows: OSD FR2X FR 4X FR 8X FR 16X FR 32X ...PLAY CONDMON 2X rewind search 4X rewind search 8X rewind search 16X rewind search 32X rewind search PLAY [AUDIO] I [DVD] Pressing FR button changes the play mode as follows: FR2X FR 4X FR 8X FR 16X FR 32X PLAY CONDITION 2X rewind play 4X...
User Manual in English
Page 17
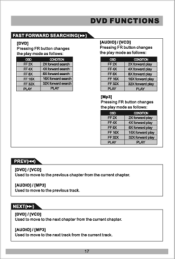
... 8X FF 16X FF 32X PLAY CONDITION 2X forward search 4X forward search 8X forward search 16X forward search 32X forward search PLAY DVD FUNCTIONS [AUDIO] [VCD] Pressing FR button changes the play mode as follows: OSD FF2X FF 4X FF 8X FF 16X FF 32X PLAY CONDMON 2X forward play... 16X forward play FF 32X PLAY 32X forward play PLAY PRE1/(i44) [DVD] / [VCD] Used to move to the previous chapter from the current chapter. [AUDIO] / [MP3] Used to move to the previous track. [DVD] I [VCD] Used to move to the next chapter from the current chapter...
... 8X FF 16X FF 32X PLAY CONDITION 2X forward search 4X forward search 8X forward search 16X forward search 32X forward search PLAY DVD FUNCTIONS [AUDIO] [VCD] Pressing FR button changes the play mode as follows: OSD FF2X FF 4X FF 8X FF 16X FF 32X PLAY CONDMON 2X forward play... 16X forward play FF 32X PLAY 32X forward play PLAY PRE1/(i44) [DVD] / [VCD] Used to move to the previous chapter from the current chapter. [AUDIO] / [MP3] Used to move to the previous track. [DVD] I [VCD] Used to move to the next chapter from the current chapter...

User Manual in English
Page 18
DVD FUNCTIONS [DVD] Pressing REPEAT button changes the play mode as follows. OSD Chapter The All CONDMON Repeat chapter repeat title all repeat off [MP3] Used to change the play mode. OSD Track All comxnoN Repeat single all Random random play Single single play mode as follows. Pressing REPEAT button changes the play mode as follows: OSD CONDMON Repeat One Single Repeat Folder repeat folder Folder repeat folder one time Shuffle all repeat off [VCD] An invalid button press. [AUDIO] Pressing REPEAT button changes the play 18
DVD FUNCTIONS [DVD] Pressing REPEAT button changes the play mode as follows. OSD Chapter The All CONDMON Repeat chapter repeat title all repeat off [MP3] Used to change the play mode. OSD Track All comxnoN Repeat single all Random random play Single single play mode as follows. Pressing REPEAT button changes the play mode as follows: OSD CONDMON Repeat One Single Repeat Folder repeat folder Folder repeat folder one time Shuffle all repeat off [VCD] An invalid button press. [AUDIO] Pressing REPEAT button changes the play 18

User Manual in English
Page 19
Connect yellow positive (+) wire 2. Check your vechicle' s door trigger is positive "+" or negative "-" 3. Connect unit one correct trigger wire (positive "+" or negative "-" ) with vechicle' s door trigger in accordance 19 CND (BLACK) ACC (R BD) PIM BOX fl Connection Diagram D = AUDIO1 R IN(RED) AUDIO 1 LIN(WHLTE) VIDE01 IN(YELLOW) AUDIO R OUT(RED) AUDIO LOUT(WHITE) VIDEO OUT(YELLOIV) n 0 TR+ (ME) TB-MLACI) B+ MILOS FM Antenna(BLACI) *How to connect the DOOR TRIGGER wire 1.
Connect yellow positive (+) wire 2. Check your vechicle' s door trigger is positive "+" or negative "-" 3. Connect unit one correct trigger wire (positive "+" or negative "-" ) with vechicle' s door trigger in accordance 19 CND (BLACK) ACC (R BD) PIM BOX fl Connection Diagram D = AUDIO1 R IN(RED) AUDIO 1 LIN(WHLTE) VIDE01 IN(YELLOW) AUDIO R OUT(RED) AUDIO LOUT(WHITE) VIDEO OUT(YELLOIV) n 0 TR+ (ME) TB-MLACI) B+ MILOS FM Antenna(BLACI) *How to connect the DOOR TRIGGER wire 1.

User Manual in English
Page 20
Align mounting plate with installation position and secure plate with screws 0 0 e 0 , off 0 Use the correct screws that matches the car. 3.Tighten the unit with the supplied SCREW B. 119 20 Installation 1.Open the box and check the contents. T T T T 0 of 0 Mounting Plate UNIT SCREW B 2.
Align mounting plate with installation position and secure plate with screws 0 0 e 0 , off 0 Use the correct screws that matches the car. 3.Tighten the unit with the supplied SCREW B. 119 20 Installation 1.Open the box and check the contents. T T T T 0 of 0 Mounting Plate UNIT SCREW B 2.

User Manual in English
Page 21
SNAP JOINT Swivel cover moving/assembling Use supplied small tool to release the Screen back. The Shroud/Screen back will snap in place SNAP JOINT 0 21 Pressing the swviel cover over the swivel, the cover will snap in place. Insert the supplied pry tool between the Housing Screen back, then press the pry tool to insert the hook hole, and get the cover off. Interchangeabel housing change diagram Assembling the shroud Begining by hooking the area and press the shroud over the pod. Assembling the screen back Begin by screws supplied.Removing shroud Release screws and take out...
SNAP JOINT Swivel cover moving/assembling Use supplied small tool to release the Screen back. The Shroud/Screen back will snap in place SNAP JOINT 0 21 Pressing the swviel cover over the swivel, the cover will snap in place. Insert the supplied pry tool between the Housing Screen back, then press the pry tool to insert the hook hole, and get the cover off. Interchangeabel housing change diagram Assembling the shroud Begining by hooking the area and press the shroud over the pod. Assembling the screen back Begin by screws supplied.Removing shroud Release screws and take out...
User Manual in English
Page 22
.... Discs that is recorded on eight side of the disc (the side with a clean cloth. Do not use of various versions, but also S-VCD,VCD,audio CD and Mp3 disc .
.... Discs that is recorded on eight side of the disc (the side with a clean cloth. Do not use of various versions, but also S-VCD,VCD,audio CD and Mp3 disc .
