
User Manual
Page 2
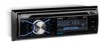
CONTENTS Precautions...1 How to Handle Discs...1 Lithium Battery Cell Warnings...1 Installation ...2 Prepare Radio...2 Mount Radio...2-3 Wiring Connections...3 Uninstall the Main Unit ...4 Control Panel Button Locations ...5 General Operation ...6 Turn Unit .../Folder Navigation ...8 Bluetooth Operation...9 Pair and Connect ...9 Make a Call ...9 Redial Last Dialed Number ...9 Answer a Call...9 End a Call ...9 Switch Audio Between Car and Phone 9 Adjust Talk Volume...9 Bluetooth Music (A2DP)...9 Remote Control ...10 Remove Insulating Sheet...10 Replace Lithium Battery Cell...10 Remote Control ...
CONTENTS Precautions...1 How to Handle Discs...1 Lithium Battery Cell Warnings...1 Installation ...2 Prepare Radio...2 Mount Radio...2-3 Wiring Connections...3 Uninstall the Main Unit ...4 Control Panel Button Locations ...5 General Operation ...6 Turn Unit .../Folder Navigation ...8 Bluetooth Operation...9 Pair and Connect ...9 Make a Call ...9 Redial Last Dialed Number ...9 Answer a Call...9 End a Call ...9 Switch Audio Between Car and Phone 9 Adjust Talk Volume...9 Bluetooth Music (A2DP)...9 Remote Control ...10 Remove Insulating Sheet...10 Replace Lithium Battery Cell...10 Remote Control ...
User Manual
Page 4
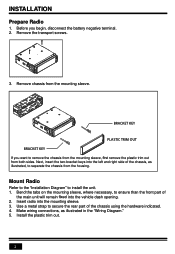
... part of the chassis using the hardware indicated. 4. BRACKET KEY PLASTIC TRIM OUT BRACKET KEY If you begin, disconnect the battery negative terminal. 2. Install the plastic trim out. 2 INSTALLATION Prepare Radio 1. Before you want to secure the rear part of the main unit will remain into the mounting sleeve. 3. Mount Radio Refer...
... part of the chassis using the hardware indicated. 4. BRACKET KEY PLASTIC TRIM OUT BRACKET KEY If you begin, disconnect the battery negative terminal. 2. Install the plastic trim out. 2 INSTALLATION Prepare Radio 1. Before you want to secure the rear part of the main unit will remain into the mounting sleeve. 3. Mount Radio Refer...
User Manual
Page 5
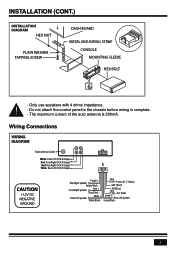
... (Red) Front Left Speaker White + Green + Rear Left Speaker White/Black - Green/Black - 3 Fuse 15A Power B+ ( Yellow) GND (Black) Front Right Speaker Gray + Gray/Black - INSTALLATION (CONT.) INSTALLATION DIAGRAM HEX NUT PLAIN WASHER TAPPING SCREW DASH BOARD METAL MOUNTING STRAP CONSOLE MOUNTING SLEEVE HEX BOLT -
... (Red) Front Left Speaker White + Green + Rear Left Speaker White/Black - Green/Black - 3 Fuse 15A Power B+ ( Yellow) GND (Black) Front Right Speaker Gray + Gray/Black - INSTALLATION (CONT.) INSTALLATION DIAGRAM HEX NUT PLAIN WASHER TAPPING SCREW DASH BOARD METAL MOUNTING STRAP CONSOLE MOUNTING SLEEVE HEX BOLT -
User Manual
Page 6
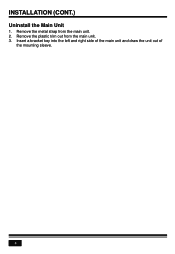
INSTALLATION (CONT.) Uninstall the Main Unit 1. Remove the metal strap from the main unit. 3. Remove the plastic trim out from the main unit. 2. Insert a bracket key into the left and right side of the main unit and draw the unit out of the mounting sleeve. 4
INSTALLATION (CONT.) Uninstall the Main Unit 1. Remove the metal strap from the main unit. 3. Remove the plastic trim out from the main unit. 2. Insert a bracket key into the left and right side of the main unit and draw the unit out of the mounting sleeve. 4
User Manual
Page 14
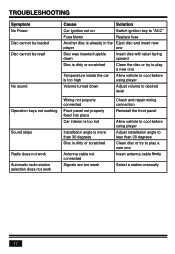
...volume to desired level Operation keys not working Wiring not properly connected Front panel not properly into place Car interior is too hot Sound skips Installation angle is more than 30 degrees Disc is dirty or scratched Radio does not work Automatic radio station selection does not work Antenna cable not... connected Signals are too weak Check and repair wiring connection Reinstall the front panel Allow vehicle to cool before using player Adjust installation angle to less than 30 degrees Clean disc or try to play a new one Insert antenna cable Select a station manually 12
...volume to desired level Operation keys not working Wiring not properly connected Front panel not properly into place Car interior is too hot Sound skips Installation angle is more than 30 degrees Disc is dirty or scratched Radio does not work Automatic radio station selection does not work Antenna cable not... connected Signals are too weak Check and repair wiring connection Reinstall the front panel Allow vehicle to cool before using player Adjust installation angle to less than 30 degrees Clean disc or try to play a new one Insert antenna cable Select a station manually 12


