English Owners Guide
Page 2
...speaker wire and interconnect cables included with a dry cloth. 7. X: Indicates that could void the user's authority to ventilation requirements, Bose does not recommend placing the product in a confined space such as household waste, and should be found to comply with the ... that produce heat. • Do not use caution when moving the cart/apparatus combination to qualified personnel. The complete Declaration of Conformity can radiate radio frequency energy and, if not installed and used , use the ToneMatch® T4S/T8S mixer with the provisions of GB/T 26572.
...speaker wire and interconnect cables included with a dry cloth. 7. X: Indicates that could void the user's authority to ventilation requirements, Bose does not recommend placing the product in a confined space such as household waste, and should be found to comply with the ... that produce heat. • Do not use caution when moving the cart/apparatus combination to qualified personnel. The complete Declaration of Conformity can radiate radio frequency energy and, if not installed and used , use the ToneMatch® T4S/T8S mixer with the provisions of GB/T 26572.
English Owners Guide
Page 3
...T4S ToneMatch® Mixer 6 Control Panel 6 Connection Panel 7 T8S ToneMatch® Mixer 8 Control Panel 8 Connection Panel 9 System Setup Removing/Attaching the Cover 10 Mounting Options 11 Mounting the T4S/T8S on a Camera Tripod Stand 11 Connecting the T4S via Digital Connection 12 Connecting the T4S/T8S via...Channel Effects 18 Using the Rotary Selector 19 Editing the Sound of a Channel 20 Using the Pan/Aux Functions 20 Using the Tuner 20 Selecting a ToneMatch® Preset 22 Adjusting zEQ 22 Adjusting Para EQ 23 Using Compressor/Gate Functions 23 Using Modulation Effects ...
...T4S ToneMatch® Mixer 6 Control Panel 6 Connection Panel 7 T8S ToneMatch® Mixer 8 Control Panel 8 Connection Panel 9 System Setup Removing/Attaching the Cover 10 Mounting Options 11 Mounting the T4S/T8S on a Camera Tripod Stand 11 Connecting the T4S via Digital Connection 12 Connecting the T4S/T8S via...Channel Effects 18 Using the Rotary Selector 19 Editing the Sound of a Channel 20 Using the Pan/Aux Functions 20 Using the Tuner 20 Selecting a ToneMatch® Preset 22 Adjusting zEQ 22 Adjusting Para EQ 23 Using Compressor/Gate Functions 23 Using Modulation Effects ...

English Owners Guide
Page 4
English Contents Using Global Functions 27 Selecting a Reverb Type 27 Using the Prefs Utilities 28 Loading and Saving Scenes 30 Sharing a Scene 33 Bose Scenes 35 Factory Settings 35 Singer/Songwriter 36 DJ/Playback 38 Full Band 40 Factory Settings Factory Settings 42 Care & Maintenance Troubleshooting 43 Cleaning 46 Technical Information 46 Additional Resources Contact Information 47 Importer Information 47 Additional Information 47 Limited Warranty 47 4 -
English Contents Using Global Functions 27 Selecting a Reverb Type 27 Using the Prefs Utilities 28 Loading and Saving Scenes 30 Sharing a Scene 33 Bose Scenes 35 Factory Settings 35 Singer/Songwriter 36 DJ/Playback 38 Full Band 40 Factory Settings Factory Settings 42 Care & Maintenance Troubleshooting 43 Cleaning 46 Technical Information 46 Additional Resources Contact Information 47 Importer Information 47 Additional Information 47 Limited Warranty 47 4 -
English Owners Guide
Page 5
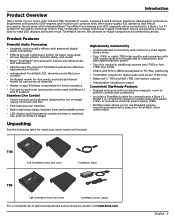
..., please visit www.Bose.com. Engineered with T4S and T8S ToneMatch® mixers, compact 4 and 8 channel interfaces designed for what your music with powerful DSP engines and intuitive user controls, they offer studio-quality EQ, dynamics and effects processing. Sound great with these rugged ToneMatch mixers using tactile controls, easy-to keep your ToneMatch mixer within reach Unpacking See...
..., please visit www.Bose.com. Engineered with T4S and T8S ToneMatch® mixers, compact 4 and 8 channel interfaces designed for what your music with powerful DSP engines and intuitive user controls, they offer studio-quality EQ, dynamics and effects processing. Sound great with these rugged ToneMatch mixers using tactile controls, easy-to keep your ToneMatch mixer within reach Unpacking See...

English Owners Guide
Page 6
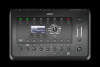
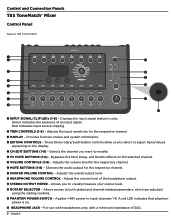
... - u VOLUME CONTROLS (1-4) - a HEADPHONE VOLUME CONTROL - Applies +48V power to both global and channel-related parameters, which are adjusted using the editing controls. A red LED indicates that phantom power is on the selected channel. English t CH EDIT BUTTONS (1-4) - d PHANTOM POWER SWITCH - For... output. e DISPLAY - s ROTARY SELECTOR - Adjusts the overall output level. r EDITING CONTROLS - Control and Connection Panels T4S ToneMatch® Mixer Control Panel Figure 1. T4S Control Panel q w d e s r t a y f u o i q INPUT SIGNAL/CLIP LEDs (1-4) -
... - u VOLUME CONTROLS (1-4) - a HEADPHONE VOLUME CONTROL - Applies +48V power to both global and channel-related parameters, which are adjusted using the editing controls. A red LED indicates that phantom power is on the selected channel. English t CH EDIT BUTTONS (1-4) - d PHANTOM POWER SWITCH - For... output. e DISPLAY - s ROTARY SELECTOR - Adjusts the overall output level. r EDITING CONTROLS - Control and Connection Panels T4S ToneMatch® Mixer Control Panel Figure 1. T4S Control Panel q w d e s r t a y f u o i q INPUT SIGNAL/CLIP LEDs (1-4) -

English Owners Guide
Page 7
... unbalanced cables for high-impedance inputs, such as guitars. Accepts the included ToneMatch® cable. e USB 2.0 TYPE-A - u INPUTS 1-4 - A digital output used in stereo to the T4S mixer from an AC outlet via a ToneMatch power supply (not included with Digital Main Output R. Delivers power to two... L1® Model 1S/II systems. Note: Only used by the L1 Model 1S/II system. Analog input ...
... unbalanced cables for high-impedance inputs, such as guitars. Accepts the included ToneMatch® cable. e USB 2.0 TYPE-A - u INPUTS 1-4 - A digital output used in stereo to the T4S mixer from an AC outlet via a ToneMatch power supply (not included with Digital Main Output R. Delivers power to two... L1® Model 1S/II systems. Note: Only used by the L1 Model 1S/II system. Analog input ...
English Owners Guide
Page 8
... Control and Connection Panels T8S ToneMatch® Mixer Control Panel Figure 3. u VOLUME CONTROLS (1-8) - Silences the audio output for the respective channel. Allows access to input channels 1-8. A red LED indicates that phantom power is on the selected channel. g HEADPHONE JACK - For use with headphones only, with... items/values appearing on the display. Applies +48V power to both global and channel-related parameters, which are adjusted using the editing controls. Provides function menus and system information. Adjusts the overall output level. d ROTARY SELECTOR - Displays ...
... Control and Connection Panels T8S ToneMatch® Mixer Control Panel Figure 3. u VOLUME CONTROLS (1-8) - Silences the audio output for the respective channel. Allows access to input channels 1-8. A red LED indicates that phantom power is on the selected channel. g HEADPHONE JACK - For use with headphones only, with... items/values appearing on the display. Applies +48V power to both global and channel-related parameters, which are adjusted using the editing controls. Provides function menus and system information. Adjusts the overall output level. d ROTARY SELECTOR - Displays ...

English Owners Guide
Page 9
...cables. Four user-definable analog outputs. Can be configured for stereo output. A USB interface that allows you to connect the mixer to stream audio from your computer. Main analog output. Accepts 1/4" TRS balanced or TS unbalanced cables for high-impedance inputs,... output. Accepts 1/4" TRS balanced or TS unbalanced cables. For use w/ ToneMatch power supply (see "Connecting the ToneMatch® Power Supply" on or off. CAUTION: Although the ToneMatch port accepts a standard RJ-45 connector, do NOT connect the T8S to the L1® Model 1S/II. r ANALOG L/R ...
...cables. Four user-definable analog outputs. Can be configured for stereo output. A USB interface that allows you to connect the mixer to stream audio from your computer. Main analog output. Accepts 1/4" TRS balanced or TS unbalanced cables for high-impedance inputs,... output. Accepts 1/4" TRS balanced or TS unbalanced cables. For use w/ ToneMatch power supply (see "Connecting the ToneMatch® Power Supply" on or off. CAUTION: Although the ToneMatch port accepts a standard RJ-45 connector, do NOT connect the T8S to the L1® Model 1S/II. r ANALOG L/R ...
English Owners Guide
Page 11
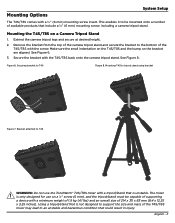
... tripod stand. English - 11 Bracket attached to T4S Figure 8. This enables it to tripod stand using bracket Figure 7. Mounting the T4S/T8S on the bracket are aligned. Figure 6. The mixer is only designed for use the ToneMatch® T4S/T8S mixer with the screw. Extend the camera tripod legs and secure at desired height. 2. Secure the bracket...
... tripod stand. English - 11 Bracket attached to T4S Figure 8. This enables it to tripod stand using bracket Figure 7. Mounting the T4S/T8S on the bracket are aligned. Figure 6. The mixer is only designed for use the ToneMatch® T4S/T8S mixer with the screw. Extend the camera tripod legs and secure at desired height. 2. Secure the bracket...

English Owners Guide
Page 12
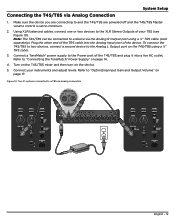
... power stand to a T4S via Digital Connection 1. English Two L1 model II systems connected to the Digital Main Output L port on the T4S using a ToneMatch cable. 3. Turn on the mixer and then turn on the power stand. System Setup Connecting the T4S via digital connection USB AUDIO MONO M () Note: The... T8S cannot be connected digitally and cannot be powered by the L1 Model 1S/II. 12 - Figure 9. Refer to minimum. 2. Make sure ...
... power stand to a T4S via Digital Connection 1. English Two L1 model II systems connected to the Digital Main Output L port on the T4S using a ToneMatch cable. 3. Turn on the mixer and then turn on the power stand. System Setup Connecting the T4S via digital connection USB AUDIO MONO M () Note: The... T8S cannot be connected digitally and cannot be powered by the L1 Model 1S/II. 12 - Figure 9. Refer to minimum. 2. Make sure ...
English Owners Guide
Page 13
...levels. Using XLR balanced cables, connect one or two devices to "Connecting the ToneMatch® Power Supply" on the T4S/T8S using a 1/4" TRS cable (sold separately). Plug the other end of the TRS cable into the Analog Input port of the T4S/T8S and plug...ToneMatch® power supply to the Analog L Output port on page 14. 4. Refer to a T8S via Analog Connection 1. Figure 10. Two F1 systems connected to "Optimizing Input Gain and Output Volume" on the device. 5. Connect your T8S (see Figure 10). Note: The T4S/T8S can be connected to minimum. 2. Turn on the T4S/T8S mixer...
...levels. Using XLR balanced cables, connect one or two devices to "Connecting the ToneMatch® Power Supply" on the T4S/T8S using a 1/4" TRS cable (sold separately). Plug the other end of the TRS cable into the Analog Input port of the T4S/T8S and plug...ToneMatch® power supply to the Analog L Output port on page 14. 4. Refer to a T8S via Analog Connection 1. Figure 10. Two F1 systems connected to "Optimizing Input Gain and Output Volume" on the device. 5. Connect your T8S (see Figure 10). Note: The T4S/T8S can be connected to minimum. 2. Turn on the T4S/T8S mixer...

English Owners Guide
Page 15
...T8S to a computer, you also can use the T4S/T8S as a general-purpose USB audio device for details on updating your mixer. Figure 12. Visit www.Bose.com/livesound for recording/playback. Plug one end of the USB cable into a USB port on the mixer. Figure 13. To an L1 Model 1S/II system or an ToneMatch...may need to a power source (ToneMatch® power supply for T4S/T8S or an L1 Model 1S/II for 48 kHz/24-bit operation. When using the T4S/T8S with WAV/MP3 files into the mixer's USB 2.0 Type-B port (Figure 12). 3. Connect the mixer to configure the software settings for ...
...T8S to a computer, you also can use the T4S/T8S as a general-purpose USB audio device for details on updating your mixer. Figure 12. Visit www.Bose.com/livesound for recording/playback. Plug one end of the USB cable into a USB port on the mixer. Figure 13. To an L1 Model 1S/II system or an ToneMatch...may need to a power source (ToneMatch® power supply for T4S/T8S or an L1 Model 1S/II for 48 kHz/24-bit operation. When using the T4S/T8S with WAV/MP3 files into the mixer's USB 2.0 Type-B port (Figure 12). 3. Connect the mixer to configure the software settings for ...

English Owners Guide
Page 17
... when adjusting the input Trim level (see page 28). 3. English - 17 Make sure the Master volume, Trim, and channel volume controls are using a device that requires phantom power (+48V), such as a condenser microphone, depress the Phantom power switch before adjusting the Trim control. B. Play... the desired level. If applicable, adjust the volume of input channel gain, master volume, and channel volume. Do the following for each channel used. 1. Adjust input channel Trim. A. Note: The input level meter in the Prefs menu to check your input levels Input Level Preferences Ch ...
... when adjusting the input Trim level (see page 28). 3. English - 17 Make sure the Master volume, Trim, and channel volume controls are using a device that requires phantom power (+48V), such as a condenser microphone, depress the Phantom power switch before adjusting the Trim control. B. Play... the desired level. If applicable, adjust the volume of input channel gain, master volume, and channel volume. Do the following for each channel used. 1. Adjust input channel Trim. A. Note: The input level meter in the Prefs menu to check your input levels Input Level Preferences Ch ...
English Owners Guide
Page 18
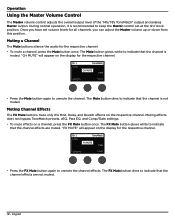
...FX Mute button again to indicate that the channel effects are muted. The Mute button dims to unmute the channel effects. Ch 1 Utility ToneMatch CH MUTE Flat Category Preset • Press the Mute button again to indicate that the channel is muted. English "FX MUTE" will...appear on the respective channel. The FX Mute button dims to unmute the channel. Operation Using the Master Volume Control The Master volume control adjusts the overall output level of the T4S/T8S ToneMatch® output and analog Master output. Muting a Channel The Mute buttons silence the audio ...
...FX Mute button again to indicate that the channel effects are muted. The Mute button dims to unmute the channel effects. Ch 1 Utility ToneMatch CH MUTE Flat Category Preset • Press the Mute button again to indicate that the channel is muted. English "FX MUTE" will...appear on the respective channel. The FX Mute button dims to unmute the channel. Operation Using the Master Volume Control The Master volume control adjusts the overall output level of the T4S/T8S ToneMatch® output and analog Master output. Muting a Channel The Mute buttons silence the audio ...

English Owners Guide
Page 19
...gate, compression, limiter, de-esser, and kick drum presets with adjustable parameters. Applies a selected type of the ToneMatch® mixer output. d Scenes - o Reverb - The following pages describe how to pan, aux ins, and aux ...outs. Provides access to adjust each function. Provides access to mains or aux. Applies reverb to a selected channel and can be sent to proprietary ToneMatch presets designed for an instrument playing into the selected channel. Operation Using...
...gate, compression, limiter, de-esser, and kick drum presets with adjustable parameters. Applies a selected type of the ToneMatch® mixer output. d Scenes - o Reverb - The following pages describe how to pan, aux ins, and aux ...outs. Provides access to adjust each function. Provides access to mains or aux. Applies reverb to a selected channel and can be sent to proprietary ToneMatch presets designed for an instrument playing into the selected channel. Operation Using...

English Owners Guide
Page 20
...Pan 6 Lvl 50% 20 - To edit a channel: 1. Adjust the settings for the selected channel only. Press the CH Edit 1, 2, 3, 4, (T4S and T8S) 5, 6, 7, or 8 (T8S only) button. Rotate the Pan control to adjust the line output from L to R. Rotate the 5 Lvl or 6 Lvl control to 5 Pan; The CH Edit functions... are Pan/ Aux, Tuner, ToneMatch®, zEQ, Para EQ, Comp/Gate, Mod, Delay, and Reverb. Ch 1 Pan Menu Pan Pan 1. Select one channel at a time. Press the 5 Lvl to switch to adjust the signal level of the CH Edit functions using the following instructions.
...Pan 6 Lvl 50% 20 - To edit a channel: 1. Adjust the settings for the selected channel only. Press the CH Edit 1, 2, 3, 4, (T4S and T8S) 5, 6, 7, or 8 (T8S only) button. Rotate the Pan control to adjust the line output from L to R. Rotate the 5 Lvl or 6 Lvl control to 5 Pan; The CH Edit functions... are Pan/ Aux, Tuner, ToneMatch®, zEQ, Para EQ, Comp/Gate, Mod, Delay, and Reverb. Ch 1 Pan Menu Pan Pan 1. Select one channel at a time. Press the 5 Lvl to switch to adjust the signal level of the CH Edit functions using the following instructions.

English Owners Guide
Page 21
...processing, recording, and sound reinforcement applications. A. Dry: After Preamp - C. As you tune, a pitch indicator appears on each of your tuning using the reference pitch. Adjust the pitch of the available Aux outputs: Note: To mute the Aux output, press the Level control. Operation Routing Input... processing) signal is available on the display, showing you to route signals to two Aux outputs (T4S only) or four Aux outputs (T8S only) for each input channel. Note: For silent tuning, press the Mute button for the applicable channel. Or precisely dial in bold type...
...processing, recording, and sound reinforcement applications. A. Dry: After Preamp - C. As you tune, a pitch indicator appears on each of your tuning using the reference pitch. Adjust the pitch of the available Aux outputs: Note: To mute the Aux output, press the Level control. Operation Routing Input... processing) signal is available on the display, showing you to route signals to two Aux outputs (T4S only) or four Aux outputs (T8S only) for each input channel. Note: For silent tuning, press the Mute button for the applicable channel. Or precisely dial in bold type...

English Owners Guide
Page 23
Ch 1 Select PEQ 1 Parametric EQ B3 Width Level Freq -3.4dB 250.0Hz Using Compressor/Gate Functions The Comp/Gate function provides access to activate. 1. Compressor featuring a preset low-compression ratio with variable threshold and gain parameters. Compressor featuring a ...
Ch 1 Select PEQ 1 Parametric EQ B3 Width Level Freq -3.4dB 250.0Hz Using Compressor/Gate Functions The Comp/Gate function provides access to activate. 1. Compressor featuring a preset low-compression ratio with variable threshold and gain parameters. Compressor featuring a ...

English Owners Guide
Page 24
... to 30.0 dB. Rotate the Tight control to adjust the tightness (how quickly the gate closes) from the microphone. Using the KickGate The KickGate is a Bose® proprietary technology designed specifically for kick drums. This robust gate provides maximum gain before feedback, making your channel input Trim...to adjust the input threshold (trigger) level from microphones and instruments. Connect the appropriate type of gain reduction. Select an appropriate ToneMatch® preset. 3. Adjust the channel input Trim control until the hardest kick drum hits turn the input channel LED red, ...
... to 30.0 dB. Rotate the Tight control to adjust the tightness (how quickly the gate closes) from the microphone. Using the KickGate The KickGate is a Bose® proprietary technology designed specifically for kick drums. This robust gate provides maximum gain before feedback, making your channel input Trim...to adjust the input threshold (trigger) level from microphones and instruments. Connect the appropriate type of gain reduction. Select an appropriate ToneMatch® preset. 3. Adjust the channel input Trim control until the hardest kick drum hits turn the input channel LED red, ...

English Owners Guide
Page 25
...% Speed Depth 50% Operation 1. Includes adjustable mix, depth, and speed parameters. Flanger 1: Tape - Phaser 3: Warm - I. Works well as an effect on electric guitars and keyboards. Using Modulation Effects The Mod function allows you to access the Speed parameter. F. Classic "stompbox"-style phaser. G. Works well as an effect on guitars, keyboards, and...
...% Speed Depth 50% Operation 1. Includes adjustable mix, depth, and speed parameters. Flanger 1: Tape - Phaser 3: Warm - I. Works well as an effect on electric guitars and keyboards. Using Modulation Effects The Mod function allows you to access the Speed parameter. F. Classic "stompbox"-style phaser. G. Works well as an effect on guitars, keyboards, and...


