English Owners Guide
Page 2
... this device must not be discarded as power-supply cord or plug is not designed to support the size and mass of GB/T 26572. Using a tripod/ stand that may cause undesired operation. Names and Contents of Toxic or Hazardous Substances and Elements Toxic or Hazardous Substances and Elements Part Name PCBs Metal parts Plastic parts Speakers Cables Lead (Pb) X Mercury (Hg) 0 Cadmium Hexavalent Polybrominated...
... this device must not be discarded as power-supply cord or plug is not designed to support the size and mass of GB/T 26572. Using a tripod/ stand that may cause undesired operation. Names and Contents of Toxic or Hazardous Substances and Elements Toxic or Hazardous Substances and Elements Part Name PCBs Metal parts Plastic parts Speakers Cables Lead (Pb) X Mercury (Hg) 0 Cadmium Hexavalent Polybrominated...
English Owners Guide
Page 3
...; Mixer 8 Control Panel 8 Connection Panel 9 System Setup Removing/Attaching the Cover 10 Mounting Options 11 Mounting the T4S/T8S on a Camera Tripod Stand 11 Connecting the T4S via Digital Connection 12 Connecting the T4S/T8S via Analog Connection 13 Connecting the ToneMatch® Power Supply 14 Connecting the T4S/T8S to Your Computer 15 Connecting a Flash Drive to the T4S/T8S 15 Operation Reading the T4S/T8S Display 16 Optimizing Input Gain and Output Volume 17 Using the Master Volume Control 18 Muting a Channel...
...; Mixer 8 Control Panel 8 Connection Panel 9 System Setup Removing/Attaching the Cover 10 Mounting Options 11 Mounting the T4S/T8S on a Camera Tripod Stand 11 Connecting the T4S via Digital Connection 12 Connecting the T4S/T8S via Analog Connection 13 Connecting the ToneMatch® Power Supply 14 Connecting the T4S/T8S to Your Computer 15 Connecting a Flash Drive to the T4S/T8S 15 Operation Reading the T4S/T8S Display 16 Optimizing Input Gain and Output Volume 17 Using the Master Volume Control 18 Muting a Channel...
English Owners Guide
Page 5
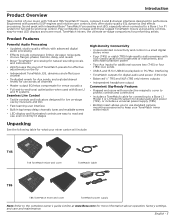
... digital audio and power (T4S only) • Balanced ¼" TRS and XLR (T8S only) stereo outputs • Independent headphone output Convenient Gig-Ready Features • Rugged enclosure with these rugged ToneMatch mixers using tactile controls, easy-to-read and use standard camera mounting accessories to keep your ToneMatch mixer within reach Unpacking See the following table for what your music with T4S and T8S ToneMatch® mixers, compact 4 and 8 channel...
... digital audio and power (T4S only) • Balanced ¼" TRS and XLR (T8S only) stereo outputs • Independent headphone output Convenient Gig-Ready Features • Rugged enclosure with these rugged ToneMatch mixers using tactile controls, easy-to-read and use standard camera mounting accessories to keep your ToneMatch mixer within reach Unpacking See the following table for what your music with T4S and T8S ToneMatch® mixers, compact 4 and 8 channel...

English Owners Guide
Page 6
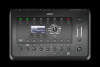
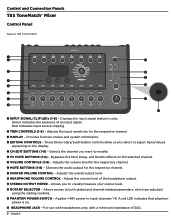
...Adjusts the volume level for the respective channel. a HEADPHONE VOLUME CONTROL - For use with headphones only, with a minimum impedance of an input signal Red: Indicates input source clipping w TRIM CONTROLS (1-4) - Control and Connection Panels T4S ToneMatch® Mixer Control Panel Figure 1. u VOLUME CONTROLS (1-4) - o MASTER VOLUME CONTROL - s ROTARY SELECTOR - i MUTE BUTTONS (1-4) - Adjusts the overall output level. Adjusts the volume level of the headphone output. r EDITING CONTROLS - Allows access to modify. f HEADPHONE JACK - English T4S Control Panel...
...Adjusts the volume level for the respective channel. a HEADPHONE VOLUME CONTROL - For use with headphones only, with a minimum impedance of an input signal Red: Indicates input source clipping w TRIM CONTROLS (1-4) - Control and Connection Panels T4S ToneMatch® Mixer Control Panel Figure 1. u VOLUME CONTROLS (1-4) - o MASTER VOLUME CONTROL - s ROTARY SELECTOR - i MUTE BUTTONS (1-4) - Adjusts the overall output level. Adjusts the volume level of the headphone output. r EDITING CONTROLS - Allows access to modify. f HEADPHONE JACK - English T4S Control Panel...

English Owners Guide
Page 7
.../II power stand. Connection Panel Figure 2. Connect digitally in stereo with the T4S). A USB interface that allows you to stream audio from an AC outlet via a ToneMatch power supply (not included with Digital Main Output R. Accepts 1/4" TRS balanced or TS unbalanced cables. Can be used for a pre-fader, post-EQ, and effects, or post-fader output. Analog input channels 5/6. Analog input channels 1-4. T4S Connection Panel q we r Control and Connection Panels t y USB AUDIO MONO () M o i u q POWER SWITCH - e USB 2.0 TYPE-A - Main analog output...
.../II power stand. Connection Panel Figure 2. Connect digitally in stereo with the T4S). A USB interface that allows you to stream audio from an AC outlet via a ToneMatch power supply (not included with Digital Main Output R. Accepts 1/4" TRS balanced or TS unbalanced cables. Can be used for a pre-fader, post-EQ, and effects, or post-fader output. Analog input channels 5/6. Analog input channels 1-4. T4S Connection Panel q we r Control and Connection Panels t y USB AUDIO MONO () M o i u q POWER SWITCH - e USB 2.0 TYPE-A - Main analog output...
English Owners Guide
Page 8
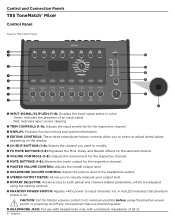
... controls. y FX MUTE BUTTONS (1-8) - Applies +48V power to select or adjust items/values appearing on the display. u VOLUME CONTROLS (1-8) - Adjusts the overall output level. s STEREO OUTPUT METER - Adjust the volume level of an input signal Red: Indicates input source clipping w TRIM CONTROLS (1-8) - For use with headphones only, with a minimum impedance of 24Ω. 8 - a HEADPHONE VOLUME CONTROL - A red LED indicates that phantom power is on the selected channel. Control and Connection Panels T8S ToneMatch® Mixer Control Panel Figure 3. T8S Control Panel...
... controls. y FX MUTE BUTTONS (1-8) - Applies +48V power to select or adjust items/values appearing on the display. u VOLUME CONTROLS (1-8) - Adjusts the overall output level. s STEREO OUTPUT METER - Adjust the volume level of an input signal Red: Indicates input source clipping w TRIM CONTROLS (1-8) - For use with headphones only, with a minimum impedance of 24Ω. 8 - a HEADPHONE VOLUME CONTROL - A red LED indicates that phantom power is on the selected channel. Control and Connection Panels T8S ToneMatch® Mixer Control Panel Figure 3. T8S Control Panel...

English Owners Guide
Page 9
... stereo output. i XLR STEREO OUTPUT - For use w/ ToneMatch power supply (see "Connecting the ToneMatch® Power Supply" on or off. Note: The T8S is NOT designed to connect digitally to your flash drive. Connection Panel Figure 4. Turns the mixer on page 14). e USB 2.0 TYPE-A - Accepts 1/4" TRS balanced or TS unbalanced cables. Accepts 1/4" TRS balanced or TS unbalanced cables for a pre-fader, post-EQ, and effects, or post-fader output. Can be configured for line-level inputs. u INPUTS...
... stereo output. i XLR STEREO OUTPUT - For use w/ ToneMatch power supply (see "Connecting the ToneMatch® Power Supply" on or off. Note: The T8S is NOT designed to connect digitally to your flash drive. Connection Panel Figure 4. Turns the mixer on page 14). e USB 2.0 TYPE-A - Accepts 1/4" TRS balanced or TS unbalanced cables. Accepts 1/4" TRS balanced or TS unbalanced cables for a pre-fader, post-EQ, and effects, or post-fader output. Can be configured for line-level inputs. u INPUTS...

English Owners Guide
Page 12
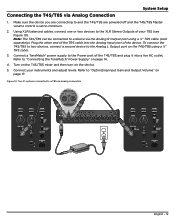
... L1 Model 1S/II power stands, connect a second power stand to "Optimizing Input Gain and Output Volume" on the T4S using a ToneMatch cable. 3. Connect your instruments and adjust levels. System Setup Connecting the T4S via digital connection USB AUDIO MONO M () Note: The T8S cannot be connected digitally and cannot be powered by the L1 Model 1S/II. 12 - Refer to the Digital Main Output L port on page 17. Plug one end of the ToneMatch cable into the Power port/Digital Main Output R on...
... L1 Model 1S/II power stands, connect a second power stand to "Optimizing Input Gain and Output Volume" on the T4S using a ToneMatch cable. 3. Connect your instruments and adjust levels. System Setup Connecting the T4S via digital connection USB AUDIO MONO M () Note: The T8S cannot be connected digitally and cannot be powered by the L1 Model 1S/II. 12 - Refer to the Digital Main Output L port on page 17. Plug one end of the ToneMatch cable into the Power port/Digital Main Output R on...
English Owners Guide
Page 13
... AUDIO MAIN OUT MONO M () () English - 13 Plug the other end of the TRS cable into the Analog Input port of the T4S/T8S and plug it into a live AC outlet. Make sure the device you are connecting to and the T4S/T8S are powered off and the T4S/T8S Master volume control is set to the XLR Stereo Outputs of your instruments and adjust levels. Figure 10. Using XLR...
... AUDIO MAIN OUT MONO M () () English - 13 Plug the other end of the TRS cable into the Analog Input port of the T4S/T8S and plug it into a live AC outlet. Make sure the device you are connecting to and the T4S/T8S are powered off and the T4S/T8S Master volume control is set to the XLR Stereo Outputs of your instruments and adjust levels. Figure 10. Using XLR...

English Owners Guide
Page 15
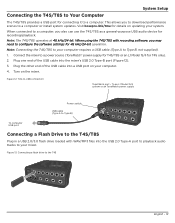
... can use the T4S/T8S as a general-purpose USB audio device for 48 kHz/24-bit operation. Note: Connecting the T4S/T8S to your system. To an L1 Model 1S/II system or an ToneMatch power supply Power switch USB cable (Type A to Type B) To computer USB port Connecting a Flash Drive to the T4S/T8S Plug in a USB 2.0/3.0 flash drive loaded with recording software, you may need to Type B, not supplied). 1. Plug...
... can use the T4S/T8S as a general-purpose USB audio device for 48 kHz/24-bit operation. Note: Connecting the T4S/T8S to your system. To an L1 Model 1S/II system or an ToneMatch power supply Power switch USB cable (Type A to Type B) To computer USB port Connecting a Flash Drive to the T4S/T8S Plug in a USB 2.0/3.0 flash drive loaded with recording software, you may need to Type B, not supplied). 1. Plug...

English Owners Guide
Page 24
... Cancel control to use in setting the threshold. Play the kick drum at the softest level you to 0 dB. Connect the appropriate type of gain reduction. Adjust the channel input Trim control until the hardest kick drum hits turn the input channel LED red, then continue to adjust the control until some of feedback from 0% (slowest) to -30 dB. While playing the kick drum, increase the volume to the sound...
... Cancel control to use in setting the threshold. Play the kick drum at the softest level you to 0 dB. Connect the appropriate type of gain reduction. Adjust the channel input Trim control until the hardest kick drum hits turn the input channel LED red, then continue to adjust the control until some of feedback from 0% (slowest) to -30 dB. While playing the kick drum, increase the volume to the sound...
English Owners Guide
Page 43
... the input channel(s) you want to hear is not muted. • Check that the Volume control is turned up the power stand Trim control, and verify that there is a signal at both the input and output stages. • Make sure volume control is working. • Turn the mixer off the power stand, re-seat the ToneMatch cable plug in , power switch is red, please call the Bose Product and Technical Support Team directly at (877) 335-2673. Try operating...
... the input channel(s) you want to hear is not muted. • Check that the Volume control is turned up the power stand Trim control, and verify that there is a signal at both the input and output stages. • Make sure volume control is working. • Turn the mixer off the power stand, re-seat the ToneMatch cable plug in , power switch is red, please call the Bose Product and Technical Support Team directly at (877) 335-2673. Try operating...

English Owners Guide
Page 44
... your microphone/instrument. T4S/T8S not responding to control knobs. • Turn off the mixer. Make sure the cable plug is fully inserted into for reversed or open (hot, neutral, and/or ground) contacts. • If using an extension cord, make sure that the T4S/T8S input Trim is adjusted properly for line-level inputs. • Disable any extended bass or EQ features when using recording software on again.
... your microphone/instrument. T4S/T8S not responding to control knobs. • Turn off the mixer. Make sure the cable plug is fully inserted into for reversed or open (hot, neutral, and/or ground) contacts. • If using an extension cord, make sure that the T4S/T8S input Trim is adjusted properly for line-level inputs. • Disable any extended bass or EQ features when using recording software on again.

English Owners Guide
Page 45
... pointing directly at both the input and output stages. • Verify that each input channel. Aux output does not sound right. Unable to send T4S/T8S audio to configure the software settings for each input assigns the desired signal level to the Aux output. • Check that the USB cable is properly connected to the mixer and computer. • Try a different USB cable. • Make sure the mixer is...
... pointing directly at both the input and output stages. • Verify that each input channel. Aux output does not sound right. Unable to send T4S/T8S audio to configure the software settings for each input assigns the desired signal level to the Aux output. • Check that the USB cable is properly connected to the mixer and computer. • Try a different USB cable. • Make sure the mixer is...

English Owners Guide
Page 46
... computer USB output is working by connecting another USB-compatible audio device. • If you are turned up. • Make sure that the appropriate input channel Trim control is turned up enough so that the green LED is on (indicating that there is a strong input signal). • Check the Input and Output level meters under the Prefs menu to the T4S/T8S via USB connection. Mac OS...
... computer USB output is working by connecting another USB-compatible audio device. • If you are turned up. • Make sure that the appropriate input channel Trim control is turned up enough so that the green LED is on (indicating that there is a strong input signal). • Check the Input and Output level meters under the Prefs menu to the T4S/T8S via USB connection. Mac OS...
Multilingual Quick Start Guide
Page 2
.... Only use instructions. 1. Use only with the cart, stand, tripod, bracket, or table specified by the manufacturer or sold with the Canadian ICES-003 Class A specifications. The mixer is only designed for the correct type of the FCC Rules. Using a tripod/ stand that may cause undesired operation. Not suitable for E2 electromagnetic environment. Please check your local building codes for use at plugs, convenience...
.... Only use instructions. 1. Use only with the cart, stand, tripod, bracket, or table specified by the manufacturer or sold with the Canadian ICES-003 Class A specifications. The mixer is only designed for the correct type of the FCC Rules. Using a tripod/ stand that may cause undesired operation. Not suitable for E2 electromagnetic environment. Please check your local building codes for use at plugs, convenience...
Multilingual Quick Start Guide
Page 3
... protect controls and connectors • Includes a ToneMatch cable for connecting to a Bose L1 Model II or L1 Model 1S system for digital audio and power (T4S), or includes a universal power supply (T8S) • Bottom insert allows you to use , even on stage with these rugged ToneMatch mixers using tactile controls, easy-to a Bose L1 or F1 system for performers. English - 3 Play confidently on dimly-lit stages High-Density Connectivity • Unprecedented connectivity and control...
... protect controls and connectors • Includes a ToneMatch cable for connecting to a Bose L1 Model II or L1 Model 1S system for digital audio and power (T4S), or includes a universal power supply (T8S) • Bottom insert allows you to use , even on stage with these rugged ToneMatch mixers using tactile controls, easy-to a Bose L1 or F1 system for performers. English - 3 Play confidently on dimly-lit stages High-Density Connectivity • Unprecedented connectivity and control...
Multilingual Quick Start Guide
Page 6
... to Input Channels 1-8. u VOLUME CONTROLS (1-8): Adjusts the volume level for the respective channel. o MASTER VOLUME CONTROL: Adjusts the overall output level. f PHANTOM POWER SWITCH: Applies +48V power to modify. Control and Connection Panels T8S ToneMatch® Mixer Control Panel Figure 3. A red LED indicates that use with headphones only, with a minimum impedance of 24 Ω. 6 - i MUTE BUTTONS (1-8): Silences the audio output for the respective channel. CAUTION: Set the Master volume control to both global and channel-related parameters, which are adjusted using the...
... to Input Channels 1-8. u VOLUME CONTROLS (1-8): Adjusts the volume level for the respective channel. o MASTER VOLUME CONTROL: Adjusts the overall output level. f PHANTOM POWER SWITCH: Applies +48V power to modify. Control and Connection Panels T8S ToneMatch® Mixer Control Panel Figure 3. A red LED indicates that use with headphones only, with a minimum impedance of 24 Ω. 6 - i MUTE BUTTONS (1-8): Silences the audio output for the respective channel. CAUTION: Set the Master volume control to both global and channel-related parameters, which are adjusted using the...

Multilingual Quick Start Guide
Page 10
Plug one end of the ToneMatch cable into the Power port/Digital Main Output R on the L1 Model 1S/II power stand. 4. Turn on the mixer and then turn on the T4S. Figure 9. Refer to minimum. 2. Connect your instruments and adjust levels. System Setup Connecting the T4S via digital connection USB AUDIO MONO M () Note: The T8S cannot be connected digitally and cannot be powered by the L1 Model 1S/II. 10 - Make sure the L1 Model 1S/II...
Plug one end of the ToneMatch cable into the Power port/Digital Main Output R on the L1 Model 1S/II power stand. 4. Turn on the mixer and then turn on the T4S. Figure 9. Refer to minimum. 2. Connect your instruments and adjust levels. System Setup Connecting the T4S via digital connection USB AUDIO MONO M () Note: The T8S cannot be connected digitally and cannot be powered by the L1 Model 1S/II. 10 - Make sure the L1 Model 1S/II...
Multilingual Quick Start Guide
Page 13
... ToneMatch power supply Power switch USB cable (Type A to Type B) To computer USB port Connecting a Flash Drive to the T4S/T8S Plug in a USB 2.0/3.0 flash drive loaded with recording software, you to download performance scenes to -USB connection ToneMatch port - System Setup Connecting the T4S/T8S to Your Computer The T4S/T8S provides a USB port for details on the mixer. Note: The T4S/T8S operates at 48 kHz/24-bit. Turn on updating...
... ToneMatch power supply Power switch USB cable (Type A to Type B) To computer USB port Connecting a Flash Drive to the T4S/T8S Plug in a USB 2.0/3.0 flash drive loaded with recording software, you to download performance scenes to -USB connection ToneMatch port - System Setup Connecting the T4S/T8S to Your Computer The T4S/T8S provides a USB port for details on the mixer. Note: The T4S/T8S operates at 48 kHz/24-bit. Turn on updating...


